FREE DINNER EBOOK! Get your copy!
  • Cookie Policy
  • GDPR Policy
  • Disclaimer
  • Terms Of Use
  • Visit my other site: Fun Cookie Recipes
flavor nest kitchen
  • Home
  • Dinner
  • Desserts
  • Drinks
  • Appetizers
  • Contact
  • About
  • Privacy Policy
  • Home
  • Dinner
  • Desserts
  • Drinks
  • Appetizers
  • Contact
  • About
  • Privacy Policy
  • Cookie Policy
  • GDPR Policy
  • Disclaimer
  • Terms Of Use
Visit my other site: Fun Cookie Recipes

HOME / CATEGORIES /

Latest

- 1 pre-made pie crust (or homemade if preferred) - 2 cups fresh spinach, chopped - 1 cup mushrooms, sliced - 1 small onion, finely chopped - 3 large eggs - 1 cup heavy cream (or half-and-half for a lighter version) - 1 cup shredded cheese (such as Gruyère or cheddar) - 1 teaspoon garlic powder - Salt and pepper to taste - 1 tablespoon olive oil - Fresh herbs (such as thyme or parsley) for garnish To make a great Mushroom Spinach Quiche, you need fresh ingredients. The pie crust is the base. You can use a pre-made crust for ease. If you're feeling adventurous, make a homemade crust. Fresh spinach adds color and nutrition. Choose vibrant green spinach for the best flavor. Mushrooms give the quiche a nice earthiness. Use any variety you like, but button or cremini work well. Onions add sweetness when cooked. They pair well with garlic powder, which brings a nice depth of flavor. Eggs and heavy cream create a creamy filling. The eggs set the quiche, while the cream makes it rich. Cheese is essential for that gooey, melty goodness. Gruyère has a nutty taste, while cheddar is always a favorite. Season with salt and pepper to enhance all the flavors. Finally, olive oil helps sauté the veggies and adds healthy fats. Fresh herbs like thyme or parsley make a lovely garnish. They also add a fresh touch to each slice. 1. Preheat the oven and prepare the pie crust Start by setting your oven to 375°F (190°C). If you use a frozen pie crust, it’s best to let it thaw. You want the crust ready for the filling. 2. Sautéing the onion, mushrooms, and spinach In a skillet, add 1 tablespoon of olive oil and heat over medium heat. Once hot, add 1 small, finely chopped onion. Cook for about 3-4 minutes until it turns translucent. Next, add 1 cup of sliced mushrooms. Sauté these for another 3-4 minutes until soft. Finally, stir in 2 cups of chopped spinach. Cook until it wilts, then set aside to cool a bit. 3. Mixing the egg and cream filling In a mixing bowl, whisk together 3 large eggs and 1 cup of heavy cream. Add in 1 teaspoon of garlic powder, salt, and pepper to taste. Mix until well combined. Fold in the sautéed onion, mushrooms, and spinach mixture. Lastly, add in 1 cup of shredded cheese, like Gruyère or cheddar. Ensure everything is mixed evenly. 1. Pouring the filling into the crust Take your prepared pie crust and pour the filling into it. Use a spatula to spread the filling evenly across the crust. 2. Baking time and temperature details Place the quiche in the oven and bake for 25-30 minutes. The top should look golden brown. To check if it’s done, insert a toothpick in the center. If it comes out clean, your quiche is ready. 3. Cooling and slicing the quiche Once baked, let the quiche cool for a few minutes. This helps it set. After cooling, slice it into wedges. You can garnish each slice with fresh herbs for a nice touch. To make a great quiche, start with the crust. A flaky crust holds the filling well. If you use a pre-made crust, look for one that is all-butter for the best taste. If you make your own, chill the dough before rolling it out. This keeps it flaky. Next, sauté your vegetables properly. Heat olive oil over medium heat. Add onion and cook until soft. This takes about 3-4 minutes. Then add sliced mushrooms and cook until they are tender. Finally, stir in the spinach and cook until it wilts. This step brings out their flavors. For the custard, beat eggs and mix them with cream. Whisk them until they blend well. The mixture should be smooth but not too airy. Add garlic powder, salt, and pepper for seasoning. This will give your quiche a rich taste. Pair your quiche with a fresh salad. A simple green salad works well. It adds crunch and color to your meal. You can also serve it with roasted vegetables for a heartier side. For garnishing, sprinkle fresh herbs like thyme or parsley on top. This adds a pop of color and flavor. You can use a sharp knife to cut the slices. A pie server helps to lift them out cleanly. Try serving the quiche on a pretty platter. It makes your meal look inviting. Additionally, you can add a dollop of sour cream or yogurt on the side. This adds creaminess and a nice tang. {{image_2}} You can easily make this quiche fit your diet. For a gluten-free crust, use almond flour or a store-bought gluten-free pie crust. These options give you a great base without gluten. If you want a dairy-free filling, try using almond milk or coconut cream instead of heavy cream. You can also use dairy-free cheese for a tasty twist. These swaps make the quiche light but still creamy. To boost flavor, consider adding fresh herbs like basil, oregano, or dill. These herbs add depth and freshness. You can also try spices like paprika or nutmeg for a warm, rich taste. If you want to mix it up, add other veggies. Bell peppers, zucchini, or tomatoes work well. For protein, try cooked bacon or diced ham. These additions will make your quiche even more filling and delicious. To keep your mushroom spinach quiche fresh, follow these steps: - Refrigeration: Let the quiche cool to room temperature. Wrap it tightly in plastic wrap or cover it with aluminum foil. Store it in the fridge for up to 3 days. Proper sealing helps keep the quiche moist and tasty. - Freezing: If you want to store the quiche longer, freezing is a great option. Slice the quiche into individual portions. Wrap each slice in plastic wrap and then in aluminum foil. Place the wrapped slices in a freezer-safe bag. You can freeze them for up to 2 months. This way, you have a quick meal ready anytime. When you’re ready to enjoy your quiche again, here's how to reheat it: - Oven Method: Preheat your oven to 350°F (175°C). Place the quiche on a baking sheet. Cover it loosely with foil to prevent burning. Heat for about 15-20 minutes, or until it is warm all the way through. This method keeps the crust crispy. - Microwave Method: For a faster option, you can use the microwave. Place a slice on a microwave-safe plate. Heat it on medium for 1-2 minutes. Check if it's warm enough. If not, heat in 30-second intervals. This method may soften the crust, but it’s quick. - Serving Temperature: Quiche is best enjoyed warm. Aim for an internal temperature of about 165°F (74°C). This ensures it's safe and delicious. How do I ensure my quiche doesn’t get soggy? To prevent a soggy quiche, bake the crust first. Pre-baking it for about 10 minutes helps. Use a fork to poke holes in the crust. This allows steam to escape. Also, make sure to drain any extra moisture from the mushrooms and spinach after cooking. This keeps the filling firm. Can I make quiche ahead of time? Yes, you can make quiche ahead of time. You can prepare it the night before and store it in the fridge. Just cover it well to keep it fresh. You can also freeze it. Wrap it tightly and store it for up to three months. When ready to eat, bake it straight from the fridge or thaw it overnight. What are great side dishes to serve with quiche? Quiche pairs well with several side dishes. A fresh green salad adds crunch and color. You can also serve it with roasted vegetables for a hearty meal. For something light, try sliced tomatoes or a fruit salad. Each of these sides adds balance to your meal. Calorie count and serving size considerations Each slice of this quiche has about 300 calories. The total recipe serves six, so it’s great for a family meal. Keep in mind that the calorie count can change based on the cheese and cream you use. Key nutritional benefits of the ingredients used This quiche is packed with nutrients. Spinach provides iron and vitamins A and C. Mushrooms add fiber and antioxidants. Eggs are a great source of protein, and cheese gives calcium. Together, these ingredients create a tasty and nutritious dish. In this blog post, we explored how to make a delicious mushroom and spinach quiche. You learned about essential ingredients like fresh veggies and eggs. I shared step-by-step instructions for preparation and baking, along with tips to perfect your quiche. You also discovered variations for dietary needs and proper storage methods. Quiche is great for any meal and easy to customize. Try it out and enjoy a tasty dish that fits your style!

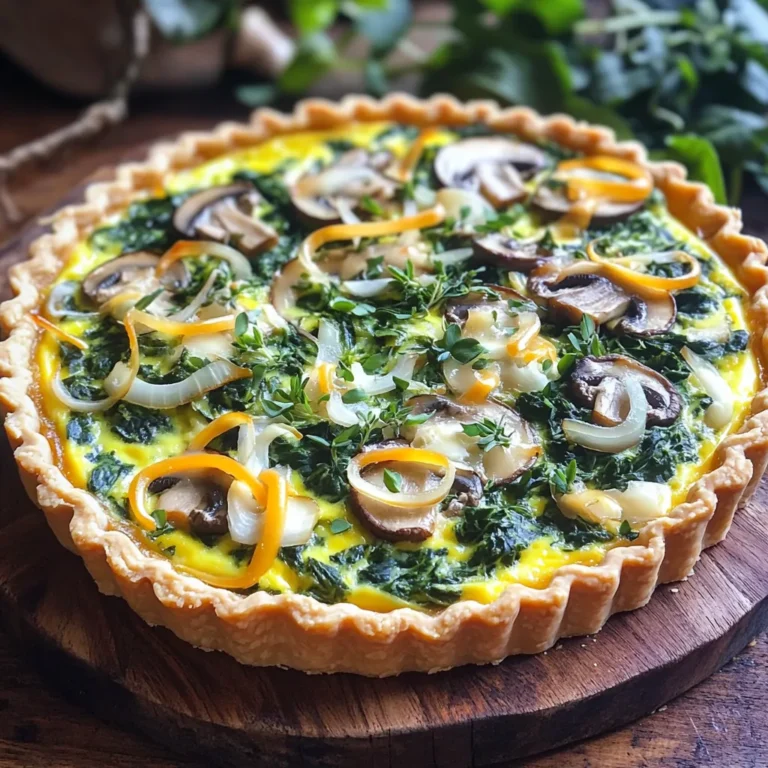
Mushroom Spinach Quiche Easy and Flavorful Recipe

To make the perfect Peanut Butter Oatmeal Fudge Bars, you need simple, wholesome ingredients. Here’s what you will need: - 1 cup natural peanut butter (creamy or crunchy) - 1/2 cup honey or maple syrup - 1/4 cup coconut oil, melted - 2 cups rolled oats - 1/2 cup cocoa powder - 1/2 cup dark chocolate chips - 1 teaspoon vanilla extract - Pinch of salt - Optional: chopped nuts or seeds for topping These ingredients come together to create a rich, chewy treat. The natural peanut butter adds depth, while honey or maple syrup gives sweetness. Coconut oil makes everything smooth and rich. Rolled oats provide a hearty texture. Cocoa powder and dark chocolate chips make these bars truly decadent. The vanilla extract enhances the flavor, and a pinch of salt balances the sweetness. You can also add nuts or seeds on top for extra crunch. Gather these ingredients, and you’re ready to create a delicious snack that everyone will love! 1. Preheat your oven to 350°F (175°C). Next, line an 8x8-inch baking pan with parchment paper. Leave some paper hanging over the sides. This helps with easy removal later. 2. In a large bowl, mix together the natural peanut butter, honey (or maple syrup), and melted coconut oil. Use a spoon to stir until it is smooth. Make sure everything blends well. 3. Add the vanilla extract and a pinch of salt to your wet mixture. Stir until you can’t see the salt anymore. 4. In another bowl, mix the rolled oats and cocoa powder. Gradually fold this dry mix into the wet ingredients. Keep mixing until you have a thick and sticky batter. 5. Now, fold in the dark chocolate chips. Make sure they are spread evenly throughout the batter. 1. Pour the thick batter into the prepared baking pan. Use a spatula to press it down firmly. Aim for an even layer across the pan. 2. If you want, sprinkle some chopped nuts or seeds on top. Press them lightly into the fudge mixture. 3. Bake in your preheated oven for 15-20 minutes. The edges should be firm, but the center can be a bit soft. 4. Once baked, remove the pan from the oven. Let the bars cool in the pan for about 30 minutes. Then, transfer them to the fridge for another 30 minutes. This helps them set completely. 5. After cooling, lift the fudge out of the pan using the parchment paper. Cut into squares or bars. Enjoy your Peanut Butter Oatmeal Fudge Bars! To get the right consistency for the batter, mix your wet and dry ingredients well. When you combine the peanut butter, honey, and coconut oil, stir until smooth. The mixture should feel thick and sticky. If it’s too dry, add a splash of water or more oil. For even baking, spread the batter smoothly in the pan. Press down firmly to create a level surface. This helps them cook evenly. Keep an eye on them while baking. The edges should firm up, but the center can stay soft. After cooling, cutting the bars can be tricky. Use a sharp knife for clean cuts. If the bars stick, run the knife under warm water. That will help slice through without pulling apart the bars. For presentation, arrange the bars on a nice wooden board. Drizzle some melted chocolate on top for a fancy touch. This makes them look great for guests. Pair the bars with fresh fruit like strawberries or bananas. The fruit adds color and freshness to your plate. Plus, it balances the rich fudge flavor. {{image_2}} You can easily make these bars vegan. Swap honey for maple syrup. Use coconut oil or any plant-based oil in place of butter. This keeps the bars rich and creamy, while still being dairy-free. For gluten-free options, make sure to use certified gluten-free oats. This small change lets everyone enjoy these tasty treats. Just check the label on your oats to ensure they meet this standard. Want to spice things up? You can add a dash of cinnamon or nutmeg. These spices give depth to the flavor. Just a little bit can turn a simple bar into something special. Feeling adventurous? Try swapping peanut butter for almond butter. You could even use white chocolate chips instead of dark chocolate. This adds a sweet twist. Each change lets you create a new flavor that keeps things exciting. To keep your Peanut Butter Oatmeal Fudge Bars fresh, store them in an airtight container. This helps prevent them from drying out. You can keep them at room temperature for up to a week. If you want to keep them longer, the fridge is a great option. In the fridge, they can last for about two weeks. For the best results, use glass or plastic containers with tight lids. If you stack the bars, place parchment paper between layers. This will keep them from sticking together. Freezing your fudge bars is simple. First, cut them into squares or bars. Then, wrap each piece in plastic wrap. Place the wrapped bars in a freezer-safe container or a zip-top bag. They can stay fresh in the freezer for up to three months. When you're ready to enjoy them, take out the bars. Let them thaw in the fridge for about an hour. You can also leave them at room temperature for about 30 minutes. After thawing, they will be soft and tasty, just like fresh! Can I use different nut butters? Yes, you can use other nut butters. Almond butter, cashew butter, or sunflower seed butter work well. Each nut butter gives a unique taste and texture. How long do these bars last? These bars last about one week at room temperature. Keep them in an airtight container to maintain freshness. They can also last up to three weeks in the fridge. Can I skip the cocoa powder? You can skip the cocoa powder if you want. The bars will still taste great with just peanut butter and oats. You may want to add more sweetener to balance the flavor. What can I use instead of honey/maple syrup? You can use agave syrup, brown rice syrup, or date syrup. Each option adds a different sweetness level, so adjust to your taste. You learned how to make delicious peanut butter oatmeal fudge bars. We covered ingredients, steps, and tips for success. Remember, you can tweak recipes for dietary needs or flavor. Store them right to keep them fresh. These bars are easy to make and fun to share. I hope you enjoy baking and eating them as much as I do! Try out your own variations, and have fun in the kitchen. Happy baking!

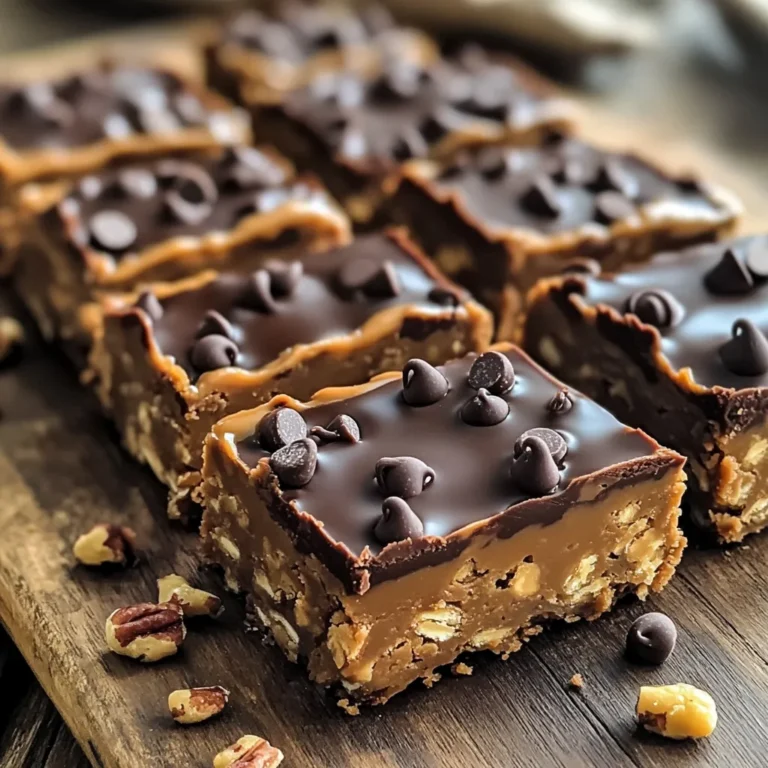
Peanut Butter Oatmeal Fudge Bars Delightful Treat Idea

To make Slow Cooker Coconut Curry Lentil Soup, gather these ingredients: - 1 cup dried green or brown lentils, rinsed - 1 can (14 oz) coconut milk - 4 cups vegetable broth - 1 medium onion, diced - 2 cloves garlic, minced - 1 inch fresh ginger, grated - 1 red bell pepper, diced - 1 medium carrot, diced - 1 tablespoon red curry paste - 1 teaspoon turmeric powder - 1 teaspoon cumin - 1 teaspoon coriander - 1 tablespoon soy sauce (or tamari for gluten-free) - Salt and pepper to taste - 2 cups fresh spinach, roughly chopped - Juice of 1 lime - Fresh cilantro for garnish When picking fresh ingredients, look for bright colors and firm textures. - Choose lentils that are whole and free of cracks. - Select onions that feel heavy and have dry skins. - Pick bell peppers that are firm and shiny. - Look for carrots that are crisp and smooth. - Use fresh ginger that is firm and has a strong scent. You can easily swap some ingredients for allergies or preferences. - For soy sauce, use coconut aminos for a soy-free option. - If you have a nut allergy, ensure the coconut milk is safe for you. - For gluten-free, use tamari instead of regular soy sauce. - You can also replace spinach with kale or Swiss chard if needed. Start by rinsing 1 cup of lentils. This step helps remove any dust. Next, chop 1 medium onion and dice 1 red bell pepper. Mince 2 cloves of garlic and grate a 1-inch piece of fresh ginger. Dice 1 medium carrot as well. Gather all these ingredients to make the process smooth. In your slow cooker, combine the rinsed lentils, onion, garlic, ginger, bell pepper, and carrot. Add 1 can of coconut milk and 4 cups of vegetable broth. Then, mix in 1 tablespoon of red curry paste, 1 teaspoon of turmeric, 1 teaspoon of cumin, and 1 teaspoon of coriander. Pour in 1 tablespoon of soy sauce and sprinkle some salt and pepper. Stir everything well. Cover the slow cooker and set it to low for 6-7 hours or high for 3-4 hours. You want the lentils to be tender. This slow cooking makes the flavors rich and deep. After the cooking time, stir in 2 cups of fresh spinach. Let it wilt for a few minutes. This adds a bright color and fresh taste. Before serving, squeeze the juice of 1 lime into the pot. Taste the soup and adjust the salt and pepper if needed. Serve hot, garnished with fresh cilantro on top for a lovely finish. To enhance the flavor of your soup, always use fresh spices. Fresh spices have more aroma and taste. Start with the red curry paste; it adds a warm kick. You can mix in a bit more or less, based on your spice level. Adding lime juice at the end brightens the dish. It gives a fresh and zesty finish. Taste as you go, and adjust with salt or pepper if needed. Feel free to add a splash of soy sauce for umami depth. If your soup is too thick, add more vegetable broth. A little at a time helps reach your desired texture. Stir well after each addition. For a thicker soup, mash some lentils with a fork. This creates a creamy base without needing cream. You can also blend a portion for a smooth feel. Just remember to keep some lentils whole for texture. Rinse lentils before cooking to remove dust and debris. This simple step can improve the taste. Lentils do not need soaking, making them quick to use. Monitor cooking time; overcooked lentils turn mushy. Aim for tender, yet firm lentils. Always check for doneness after a few hours. Adding spinach at the end keeps it bright and fresh. You want it wilted, not overcooked. {{image_2}} You can make this soup your own by adding different vegetables. Try adding zucchini, sweet potatoes, or peas. Each veggie brings a new taste and texture. For example, zucchini softens well and adds a light flavor. Sweet potatoes add a sweet, creamy element. Peas can give a pop of color and sweetness. Feel free to mix and match your favorites to keep it fresh. If you want more protein, add tofu or chickpeas. Tofu is great for a soft texture. You can use firm tofu, diced and added near the end of cooking. Chickpeas add a nice bite and heartiness. You can use canned chickpeas for ease. Simply rinse and toss them in during the last hour of cooking. Both options make the soup filling and nutritious. You can easily adjust the spice level to suit your taste. If you like heat, add more red curry paste. You can also include fresh chili peppers for a kick. On the other hand, if you prefer mild flavors, reduce the curry paste. Taste as you go to find your perfect balance. Remember, it’s all about what you enjoy! To store leftovers, let the soup cool to room temperature. Then, pour it into an airtight container. You can keep it in the fridge for up to five days. Make sure to label the container with the date. This way, you will know when to eat it. If you want to freeze the soup, use freezer-safe containers. Leave some space at the top for expansion. The soup can last up to three months in the freezer. When you're ready to eat it, just take it out and let it thaw in the fridge overnight. To reheat the soup, you can use the microwave or stovetop. If using the microwave, heat it in short bursts. Stir it in between to ensure even heating. For the stovetop, heat it on low and stir often. You can add a splash of water or broth to help it warm up. Enjoy your comforting soup! Yes, you can make this soup on the stovetop. First, sauté the onion, garlic, and ginger in a pot. Then, add the diced red bell pepper and carrot. Stir for a few minutes. Next, add the rinsed lentils, coconut milk, vegetable broth, and spices. Bring the mix to a boil, then reduce the heat. Let it simmer for 25-30 minutes until the lentils are tender. Stir in the spinach and lime juice before serving. If you want to replace coconut milk, try using almond milk or cashew cream. Both options give a creamy texture, but the flavor will change. You can also use regular milk, but it will not be dairy-free. Adjust seasonings to balance the flavors. This soup lasts about 4-5 days in the fridge. Store it in an airtight container to keep it fresh. If you want to keep it longer, consider freezing it. When frozen, it can last up to 3 months. Just thaw it overnight in the fridge before reheating. This blog post covered how to make a tasty, healthy soup. We discussed essential ingredients, including tips for choosing fresh ones and allergen substitutions. The step-by-step guide made preparation easy, and the cooking tips helped improve flavor and texture. We explored fun variations, from adding veggies to adjusting spice levels. Lastly, proper storage and reheating instructions ensure your soup stays fresh. Now, you have the knowledge to create a delicious soup anytime. Enjoy your cooking adventure and make it your own!

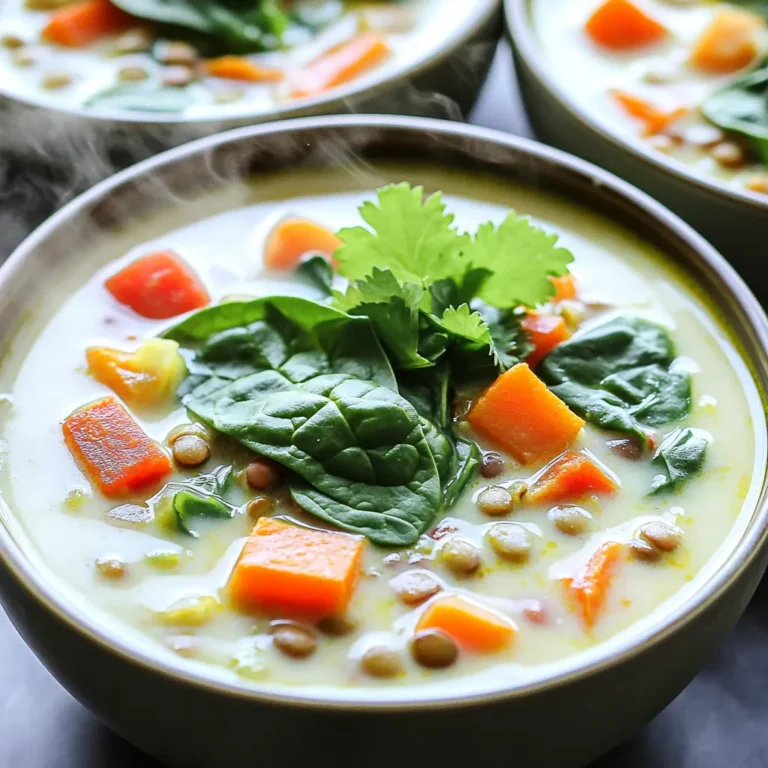
Slow Cooker Coconut Curry Lentil Soup Comforting Meal

- 4 boneless, skinless chicken breasts - 2 cups broccoli florets - 1 cup carrots, sliced - 1 bell pepper, sliced (any color) - 4 cloves garlic, minced - 1 tablespoon fresh rosemary, minced - 1 tablespoon fresh thyme, minced - 2 tablespoons olive oil - Zest of 1 lemon - Juice of 1 lemon - Salt and pepper to taste - 1 teaspoon paprika (optional for extra flavor) For this easy dinner, I love using fresh and simple ingredients. The chicken breasts serve as a great base. They soak up the marinade and cook nicely. Broccoli, carrots, and bell pepper add color and crunch to the dish. Each veggie brings its own taste and texture. I use garlic to add a strong flavor. Rosemary and thyme give a lovely herb note. Olive oil keeps everything moist and adds richness. The lemon zest and juice brighten the dish with a fresh kick. Salt and pepper are key for seasoning. Paprika is optional but adds a nice touch of warmth. This mix of ingredients makes a meal that is both tasty and healthy. You can swap in your favorite veggies too! - Preheat your oven to 400°F (200°C). Line a large sheet pan with parchment paper. - In a small bowl, mix minced garlic, rosemary, thyme, olive oil, lemon zest, lemon juice, salt, pepper, and paprika. This is your marinade. - Place the chicken breasts in a bowl or a zip-top bag. Pour half of the marinade over the chicken. Let it marinate in the fridge for at least 15 minutes. You can marinate longer for more flavor. - While the chicken marinates, prepare the veggies. Toss broccoli, carrots, and bell peppers in the remaining marinade until they are well coated. - After marinating, arrange the chicken in the center of the sheet pan. Place the marinated veggies around the chicken. Make sure everything is in a single layer. This helps with even cooking. - Bake in the oven for 25-30 minutes. The chicken should reach an internal temperature of 165°F (74°C). The veggies should be tender. If you want a crispy finish, broil for an extra 2-3 minutes. - When done, take the pan out of the oven. Let it rest for 5 minutes before serving. - Serve the chicken and veggies on a large platter. Drizzle any remaining juice from the pan over the top for added flavor. Garnish with fresh herbs and lemon slices for a vibrant look. - Recommended marination time for maximum flavor: Marinate the chicken for at least 15 minutes. For more flavor, try up to 3 hours. - How to enhance the marinade: Add a splash of balsamic vinegar or a dash of honey. These will add a sweet tang that lifts the dish. - Ensuring even cooking: Make sure to spread the chicken and veggies out in a single layer. This helps them cook evenly. - Adjustments for crispy veggies or chicken: Broil the dish for an extra 2-3 minutes at the end. This step adds a nice crisp to the chicken and veggies. - Presentation suggestions for serving: Serve on a large platter for a colorful display. Drizzle the pan juices over the top for extra flavor. - Best garnishes to use: Fresh herbs like parsley or thyme work well. Lemon slices also add a bright touch to the dish. {{image_2}} You can change the veggies to fit the season or your taste. Think about using: - Zucchini - Asparagus - Cauliflower - Cherry tomatoes These choices add a fun twist. You can also boost flavor by adding herbs like basil or parsley. Adding a sprinkle of feta cheese can give it a tasty kick. If you want to switch chicken, try these options: - Turkey breasts - Firm tofu - Salmon fillets Each protein cooks differently. If you use fish, it may need less time. Check the cooking time: - Salmon: 15-20 minutes - Turkey: 30-35 minutes - Tofu: 25-30 minutes Make sure to check the doneness to keep it safe to eat. You can adapt this dish for various diets: - Gluten-free: Use gluten-free soy sauce in the marinade. - Low-carb: Add more non-starchy veggies like spinach or mushrooms. - Dairy-free: This recipe is already dairy-free, which is great! These changes keep the meal healthy while still being delicious. To keep your leftovers fresh, place them in an airtight container. Make sure to cool the dish to room temperature first. This helps prevent moisture buildup, which can make your food soggy. Store the container in the fridge. You can enjoy your leftovers for up to 3 days. If you want to save some for later, freezing is a great option. Allow the dish to cool completely. Then, transfer it to a freezer-safe container or bag. Squeeze out as much air as possible to prevent freezer burn. You can freeze it for up to 3 months. When you're ready to eat, thaw it overnight in the fridge. For reheating, place it in the oven at 350°F (175°C) until hot. You can also use the microwave, but be sure to stir it well to heat evenly. Enjoy your meal without wasting any! Yes, you can use frozen chicken. Just remember to adjust your cooking time. - Thawing Tips: Thaw the chicken overnight in the fridge. This helps keep it safe. - Cooking Tips: If you cook it from frozen, add 10-15 minutes to the baking time. Check for the right temperature. - Even Cooking: Cut the chicken into smaller pieces for faster cooking. You can tell by checking the internal temperature. - Use a Meat Thermometer: Insert the thermometer into the thickest part of the chicken. It should read 165°F (74°C). This ensures it's safe to eat. - Visual Cues: The chicken should not be pink inside. Juices should run clear when you cut into it. - Cook Time: Generally, it takes 25-30 minutes at 400°F (200°C) for the chicken to cook through. Yes, this dish works great for meal prep. - Marinate Ahead: You can marinate the chicken the night before. This adds more flavor. - Prep Veggies: Chop the vegetables a day in advance. Store them in the fridge in a sealed bag. - Reheat Options: You can cook the chicken and veggies ahead. Store them in the fridge for up to 3 days. Reheat in the oven or microwave before serving. This blog post covered a simple, tasty sheet pan meal with chicken and veggies. You learned about the right ingredients, step-by-step prep, and useful cooking tips. I shared some fun variations and storage advice too. Experiment with flavors to suit your taste! You can easily make this dish healthier or fit your diet. With these ideas, you can create delicious meals that are fun and easy. Enjoy making your next sheet pan dinner!

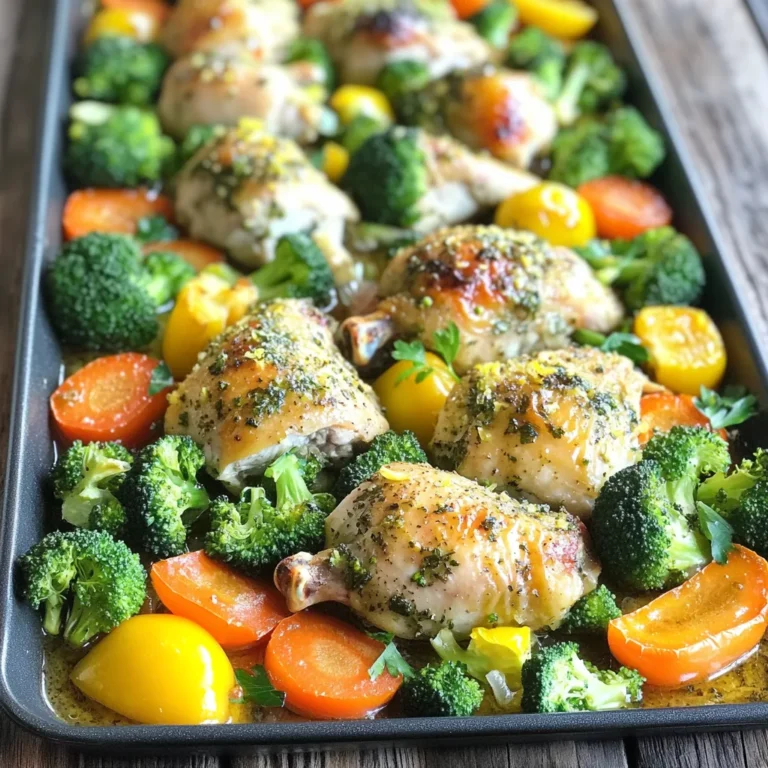
Sheet Pan Garlic Herb Chicken Veggies Easy Dinner

- 14 oz firm tofu, pressed and cut into bite-sized cubes - 1 cup breadcrumbs (use panko for extra crispiness) - 1/2 cup all-purpose flour - 1 teaspoon garlic powder - 1 teaspoon onion powder - 1/2 teaspoon smoked paprika - 1/2 teaspoon salt - 1/4 teaspoon black pepper - 1/2 cup unsweetened plant milk (such as almond or soy) - 1 tablespoon nutritional yeast (optional for added flavor) - Cooking spray The main ingredients are crucial for making these crispy tofu nuggets. Firm tofu gives the right texture. Pressing it removes water, so it gets crispy. Panko breadcrumbs provide a crunchy coating. All-purpose flour binds everything together. For seasoning, I use garlic powder and onion powder for aroma and flavor. Smoked paprika adds a little warmth and depth. Salt and black pepper enhance all the flavors. The plant milk helps the coating stick. Almond or soy works best. Nutritional yeast is optional but adds a cheesy taste. Lastly, cooking spray helps achieve that crispy finish in the air fryer. Pressing Tofu Start by pressing the tofu. This step removes extra water. Wrap the tofu in a clean kitchen towel. Place a heavy object on top, like a cast-iron skillet. Let it sit for at least 30 minutes. This makes the tofu firm and helps it absorb flavors. Cutting into Cubes After pressing, cut the tofu into 1-inch cubes. Use a sharp knife for clean cuts. Even cubes ensure they cook evenly. This size is perfect for dipping and snacking. Mixing Dry Ingredients In a medium bowl, combine the dry ingredients. Mix 1/2 cup all-purpose flour, 1/4 cup cornstarch, 1 teaspoon garlic powder, 1 teaspoon onion powder, 1/2 teaspoon smoked paprika, 1/2 teaspoon salt, and 1/4 teaspoon black pepper. Stir well to blend all flavors. This mix gives the nuggets a tasty crust. Dipping in Plant Milk Pour 1/2 cup of unsweetened plant milk into another bowl. You can use almond or soy milk. Dip each tofu cube into the plant milk. Make sure it’s fully coated. This step helps the dry mix stick to the tofu. Coating with Breadcrumbs In a third bowl, place 1 cup of breadcrumbs. If you want extra crunch, use panko breadcrumbs. Take each tofu cube from the plant milk. Roll it in the breadcrumbs, pressing gently to coat well. This creates a crispy layer. Preheating the Air Fryer Now, preheat your air fryer to 400°F (200°C). This is key for getting crispy nuggets. A hot fryer cooks them evenly. Cooking Time and Temperature Place the coated tofu nuggets in a single layer in the air fryer basket. Lightly spray them with cooking spray to help them crisp up. Cook at 400°F for 12-15 minutes. They should turn golden brown when done. Flipping for Even Cooking Halfway through cooking, flip the nuggets. This helps them brown evenly on both sides. Use tongs to avoid burning your fingers. Once they’re crispy and golden, carefully take them out to cool for a minute. To make your tofu nuggets super crispy, start by pressing the tofu. This step removes excess water, letting the tofu soak up more flavor. Press the tofu for at least 30 minutes. Use a heavy object, like a cast iron skillet, to help. Next, use panko breadcrumbs instead of regular ones. Panko breadcrumbs are light and airy. They create a crunchier texture. Combine them with nutritional yeast for an extra flavor boost if you want. Using cooking spray is key for even cooking. It helps the nuggets turn golden brown on all sides. Lightly spray the nuggets before cooking. This step improves texture without adding too much fat. If you don’t have cooking spray, use olive oil. Just brush a small amount over the nuggets. This method also works well for crispiness. You can even use an oil mister for a fine coat. For the best dipping sauces, try sweet chili sauce or tahini dressing. Both add a tasty contrast to the crispy nuggets. You can also mix soy sauce with a bit of sesame oil for a simple dip. Garnish your nuggets with fresh parsley or sesame seeds. These add color and make your dish look fancy. Serve them on a nice platter for a fun snack or appetizer! {{image_2}} You can boost your tofu nuggets with different flavors. One fun option is spicy tofu nuggets. To make them spicy, simply add cayenne pepper or chili powder to your flour mix. You can adjust the heat to your liking. This gives the nuggets a kick and makes them exciting to eat. Another option is herb-infused nuggets. Add dried herbs like oregano, thyme, or basil to the breadcrumb mix. This adds freshness and flavor. You can even use fresh herbs if you have them. Both variations will keep your snacks interesting. If you need gluten-free options, you can easily swap ingredients. Use gluten-free breadcrumbs instead of regular ones. They still give a great crunch. For the flour, try almond flour or coconut flour. These options make the nuggets crispy without gluten. You can also make your tofu nuggets more nutritious by adding vegetables. Chopped spinach, grated carrots, or bell peppers mix well. Just make sure to chop them small so they cook evenly. This adds color and extra taste to your nuggets. Finally, consider using different types of tofu. Firm tofu works best, but silken tofu can be fun too. It gives a creamy texture. Just make sure to adjust the cooking time. Each type of tofu brings its unique flavor and texture, making your nuggets even better. To keep your tofu nuggets fresh, store them in an air-tight container. This helps seal in moisture and flavor. I recommend using a glass or plastic container with a lid. The nuggets stay good in the fridge for about 3 to 5 days. When reheating, the air fryer works best. Set it to 350°F (175°C) and heat for about 5 minutes. This keeps the nuggets crispy. If you use a microwave, place them on a plate. Heat on high for 30 seconds to 1 minute. This method may make them softer. You can freeze tofu nuggets before or after cooking. If freezing uncooked, arrange them in a single layer on a baking sheet. Once frozen, transfer them to a freezer bag. If you freeze cooked nuggets, let them cool first. Store them in an air-tight container. For thawing, place frozen nuggets in the fridge overnight. This method helps maintain texture. You can also reheat from frozen in the air fryer, adding a few extra minutes to the cook time. To make crispy tofu, start with firm tofu. Press it for at least 30 minutes to remove moisture. Cut it into 1-inch cubes. In a bowl, mix flour, cornstarch, garlic powder, onion powder, smoked paprika, salt, and black pepper. Dip each tofu cube in the flour mix, then in plant milk, and finally coat with breadcrumbs. Place them in your air fryer basket. Cook at 400°F for 12-15 minutes, flipping halfway through. This method gives you crispy, golden nuggets. Yes, you can use frozen tofu! Freezing changes the texture, making it spongier. Thaw the tofu first, then press it to remove excess moisture. The process is similar, but it may absorb more flavor. This can enhance your crispy tofu nuggets. Some excellent sauces to pair with crispy tofu include sweet chili sauce, tahini dressing, and soy sauce. You can also try spicy sriracha or a creamy peanut sauce. These dips add flavor and complement the crispy texture perfectly. Air fryer crispy tofu nuggets can last about 3-5 days in the fridge. Store them in an airtight container to keep them fresh. They are best enjoyed right after cooking, but you can save leftovers for later. Absolutely! You can use any unsweetened plant milk, like almond, soy, or oat milk. Each type of milk adds a slightly different taste, so feel free to experiment. This flexibility helps you customize the flavor of your crispy tofu nuggets. Tofu nuggets are simple to make and taste great. You learned about key ingredients, like firm tofu and Panko breadcrumbs, and how to prepare them step by step. Tips on crispiness and storage will help you make the best nuggets. Don't forget the fun variations and serving ideas. Enjoy creating tasty, healthy meals that everyone will love!

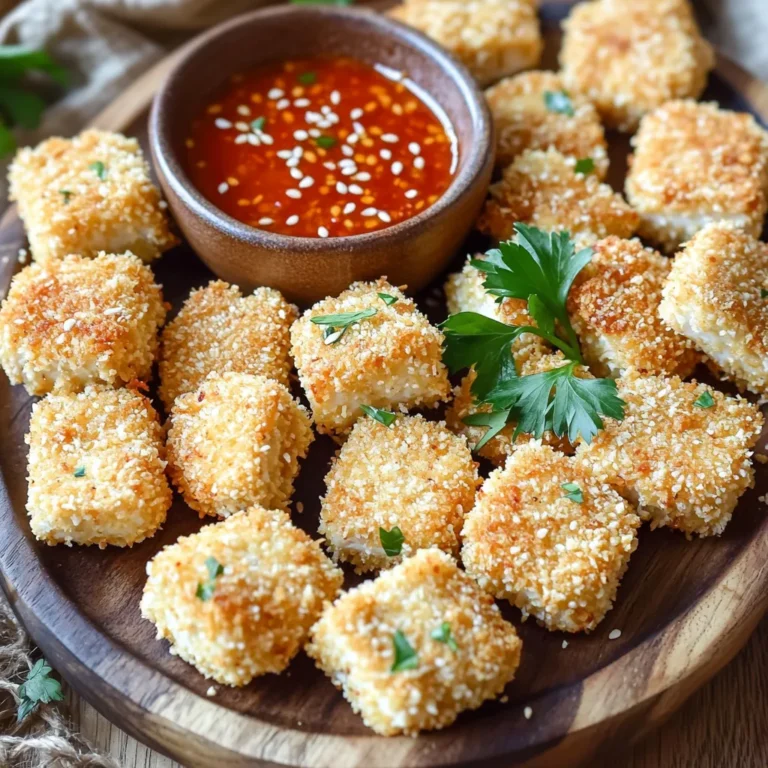
Air Fryer Crispy Tofu Nuggets Flavorful Plant-Based Snack

- 1 ½ cups graham cracker crumbs - 1/3 cup granulated sugar - 1/2 cup unsalted butter, melted - 16 oz cream cheese, at room temperature - 1 cup powdered sugar - 1 teaspoon vanilla extract - 1 cup heavy whipping cream - 1 ½ cups fresh blueberries - 2 tablespoons lemon juice - 1 teaspoon lemon zest Fresh blueberries are key for this recipe. They add flavor and a nice color. When you use fresh blueberries, you get a sweeter and juicier taste. Frozen blueberries can work, but they may make the filling watery. If you cannot find graham crackers, try using crushed cookies or oats. Vanilla wafers or digestive biscuits can also work as a base. Just make sure the texture is fine so it mixes well with the butter. This will help keep the crust firm. First, gather your ingredients for the crust. You will need: - 1 ½ cups graham cracker crumbs - 1/3 cup granulated sugar - 1/2 cup unsalted butter, melted In a mixing bowl, combine the graham cracker crumbs and sugar. Pour in the melted butter and mix well. The mixture should look like wet sand. This texture helps form a solid base. To achieve a firm base, press the crumb mixture into an 8x8 inch baking dish. Use a flat-bottomed glass to compact it well. Make sure it is even. Next, refrigerate the crust while you prepare the filling. Now it’s time to make the filling. You’ll need: - 16 oz cream cheese, at room temperature - 1 cup powdered sugar - 1 teaspoon vanilla extract - 1 cup heavy whipping cream In a large bowl, beat the cream cheese with a hand mixer. Mix until it is creamy and smooth. Gradually add the powdered sugar and vanilla extract. Keep mixing until everything is well combined. In another bowl, whip the heavy cream until it forms stiff peaks. Gently fold the whipped cream into the cream cheese mixture. Be careful not to lose the fluffiness. This step is key for a light texture. Now, let’s assemble your cheesecake. First, you will need: - 1 ½ cups fresh blueberries - 2 tablespoons lemon juice - 1 teaspoon lemon zest In a separate bowl, mix the fresh blueberries with lemon juice and zest. Fold about 2/3 of this blueberry mix into the cheesecake filling. Reserve the rest for later. Pour the cheesecake filling over the crust and spread it evenly. Top with the reserved blueberries to add a burst of flavor. Cover the dish and place it in the refrigerator for at least 4 hours. This time allows the cheesecake to set firmly. To avoid lumps in your cheesecake filling, make sure your cream cheese is at room temperature. Cold cream cheese is hard to beat smoothly. Use a hand mixer for the best results. Start mixing on low to combine, then increase the speed to get it creamy. For whipping cream, chill your bowl and beaters first. This helps the cream whip faster. Whip until stiff peaks form. Be gentle when folding it into the cream cheese mixture. You want it fluffy, not flat. Garnish each cheesecake bar with a fresh blueberry. Add a sprinkle of lemon zest for color. This makes each slice look bright and fresh. When serving at a party, place the bars on a white platter. It gives an elegant look. You can also cut the bars into fun shapes, like hearts, for special occasions. This adds a personal touch that everyone will love. {{image_2}} You can switch up the fruits in this recipe. Try strawberries or raspberries for a new twist. Mixing different berries gives a fun taste and pretty colors. You can also infuse flavors like chocolate or coconut. Just add cocoa powder or shredded coconut to the cream cheese mix. This adds depth and fun to the bars. If you need a gluten-free option, swap graham crackers for almond flour or gluten-free cookies. This keeps the crust tasty and safe for those who can't have gluten. For a vegan version, use dairy-free cream cheese and coconut cream instead of heavy cream. This way, everyone can enjoy these delicious bars without worry. To keep your no bake blueberry cheesecake bars fresh, store them in the fridge. Place the bars in an airtight container. You can also cover the dish tightly with plastic wrap. If you want to freeze them, slice the bars first. Wrap each piece in plastic wrap and place them in a freezer-safe bag. This way, you can enjoy them later! These cheesecake bars last about 5 to 7 days in the fridge. If stored properly in the freezer, they can last up to 3 months. Look for signs of spoilage, such as a sour smell or mold. If you see any of these signs, it’s best to toss the bars. Always trust your senses; they help keep you safe! Yes, you can make these cheesecake bars a day or two before you want to serve them. This gives the bars time to chill and set perfectly. Just store them in the fridge, covered tightly. They will taste great when you are ready to serve them. The cheesecake needs at least 4 hours in the fridge to set. I recommend waiting overnight if you can. This way, the bars will be firm and easy to slice. A well-set cheesecake gives you nice clean edges when you cut it. Yes, you can use Greek yogurt or mascarpone cheese instead of cream cheese. Both options add a unique flavor. Greek yogurt will make the cheesecake a bit tangy. Mascarpone will give it a rich and creamy texture. Just keep in mind that the taste will change slightly. You now have a complete guide to making No Bake Blueberry Cheesecake Bars. You learned about the fresh ingredients, clear instructions, and helpful tips to achieve the best results. Don't hesitate to experiment with flavors or dietary changes. Remember to store your leftovers properly to enjoy them later. With this knowledge, you can impress friends and family with your cheesecake bars. Enjoy your baking adventure and savor every bite!

No Bake Blueberry Cheesecake Bars Easy Dessert Recipe

- 2 lbs chicken thighs (boneless, skinless) - 1/2 cup honey - 1/2 cup soy sauce or coconut aminos (for gluten-free) - 4 cloves garlic, minced - 1 tablespoon fresh ginger, minced - 1 tablespoon sesame oil - 1 teaspoon red pepper flakes - 1 tablespoon cornstarch - 2 tablespoons water - 2 green onions, sliced - Sesame seeds Let's break down the ingredients. The chicken thighs form the base of this dish. They are juicy and cook well in the Instant Pot. Honey gives the dish a sweet taste. It also helps to caramelize the chicken. Soy sauce or coconut aminos adds saltiness and depth. Next, we have flavor enhancers. Garlic and ginger add fresh, bold flavors. They create a fragrant aroma when cooking. Sesame oil provides a nutty taste, giving the dish richness. Red pepper flakes add heat. You can adjust the amount to suit your taste. Finally, we need a thickening agent. Cornstarch mixed with water makes a slurry. This helps to thicken the sauce. Green onions and sesame seeds are for garnish. They add color and a bit of crunch. Together, these ingredients create a flavor-packed dish that's sure to impress! Start by patting the chicken thighs dry. This helps them sear better. Next, season the chicken lightly with salt and pepper. This step adds flavor and enhances the dish. In a mixing bowl, combine the honey, soy sauce, minced garlic, ginger, sesame oil, and red pepper flakes. Stir everything together until well mixed. This sauce is the star of the dish and gives it that sweet and savory punch. Turn on your Instant Pot and select the Sauté function. Once it is hot, you can add a bit of oil if you like. Sear the chicken thighs for about 2 to 3 minutes on each side until they turn golden brown. This locks in the juices. After searing, remove the chicken from the pot. Pour the honey garlic mixture into the pot. Be sure to scrape the bottom to deglaze, lifting any browned bits. This adds extra flavor to your sauce. Now, return the seared chicken thighs to the pot, making sure they are well-coated with the sauce. Close the Instant Pot lid and set the steam release valve to sealing. Select Manual or Pressure Cook and set it for 10 minutes at high pressure. When cooking finishes, let it naturally release pressure for 5 minutes. Then, carefully switch the valve to venting to release any remaining pressure. Remove the chicken from the pot and place it on a plate. To thicken the sauce, mix cornstarch with water in a small bowl. Add this mixture to the pot and select the Sauté function again. Stir continuously for about 2 to 3 minutes until the sauce thickens. Finally, return the chicken to the pot and toss it to coat in the thickened sauce. This step makes the dish even more delicious! To achieve perfectly seared chicken, start by patting the thighs dry. This step helps to create a good crust. Season them lightly with salt and pepper. When the Instant Pot is hot, add a bit of oil. Sear each side for about 2-3 minutes until golden brown. This browning adds depth to the dish. Deglazing the pot is key to great flavor. After searing, pour in the honey-garlic mixture. Scrape the bottom well with a spatula. This lifts any brown bits, enhancing the sauce’s taste. Adjusting the red pepper flakes lets you control the spice. If you like it mild, use less. For a kick, add more flakes. Experiment to find your perfect heat level. You can also substitute ingredients for variety. Try using coconut aminos instead of soy sauce for a gluten-free dish. You can switch honey for maple syrup for a different sweet note. Serve the chicken over steamed rice or quinoa. This adds a nice base for the rich sauce. Drizzle the honey garlic sauce over the top for extra flavor. For garnishing, slice green onions and sprinkle them on top. Add sesame seeds for crunch and a pop of color. This makes your dish look as good as it tastes! {{image_2}} You can switch up the protein in this recipe. If you prefer chicken breasts, use them instead of thighs. Chicken breasts cook faster and are leaner. For a plant-based option, try using tofu. Just press the tofu first to remove extra moisture. Cut it into cubes and follow the same cooking steps. This gives you a tasty and healthy meal. If you need a gluten-free option, use coconut aminos instead of soy sauce. It has a similar sweet taste but is safe for those avoiding gluten. You can also use different sweeteners like maple syrup or agave nectar. These options help lower the sugar content without losing flavor. You can make this dish even better by adding seasonal veggies. In spring, consider adding snap peas or asparagus. In fall, try diced butternut squash or carrots. These veggies not only add color but also provide extra nutrients. Just chop them up and toss them in during the last few minutes of cooking for a fresh touch. To store leftover honey garlic chicken, let it cool first. Place it in an airtight container. Make sure to cover it well. This helps keep the chicken fresh and tasty. You can store it in the fridge for up to three days. If you want to enjoy it later, consider freezing it instead. To freeze honey garlic chicken, follow these steps. First, let the chicken cool completely. Slice or leave it whole, depending on your taste. Place it in a freezer-safe bag or container. Remove as much air as possible to prevent freezer burn. Label the bag with the date. You can freeze it for up to three months. When you are ready to eat, just thaw it in the fridge overnight. To reheat honey garlic chicken, use a few methods. The best way is in the microwave. Place the chicken in a microwave-safe dish. Cover it with a lid or plastic wrap. Heat it in short bursts of one minute. Check to see if it’s warm throughout. You can also reheat it on the stove. Use a non-stick pan over medium heat. Add a splash of water to keep it moist. Stir it gently until hot. This keeps the flavors alive and tasty. Cooking honey garlic chicken in an Instant Pot takes about 30 minutes. This time includes 10 minutes of high-pressure cooking. You also need to allow for 5 minutes of natural pressure release. Prepping the ingredients takes about 15 minutes. So, you can have a tasty meal ready in no time. Yes, you can make this dish ahead of time. Prepare the chicken and sauce, then store them in the fridge for up to two days. When you're ready to eat, just reheat it in the Instant Pot. You can also freeze the cooked chicken for up to three months. Just thaw it overnight in the fridge before reheating. Honey garlic chicken pairs well with many sides. Here are some great options: - Steamed rice or quinoa for a healthy base. - Stir-fried vegetables for added crunch. - A fresh salad to balance the flavors. - Mashed potatoes for a comforting touch. These sides enhance the meal and bring out the delicious honey garlic flavor. Enjoy experimenting! This blog post covered how to make a tasty honey garlic chicken in the Instant Pot. We looked at the main ingredients, like chicken thighs, honey, and soy sauce. The cooking steps made it simple and quick. I shared tips for the best cooking and serving ways. In closing, this recipe is easy to make and full of flavor. Enjoy this dish with your favorite sides!

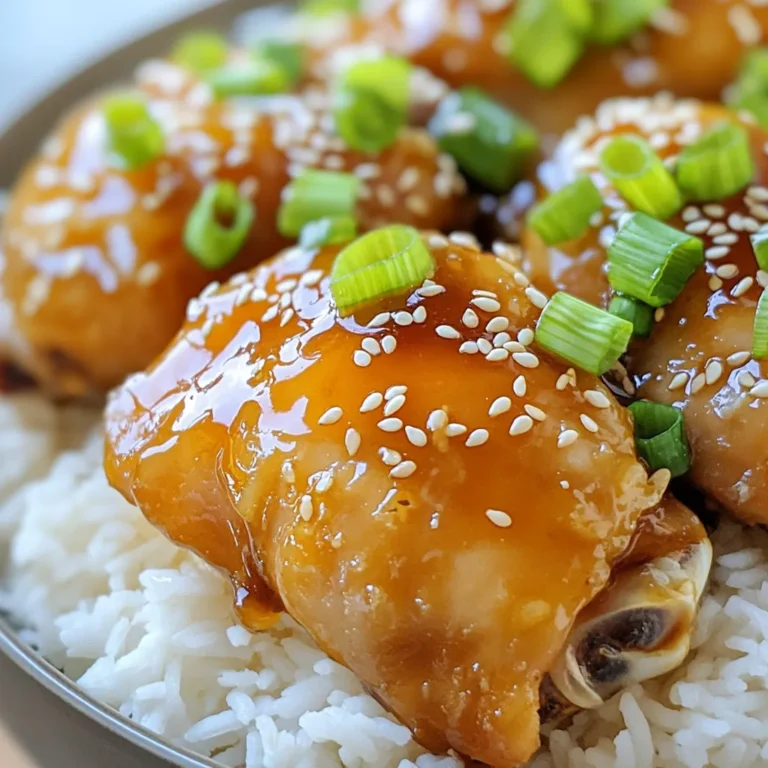
Instant Pot Honey Garlic Chicken Flavor-Packed Dish

- 1 cup ricotta cheese - 1 cup all-purpose flour - 2 large eggs - 1/2 cup milk - 1/4 cup granulated sugar - Zest of 1 lemon - 2 tablespoons fresh lemon juice - 1/2 teaspoon vanilla extract - Pinch of salt - 2 teaspoons baking powder - Unsalted butter (for greasing the skillet) - Maple syrup and fresh berries (for serving) These ingredients come together to create a delightful pancake. Ricotta cheese adds creaminess and richness to the batter. The lemon zest and juice bring a bright, fresh flavor that complements the sweetness of the sugar. Baking powder is key for fluffiness. It helps the pancakes rise and become light. Using unsalted butter ensures you can control the salt in the dish. Maple syrup and fresh berries make a perfect topping. They add sweetness and a pop of color. The berries also give a nice texture and flavor contrast. - First, whisk together 1 cup of ricotta cheese, 2 large eggs, 1/2 cup of milk, and 1/4 cup of sugar in a big bowl. - Next, add the zest of 1 lemon, 2 tablespoons of fresh lemon juice, and 1/2 teaspoon of vanilla extract. Mix until everything is smooth and well combined. - In another bowl, combine 1 cup of flour, 2 teaspoons of baking powder, and a pinch of salt. - Slowly mix the dry ingredients into the wet mixture. Stir gently until just combined. Be careful not to over-mix. This keeps the pancakes fluffy. - Preheat your skillet over medium heat. Add a tablespoon of unsalted butter to coat the bottom. - Pour about 1/4 cup of batter into the skillet for each pancake. Cook for about 3-4 minutes until bubbles form on the surface. - Carefully flip the pancakes and cook for another 2-3 minutes until they are golden brown. - Keep repeating until all the batter is used up. Add more butter to the skillet as needed to prevent sticking. To make sure your pancakes are fluffy, avoid over-mixing the batter. When you mix the wet and dry ingredients, stir just until combined. Lumps are okay! This helps keep the pancakes light. Also, cook at the right temperature. Medium heat works well. If it's too hot, the outside burns before the inside cooks. If it's too low, the pancakes can turn out flat and sad. To keep your pancakes warm while you finish cooking, use the oven. Preheat it to 200°F. Place the cooked pancakes on a baking sheet. This way, they stay warm and ready to serve. Garnish your pancakes with maple syrup and fresh berries. They add flavor and make your dish look great. A drizzle of syrup adds sweetness, while berries bring a fresh touch. Choosing the right skillet is key for even cooking. A heavy-bottomed, oven-safe skillet is best. It helps distribute heat evenly, so no burnt spots appear. For greasing, use unsalted butter. It adds flavor and keeps pancakes from sticking. Make sure to coat the skillet well before pouring in the batter. This will help the pancakes cook perfectly every time. {{image_2}} You can switch up the flavor of your Lemon Ricotta Pancake Skillet in fun ways. Adding chocolate chips or blueberries can make the dish sweeter. These tasty treats blend well with the creamy ricotta and fresh lemon. If you want a twist, try using other citrus fruits. Oranges, limes, or grapefruits can give a unique spin. Just remember to adjust the zest and juice amounts according to the fruit you choose. If you need gluten-free options, use almond flour or coconut flour instead of all-purpose flour. These substitutes work well and still taste great. For those who are dairy-free, you can try nut-based ricotta or tofu. These alternatives keep the dish creamy and delicious without dairy. How you serve your pancakes can make a big difference! Try using mini skillets for each person. It adds a fun touch and makes it easy to serve. You can also layer your pancakes with whipped cream or yogurt. This adds a light, fluffy texture and makes your dish look even more inviting. Don’t shy away from garnishing with fresh berries or a drizzle of maple syrup for extra flair. To store leftovers in the fridge, place pancakes in a single layer. Use parchment paper between layers to keep them from sticking. Put them in an airtight container. This method helps keep them fresh. I recommend using glass or BPA-free plastic containers. They seal well and are easy to clean. For freezing pancakes, let them cool completely first. Stack them with parchment paper in between. Then place them in a freezer-safe bag. Remove as much air as possible to prevent freezer burn. To defrost, take out the pancakes and leave them in the fridge overnight. Reheat them on a skillet over low heat or in the microwave for a quick warm-up. In the refrigerator, pancakes last about 3 to 4 days. Always check for any off smell or mold before eating. If they feel dry or hard, they might have gone bad. Trust your senses. If something seems off, it’s best to toss them out. Enjoy your lemon ricotta pancakes while they are fresh! To make lemon ricotta pancakes fluffier, start by whisking your wet ingredients well. Incorporate air into the batter by using a hand mixer or whisk vigorously. Fold in the flour gently. Over-mixing can deflate the batter. Letting the batter rest for a few minutes also helps. This allows the baking powder to activate and creates a lighter texture. Yes, you can make the batter ahead of time. Prepare the batter and store it in the fridge for up to 24 hours. Cover it tightly with plastic wrap or in an airtight container. When you're ready to cook, give it a quick stir. If it thickens too much, add a splash of milk to loosen it up. Lemon ricotta pancakes pair well with a variety of sides. Here are some ideas: - Fresh berries like strawberries, blueberries, or raspberries - Maple syrup or honey for drizzling - A dollop of whipped cream for creaminess - A sprinkle of powdered sugar for a touch of sweetness - Greek yogurt for added protein - A side of bacon or sausage for a savory contrast Lemon ricotta pancakes are a delightful treat. You need simple ingredients like ricotta, lemon, and sugar. Mixing wet and dry elements creates a fluffy batter. Remember, don’t over-mix! Serve with maple syrup and berries for the best taste. Storing leftovers properly keeps them fresh for later. Transitioning to variations lets you explore flavors that excite your palate. Try these tips and make delicious pancakes every time. Enjoy the process and savor each bite of your creation!

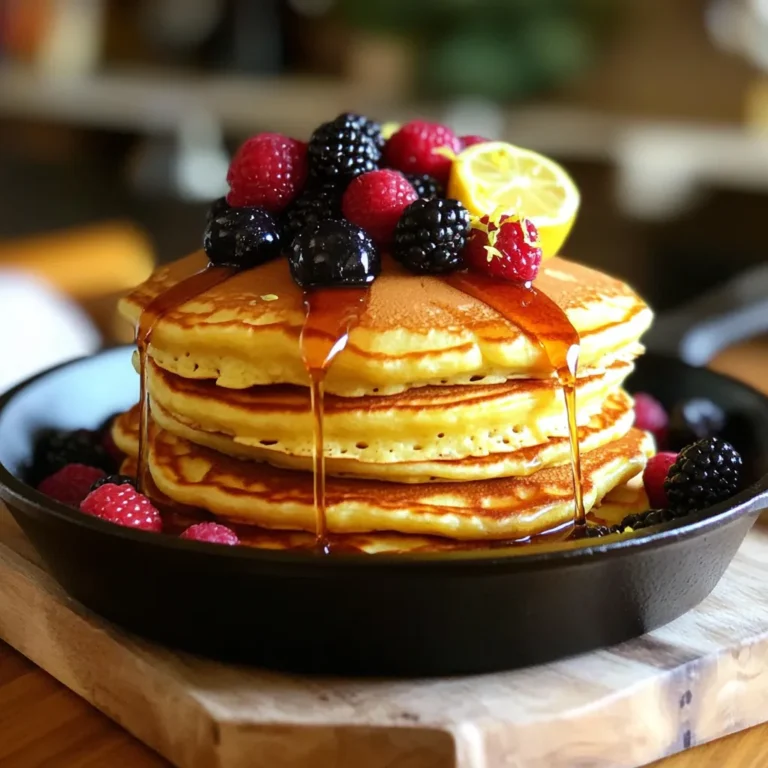
Lemon Ricotta Pancake Skillet Quick and Easy Recipe

- 1 cup canned pumpkin puree - 1/2 cup brown sugar, packed - 1/4 cup granulated sugar - 2 large eggs - 1/2 cup vegetable oil These main ingredients bring rich flavor and moisture to the muffins. The canned pumpkin puree offers a sweet and earthy base. Brown sugar adds depth, while granulated sugar balances the taste. Eggs help bind the mix and provide structure. Vegetable oil keeps the muffins soft and fluffy. - 1 1/2 cups all-purpose flour - 1 teaspoon baking powder - 1/2 teaspoon baking soda - 1/2 teaspoon ground cinnamon - 1/4 teaspoon nutmeg - 1/4 teaspoon salt The dry ingredients create the perfect muffin texture. All-purpose flour gives stability. Baking powder and baking soda help the muffins rise. Ground cinnamon and nutmeg add warm spices that enhance the pumpkin's flavor. Salt rounds out the taste, making it complex and delightful. - 1 cup chopped pecans, toasted - 1/2 cup streusel topping Toppings add crunch and flavor. Chopped pecans bring a nutty taste that pairs well with pumpkin. Toasting them enhances their flavor. The streusel topping adds a sweet, crumbly layer that contrasts with the soft muffin. This mix of textures makes every bite a treat. 1. Preheat your oven to 350°F (175°C). This helps muffins bake evenly. 2. Line a muffin tin with paper liners. You can also grease it with non-stick spray. 3. In a small bowl, prepare the streusel topping. Combine 1/2 cup flour, 1/3 cup brown sugar, chopped pecans, and 1/2 teaspoon cinnamon. 4. Add 3 tablespoons of cold, cubed butter. Mix until it looks crumbly. Set this aside for later. 1. In a large bowl, mix 1 cup of pumpkin puree with 1/2 cup brown sugar and 1/4 cup granulated sugar. 2. Crack in 2 large eggs and add 1/2 cup vegetable oil. 3. Pour in 1 teaspoon vanilla extract. Whisk everything until smooth. 1. In another bowl, sift together 1 1/2 cups all-purpose flour, 1 teaspoon baking powder, 1/2 teaspoon baking soda, 1/2 teaspoon ground cinnamon, 1/4 teaspoon nutmeg, and 1/4 teaspoon salt. 2. Fold this dry mix into the wet mixture gently. It’s okay if there are a few lumps. 3. Carefully fold in 1 cup of toasted pecans. 1. Use a spoon to divide the batter evenly into the muffin cups. Fill each about 2/3 full. 2. Evenly sprinkle the prepared streusel topping over each muffin. 1. Place the muffin tin in the preheated oven. Bake for 18-22 minutes. 2. To check if they are done, insert a toothpick into the center. If it comes out clean, they are ready. 3. Let the muffins cool in the pan for about 5 minutes, then move them to a wire rack to cool completely. - Know your oven for accurate baking time. Ovens can vary, so check early. I find that my oven often bakes faster than the time listed. - How to check for doneness? Insert a toothpick into the center. If it comes out clean, your muffins are ready. - Preventing overmixing is key. Mix until just combined. A few lumps are okay; this helps keep muffins fluffy. - Ensuring moist muffins comes from using enough pumpkin puree and not overbaking. The pumpkin adds moisture, so embrace it! - For presentation, serve these muffins warm on a rustic wooden platter. Add whole pecans and a sprinkle of powdered sugar to impress! - Pair your muffins with hot coffee or spiced tea. The flavors blend perfectly and enhance the cozy vibe. {{image_2}} To make gluten-free pumpkin pecan coffee cake muffins, you can use a gluten-free flour blend. Brands like Bob's Red Mill or King Arthur offer great options. Look for blends that include xanthan gum, which helps with texture. You can also mix almond flour and coconut flour for a nutty taste. Just remember, the ratio may vary, so follow the package instructions for best results. If you want vegan muffins, replace eggs with flaxseed meal or applesauce. Use 1 tablespoon of flaxseed meal mixed with 2.5 tablespoons of water for each egg. For dairy, swap vegetable oil with coconut oil or any plant-based oil. Use a non-dairy milk option like almond or oat milk instead of regular milk. These swaps keep the muffins moist and delicious. Add dried fruits like cranberries or raisins for extra sweetness. Chopped apples or pears can also bring a nice texture. If you're feeling adventurous, try adding spices like ginger or cloves. A pinch of cardamom can also enhance the pumpkin flavor. Mixing and matching these ingredients can turn your muffins into a new treat each time! To keep your pumpkin pecan coffee cake muffins fresh, place them in an airtight container. This helps lock in moisture and flavor. You can store them at room temperature for up to three days. If you want to keep them longer, put them in the fridge. They will last about a week this way. Just make sure to let them cool completely before sealing them up. If you want to enjoy these muffins later, freezing is a great option. Start by letting the muffins cool fully. Wrap each muffin in plastic wrap. Then, place them in a freezer-safe bag or container. This keeps them fresh for up to three months. When you’re ready to indulge, simply thaw them at room temperature or heat them in the microwave. To warm up your muffins, preheat your oven to 350°F (175°C). Place the muffins on a baking sheet and cover them with foil. Heat them for about 10-15 minutes. This method keeps them moist and tasty. You can also use the microwave for a quick fix. Heat each muffin for about 15-20 seconds. Enjoy your warm, delicious treat! Yes, you can use fresh pumpkin. Start with a small pumpkin. Cut it in half and remove the seeds. Roast the halves cut-side down until soft. This takes about 45 minutes at 350°F (175°C). Once cool, scoop out the flesh and mash it. You need 1 cup of fresh puree for this recipe. This will give a fresh flavor and nice texture. To check if the muffins are done, insert a toothpick into the center. If it comes out clean or with a few crumbs, they are done. If the toothpick has wet batter, bake for a few more minutes. The muffins should also look golden brown on top. Trust your eyes and the toothpick! Yes, you can make the batter ahead of time. Store it in the fridge for up to 24 hours. Cover the bowl tightly with plastic wrap. When ready to bake, let it sit for a few minutes at room temperature. Stir gently before filling the muffin cups. This helps keep them fluffy and moist! You learned about making the best pumpkin muffins. We covered key ingredients and simple steps. Each tip helps you bake perfect, moist muffins every time. Use variations to mix things up or adapt to your needs. Store your treats well for fresh enjoyment later. Follow these ideas to impress at your next gathering. Enjoy your baking adventure and share your delicious muffins with others!

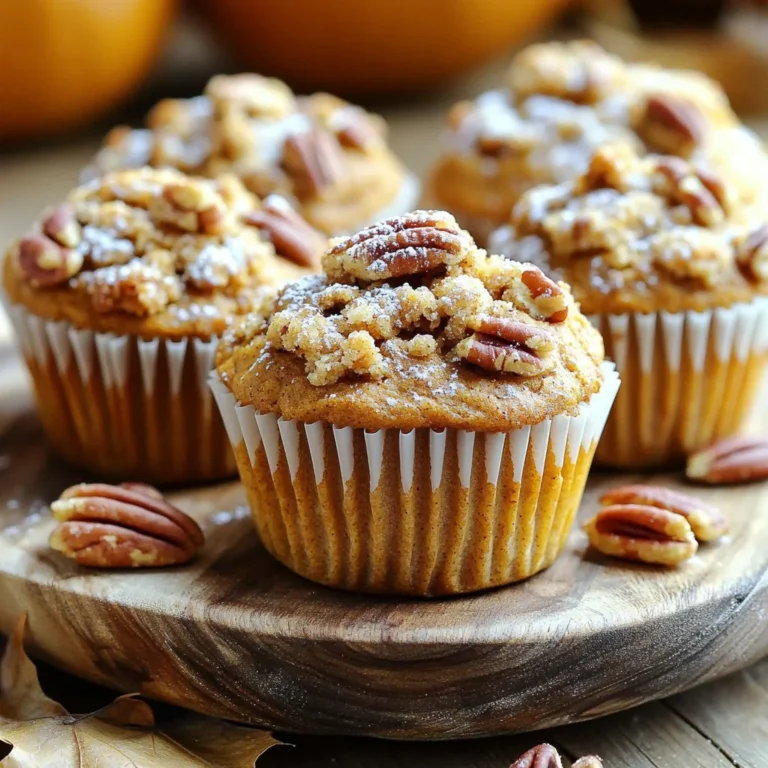
Pumpkin Pecan Coffee Cake Muffins Delightful Treat

- 12 ounces penne pasta - 2 cups cherry tomatoes, halved - 1 onion, diced - 4 cloves garlic, minced - 4 cups vegetable broth - 1 cup heavy cream - 1 teaspoon dried basil - 1 teaspoon dried oregano - 1 teaspoon red pepper flakes (adjust to taste) - 2 cups fresh spinach - 1/2 cup grated Parmesan cheese (plus more for serving) - Salt and pepper to taste - 2 tablespoons olive oil Each ingredient plays a key part in the flavor and texture of this dish. - Penne pasta forms the base. It holds sauce well and cooks evenly. - Cherry tomatoes add sweetness and freshness. They burst while cooking, enriching the sauce. - Onion and garlic provide a savory foundation. They create depth and aroma when sautéed. - Vegetable broth adds rich flavor and moisture. It cooks the pasta and enhances taste. - Heavy cream brings creaminess, making the dish rich and velvety. - Spinach adds color and nutrients. It wilts down, blending into the dish perfectly. - Parmesan cheese gives a salty, nutty flavor. It melts into the pasta, enhancing the overall taste. You can easily swap some ingredients if needed. - Use fusilli or farfalle instead of penne for a different shape. - If you don’t have cherry tomatoes, try diced canned tomatoes for convenience. - Shallots can replace onion for a milder flavor. - For a lighter dish, substitute coconut milk for heavy cream. - Use nutritional yeast instead of Parmesan for a vegan option. - Kale or arugula can replace spinach if you prefer. These swaps keep the dish tasty, while catering to your needs. First, gather your ingredients. You will need: - 12 ounces penne pasta - 2 cups cherry tomatoes, halved - 1 onion, diced - 4 cloves garlic, minced - 4 cups vegetable broth - 1 cup heavy cream - 1 teaspoon dried basil - 1 teaspoon dried oregano - 1 teaspoon red pepper flakes - 2 cups fresh spinach - 1/2 cup grated Parmesan cheese - Salt and pepper to taste - 2 tablespoons olive oil Next, prepare your space. Chop the onion and mince the garlic. Halve the cherry tomatoes. This makes cooking easier and faster. Heat the olive oil in a large pot over medium heat. Add the diced onion. Sauté for about 3-4 minutes until the onion softens. Then, add the minced garlic and stir for one more minute. This step releases a great aroma. Now, stir in the halved cherry tomatoes. Cook them for about 5 minutes until they soften. Then, pour in the vegetable broth. Add the penne pasta, red pepper flakes, basil, oregano, salt, and pepper. Stir well to mix all the flavors. Bring the mixture to a boil. Once boiling, lower the heat and let it simmer. Cook uncovered for 10-12 minutes. Stir occasionally until the pasta is al dente and most liquid is gone. Reduce the heat to low. Stir in the heavy cream and fresh spinach. Cook for 2-3 minutes until the spinach wilts. Lastly, fold in the grated Parmesan cheese until it melts. Taste and adjust the seasoning with more salt and pepper if needed. For presentation, serve the pasta straight from the pot for a rustic look. You can also plate it in bowls and add extra Parmesan and fresh basil on top. Enjoy your meal! To get pasta just right, use a large pot. This allows the pasta to move freely. Always add enough water to cover the pasta. Salt your water well; it should taste like the sea. Cook the penne until it's al dente, which means firm to the bite. Stir the pasta often to prevent it from sticking together. Adding fresh herbs can boost flavor. Try using basil or parsley right before serving. You can also sprinkle more grated Parmesan on top for a rich taste. Consider a squeeze of lemon juice for a bright note. For more heat, adjust red pepper flakes based on your taste. Fresh spinach adds color and nutrients, so don’t skip it! One common mistake is overcooking the pasta. This makes it mushy. Always check for doneness a minute or two early. Another mistake is not seasoning enough. Always taste and adjust salt and pepper before serving. Lastly, don’t skip the cheese; it adds creaminess and depth. Enjoy your cooking and have fun with flavors! {{image_2}} To add meat to your dish, ground beef or Italian sausage works well. Brown the meat before adding onions and garlic. This step adds rich flavor. You can use turkey for a leaner option. Just remember to drain excess fat after cooking. The meat enhances the pasta’s heartiness and pairs beautifully with the sauce. If you want a vegetarian twist, skip the meat and add more veggies. Zucchini, bell peppers, or mushrooms are great choices. For a vegan version, replace heavy cream with coconut milk or cashew cream. You can also use nutritional yeast instead of Parmesan cheese for a cheesy flavor. This keeps the dish creamy and plant-based. Using seasonal ingredients can brighten your pasta. In spring, add fresh peas or asparagus. In summer, consider ripe heirloom tomatoes. Fall is perfect for roasted butternut squash or pumpkin. In winter, kale or Brussels sprouts can add texture. These swaps keep the dish fresh and fun all year long. To store your One Pot Tuscan Tomato Pasta, let it cool first. Place the pasta in an airtight container. You can keep it in the fridge for up to three days. Make sure to cover it well so it stays fresh. When you’re ready to eat it again, check for any signs of spoilage. You can freeze this pasta dish for up to three months. Use a freezer-safe container or bag for best results. Make sure to leave some space for expansion. Label the container with the date so you remember when you made it. Thaw it overnight in the fridge before reheating. To reheat, you can use the microwave or the stove. If using the microwave, add a splash of water to keep it moist. Heat it in short bursts, stirring often. If using the stove, warm it gently over low heat. Stir in a bit of cream or broth to bring back its creaminess. Enjoy it just like the first time! I like to use penne pasta for this dish. Its shape holds sauce well. You can also try fusilli or rigatoni. Both will work great in this recipe. Yes, you can! Just swap the penne for gluten-free pasta. Many brands offer good options. Make sure to check the cooking time, as it may vary with gluten-free pasta. To serve more people, simply double the ingredients. Use 24 ounces of pasta and adjust the broth and cream too. This keeps the flavor strong for larger batches. Absolutely! Use about 3 cups of diced fresh tomatoes. They will provide a nice flavor and texture. Just remember to cook them a bit longer to soften. You can use half-and-half or whole milk. Coconut milk is another great choice for a dairy-free option. Each of these will change the flavor slightly, but they keep it creamy. This post covers how to make a tasty pasta dish. We looked at ingredients, cooking steps, and helpful tips. You learned about key parts of the recipe and what to swap. We discussed easy tricks for better flavor and how to avoid mistakes. Plus, I shared different variations to meet your taste. Store leftovers safely and know how to reheat them. Remember, cooking is fun, so play around with flavors. Enjoy your delicious pasta!

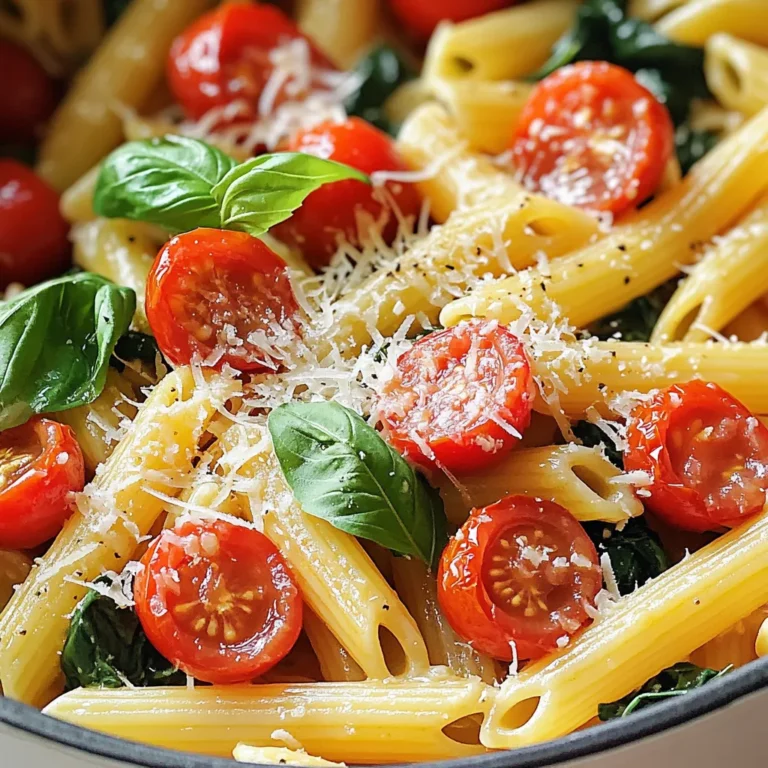
One Pot Tuscan Tomato Pasta Flavorful and Easy Meal

PREV 1 … 11 12 13 … 57 NEXT
flavor nest kitchen

explore

DessertsDinnerAppetizersDrinks

Our Policies

  • Cookie Policy
  • Copyright Policy
  • Disclaimer
  • GDPR Policy
  • Terms Of Use
Back to Top
  • About
  • Contact Us
  • Privacy Policy
© 2025 flavor nest kitchen