FREE DINNER EBOOK! Get your copy!
  • Cookie Policy
  • GDPR Policy
  • Disclaimer
  • Terms Of Use
  • Visit my other site: Fun Cookie Recipes
flavor nest kitchen
  • Home
  • Dinner
  • Desserts
  • Drinks
  • Appetizers
  • Contact
  • About
  • Privacy Policy
  • Home
  • Dinner
  • Desserts
  • Drinks
  • Appetizers
  • Contact
  • About
  • Privacy Policy
  • Cookie Policy
  • GDPR Policy
  • Disclaimer
  • Terms Of Use
Visit my other site: Fun Cookie Recipes

HOME / CATEGORIES /

Latest

For this dish, you need 1 pound of rainbow carrots. Choose a mix of colors: red, orange, and yellow. These colors not only look great but also bring different flavors. The variety makes each bite exciting and fun. You will use a few key seasonings for flavor. - 3 tablespoons olive oil - 4 cloves garlic, minced - 1 tablespoon fresh thyme leaves (or 1 teaspoon dried thyme) - 1 tablespoon fresh rosemary, chopped - Salt and pepper to taste These ingredients create a tasty marinade that brings the carrots to life. Olive oil helps to roast them perfectly. Garlic adds a rich flavor, while thyme and rosemary give a fresh touch. If you want to add a bit of sweetness, consider using 1 tablespoon of honey. This is not necessary, but it can balance the flavors well. Finally, garnish the dish with fresh parsley, chopped. This adds color and a fresh taste that brightens up your meal. Start by gathering your rainbow carrots. You want one pound. Peel them and cut them into even pieces. This helps them cook evenly. Next, peel and mince four cloves of garlic. Fresh herbs make a big difference. Get one tablespoon of fresh thyme and one tablespoon of fresh rosemary, chopped. You can use dried herbs if you do not have fresh ones. In a large mixing bowl, add three tablespoons of olive oil. Then, add your minced garlic, thyme, rosemary, salt, and pepper. If you like a touch of sweetness, add one tablespoon of honey. Mix well until all the ingredients blend together. This marinade will add great flavor to your carrots. Preheat your oven to 425°F (220°C). Line a baking sheet with parchment paper for easy cleanup. Add the cut carrots to the bowl with the marinade. Toss them well until they are evenly coated. Spread the carrots in a single layer on the baking sheet. This helps them roast evenly. Roast for 25-30 minutes until they are tender and slightly caramelized. Turn them halfway through cooking for even browning. Once done, let them cool for a minute. Then, transfer them to a platter and garnish with fresh parsley. Enjoy your tasty garlic herb roasted rainbow carrots! To get your carrots roasted evenly, cut them into similar sizes. Use a sharp knife for clean cuts. This step helps them cook at the same rate. I recommend keeping the pieces about one inch thick. When you spread them on the baking sheet, arrange them in a single layer. This allows hot air to circulate around each piece. Turn the carrots halfway through cooking for a nice golden color. Always wash your rainbow carrots well before peeling. This removes dirt and grit. Use a vegetable peeler to remove the skin. Cutting off the tops and tails makes them look neat. If you prefer, you can leave the skin on for extra texture. Just scrub them well. For a fun touch, mix different colors together. The bright hues make your dish more appealing. To boost flavor, try adding spices like cumin or paprika. Mix them into the marinade with the garlic and herbs. If you like a hint of sweetness, drizzle honey over the carrots before roasting. This caramelizes and adds a rich taste. Fresh lemon juice can brighten the flavors after roasting. Lastly, don’t skip the parsley garnish. It adds a fresh finish and makes the dish pop. {{image_2}} You can swap rainbow carrots for other veggies. Try parsnips for a sweet bite. Beets add color and earthiness. Sweet potatoes bring a creamy texture. You can even mix in broccoli for a nice crunch. All these options roast well with garlic and herbs. Feel free to change the herbs in this recipe. Oregano or basil can add a new twist. You can also use dill for a fresh taste. If you like a kick, add some red pepper flakes. These small changes can make your dish unique and exciting. For a sweet touch, drizzle more honey on the carrots. Maple syrup also works great. You can balance flavors by adding balsamic vinegar. This gives a nice tang to the sweet carrots. Mixing sweet and savory creates layers of flavor that are hard to resist. To keep your leftover garlic herb roasted rainbow carrots fresh, let them cool first. Place them in an airtight container. This will help lock in moisture and flavor. Store in the fridge for up to four days. If you want to enjoy them later, avoid adding any garnishes before storing. Reheating these carrots is easy. You can use the oven or a microwave. For the oven, preheat it to 350°F (175°C). Spread the carrots on a baking sheet and heat for about 10-15 minutes. This method keeps them crispy. In the microwave, heat them on a plate for 1-2 minutes. Stir halfway through for even heating. You can freeze your roasted carrots too! Start by letting them cool completely. Then, place them in a freezer-safe bag. Remove as much air as possible to prevent freezer burn. They can last up to three months. When you’re ready to eat them, thaw in the fridge overnight, then reheat as mentioned above. Yes, you can use regular carrots. They will taste great too. Rainbow carrots add color and fun. Regular carrots are often sweeter and more common. Just cut them into equal pieces for even cooking. These carrots pair well with many dishes. Try serving them with roasted chicken or grilled fish. They also work great with quinoa or rice. A fresh salad would make a nice side, too. You can even add them to a veggie platter. You can easily change this recipe for diets. If you want it vegan, skip the honey. You can use any oil if olive oil is not suitable. For gluten-free, this recipe is safe as it is. Always check your herbs and spices to ensure they fit your needs. We covered how to make garlic herb roasted rainbow carrots in this blog post. You learned about the ingredients, detailed steps, and key tips. Variations let you try different flavors or veggies. Storage tips ensure your leftovers stay fresh. This dish is packed with flavor and color. It’s perfect for any meal. Enjoy the simplicity and taste of your roasted carrots!

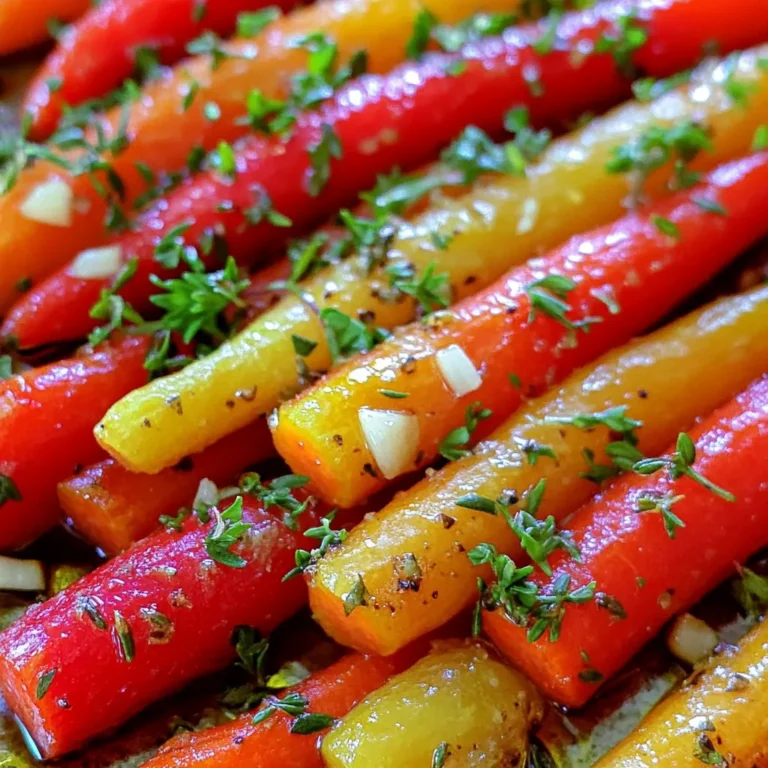
Garlic Herb Roasted Rainbow Carrots Vibrant and Flavorful

- 1 ½ cups all-purpose flour - 1 teaspoon baking powder - ½ teaspoon baking soda - ½ teaspoon salt - 1 teaspoon ground cinnamon - ½ teaspoon ground nutmeg - ½ teaspoon ground ginger - ½ cup unsalted butter, softened - 1 cup granulated sugar - 2 large eggs - 1 teaspoon vanilla extract - ¾ cup apple cider - 1 cup peeled and diced apples (like Granny Smith or Honeycrisp) - ½ cup unsalted butter - 1 cup brown sugar - ¼ cup heavy cream - 1 teaspoon vanilla extract - 2 cups powdered sugar You can swap all-purpose flour with whole wheat flour for a healthier option. If you want less sugar, use a sugar substitute. Applesauce can replace butter for a lighter cupcake. For those who can't have eggs, a flaxseed mix works well. Use dairy-free butter and cream for a vegan frosting. If you cannot find apple cider, try using apple juice instead. Start by preheating your oven to 350°F (175°C). This step ensures even baking. Line a muffin tin with cupcake liners. This keeps your cupcakes from sticking. In a medium bowl, whisk together these dry ingredients: - 1 ½ cups all-purpose flour - 1 teaspoon baking powder - ½ teaspoon baking soda - ½ teaspoon salt - 1 teaspoon ground cinnamon - ½ teaspoon ground nutmeg - ½ teaspoon ground ginger Mix until well combined. This blend gives the cupcakes their spiced flavor. In a large bowl, cream together: - ½ cup unsalted butter, softened - 1 cup granulated sugar Beat until light and fluffy. This step adds air for a soft texture. Add in two large eggs, one at a time. Mix well after each addition. Stir in 1 teaspoon of vanilla extract. This adds depth to the flavor. Gradually add the dry mixture to the wet ingredients. Alternate with ¾ cup of apple cider. Mix until just combined. Be careful not to overmix. Gently fold in 1 cup of peeled and diced apples. Use Granny Smith or Honeycrisp for a nice tartness. Ensure they are evenly distributed in the batter. Divide the batter among the liners. Fill each about two-thirds full to allow for rising. Bake for 18-20 minutes. Check for doneness by inserting a toothpick in the center. It should come out clean. Once baked, let the cupcakes cool in the pan for 5 minutes. Then, transfer them to a wire rack to cool completely. This prevents soggy bottoms. For the caramel frosting, melt ½ cup of unsalted butter in a saucepan over medium heat. Stir in 1 cup of brown sugar and ¼ cup of heavy cream. Stir continuously until it begins to boil. Once boiling, let it cook for 2 minutes. Remove from heat and stir in 1 teaspoon of vanilla extract. This makes the frosting rich and flavorful. Allow the caramel mixture to cool slightly. Gradually whisk in 2 cups of powdered sugar until smooth and creamy. This gives the frosting a perfect texture. Once the cupcakes are cool, frost them generously with the caramel frosting. Enjoy the delightful blend of flavors! To make perfect spiced apple cider cupcakes, follow these tips: - Use fresh spices: Fresh spices enhance the flavor. Old spices lose their punch. - Room temperature ingredients: Make sure your butter and eggs are at room temperature. This helps them mix well. - Don’t overmix: Mix just until combined. Overmixing can make cupcakes tough. - Fill liners correctly: Fill each cupcake liner about two-thirds full. This allows room for rising. - Check doneness: Use a toothpick to test for doneness. It should come out clean. Creating a smooth caramel frosting is simple with these tricks: - Use medium heat: Cook the caramel over medium heat to prevent burning. - Stir constantly: Keep stirring as it cooks. This helps blend the butter, sugar, and cream. - Cool before mixing: Let the caramel cool slightly before adding powdered sugar. This helps achieve a creamy texture. - Adjust thickness: If frosting is too thick, add a splash of cream. If too thin, add more powdered sugar. Make your cupcakes shine with these ideas: - Dust with cinnamon: A light sprinkle of cinnamon adds visual flair. - Top with apple slices: A small slice of apple on each cupcake is a lovely touch. - Drizzle with caramel: A drizzle of caramel sauce creates a decadent look. - Serve on a beautiful platter: A nice platter adds to the overall presentation. - Pair with drinks: Enjoy these cupcakes with spiced tea or hot cider for a cozy treat. {{image_2}} If you want to switch up the frosting, try cream cheese frosting. It adds a tangy taste that pairs well with the sweetness of the cupcakes. Another option is whipped cream. It creates a light and airy texture. You could also use chocolate ganache. This rich frosting brings a bold flavor. Each option offers a unique twist to the classic caramel frosting. You can change the flavors in these cupcakes to suit your taste. Try adding a splash of orange or lemon zest for a citrus twist. You could also mix in some chopped nuts for crunch. Walnuts or pecans work great. For a spicier kick, add more ginger or a pinch of cloves. Even swapping out the apples for pears can create a fun new flavor. For those with dietary needs, you can make simple swaps. Use gluten-free flour to make these cupcakes gluten-free. Replace the sugar with a sweetener like maple syrup for a healthier option. If you need a dairy-free treat, use coconut oil instead of butter and a dairy-free milk. These changes keep the cupcakes tasty while accommodating different diets. You can store your spiced apple cider cupcakes in an airtight container. Keep them at room temperature for up to three days. If you want to keep them longer, place them in the fridge. Chilling helps keep the freshness and flavor intact. Just remember to bring them back to room temp before serving for the best taste. To freeze the cupcakes, let them cool completely first. Wrap each cupcake tightly in plastic wrap. Then place them in a freezer-safe bag or container. They can stay frozen for up to three months. When you are ready to enjoy them, thaw them in the fridge overnight. This keeps them moist and delicious. Store leftover caramel frosting in an airtight container in the fridge. It will last about a week. When you want to use it again, let it sit at room temperature for about 30 minutes. If it hardens, you can gently rewhip it to make it smooth again. Avoid leaving it out too long, as it can spoil quickly. You can tell when the cupcakes are done by inserting a toothpick into the center. If it comes out clean, they are ready. The tops should look golden and slightly springy. Overbaking can make them dry, so keep an eye on them as they bake. Yes, you can make the cupcakes ahead of time. Once cooled, store them in an airtight container. They will stay fresh for up to three days. You can frost them just before serving for the best texture and flavor. If you don’t have apple cider, you can use apple juice or a mix of water and lemon juice. This will give you a similar flavor. However, the spice notes may not be as strong, so consider adding a bit more cinnamon or nutmeg for depth. Caramel frosting can last about one week in the fridge. Store it in an airtight container. Before using, let it sit at room temperature to soften. You can also rewhip it for a smooth texture before frosting your cupcakes. You learned about the best ingredients for cupcakes and caramel frosting. I shared tips for baking perfect treats and how to adapt recipes. You also found storage info to keep them fresh. Remember, baking is fun and allows you to be creative. Use the variations to make your cupcakes unique. Enjoy every bite you create, and share your tasty results!

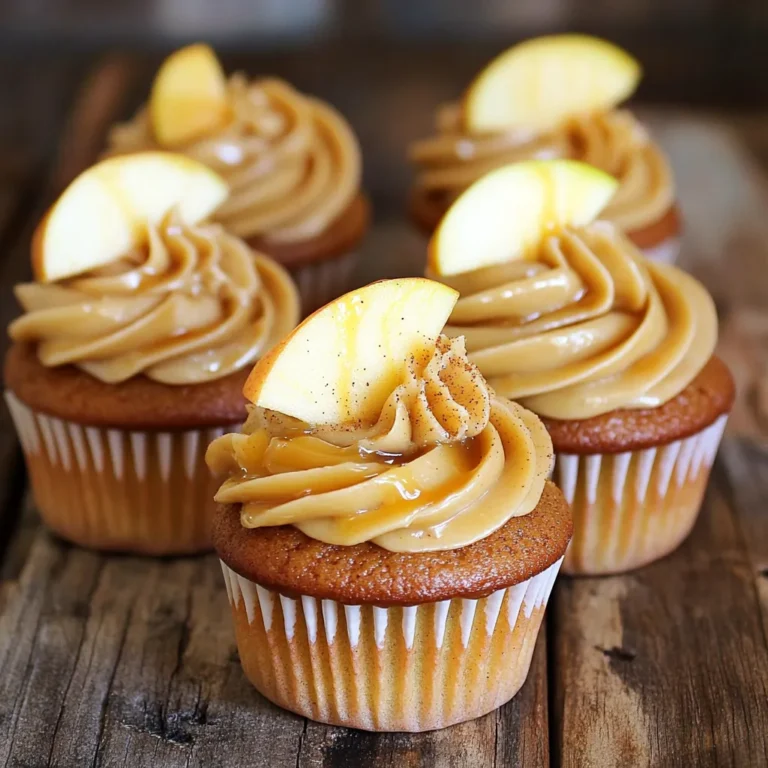
Spiced Apple Cider Cupcakes with Caramel Frosting Delight

- 1 package (16 oz) gnocchi - 1 cup sun-dried tomatoes, chopped - 3 cups vegetable broth - 1 cup heavy cream - 2 tablespoons olive oil - 2 cups fresh spinach - 1/2 cup grated Parmesan cheese - Fresh basil leaves for garnish - 1 teaspoon garlic powder - 1 teaspoon onion powder - 1 teaspoon Italian seasoning - Salt and pepper to taste You need to gather your ingredients first. Let’s talk about the main ingredients. Gnocchi are soft, pillowy pasta made from potatoes. They serve as the base for this dish. Sun-dried tomatoes bring a sweet and tangy flavor. They add a burst of color, too. Next, you need heavy cream. It gives the dish a rich and smooth texture. Vegetable broth adds depth and flavor. You can use homemade or store-bought broth. Both work well. For optional ingredients, olive oil helps sauté the sun-dried tomatoes. Fresh spinach adds a pop of green and nutrients. Grated Parmesan cheese melts into the sauce for extra creaminess. Fresh basil leaves make a lovely garnish. Now, let’s discuss seasoning. Garlic powder gives a warm flavor. Onion powder adds sweetness. Italian seasoning combines herbs like oregano and basil. Finally, salt and pepper enhance all the flavors. With these ingredients, you are ready to make a delicious meal. First, grab a large pot or deep skillet. Heat 2 tablespoons of olive oil over medium heat. This helps release the flavors of the sun-dried tomatoes. Once the oil is hot, add 1 cup of chopped sun-dried tomatoes. Sauté them for about 2-3 minutes. You want them to soften slightly, releasing their rich flavor into the oil. Next, toss in 1 package (16 oz) of gnocchi. Pour in 3 cups of vegetable broth. Sprinkle 1 teaspoon of garlic powder, 1 teaspoon of onion powder, and 1 teaspoon of Italian seasoning for added taste. Stir everything well, then bring it to a simmer. Cover the pot and reduce the heat to low. Let the gnocchi cook for 5-7 minutes. Keep an eye on them; they will float when they are tender. Now it’s time to add the creaminess. Pour in 1 cup of heavy cream and stir gently. Let it simmer for another 3-4 minutes. This thickens the sauce and makes it rich. Add 2 cups of fresh spinach and 1/2 cup of grated Parmesan cheese. Stir until the spinach wilts and the cheese melts. Finally, season with salt and pepper to taste. Adjust according to your liking. To ensure tenderness, cook gnocchi until they float. This means they are ready. If you overcook them, they can become mushy. Keep an eye on the clock. Remove them from heat as soon as they rise. You can add spices like red pepper flakes for heat. Fresh herbs, like parsley or thyme, can brighten the dish. For extra protein, try adding cooked chicken or shrimp. Veggies like bell peppers or zucchini also work well in this dish. Garnish with fresh basil leaves for color and flavor. A sprinkle of extra Parmesan cheese adds a gourmet touch. Serve in shallow bowls to show off the creamy sauce and gnocchi. Pair it with a crisp salad to balance the richness. {{image_2}} To make a vegan version, swap heavy cream for coconut cream. Use a plant-based gnocchi too. For a gluten-free option, select gluten-free gnocchi. These changes keep the dish creamy and tasty without losing flavor. You can add different cheeses for extra flavor. Try goat cheese or feta for a tangy twist. Incorporate more vegetables like bell peppers or mushrooms for added nutrition. These additions make each bite unique and exciting. You can cook this dish on the stovetop or in an Instant Pot. If you use an Instant Pot, set it to high pressure for five minutes for quick cooking. A one-pan method allows for easy cleanup, while a skillet can give you a nice sear. Both methods yield a delicious meal with minimal fuss. To keep your One-Pot Creamy Sun-Dried Tomato Gnocchi fresh, use airtight containers. Glass or plastic containers work great. Store your dish in the fridge within two hours after cooking. This meal stays good for about three days. You can freeze leftovers for later. First, let the gnocchi cool down completely. Then, place it in a freezer-safe container or bag. Be sure to remove as much air as possible. This helps prevent freezer burn. You can freeze it for up to two months. When you’re ready to enjoy it, thaw it overnight in the fridge. To reheat, use a skillet on low heat. Add a splash of vegetable broth or cream to keep it moist. Stir gently until heated through. Avoid using a microwave, as it can make the gnocchi mushy. If you want the best texture, use the stovetop method. This keeps the gnocchi creamy and delicious! For this dish, you can use either fresh or packaged gnocchi. Fresh gnocchi often tastes better and has a softer texture. It cooks quickly and adds a delightful touch. Packaged gnocchi is more convenient and has a longer shelf life. Both types work well in this recipe, so pick what you like best! Yes, you can use different types of cream in this recipe. Heavy cream gives a rich taste, but you can swap it for half-and-half for a lighter option. If you want dairy-free, try coconut cream or cashew cream. Both add a nice creaminess without dairy. Adjust the amount based on your taste! Watch for the gnocchi to float to the surface. This usually happens after about 5-7 minutes of cooking. Once they float, they are mostly done. You can also taste one to check for tenderness. If it feels soft and pillowy, it's ready to enjoy! This blog post covered everything you need for a creamy gnocchi dish. We explored key ingredients like gnocchi, sun-dried tomatoes, and heavy cream. I shared easy steps for cooking and tips for perfecting your dish. You can customize flavors and even accommodate dietary needs. With simple storage and reheating methods, you can enjoy this meal later. I hope you feel inspired to try it. Enjoy cooking and experimenting!

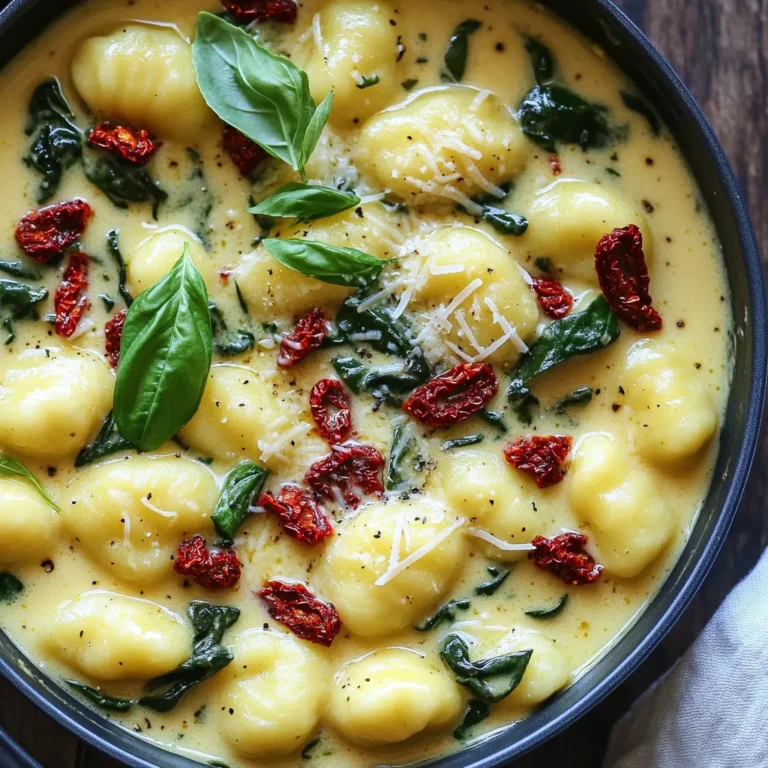
One-Pot Creamy Sun-Dried Tomato Gnocchi Delight

To make the best air fryer coconut shrimp, you need: - 1 pound large shrimp, peeled and deveined - 1 cup unsweetened shredded coconut - 1 cup panko breadcrumbs - 1/2 cup all-purpose flour - 2 large eggs, beaten - 1 teaspoon garlic powder - 1 teaspoon paprika - Salt and pepper to taste These ingredients come together to create a crunchy, flavorful dish. The shrimp adds protein, while the coconut and panko give it a satisfying crunch. Garlic powder and paprika add a nice flavor boost. For the sweet chili sauce, gather: - 1/2 cup sweet chili sauce - 1 tablespoon lime juice - 1 teaspoon sriracha (optional, for extra heat) This sauce brings a sweet and tangy taste. The lime juice adds freshness, while sriracha can kick up the flavor if you like a bit of heat. Use a cooking spray that fits your needs. A light olive oil spray works well. It helps the shrimp crisp up nicely in the air fryer. Just a quick spray will do the trick to avoid sticking. First, you need to prep the shrimp. Take one pound of large shrimp that is peeled and deveined. Use paper towels to pat the shrimp dry. This step is key. It removes extra moisture. A dry shrimp helps the coating stick better. Set the shrimp aside while you prepare the breading stations. Now, gather three shallow bowls. In the first bowl, place 1/2 cup of all-purpose flour. In the second bowl, beat two large eggs and pour them in. For the third bowl, mix 1 cup of unsweetened shredded coconut with 1 cup of panko breadcrumbs. Add 1 teaspoon of garlic powder, 1 teaspoon of paprika, and salt and pepper to taste. Make sure to mix this well. Each bowl will help you coat the shrimp perfectly. Before you cook, preheat your air fryer to 400°F (200°C). This usually takes about 5 minutes. While it heats up, lightly spray the air fryer basket with cooking spray. Now, take each shrimp. First, dip it in the flour and shake off any extra. Then, coat it in the egg. Finally, dredge it through the coconut panko mix. Press gently so the coating sticks. Place the shrimp in a single layer in the basket. Make sure they don’t touch each other. Cook for 8-10 minutes. Flip them halfway through. They should be golden brown and crispy when done. While the shrimp cooks, you can make the sweet chili sauce. In a small bowl, mix 1/2 cup of sweet chili sauce with 1 tablespoon of lime juice. If you like heat, add 1 teaspoon of sriracha. Taste the sauce and adjust it to your liking. This sauce is perfect for dipping your crispy shrimp. To get a crispy coconut coating, start with dry shrimp. Pat them with paper towels to remove moisture. Use unsweetened shredded coconut for a pure coconut taste. Mix panko breadcrumbs with the coconut. The panko adds crunch. Press the mixture onto the shrimp to help it stick. Lightly spray the air fryer basket with cooking spray for even crisping. Cooking time can change based on shrimp size. For large shrimp, cook for 8-10 minutes. Smaller shrimp may need less time. Always flip the shrimp halfway through cooking. This helps them cook evenly. If they look golden brown, they are ready. Check to ensure they are fully cooked inside. Serve the shrimp hot for the best taste. Pair them with sweet chili sauce for a fun dip. Add lime wedges for a fresh twist. Fresh cilantro makes a nice garnish. You can also serve them with a side of rice or a salad. Try adding pineapple salsa for extra flavor. This creates a tropical feel that everyone will love! {{image_2}} You can kick up the heat in your coconut shrimp. Just add some sriracha to the coating. Mix one teaspoon of sriracha into the coconut panko mixture. This gives an extra zing with every bite. If you want more spice, increase the amount of sriracha. You can also add a pinch of cayenne pepper to the flour for a spicy twist. While sweet chili sauce is great, you can try other dips too. A tangy mango salsa adds freshness and flavor. You can easily make it by mixing diced mango, onion, and cilantro. Another option is a creamy avocado dip. Mash one ripe avocado and mix it with lime juice and salt. This creamy dip pairs well with the crispy shrimp. If you prefer other proteins, shrimp is not the only option. Chicken tenders work well in this recipe. Just cut the chicken into strips and follow the same steps. You can use firm tofu for a vegetarian option. Press the tofu to remove moisture and slice it into bite-sized pieces. Each protein can bring a new flavor to the dish, so feel free to experiment! You might have some coconut shrimp left after a tasty meal. To store it, let the shrimp cool completely. Place them in an airtight container. They will stay fresh in the fridge for up to two days. Remember, the longer they sit, the less crispy they become. To reheat your coconut shrimp, use your air fryer. Set it to 350°F (175°C). Cook for about 5 minutes. This will help regain some of the crunch. You can also use a regular oven. Preheat it to 350°F (175°C) and bake for about 10 minutes. Avoid using a microwave, as it makes the shrimp soggy. If you want to save some shrimp for later, freezing is a great option. Place the cooled shrimp on a baking sheet in a single layer. Freeze them for about an hour. Once frozen, transfer them to a freezer bag. They can last for up to three months. When ready to eat, just reheat in the air fryer without thawing. Yes, you can use frozen shrimp. Just make sure to thaw them first. Place them in a bowl of cold water for about 15 to 20 minutes. Dry them well with paper towels before breading. This step helps the coating stick better. To make the shrimp gluten-free, swap out the all-purpose flour and panko breadcrumbs. Use a gluten-free flour blend and gluten-free breadcrumbs instead. Check labels to ensure all ingredients are gluten-free. Sweet chili sauce is a classic choice. You can also try honey mustard or a tangy mango salsa. These sauces complement the flavors of the shrimp perfectly. The shrimp should turn pink and opaque when cooked. It usually takes 8 to 10 minutes in the air fryer. Use a food thermometer if you're unsure; the internal temperature should reach 120°F (49°C). Coconut shrimp is a tasty dish made with simple, fresh ingredients. I shared steps to prepare the shrimp, create sweet chili sauce, and tips for a perfect crunch. You learned to customize the recipe with spice or different proteins. Proper storage methods help you enjoy leftovers later. Remember, using frozen shrimp is an easy option, and pairing with the right sauces makes a big difference. Enjoy your cooking adventure and impress your guests with this delightful meal!

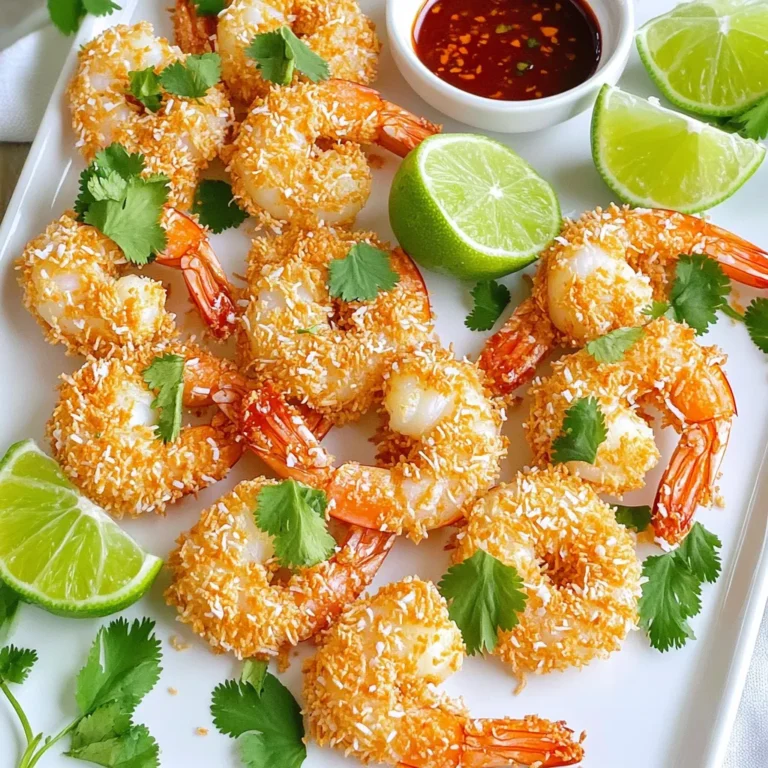
Air Fryer Coconut Shrimp with Sweet Chili Sauce Bliss

- 1 cup rolled oats - 1/2 cup natural peanut butter - 1/4 cup honey or maple syrup - 1/4 cup unsweetened cocoa powder - 1/2 teaspoon vanilla extract - 1/4 teaspoon salt - 1/2 cup chocolate chips These main ingredients make the oat cups rich and tasty. Rolled oats provide great texture and nutrition. Natural peanut butter gives a creamy, nutty flavor. Honey or maple syrup adds sweetness, and cocoa powder brings a chocolatey kick. Vanilla extract and salt enhance all the flavors. Lastly, chocolate chips make it extra special. - Crushed nuts - Shredded coconut - Additional chocolate chips Toppings let you add your personal touch. Crushed nuts add crunch and protein. Shredded coconut gives some tropical flair. More chocolate chips make it sweeter and more decadent. You can mix and match toppings to create your perfect cup. 1. In a medium mixing bowl, add the rolled oats, cocoa powder, and salt. Stir them well until they blend together. 2. In another bowl, mix the peanut butter, honey or maple syrup, and vanilla extract. Keep mixing until the mixture is smooth and creamy. 3. Pour the peanut butter mix into the dry ingredients. Stir until everything combines. The mixture should feel thick and sticky. 1. Line a muffin tin with cupcake liners. Evenly distribute the mixture into each liner. 2. Press down firmly to make a compact base. This helps the cups hold their shape. 3. Top each cup with your choice of toppings. Use crushed nuts, shredded coconut, or more chocolate chips for that extra crunch. 1. Place the muffin tin in the refrigerator for at least 30 minutes. This helps the cups set properly. 2. Once they feel solid, carefully peel away the liners. Enjoy your no-bake oat cups! To make these no-bake chocolate peanut butter oat cups just right, focus on consistency. The mixture should be thick and slightly sticky. If it's too dry, add a splash of water or more peanut butter. If it's too wet, add more oats or cocoa powder. For the best flavor, I recommend using natural peanut butter. Brands like Smucker’s and Justin’s offer great taste without extra oils or sugars. For chocolate chips, enjoy semi-sweet or dark options. Enjoy Life makes a nice dairy-free choice for those who need it. When it's time to serve, presentation matters. Arrange the oat cups on a nice plate. Drizzle with extra peanut butter or melted chocolate for flair. This makes them look even more tempting. Pair these cups with a cold glass of almond milk or a hot cup of coffee. You can also serve them with fresh fruit like strawberries or bananas. These pairings add a nice balance of flavors and nutrients. {{image_2}} You can easily swap out some ingredients in this recipe. For example, if you want a nut-free option, try using almond butter or sunflower seed butter instead of peanut butter. Both options bring a creamy texture and rich taste to the cups. You can also change the sweeteners. Instead of honey or maple syrup, you can use agave or date syrup. These alternatives work well and add a unique flavor. They keep the cups sweet without overpowering the chocolate. To make your oat cups more exciting, you can add different flavors. Try mixing in spices like cinnamon or a bit of espresso powder. Cinnamon adds warmth, while espresso powder gives a nice coffee kick. You can also incorporate dried fruits or seeds. Adding raisins, cranberries, or pumpkin seeds can give your cups a chewy texture and extra nutrition. These small changes let you create a new treat each time! To keep your no-bake chocolate peanut butter oat cups fresh, store them in the fridge. Use an airtight container to prevent them from drying out. You can also place parchment paper between layers to avoid sticking. If you want to freeze them, wrap each cup in plastic wrap or foil. Place the wrapped cups in a freezer bag. They will stay fresh for up to three months in the freezer. Just remember to label your bags with the date! These oat cups stay fresh for about one week in the fridge. Look for signs of spoilage to know when to toss them. If they smell off or look discolored, it's time to say goodbye. You should also check for any mold or unusual texture. Freshness is key for the best taste! Can I make these oat cups vegan? Yes, you can easily make these oat cups vegan. Use maple syrup instead of honey. Also, select dairy-free chocolate chips. These swaps keep the tasty treat plant-based. What can I use instead of oats? If you need a substitute for oats, try using quick oats or puffed rice. Both options provide a similar texture. Just remember, different grains may change the taste a bit. Are there nut-free alternatives? You can swap peanut butter for sunbutter or soy nut butter. These nut-free options keep the flavor rich without nuts. Check for allergies to ensure safety. What to do if the mixture is too dry? If the mixture feels too dry, add a touch of water or extra honey. Mix well until the texture is thick but moist. You want it to stick together well. Fixing overly sticky oat cups For sticky oat cups, you can chill the mixture longer. If they are still sticky after cooling, sprinkle a bit of cocoa powder on your hands before handling them. This helps with stickiness. Caloric content and nutritional benefits Each oat cup contains about 150 calories. They provide healthy fats from peanut butter and fiber from oats. This makes them a balanced snack choice. Health considerations (gluten-free, dairy-free options) These oat cups can be gluten-free if you use certified gluten-free oats. They are also dairy-free when you choose dairy-free chocolate chips. This makes them friendly for many diets. This blog post shared a simple recipe for tasty oat cups. We explored key ingredients, like oats, peanut butter, and cocoa powder. The step-by-step guide helped you learn how to mix, mold, and chill the cups. You also found tips for perfecting the recipe and ideas for variations. Plus, we covered storage info to keep them fresh. In closing, these oat cups are fun to make and enjoy. You can adapt them to fit your tastes and dietary needs. Happy cooking!

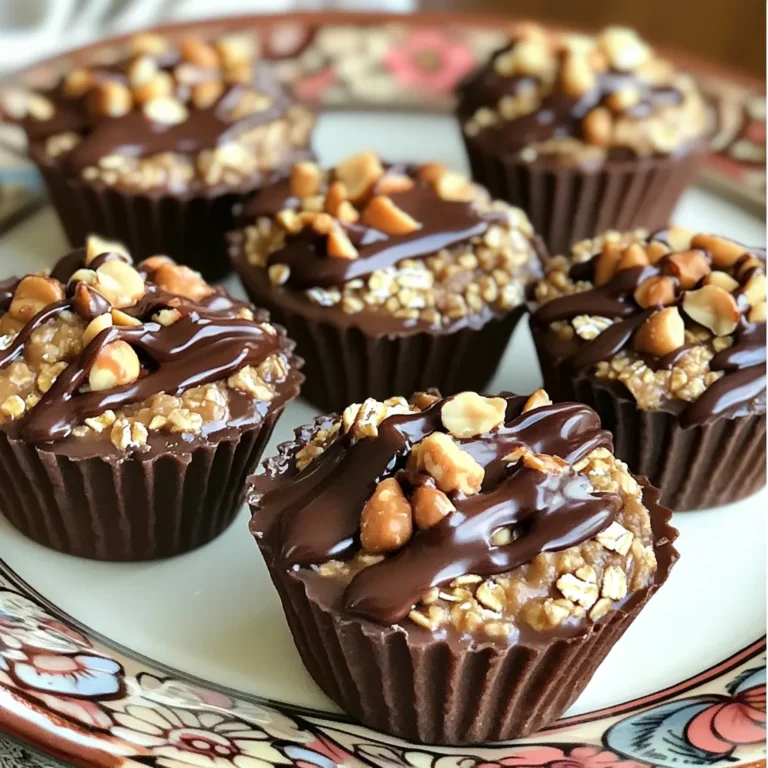
No-Bake Chocolate Peanut Butter Oat Cups Delight

- 200g ramen noodles - 2 cups vegetable broth - 1 tablespoon sesame oil - 2 cloves garlic, minced - 1-inch piece of ginger, grated - 200g shiitake mushrooms, sliced - 3 tablespoons soy sauce (or tamari) - 1 tablespoon rice vinegar - 1 tablespoon chili paste - 2 green onions, chopped - 1 cup baby spinach - 1 tablespoon sesame seeds - Optional: Soft-boiled eggs for garnish - Salt and pepper to taste To make your Sesame Soy Mushroom Ramen, start with fresh ingredients. The ramen noodles are the base. Choose good quality noodles for the best texture. Next, the vegetable broth adds rich flavor. I prefer homemade, but store-bought works too. The sesame oil gives a nutty taste. Garlic and ginger add warmth and spice. Shiitake mushrooms bring an umami kick. You can swap them for other mushrooms if you like. Soy sauce adds saltiness, while rice vinegar balances the flavors. Chili paste adds heat, but you can adjust it to your taste. Green onions and baby spinach add color and nutrients. Don’t skip the sesame seeds; they add crunch! Lastly, if you like, top with soft-boiled eggs. They make the dish even richer. Always taste and adjust with salt and pepper before serving. Enjoy your cooking! {{ingredient_image_1}} - Cook 200g of ramen noodles according to the package. Drain and set aside. - Mince 2 cloves of garlic and grate a 1-inch piece of ginger. - Slice 200g of shiitake mushrooms and chop 2 green onions. - In a large pot, heat 1 tablespoon of sesame oil over medium heat. - Add the minced garlic and grated ginger. Sauté for about 1 minute until you smell a lovely aroma. - Next, add the sliced shiitake mushrooms. Cook them for 5 to 7 minutes until they soften and release their juices. - Pour in 2 cups of vegetable broth, 3 tablespoons of soy sauce, 1 tablespoon of rice vinegar, and 1 tablespoon of chili paste. Bring this to a gentle boil. - Reduce the heat and let it simmer for about 5 minutes. - Stir in 1 cup of baby spinach and the chopped green onions. Let the spinach wilt for 2 to 3 minutes. - Season the broth with salt and pepper to your taste. - Divide the cooked ramen noodles into bowls. Ladle the hot mushroom broth over each bowl. - If you like, top with a soft-boiled egg and sprinkle 1 tablespoon of sesame seeds on top for a nice crunch. To get the right noodle texture, cook your ramen noodles just until they are al dente. This means they should be firm but not hard. Rinse them under cold water after cooking. This stops the cooking process and keeps them from getting mushy. To perfect the broth flavor, start with high-quality vegetable broth. Use fresh garlic and ginger to bring out rich flavors. Sauté them in sesame oil to enhance the aroma. Add shiitake mushrooms for a deep umami taste. The soy sauce and rice vinegar balance the flavors perfectly. Ramen pairs well with many dishes. Try serving it with a side of crispy tempura vegetables. A light salad with sesame dressing also complements the meal. For toppings, think beyond soft-boiled eggs. Add toasted sesame seeds for crunch. You can also include sliced radishes or pickled ginger for a zesty kick. Fresh herbs like cilantro or basil can elevate your ramen too. One mistake is overcooking the noodles. This can make them mushy and unappealing. Always check the package for the right cooking time. Another common issue is misbalancing flavors in the broth. Taste your broth before serving. Adjust with more soy sauce or a splash of vinegar if needed. Remember, a well-balanced broth is key to great ramen. Pro Tips Use Fresh Ingredients: Fresh mushrooms and greens enhance the flavors and texture of your ramen, making it more vibrant and delicious. Customize the Broth: Feel free to add other vegetables like bok choy or carrots for extra nutrients and flavor depth. Perfect Soft-Boiled Eggs: For the best soft-boiled eggs, cook them for exactly 6-7 minutes in boiling water, then plunge into ice water to stop the cooking. Adjust Heat Level: Modify the amount of chili paste based on your preference for spice; you can also add sliced fresh chili for an extra kick. {{image_2}} You can switch up the mushrooms in this recipe. If you don’t have shiitake, try button or portobello mushrooms. Both give a nice taste. You can even use tofu for a different texture. For those on a gluten-free diet, feel free to use tamari instead of soy sauce. It tastes great and keeps the dish flavorful. You can also find gluten-free ramen noodles in stores. To change the heat, adjust the chili paste. If you like it mild, use less. If you want it spicier, add more. You can also try adding crushed red pepper or a dash of hot sauce for extra kick. For more flavor, you can mix in spices like garlic powder or onion powder. These add depth without changing the dish too much. You can easily make this recipe vegan. Simply skip the soft-boiled eggs. The dish is still rich and tasty without them. If you're on a keto diet, choose konjac noodles instead of traditional ramen. They are low in carbs and still give you that noodle feel. You can also cut down on the broth by adding fewer veggies. To keep leftover ramen fresh, store the broth and noodles separately. Place the ramen noodles in an airtight container. This keeps them from getting soggy. For the broth, let it cool to room temperature before transferring it to another container. Seal tightly. It’s best to eat the leftovers within three days. When you want to reheat, warm the broth in a pot. Do this over low heat. You can also reheat the noodles in hot water for a minute. This helps them regain their texture. Combine both when ready to eat. Yes, you can freeze ramen! Just follow these steps. First, cool the broth completely. Pour it into a freezer-safe container. Don’t forget to leave some space at the top for expansion. For noodles, you can freeze them too. Place them in a separate bag or container. To thaw, put the broth in the fridge overnight. For noodles, you can run them under hot water. This way, they’ll be ready to eat. Avoid refreezing once thawed. Leftover ramen can last up to three days in the fridge. If you freeze it, the broth can last for up to three months. The noodles are best used within one month for the best taste. Always check for any signs of spoilage before eating. For ramen, shiitake mushrooms are my top choice. They add a rich flavor. Other great options include cremini and oyster mushrooms. These mushrooms also work well in ramen dishes. They offer a nice texture and taste. You can mix different types too for more depth. Yes, you can use store-bought broth. It saves time and works well in a pinch. However, homemade broth often tastes fresher and more flavorful. Store-bought may have added salt or preservatives. If you choose store-bought, look for low-sodium options. This helps control the saltiness in your dish. You can enhance your ramen with various proteins and veggies. Try adding tofu for a vegetarian option. Grilled chicken or pork belly also work great. For veggies, consider bok choy, carrots, or snap peas. They add color and crunch. Don't forget to top with soft-boiled eggs for richness! If your broth is too salty, add more water or broth. You can also include more veggies. This dilutes the saltiness without losing flavor. Another tip is to add a dash of sugar. It helps balance the salty taste. Taste as you go to find the right mix! This article covered everything you need to make delicious ramen. We discussed key ingredients, step-by-step cooking methods, and tips to avoid common mistakes. I also shared variations, storage tips, and answered frequently asked questions. Ramen can be your canvas for creativity. Experiment with flavors, styles, and ingredients. Embrace this tasty dish, and make it your own! Enjoy your ramen adventure.

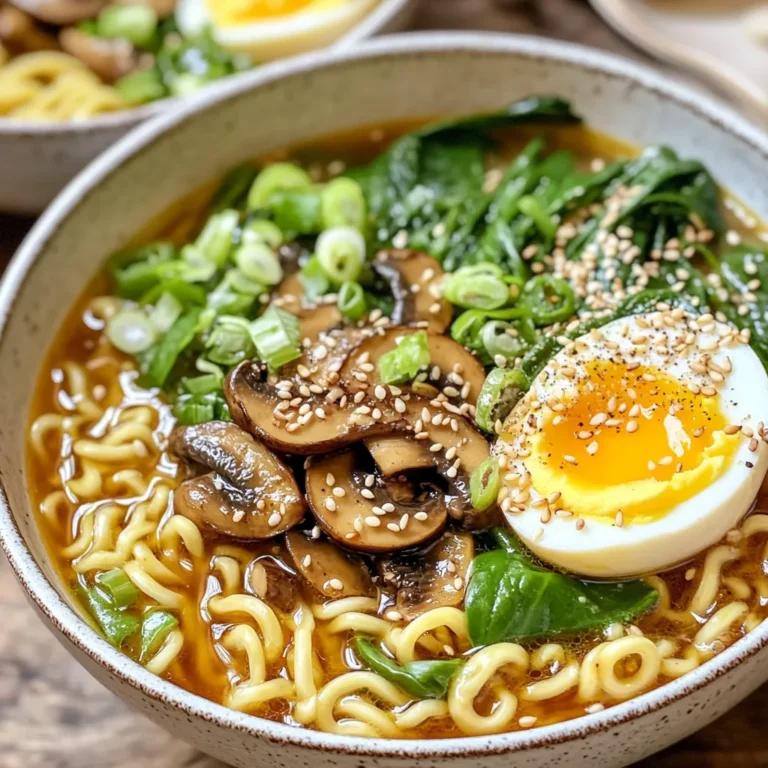
Savory Sesame Soy Mushroom Ramen Quick and Tasty Meal

- 1 cup pumpkin puree - 1/2 cup cream cheese, softened - 1/4 cup granulated sugar - 1/2 cup brown sugar - 1/4 cup vegetable oil - 2 large eggs - 2 cups all-purpose flour - 1 tsp baking powder - 1/2 tsp baking soda - 2 tsp pumpkin pie spice - 1/2 tsp vanilla extract - Pinch of salt - 1/2 cup powdered sugar (for dusting) The key to making delicious pumpkin cream cheese donut holes is using fresh, quality ingredients. Pumpkin puree brings the fall flavor that we all love. Cream cheese adds a rich and creamy texture. Granulated and brown sugars provide sweetness and moisture. Vegetable oil keeps the donut holes soft. Two large eggs help bind everything together. All-purpose flour gives structure to the donuts. Baking powder and baking soda help them rise. Pumpkin pie spice adds warmth and depth. A pinch of salt balances the sweetness. Lastly, powdered sugar gives a sweet finish when dusted on top. Gather all these ingredients before you start. This will make the process smooth and easy. Enjoy the comforting aroma of fall as you create this tasty treat! - Preheat the oven to 350°F (175°C). - Grease the mini muffin or donut hole pan with a little oil or cooking spray. - In a large bowl, combine pumpkin puree, cream cheese, granulated sugar, brown sugar, and vegetable oil. - Mix these ingredients until you have a smooth and creamy texture. - Add the eggs one at a time, mixing well after each addition. - Stir in the vanilla extract to give your batter a lovely flavor. - In another bowl, whisk together the flour, baking powder, baking soda, pumpkin pie spice, and salt. - Make sure there are no lumps in the flour mixture. - Gradually mix the dry ingredients into the wet mixture. - Be careful not to overmix; just stir until everything is combined. - Using a spoon or cookie scoop, fill each cavity of the donut hole pan about two-thirds full with batter. - Bake for 10-12 minutes. Check if they are done by inserting a toothpick. It should come out clean. - Let the donut holes cool in the pan for about five minutes. - After cooling, dust them with powdered sugar for a sweet finish. To make great donut holes, avoid overmixing the batter. When you combine wet and dry ingredients, mix until just combined. Lumps are okay! Overmixing can create tough donut holes. Let your donut holes cool before dusting them with powdered sugar. If they are warm, the sugar will melt. This makes them sticky instead of sweet and fluffy. These donut holes pair well with coffee or tea. The flavors of pumpkin and cream cheese blend perfectly with your favorite warm drink. You can serve them at gatherings or on a cozy morning at home. For a fun presentation, arrange them on a decorative plate. Add a sprinkle of cinnamon or extra powdered sugar for flair. You can even use festive cupcake liners for a seasonal touch. Watch the baking time closely. Donut holes can go from perfect to overcooked quickly. Check for doneness at around 10 minutes. Use a toothpick to see if they are done. Be careful with ingredient substitutions. If you swap flour for a gluten-free option, the texture may change. Stick to the recipe for the best results. {{image_2}} You can add fun flavors to your donut holes. Try mixing in chocolate chips for a sweet twist. Just fold in about 1/2 cup of chocolate chips into your batter. This adds a rich taste and makes each bite extra special. You can also add nuts like walnuts or pecans. About 1/2 cup chopped nuts will give a nice crunch. Spices can change the flavor, too. Besides pumpkin pie spice, you can add cinnamon or nutmeg. A pinch of cardamom gives a warm, cozy taste. Experimenting with these flavors can make your donut holes unique. If you need gluten-free options, swap all-purpose flour for gluten-free flour. Brands like almond or oat flour work great, too. Just ensure you have a blend that rises well. This allows everyone to enjoy these treats. For vegan adaptations, replace the eggs with flax eggs. Mix 1 tablespoon of ground flaxseed with 2.5 tablespoons of water. Let it sit for 5 minutes until it thickens. Use almond milk or coconut cream instead of cream cheese for a dairy-free option. These swaps keep the flavor while meeting dietary needs. You can give these donut holes a holiday flair. For Halloween, add orange and black sprinkles on top. This fun touch makes them festive and kid-friendly. During Thanksgiving, try adding a bit of nutmeg or even a caramel drizzle on top. This makes them perfect for the holiday table. These seasonal twists keep your recipe fresh and exciting throughout the year. To keep your pumpkin cream cheese donut holes fresh, store them in an airtight container. This helps to lock in moisture and flavor. If you have leftovers, place a layer of parchment paper between layers to avoid sticking. For best results, refrigerate them. This keeps them cool and prevents spoilage. Use them within a week for the best taste. If you want to enjoy these treats later, freezing is a great option. Place the cooled donut holes in a single layer on a baking sheet. Freeze until solid, then transfer them to a freezer bag. Be sure to remove excess air to prevent freezer burn. When you’re ready to enjoy, thaw them in the fridge overnight. For a warm treat, microwave them for a few seconds. At room temperature, these donut holes stay fresh for about two days. In the fridge, they last up to a week. If frozen, they can maintain quality for up to three months. Always check for any off smells or changes in texture before eating. Enjoy your delicious pumpkin cream cheese donut holes anytime you crave a sweet fall treat! To make fluffy donut holes, use fresh ingredients. Make sure your baking powder and baking soda are not expired. Mix the wet and dry ingredients separately. Combine them gently to avoid overmixing. Overmixing makes the donut holes dense. Also, fill each cavity 2/3 full to give them room to rise. Yes, you can use butternut squash puree or sweet potato puree. Each option gives a different flavor. The texture may change a bit, but they will still be tasty. If you want a lighter donut hole, use applesauce. It adds moisture but less pumpkin flavor. If you lack a mini muffin pan, use a regular muffin pan. Just keep an eye on the baking time. You can also make donut holes in a cake pan, then cut them into squares. Another option is to use a cookie sheet and shape the batter into small balls. Yes, you can make these donut holes ahead. Bake them, then let them cool completely. Store them in an airtight container. They will stay fresh for about 3 days at room temperature. If you want to keep them longer, freeze them. Just thaw and dust with powdered sugar before serving. In summary, this guide gave you everything you need to make delicious pumpkin donut holes. From gathering the key ingredients to mastering the baking process, you now have the steps to succeed. Remember, cooling before dusting keeps them light and fluffy. Don't hesitate to try fun variations or impress friends with your tasty treats. Enjoy your baking, and share these delightful donut holes with those around you!

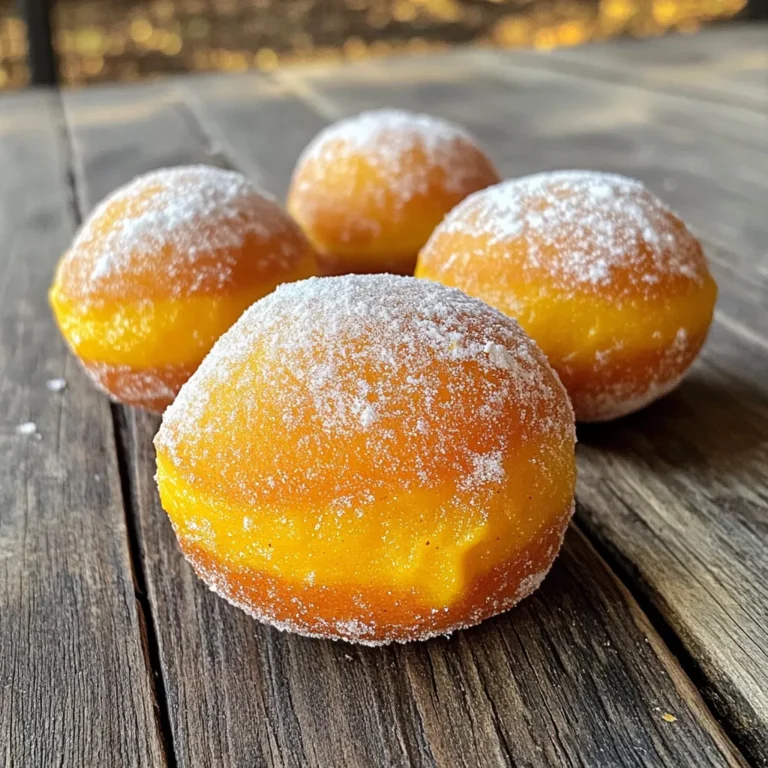
Pumpkin Cream Cheese Donut Holes Tasty Fall Treat

- 4 boneless, skinless chicken breasts - 1 cup chicken broth - 1 cup heavy cream - 8 ounces penne pasta - 1 tablespoon garlic powder - 1 teaspoon Italian seasoning - 1 teaspoon salt - 1/2 teaspoon black pepper - 1 cup grated Parmesan cheese - 1 cup frozen peas - Fresh parsley for garnish In this creamy pasta dish, the chicken and broth create a rich base. The chicken breasts stay tender as they cook. The heavy cream adds a smooth texture, while the Parmesan cheese gives a savory flavor. You can use any brand of chicken broth. Just make sure it is low sodium to control the salt level. Garlic powder gives a nice kick to the dish. Italian seasoning adds warmth and depth. The salt and pepper help balance all the flavors. Feel free to adjust these seasonings to your taste. The penne pasta is perfect for this recipe. It holds onto the creamy sauce well. You can choose any pasta shape you like, but penne works best. The frozen peas add a pop of color and sweetness. Don’t forget to garnish with fresh parsley! It adds brightness to the dish and makes it look beautiful. Enjoy this comforting meal with family or friends. First, layer the chicken in the bottom of your slow cooker. Place the four boneless, skinless chicken breasts side by side. Next, mix the seasoning blend. In a small bowl, combine one cup of chicken broth, one tablespoon of garlic powder, one teaspoon of Italian seasoning, one teaspoon of salt, and half a teaspoon of black pepper. This mixture adds great flavor to the chicken. Now, pour the broth mixture over the chicken. Make sure each piece is well coated. Set your slow cooker to low and cook for 5 to 6 hours. The chicken should be tender and fully cooked when you check it. After cooking, shred the chicken using two forks. It should pull apart easily. Return the shredded chicken to the slow cooker. Then, stir in one cup of heavy cream and one cup of grated Parmesan cheese. Mix until everything is fully combined. Cook on low for another 30 minutes to let the sauce thicken. While the sauce thickens, cook eight ounces of penne pasta according to the package instructions. After draining the pasta, set it aside. In the last ten minutes of cooking, add the cooked pasta and one cup of frozen peas to the slow cooker. Stir gently to combine everything. When ready, serve hot and garnish with fresh parsley for a pop of color. Enjoy your creamy pasta delight! To avoid curdling the cream, always add it at the end. Cook your chicken fully first. When you add cream, keep the heat low. Stir gently to mix. This helps the cream stay smooth. For cheese consistency, use fresh grated Parmesan. Pre-grated cheese often has additives that can change the sauce. When you add cheese, stir until it melts completely. This gives you a rich, creamy texture. I recommend cooking on low for the best results. This setting keeps the chicken tender and juicy. If you are short on time, you can use high for about 3-4 hours. Always check that the chicken reaches 165°F for safety. It should shred easily with a fork. For side dishes, garlic bread pairs well with this pasta. A simple green salad adds freshness. You can also serve it with steamed veggies for a healthy twist. For garnishing, sprinkle fresh parsley on top. This adds color and a fresh flavor. You can also add a bit of extra cheese if you like! {{image_2}} If you want a lighter dish, swap heavy cream for Greek yogurt or coconut milk. Both options add creaminess without extra fat. You can also use whole grain pasta instead of regular penne. Whole grain pasta gives more fiber and nutrients. Using fresh herbs makes a big difference in taste. Fresh parsley or basil adds brightness. Dried herbs work too, but fresh is best. You can also add veggies like spinach or bell peppers. These not only boost nutrition but also add color to your dish. For a vegan version, use plant-based cream and cheese. Cashew cream is a great choice for creaminess. Nutritional yeast can replace Parmesan cheese for that cheesy flavor. These swaps keep your dish creamy while making it plant-based. To store leftovers, let the dish cool down first. Then, scoop the creamy chicken pasta into an airtight container. This keeps the flavors fresh and prevents spills. Store it in the fridge for up to four days. Make sure to label it with the date. This way, you know when to eat it. You can freeze this dish for later use. First, let it cool completely. Transfer the pasta to a freezer-safe container. Leave some space at the top, as the sauce may expand when frozen. Seal the container tightly and label it. Frozen creamy Parmesan chicken pasta lasts up to three months. When you’re ready to eat, thaw it in the fridge overnight before reheating. To reheat, use the stove for the best texture. Place the pasta in a saucepan over low heat. Add a splash of chicken broth or cream to keep it creamy. Stir gently until heated through. You can also use the microwave. Heat it in short bursts, stirring in between. This prevents hot spots and keeps the dish tasty. Yes, you can use frozen chicken in this recipe. This method is simple and easy. Just place the frozen chicken breasts in the slow cooker. Cook on low for 7-8 hours instead of 5-6 hours. Make sure the chicken reaches an internal temperature of 165°F. This way, you get tender chicken without any fuss. I often use frozen chicken when I forget to thaw it. It saves time and keeps the meal easy. You can easily make this dish gluten-free. Just swap regular penne pasta for gluten-free penne. Many brands offer great gluten-free pasta that cooks well. Check the package for cooking times, as they can differ from regular pasta. You can also use spiralized veggies like zucchini for a lighter option. This keeps the dish fresh and tasty while meeting your needs. Absolutely! You can prep this meal ahead of time. You can season and layer the chicken in the slow cooker the night before. Cover it and store it in the fridge. In the morning, just plug in the slow cooker and go about your day. This dish stores well too. You can keep leftovers in the fridge for up to three days. Just reheat gently before serving to enjoy the rich flavors again. This recipe uses simple chicken, pasta, and cream for a tasty dish. I shared tips on cooking, seasoning, and storage. You learned to make it creamy without curdling. Variations offer healthy swaps and side ideas. With these steps, you can create a meal that's sure to impress. Enjoy your cooking adventure!

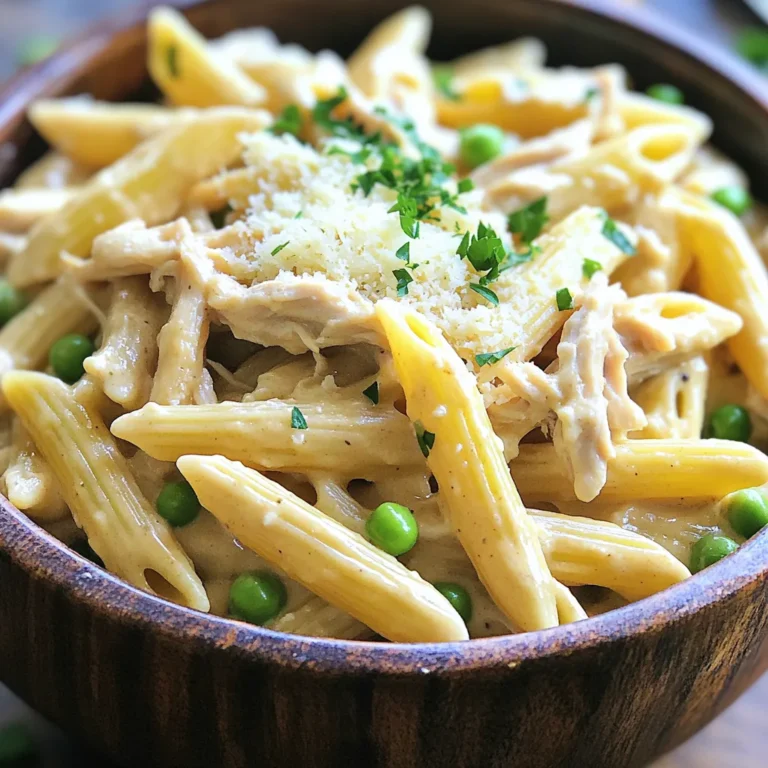
Slow Cooker Creamy Parmesan Chicken Pasta Delight

To make One-Pot Creamy Cajun Shrimp and Rice, you need a few key ingredients. Here’s the detailed list: - 1 lb (450g) shrimp, peeled and deveined - 1 cup long-grain rice - 1 medium onion, diced - 3 cloves garlic, minced - 1 bell pepper (red or green), chopped - 1 can (14 oz) diced tomatoes, drained - 2 cups chicken broth - 1 cup heavy cream - 2 tablespoons Cajun seasoning (add more for extra spice) - 1 tablespoon olive oil - Salt and pepper to taste - 1/4 cup fresh parsley, chopped (for garnish) For customization, you can add optional ingredients such as: - 1/2 cup frozen peas or corn for sweetness and color These ingredients bring warmth and flavor to your dish. Each plays a role in making your meal rich and satisfying. 1. Initial vegetable sautéing: Start by heating olive oil in a large pot over medium heat. Add diced onion and chopped bell pepper. Sauté them for about 5 minutes until they soften. This step builds a great flavor base. 2. Cooking shrimp and combining flavors: Next, stir in minced garlic and let it cook for one minute. Then, add the shrimp to the pot. Season them with Cajun seasoning, salt, and pepper. Cook the shrimp for about 3-4 minutes until they turn pink. Once done, remove the shrimp and set them aside. 1. Steps to simmer and incorporate all ingredients: In the same pot, add the long-grain rice. Mix it with the sautéed veggies for about 2 minutes. This helps to lightly toast the rice. Then, pour in the chicken broth and drained diced tomatoes. Stir well and bring this mixture to a simmer. 2. Timing for perfect rice texture: Once it simmers, cover the pot. Reduce the heat to low and cook for about 15-18 minutes. The rice should become tender and absorb most of the liquid by the end. 1. Adding shrimp back to the dish: After the rice is cooked, add the heavy cream. Mix it in well. If you’re using frozen peas or corn, toss them in now. Heat everything for about 2-3 minutes until warmed through. 2. Presentation and serving suggestions: Finally, return the cooked shrimp to the pot. Fold them gently into the rice mixture. Allow the dish to heat for an additional 2 minutes. Taste and adjust seasoning if needed. Serve hot, garnished with fresh parsley on top for a pop of color! To get the best Cajun flavor, start with your spice levels. If you like heat, add more Cajun seasoning. I recommend using brands like Tony Chachere's or Zatarain's. They bring a great kick and depth of flavor to the dish. For a rich and creamy sauce, use heavy cream. Make sure it’s at room temperature for the best results. This helps it blend smoothly into the dish. Avoid adding it too soon; let the rice cook fully first. If you add the cream too early, it may curdle and ruin the texture. One-pot cooking saves time and hassle. To make it even easier, prep your ingredients first. Chop your veggies and measure your spices before you start cooking. This way, you can focus on the cooking process without stopping to gather items. Always stir to prevent sticking, and keep the heat steady. This ensures even cooking and rich flavor in every bite. {{image_2}} You can switch up the shrimp in this dish. Chicken works great too. Just cut it into bite-size pieces and cook it the same way. Smoked sausage adds a nice kick and flavor. If you want a vegetarian option, use plant-based proteins like chickpeas or tofu. They soak up all the tasty flavors. Want to change the taste? Add spices like smoked paprika or cayenne for more heat. Fresh herbs like thyme or cilantro can brighten the dish. For broth, try vegetable broth instead of chicken broth. This adds a different depth of flavor while keeping it light. To complement the creamy Cajun shrimp and rice, serve a simple salad. A side of garlic bread is also a hit. For garnishes, I love fresh parsley or even sliced green onions. They add color and extra flavor to your meal. To store your One-Pot Creamy Cajun Shrimp and Rice, let it cool first. Place it in an airtight container. This keeps the flavors fresh and the dish safe. The meal can stay good in the fridge for about three days. When reheating, I suggest using the stovetop. Add a bit of chicken broth to keep it moist. Heat it on low to avoid drying out the shrimp. Stir gently to keep the shrimp from overcooking. You want them juicy, not rubbery. To freeze this dish, first cool it completely. Then, transfer it to a freezer-safe container. Make sure to leave some space at the top for expansion. This dish can last up to three months in the freezer. When ready to eat, thaw it overnight in the fridge. Reheat on the stovetop or microwave, adding a splash of broth for creaminess. Yes, you can use frozen shrimp. Just thaw them first. Place the shrimp in cold water for about 15-20 minutes. Drain them well before adding to your pot. Frozen shrimp may release more water. This can slightly change the dish's texture. If you use frozen shrimp, adjust the cooking time slightly. If you want to lighten the dish, consider using half-and-half or whole milk. Coconut milk is a tasty dairy-free option. For a healthier choice, use Greek yogurt. Mix it in at the end. This keeps it creamy without heavy cream's richness. This recipe has a good kick from the Cajun seasoning. You can adjust the spice level easily. Use less Cajun seasoning for a milder dish. Add more if you love heat. You can also add fresh chopped jalapeños for extra spice. Remember, you can always add more, but you can’t take it out! Yes, you can prep this dish ahead. Cook the shrimp and rice as instructed. Store them separately in the fridge. Reheat them together before serving. This helps keep the shrimp tender. You can store leftovers for up to three days. This blog post covered a delightful Cajun shrimp and rice dish. We talked about key ingredients, from shrimp to broth. I shared step-by-step cooking tips and how to get that creamy finish. You also learned how to personalize flavors and variations with different proteins. Storing and reheating tips help keep your meal fresh. With these insights, you can create a dish that's both tasty and fun. Enjoy making this recipe your own and impressing friends and family!

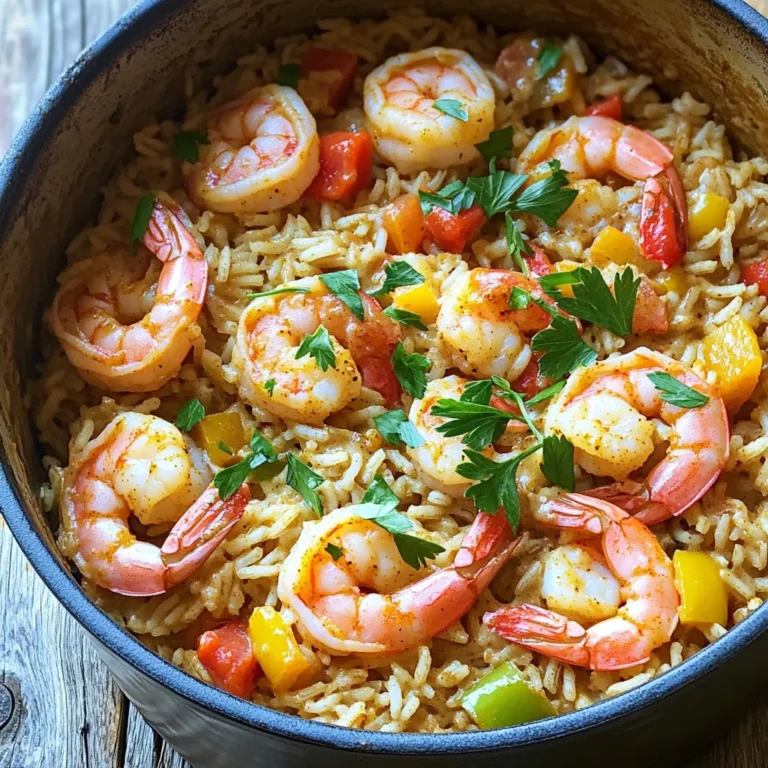
One-Pot Creamy Cajun Shrimp and Rice Delight

- 4 salmon fillets (about 6 oz each) - 1/4 cup honey - 2 tablespoons Dijon mustard - 1 tablespoon olive oil - 1 tablespoon apple cider vinegar - 2 cloves garlic, minced - 1 teaspoon dried thyme - Salt and pepper to taste - 1 bunch asparagus, trimmed - 1 cup cherry tomatoes, halved - Lemon wedges for serving To make the Sheet-Pan Honey Mustard Salmon Bake, you need fresh salmon fillets. I prefer wild-caught salmon for its taste and health benefits. Honey adds sweetness and a sticky glaze, while Dijon mustard gives a sharp kick. Olive oil helps everything cook evenly. Apple cider vinegar adds brightness to the dish. Don’t forget garlic; it adds great flavor. Dried thyme gives an herby touch. Salt and pepper bring out all the flavors. For veggies, I use asparagus and cherry tomatoes because they roast nicely. They add color and nutrition. Lemon wedges are key for serving. A squeeze of lemon brightens the dish and makes it pop. Together, these ingredients create a delicious meal that is both healthy and pleasing to the eye. 1. Preheating the oven First, set your oven to 400°F (200°C). This step is key for even cooking. 2. Whisking the honey mustard mixture In a small bowl, combine the honey, Dijon mustard, olive oil, apple cider vinegar, garlic, thyme, salt, and pepper. Use a whisk to blend all the ingredients well. This mix will give the salmon a sweet and tangy flavor. 3. Lining the sheet pan Grab a large sheet pan and line it with parchment paper. This makes cleanup a breeze. The paper also helps the food not to stick. 4. Arranging the salmon and vegetables Place the salmon fillets in the center of the lined sheet pan. Make sure to leave space around them. On one side, arrange the trimmed asparagus. On the other, scatter the halved cherry tomatoes. 5. Baking the salmon and vegetables Brush the honey mustard mixture generously over the salmon. Drizzle any leftover mix over the veggies. Sprinkle salt and pepper on the asparagus and tomatoes. Bake everything in the preheated oven for 15-20 minutes. The salmon should flake easily with a fork, and the veggies should be tender. This simple method makes a tasty meal for you and your family. The prep time for this dish is just 10 minutes. You’ll spend this time gathering your ingredients and mixing the honey mustard sauce. The cook time is 15 to 20 minutes. Bake the salmon and veggies at 400°F (200°C) until they are ready to eat. This recipe serves four people. It’s perfect for a family feast or a cozy dinner with friends. Each person will enjoy a salmon fillet, asparagus, and cherry tomatoes, all baked to perfection. {{image_2}} To make the best sheet-pan honey mustard salmon, keep an eye on the time. Salmon cooks quickly at 400°F. Bake it for 15 to 20 minutes. Check if it flakes easily with a fork. If you use thicker fillets, add a few more minutes. This ensures your salmon stays moist and tender. I recommend using fresh or frozen salmon fillets. Look for ones that are bright in color. The skin should be shiny and tight. Wild-caught salmon has a richer flavor. Farmed salmon is also good and often more affordable. Both options work great for this recipe. Want to mix it up? Add different herbs to the honey mustard mix. Fresh dill or parsley can add a nice touch. You can also toss in some lemon zest for extra brightness. If you like heat, try adding a pinch of cayenne pepper. The flavors can be as bold as you like! You can switch up the veggies to match your taste. Broccoli, bell peppers, or green beans work well. For a sweeter touch, try carrots or zucchini. Each choice brings a unique flavor and texture. Just make sure to cut them into similar sizes. This helps all the veggies cook evenly. While honey mustard makes a great base, you can explore other flavors. Try teriyaki sauce for a sweet and savory mix. A lemon-dill blend adds a fresh twist. You can also use a spicy sriracha mix for heat. Each marinade changes the taste of the salmon. This keeps meals exciting and fun. If you have a big family, just double the recipe. Use eight salmon fillets and double the marinade. This way, everyone enjoys a hearty meal. For a smaller group, you can halve the recipe. Just use two salmon fillets and cut the veggies. Adjusting serving sizes is simple and helps reduce waste. Yes, you can use other fish. Try trout or cod. Both have a mild taste and cook well. Adjust the cooking time if you use thicker fish. The flavor of the honey mustard will still shine through. Check the salmon after 15 minutes in the oven. It should flake easily with a fork. The color should change from bright pink to a lighter shade. If you have a meat thermometer, the thickest part should reach 145°F. If you don't have honey mustard, mix equal parts Dijon mustard and honey. You can also try a mix of yellow mustard and maple syrup. Both will give you a sweet and tangy flavor. In this post, we explored how to make a tasty salmon dish using simple ingredients. We covered the steps for prepping and baking your meal, along with tips for perfecting your dish. I shared ideas for variations and answered common questions. Cooking can be fun and easy with this recipe. Enjoy your delicious salmon with fresh veggies. You can impress anyone with this quick meal. Remember to add your favorite twists to make it your own. Happy cooking!

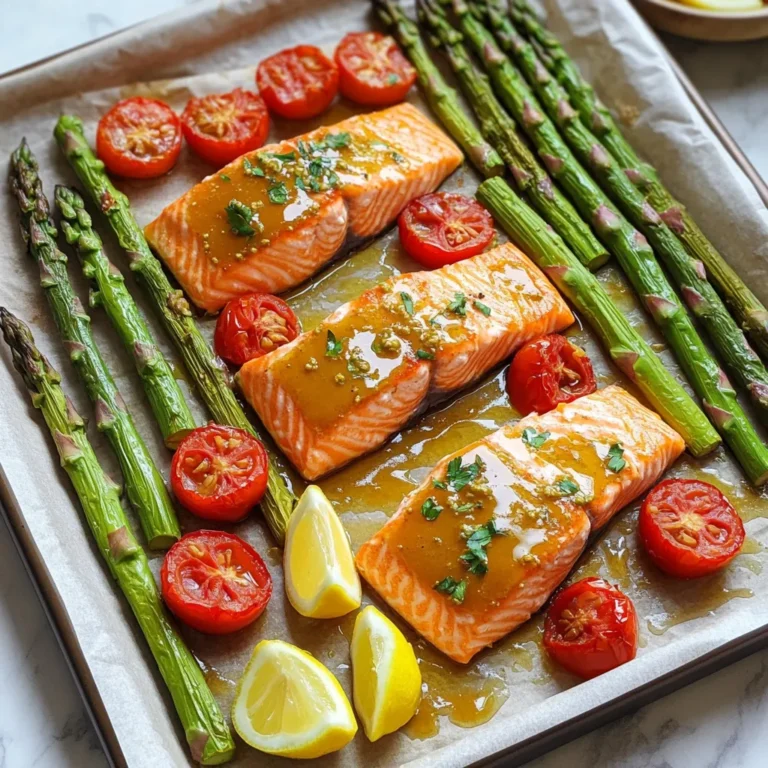
Sheet-Pan Honey Mustard Salmon Bake for Family Feast

PREV 1 … 15 16 17 … 57 NEXT
flavor nest kitchen

explore

DessertsDinnerAppetizersDrinks

Our Policies

  • Cookie Policy
  • Copyright Policy
  • Disclaimer
  • GDPR Policy
  • Terms Of Use
Back to Top
  • About
  • Contact Us
  • Privacy Policy
© 2025 flavor nest kitchen