FREE DINNER EBOOK! Get your copy!
  • Cookie Policy
  • GDPR Policy
  • Disclaimer
  • Terms Of Use
  • Visit my other site: Fun Cookie Recipes
flavor nest kitchen
  • Home
  • Dinner
  • Desserts
  • Drinks
  • Appetizers
  • Contact
  • About
  • Privacy Policy
  • Home
  • Dinner
  • Desserts
  • Drinks
  • Appetizers
  • Contact
  • About
  • Privacy Policy
  • Cookie Policy
  • GDPR Policy
  • Disclaimer
  • Terms Of Use
Visit my other site: Fun Cookie Recipes

HOME / CATEGORIES /

Latest

To make One Pot Creamy Tomato Basil Penne, you will need: - 12 oz penne pasta - 2 tablespoons olive oil - 1 medium onion, diced - 3 garlic cloves, minced - 1 can (14 oz) crushed tomatoes - 3 cups vegetable broth - 1 cup heavy cream or coconut cream - 1 teaspoon dried basil - 1 teaspoon dried oregano - Salt and pepper to taste - 1 cup fresh basil leaves, chopped - 1 cup grated Parmesan cheese or nutritional yeast - Red pepper flakes (optional) You can make this dish your own by adding: - Cooked chicken or shrimp for protein - Spinach or kale for added greens - A splash of white wine for extra flavor - Sun-dried tomatoes for a tangy twist If you need to make changes, consider these: - Use whole wheat penne for a healthier option. - Swap heavy cream for Greek yogurt for a lighter sauce. - Nutritional yeast can replace Parmesan for a vegan dish. - Any broth can work, like chicken or beef, if not vegan. Start by gathering all your ingredients. You need: - 12 oz penne pasta - 2 tablespoons olive oil - 1 medium onion, diced - 3 garlic cloves, minced - 1 can (14 oz) crushed tomatoes - 3 cups vegetable broth - 1 cup heavy cream or coconut cream - 1 teaspoon dried basil - 1 teaspoon dried oregano - Salt and pepper to taste - 1 cup fresh basil leaves, chopped - 1 cup grated Parmesan cheese - Red pepper flakes (optional) Chop the onion and mince the garlic. This helps the flavors blend well. In a large pot, heat the olive oil over medium heat. Add the diced onion and cook for about 5 minutes. You want it soft and see-through. Then, add the minced garlic for one more minute. Stir it gently so it does not brown. Next, add the crushed tomatoes and vegetable broth. Pour in the heavy cream and add the dried basil, oregano, salt, and pepper. Mix everything well. Bring this mixture to a boil. Once boiling, add the penne pasta. Stir it to make sure the pasta is under the liquid. Reduce the heat to a simmer and cover the pot. Cook for 12-15 minutes, stirring now and then. You want the pasta to be al dente and the sauce thick. When the pasta is ready, take the pot off the heat. Stir in the chopped fresh basil and grated Parmesan cheese. This will make it creamy and delicious. Taste it and adjust with salt, pepper, or red pepper flakes if you like some heat. Serve it hot. You can add extra basil and Parmesan on top for a nice touch. Enjoy your meal! To get the best flavor, use fresh ingredients. Fresh basil brings a bright taste. Always sauté the onion until soft. This step builds a flavorful base. When adding garlic, watch it closely. Garlic burns quickly and can taste bitter. For a creamier sauce, add the heavy cream slowly. Stir it in well to blend. Lastly, taste as you go. Adjust salt and pepper to your liking. You can easily make this dish vegan. Swap the heavy cream for coconut cream. It gives a nice richness without dairy. Use nutritional yeast instead of Parmesan cheese. It adds a cheesy flavor without animal products. Double-check your vegetable broth for any hidden animal ingredients. With these swaps, you can enjoy this creamy dish without worry. To achieve that perfect creamy texture, keep a few tips in mind. Cook the pasta just until al dente. Overcooking can make it mushy. Stir often during cooking to prevent sticking. If the sauce seems too thick, add a splash of broth. This helps keep it smooth. When you add the basil and cheese, stir gently. This maintains the creamy consistency you want. {{image_2}} You can easily add protein to this dish. Chicken, shrimp, or sausage work well. For chicken, cook it in the pot before adding onions. Shrimp cooks fast, so add it just before the pasta. If you like sausage, slice it and brown it first. These options make the dish heartier and more filling. Adding veggies boosts flavor and nutrition. Spinach, bell peppers, or mushrooms are great choices. Add spinach at the end, just before serving. For bell peppers or mushrooms, cook them with the onions to soften them. You can also throw in zucchini or carrots for a pop of color and taste. If you like heat, red pepper flakes are perfect. Add them to the onions while they cook. Start with a pinch, then adjust to your taste. This small change gives the dish an exciting kick. It’s a simple way to make this creamy pasta more lively. After you enjoy your One Pot Creamy Tomato Basil Penne, store any leftovers in an airtight container. Make sure to let it cool down to room temperature first. This way, it will stay fresh for up to three days in the fridge. Label the container with the date to keep track of how long it has been stored. You can freeze the pasta for longer storage. First, let it cool completely. Then, place it in a freezer-safe container or bag. Make sure to remove as much air as possible. You can freeze it for up to three months. Remember to write the date on the bag or container. When you're ready to eat your leftover pasta, here’s how to reheat it. You can use the microwave or a stovetop. If using the microwave, place a portion in a bowl, cover it, and heat for two to three minutes. Stir halfway through to ensure even heating. If using the stovetop, add a splash of vegetable broth to a pan, then heat over medium until warmed through. This will help keep it creamy and delicious! Yes, you can use whole wheat pasta. It adds more fiber and nutrients. The cooking time may change slightly. Whole wheat pasta can take a bit longer to cook, so check it often. To thicken the sauce, you can cook it a bit longer. This helps the liquid reduce. Another way is to add a bit more cheese. Parmesan melts nicely and thickens the sauce. To make it gluten-free, use gluten-free penne. You can find it in most stores. Ensure your broth and other ingredients are also gluten-free. This way, everyone can enjoy the meal. Yes, you can use canned tomatoes. Just chop them up a bit before adding. If they have juice, include it for extra flavor. This can give your dish a chunkier texture. To prepare ahead, cook the dish without the cream. Let it cool, then store it in the fridge. When ready to eat, reheat it and stir in the cream. This helps keep it creamy and fresh. This post covers every step to make a great dish. I shared all the key ingredients, from the basics to optional add-ins. You learned how to prepare, cook, and serve it perfectly. I provided tips for a creamy texture and vegan swaps. You can also explore tasty variations and smart storage tips. Remember, this dish is easy to customize based on your needs. Experimenting will make it even better!

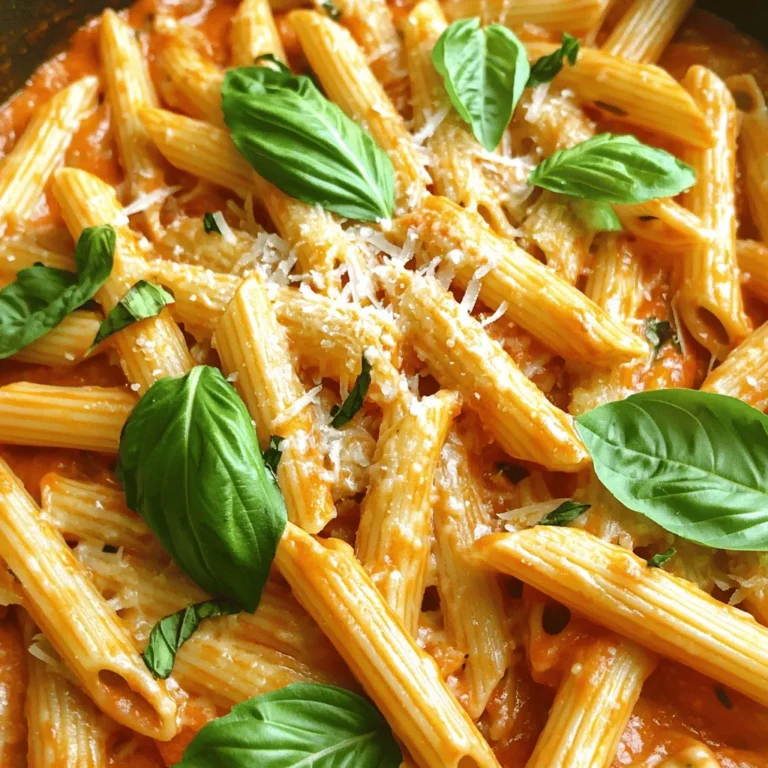
One Pot Creamy Tomato Basil Penne Simple and Tasty

To make Chicken Chow Mein, you need these key items: - 2 cups chow mein noodles - 1 lb boneless, skinless chicken breast, sliced thin - 2 tablespoons soy sauce - 1 tablespoon sesame oil - 1 red bell pepper, julienned - 1 cup broccoli florets - 1 carrot, julienned - 1 cup snap peas - 3 green onions, sliced - 3 cloves garlic, minced - Salt and pepper to taste These ingredients create a tasty and colorful dish. The chicken gives protein, and the noodles add carbs. The veggies bring crunch and nutrients. If you want to boost the taste, consider these extras: - 1 tablespoon oyster sauce - Sliced almonds for garnish Oyster sauce adds depth and a hint of sweetness. Almonds give a nice crunch on top. You can skip these if you want a simpler dish. You can adjust for diets or taste preferences: - Use tofu instead of chicken for a vegetarian option. - Try rice noodles if you cannot find chow mein noodles. - Use low-sodium soy sauce for a healthier choice. - Swap in your favorite veggies like bell peppers or zucchini. These swaps keep the meal enjoyable for everyone. Adjust as needed to fit your lifestyle. First, you need to cook the chow mein noodles. Follow the package instructions carefully. Generally, this takes about 5-7 minutes. Once they are soft, drain them in a colander. Rinse with cold water to stop the cooking. Set the noodles aside for later. Next, grab a large skillet or wok. Heat 1 tablespoon of sesame oil over medium-high heat. Add 1 pound of thinly sliced chicken breast. Season the chicken with salt and pepper. Cook for 5-7 minutes until the chicken is golden and cooked through. Add 3 minced garlic cloves and cook for 1 more minute. This makes the kitchen smell amazing! Now it’s time for the veggies! Toss in 1 red bell pepper, 1 cup of broccoli florets, 1 julienned carrot, and 1 cup of snap peas. Stir-fry these for about 3-4 minutes. You want them tender but still crisp. Next, add the cooked chow mein noodles to the skillet. Pour in 2 tablespoons of soy sauce and 1 tablespoon of oyster sauce, if using. Mix everything well and cook for another 2-3 minutes. This helps all the flavors blend together. Finally, remove from heat and toss in sliced green onions. Serve hot and enjoy your tasty meal! To cook chow mein noodles, follow these steps: - Boil water in a pot. - Add noodles and cook as per package directions. - Stir gently to prevent sticking. - Drain the noodles and rinse with cold water. - This stops the cooking process and keeps them firm. Perfectly cooked noodles are key to a great chow mein. They should be tender but not mushy. For a great stir-fry, use a large skillet or wok. Here’s how to get it just right: - Preheat the skillet. - Use medium-high heat to keep the chicken juicy. - Add one ingredient at a time. This helps each cook well. - Stir constantly for even cooking. - Don’t overcrowd the pan. Cook in batches if needed. These tips ensure your chicken gets a nice golden color and your veggies stay crisp. Flavor is vital in chicken chow mein. Here’s how to boost it: - Use soy sauce for a salty kick. - Add oyster sauce for depth. - Sesame oil gives a nice nutty flavor. - Don’t forget salt and pepper to taste. - Fresh minced garlic adds a wonderful aroma. Incorporating these seasonings creates a rich, savory taste that elevates your chow mein. {{image_2}} You can easily make a tasty vegetarian chow mein. Simply replace the chicken with tofu. Firm tofu works best. Cut it into small cubes and stir-fry until golden. You can also use tempeh for a nutty flavor. Add more veggies like bell peppers, mushrooms, and bok choy. Don't forget to keep your soy sauce and sesame oil for flavor. If you want to switch up the protein, try shrimp or beef. Shrimp cooks quickly and adds a nice touch. Use thinly sliced beef for a heartier dish. Just like chicken, season these proteins well. Cook them until they are just done, then add the veggies. Both options will give you a different twist on the classic. Get creative with your veggies! You can add any vegetables you love. Try zucchini, corn, or even spinach. Each vegetable brings a new taste and texture. Just make sure to cut them into small pieces. This way, they cook evenly. Always aim for a mix of colors for a beautiful dish. To store leftover Chicken Chow Mein, place it in an airtight container. Make sure the dish is cool before sealing. This helps keep the flavors fresh. You can store it in the fridge for up to three days. If you want to keep it longer, consider freezing it. When reheating Chicken Chow Mein, aim for even heating. You can use the microwave or the stove. If using the microwave, cover the dish with a lid or plastic wrap. Heat it in short bursts, stirring in between. On the stove, add a splash of water to prevent drying. Heat over low heat until warm. Freezing Chicken Chow Mein is a great option for meal prep. Before freezing, allow the dish to cool completely. Place it in a freezer-safe container or bag. You can freeze it for up to three months. To thaw, move it to the fridge overnight. Reheat it before serving to enjoy its full flavor. You can serve Chicken Chow Mein with several sides. Here are some ideas: - Egg rolls for a crunchy bite. - Fried rice for extra carbs. - Steamed dumplings, which add great flavor. - A light cucumber salad to cool things down. - Hot and sour soup for a spicy kick. These sides make your meal even better. Yes, you can prepare Chicken Chow Mein ahead of time. Just follow these steps: 1. Cook the dish as normal. 2. Let it cool before storing it. 3. Place in an airtight container. It stays good in the fridge for about three days. To reheat, simply warm it in a skillet. This keeps it fresh and tasty. Chow Mein and Lo Mein are both delicious, but they differ in a few ways: - Noodles: Chow Mein uses thin, crispy noodles. Lo Mein uses soft, chewy noodles. - Cooking Method: Chow Mein gets stir-fried until crispy. Lo Mein is tossed with sauce after cooking. - Texture: Chow Mein is crunchy, while Lo Mein is soft and saucy. Both are great choices that you can enjoy in many ways! You learned about the key ingredients for Chicken Chow Mein, both essential and optional. I shared step-by-step cooking instructions, plus tips to perfect your dish. We explored variations, like vegetarian options and different proteins. Finally, I gave you storage and reheating tips for leftovers. With these tools, you can create a delicious meal tailored to your taste. Enjoy experimenting and making this dish your own. Happy cooking!

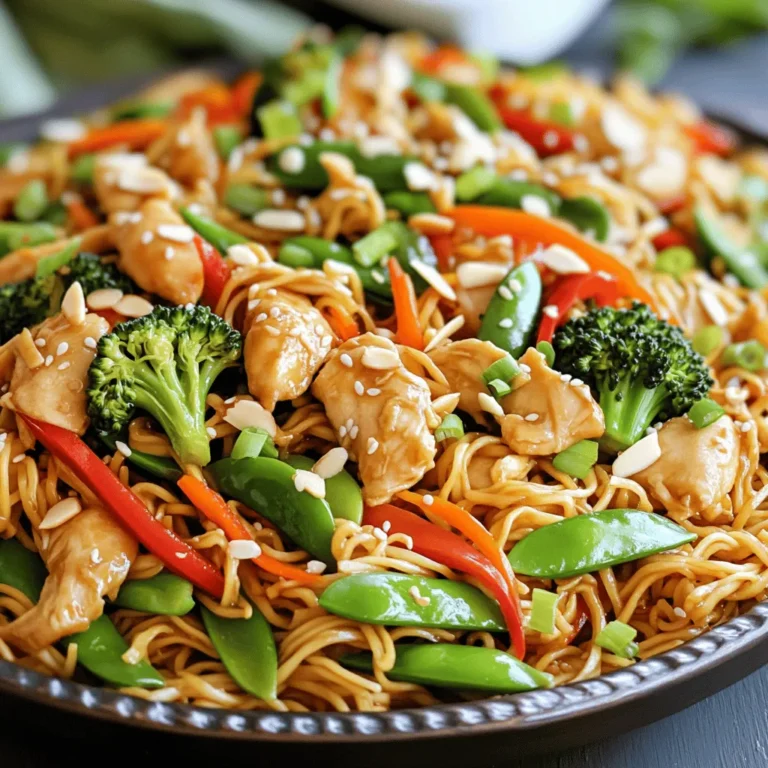
Chicken Chow Mein Tasty and Quick Weeknight Meal

- 1 cup cream cheese, softened - 1 cup pumpkin puree (not pumpkin pie filling) - ½ cup powdered sugar - 1 teaspoon vanilla extract - 1 teaspoon pumpkin spice mix (or mix cinnamon, nutmeg, and ginger) - 1 cup whipped cream (heavy cream whipped to soft peaks) - 1 cup graham cracker crumbs - 4 tablespoons unsalted butter, melted - Optional: crushed pecans or walnuts for topping You can swap cream cheese with Greek yogurt for a lighter version. If you want a dairy-free option, use vegan cream cheese. For the pumpkin puree, you can use sweet potato puree. Instead of powdered sugar, you can blend regular sugar until fine. If you don’t have pumpkin spice mix, a mix of cinnamon, nutmeg, and ginger works well. You can replace graham cracker crumbs with crushed cookies or oat flour for a gluten-free option. Choose fresh cream cheese for the best texture. Look for pure pumpkin puree without additives. This gives a richer flavor. When selecting whipped cream, heavy cream creates the best texture. Check the expiration dates on all dairy products. For spices, ensure they are fresh for maximum flavor. Using local or organic ingredients can enhance taste and support sustainability. Start by softening 1 cup of cream cheese. Use a large mixing bowl. Beat the cream cheese until it is smooth and creamy. Next, add in 1 cup of pumpkin puree. Make sure it is pure pumpkin, not pie filling. Mix in ½ cup of powdered sugar and 1 teaspoon of vanilla extract. Then, add 1 teaspoon of pumpkin spice. Beat the mixture until it is well combined. It should be smooth and creamy. Gently fold in 1 cup of whipped cream. This step makes your mixture light and airy. Be careful not to deflate the whipped cream. In a separate bowl, combine 1 cup of graham cracker crumbs with 4 tablespoons of melted unsalted butter. Mix these until the crumbs look like wet sand. This helps to form a nice crust. Grab your serving cups or parfait glasses. Start by adding the graham cracker crust to the bottom of each cup. Press it down gently to make an even layer. Next, spoon the pumpkin cheesecake mixture on top of the crust. Fill each cup generously. If your cups are large, you can repeat the layers. Finish with the cheesecake mixture on top. Once done, refrigerate the cups for at least 2 hours. This helps the cheesecake set properly. When ready to serve, add crushed pecans or walnuts for extra flavor. To get a smooth and creamy texture, start with softened cream cheese. Beat it well until it is fluffy. When adding pumpkin puree, mix it in slowly to keep the mixture light. Use a gentle folding method when adding whipped cream. This keeps the air in and makes it fluffy. If you mix too hard, the texture will be dense. A light touch is key. Serve these cheesecake cups in clear glasses or small jars. This way, everyone can see the lovely layers. Top each cup with a dollop of whipped cream. A sprinkle of pumpkin spice adds a nice touch. You can also add crushed pecans or walnuts on top for added crunch. This makes each bite even more fun to eat. One mistake is using pumpkin pie filling instead of pumpkin puree. This can change the taste and texture. Another pitfall is not chilling the cups long enough. They need at least two hours in the fridge to set properly. Finally, be careful when folding in the whipped cream. Mixing too hard can ruin the light texture you want. {{image_2}} You can easily make this treat vegan. Start by using vegan cream cheese. Look for brands that are creamy and smooth. Replace the whipped cream with coconut cream for a rich texture. Use maple syrup instead of powdered sugar for sweetness. This way, you keep the pumpkin spice flavor while making it plant-based. For a twist, add chocolate or caramel layers. Melt dark chocolate and pour it over the crust before adding the cheesecake layer. You can also drizzle caramel sauce on top for extra sweetness. Both options bring a new taste and texture to the cups. Get creative with your toppings! Instead of nuts, try crushed graham crackers or chocolate shavings. For a fruity touch, add fresh berries on top. You can also mix in a bit of orange zest for a bright flavor boost. Each topping choice can change how the dessert tastes and looks. To store leftover cheesecake cups, cover them tightly with plastic wrap. You can also use an airtight container. This keeps them fresh and prevents odors from other foods. Keep the cups in the fridge. They stay tasty for up to three days. Freezing these cheesecake cups is easy. First, wrap each cup well with plastic wrap. Then, place them in a freezer-safe bag or container. Label the bag with the date. You can freeze them for up to a month. To serve, thaw them in the fridge overnight. These cheesecake cups stay fresh for a few days in the fridge. If you follow best practices, they taste great even after a few days. Store them at the back of the fridge, where it’s coldest. Avoid leaving them out at room temperature for too long. Yes, you can use canned pumpkin. Canned pumpkin works well in this recipe. It saves time and gives a nice flavor. Just be sure to choose plain pumpkin puree. Avoid pumpkin pie filling. This will keep the taste just right. These cheesecake cups need at least two hours in the refrigerator. This time helps the cups set well. The longer they sit, the better the flavor blends. If you can, let them chill overnight for even more taste. You can use different crusts if you like. Graham cracker crumbs are standard, but others work too. Try using crushed cookies, like Oreos or gingersnaps. You can even use a nut crust for a gluten-free option. Just make sure it holds together well! Making cheesecake cups is fun and easy. We explored ingredients, preparation steps, and tips. You learned about quality ingredients and how to make a great texture. Variations like vegan options and fun toppings add excitement. Remember to store leftovers properly for the best taste. Avoid common mistakes to ensure your treats shine. With these steps, you can create delicious cheesecake cups any time. Enjoy your baking and share your tasty results!

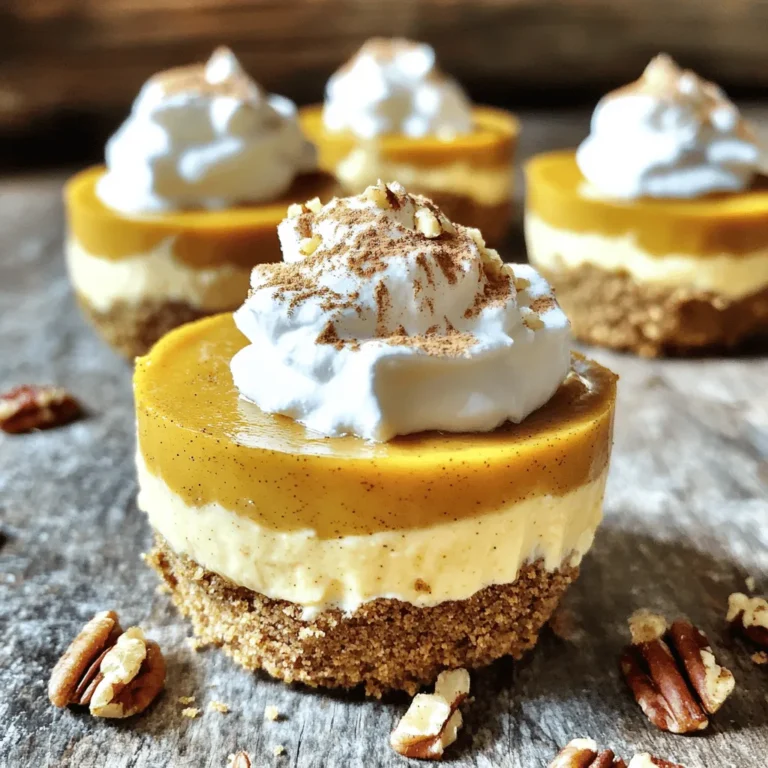
No Bake Pumpkin Spice Cheesecake Cups Delightful Treat

- 4 bone-in, skin-on chicken thighs - 1/4 cup honey - 1/4 cup fresh lime juice - 2 tablespoons soy sauce - 2 cloves garlic, minced - 1 teaspoon ground cumin - 1/2 teaspoon black pepper - 1 teaspoon chili powder - Zest of 1 lime - Salt to taste - Fresh cilantro for garnish Gather these ingredients before you start. The chicken thighs give the dish a juicy base. Honey and lime juice bring a sweet and tangy kick. Soy sauce adds depth, while garlic gives a nice aroma. Ground cumin, black pepper, and chili powder add warmth and spice. Lime zest enhances the citrus flavor. Always taste and adjust salt to your liking. Fresh cilantro not only looks great but adds a fresh touch. These simple ingredients come together to create a tasty marinade. You can use it for other meats or even veggies. Just remember, this dish shines with chicken thighs because they stay moist while grilling. Enjoy the process of mixing and marinating. Trust me; it makes all the difference! First, grab a mixing bowl. Whisk together these ingredients: - 1/4 cup honey - 1/4 cup fresh lime juice - 2 tablespoons soy sauce - 2 cloves garlic, minced - 1 teaspoon ground cumin - 1/2 teaspoon black pepper - 1 teaspoon chili powder - Zest of 1 lime - Salt to taste This will be your tasty marinade. The honey brings sweetness. The lime adds a nice zing. Each ingredient works together for a great flavor. Next, take 4 bone-in, skin-on chicken thighs. Place them in a large bowl or a resealable plastic bag. Pour the marinade over the chicken. Make sure each thigh gets a good coat. Seal the bag or cover the bowl. Refrigerate for at least 1 hour. For best taste, marinate up to 8 hours. This step makes your chicken juicy and flavorful. Time to grill! Preheat your grill to medium-high heat, around 375°F to 400°F. If you use charcoal, spread the coals evenly. Remove the chicken from the marinade. Let the extra marinade drip off. Discard the marinade. Now, place the chicken thighs skin-side down on the hot grill. Grill for about 6-7 minutes. Look for golden brown skin. After that, flip the thighs over. Grill for another 7-8 minutes. Cook until the inside reaches 165°F. The juices should run clear. Once done, take the chicken off the grill. Let it rest for 5 minutes. This step helps keep the juices in the meat. Finally, garnish with fresh cilantro before you serve. Enjoy your delicious Honey Lime Grilled Chicken Thighs! For great flavor, marinate your chicken thighs for at least 1 hour. If you have time, let them soak for up to 8 hours. This longer time helps the flavors blend well. Use a resealable bag or bowl to coat the chicken. Make sure every piece is covered. Seal the bag tight or cover the bowl to keep the marinade in. Grill your chicken thighs at a medium-high heat, about 375°F to 400°F. This heat level gives a nice sear. Cook skin-side down for 6-7 minutes until the skin is crispy and brown. Turn the thighs and grill for another 7-8 minutes. Use a meat thermometer to check if the chicken is done. It should reach 165°F. The juices should run clear when cut. To make your dish pop, garnish with fresh cilantro. You can also add lime wedges on the side for a bright touch. Serve the chicken on a colorful plate to enhance the look. Pair it with bright veggies or a fresh salad for a lovely presentation. {{image_2}} You can change the taste of this dish by adding spices or herbs. Try adding paprika for a smoky flavor. Fresh herbs, like thyme or oregano, can also brighten your chicken. Want to switch proteins? Use pork chops or shrimp! Both soak up the honey-lime marinade well. If you don’t have a grill, you can bake or air fry the chicken. For oven-baking, preheat to 400°F. Place the chicken on a baking sheet and cook for 25-30 minutes. Check the internal temperature to ensure it reaches 165°F. For air frying, set the temperature to 375°F and cook for about 20 minutes. Broiling is another great option. Broil the chicken, skin-side up, for 10-15 minutes. Keep an eye on it to avoid burning. This method gives a nice crispy skin while keeping the meat juicy. Serve your honey lime chicken with fresh sides. A light salad with avocado and tomatoes pairs well. Rice or quinoa can soak up the sauce nicely. Grilled vegetables add color and nutrition. Try corn on the cob or a simple coleslaw for crunch. Each side enhances the meal, making it more balanced and enjoyable. To keep your honey lime grilled chicken thighs fresh, follow these steps. First, let the chicken cool completely. Next, place the chicken in an airtight container. This helps keep moisture in and air out. You can also wrap the chicken tightly in plastic wrap. Store it in the fridge for up to four days. If you want to keep it longer, freeze it. Chicken can last up to three months in the freezer. Just remember to label the container with the date. When you are ready to enjoy leftovers, reheating is key. You want to keep the chicken juicy and flavorful. The best way to do this is by using the oven. Preheat it to 350°F. Place the chicken on a baking sheet and cover it with foil. Heat for about 15-20 minutes. This method warms the chicken without drying it out. If you prefer the microwave, use a microwave-safe plate. Heat for one minute, then check if it’s warm. If not, heat in 30-second intervals until hot. Enjoy your delicious chicken again! I recommend marinating chicken thighs for at least 1 hour. For the best flavor, aim for 8 hours. This longer time allows the honey and lime to soak in well. If you're short on time, even 30 minutes can still add some nice taste. Just remember, the longer, the better! Yes, you can use boneless chicken thighs for this recipe. They cook faster, so adjust your grill time. Grill them for about 5-6 minutes on each side. Always check that the internal temperature hits 165°F to ensure they are safe to eat. Boneless thighs can still be very juicy and tasty! This chicken pairs well with many sides. Here are some tasty options: - Grilled vegetables like zucchini and bell peppers - Rice or quinoa for a hearty base - Corn on the cob for a sweet crunch - Salad with fresh greens and lime vinaigrette - Guacamole and chips for a fun dip These sides enhance the flavors of the chicken and make your meal bright and colorful. Enjoy! You now have all the steps to create tasty honey lime grilled chicken. From marinating the chicken thighs to grilling, every step matters. Remember to use fresh ingredients for the best flavor. Try adding your favorite spices for a personal touch. Whether you grill, bake, or air fry, this dish works well. Serve it with perfect sides to impress your family. Enjoy your cooking journey, and don't hesitate to explore new flavors!

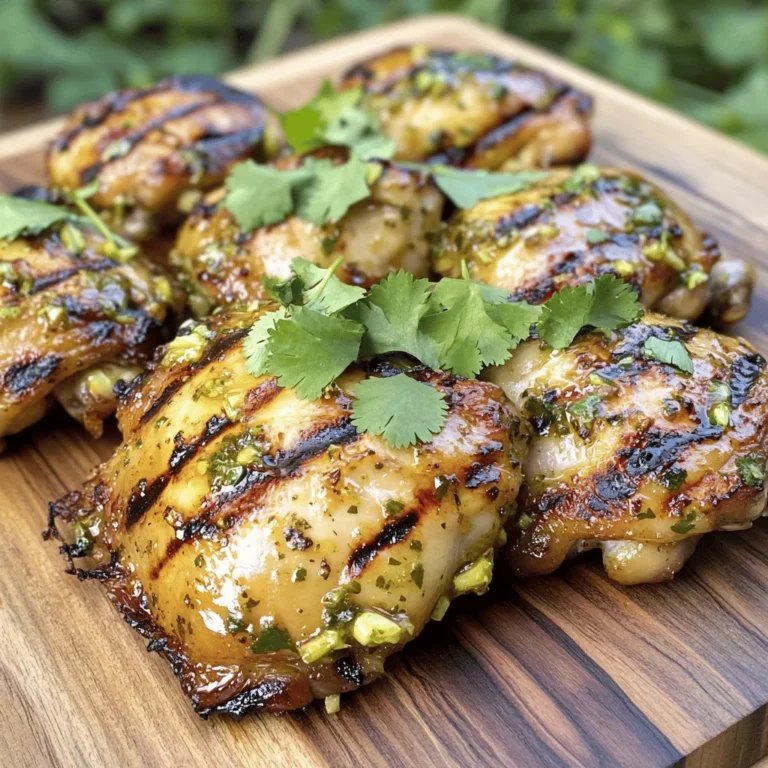
Honey Lime Grilled Chicken Thighs Easy Flavorful Dish

- 4 cups green cabbage, finely shredded - 2 cups purple cabbage, finely shredded - 1 large carrot, julienned - 1 bell pepper (red or yellow), thinly sliced - 1/2 cup edamame, shelled and cooked - 1/4 cup green onions, sliced - 1/4 cup cilantro, chopped - 1/4 cup sesame seeds, toasted - 1/2 cup toasted peanuts, roughly chopped - 1/4 cup sesame oil - 2 tablespoons rice vinegar - 2 tablespoons soy sauce (or tamari for gluten-free) - 1 tablespoon honey or maple syrup - 1 teaspoon fresh ginger, grated - 1 clove garlic, minced - Pinch of red pepper flakes (optional for heat) This slaw bursts with color and flavor. The mix of green and purple cabbage gives it a vibrant look. Fresh veggies like carrots and bell peppers add crunch and sweetness. Edamame provides protein, while green onions and cilantro bring a fresh taste. The toasted sesame seeds and peanuts add extra crunch. They make every bite exciting and delicious. For the dressing, sesame oil gives a rich, nutty flavor. Rice vinegar adds a tangy touch. Soy sauce, honey, ginger, and garlic round out the taste. A pinch of red pepper flakes gives a hint of heat if you like spice. This slaw is perfect as a light meal or side dish. It is easy to make and full of healthy ingredients. You will enjoy the fresh and crunchy flavors! - In a large mixing bowl, combine: - 4 cups green cabbage, finely shredded - 2 cups purple cabbage, finely shredded - 1 large carrot, julienned - 1 bell pepper, thinly sliced - 1/2 cup edamame, shelled and cooked - 1/4 cup green onions, sliced - 1/4 cup cilantro, chopped - 1/4 cup sesame seeds, toasted Mix these ingredients well. You want the colors to shine. Each veggie adds a special crunch and taste. - In a separate small bowl, whisk together: - 1/4 cup sesame oil - 2 tablespoons rice vinegar - 2 tablespoons soy sauce (or tamari for gluten-free) - 1 tablespoon honey or maple syrup - 1 teaspoon fresh ginger, grated - 1 clove garlic, minced - Pinch of red pepper flakes (optional for heat) Whisk until smooth. This mix brings a bright flavor to the slaw. - Pour the dressing over the slaw mixture and toss gently. - Allow the slaw to sit for 15 minutes before serving. This wait helps the flavors blend. - Just before serving, top with: - 1/2 cup toasted peanuts, roughly chopped This adds a nice crunch. Serve cold or at room temperature for the best taste. Enjoy your fresh and flavorful salad! This slaw works great as a side dish. It also makes a light meal. You can pair it with grilled chicken or tofu for extra protein. Serve it chilled for a refreshing bite. Letting the slaw sit for a while boosts the flavors. I recommend waiting at least 15 minutes. The longer it sits, the better it tastes. The veggies soak up the dressing, creating a tasty mix. Feel free to switch up the veggies. You can use carrots, broccoli, or bell peppers. Add your favorite nuts for a crunch. Try different sauces too. A spicy sauce can add a fun twist. {{image_2}} You can boost the protein in your slaw by adding grilled shrimp, chicken, or tofu. These options make the salad more filling and add great flavor. Grilled shrimp offers a sweet seafood taste, while chicken gives a hearty touch. Tofu is perfect for a plant-friendly meal. Just cook your protein choice and toss it into the slaw before serving. If you like heat, add sliced jalapeños or a dash of sriracha to the dressing. This gives your slaw a spicy kick that brightens the flavors. You can adjust the heat to your liking. The spice pairs well with the sweet and nutty dressing. Just mix in the spicy element when you whisk the dressing. To make a low-carb slaw, swap the cabbage with cauliflower rice or zucchini noodles. This change cuts carbs while keeping it fresh and crunchy. Cauliflower rice gives a nice texture, while zucchini noodles add a light, fun twist. You can prepare these bases just like you would with cabbage. Store your Sesame Crunch Asian Slaw in an airtight container. This helps keep it fresh and crunchy. Make sure the lid is sealed tightly to prevent air from getting in. For the best taste and texture, enjoy your slaw within 2-3 days. After this time, the vegetables may start to lose their crispness. Serve this slaw cold or at room temperature. Avoid reheating it, as heat can make the veggies soggy. The crunch is part of what makes this dish special. Yes, it's best to make it a few hours before serving. This lets the flavors mix well. If you can, chill it in the fridge. It tastes even better after resting. You can make it gluten-free by using tamari instead of soy sauce. Tamari gives you that rich flavor without gluten. To keep it vegan, just swap the honey for maple syrup. This change keeps the sweetness while making it plant-based. This slaw pairs well with grilled dishes like chicken or fish. You can also serve it with sandwiches or use it in lettuce wraps. The crunch adds a fresh touch to any meal. This recipe is your guide to a fresh and crunchy Asian slaw. We started with vibrant veggies and crisp crunchies that delight the palate. The dressing blends sweet and savory for a punch of flavor. As you prepare this dish, remember to experiment with new ingredients to find your perfect mix. Store leftovers properly, and enjoy them within a few days for the best taste. With these tips, your slaw will impress at any meal. Enjoy your culinary adventure!

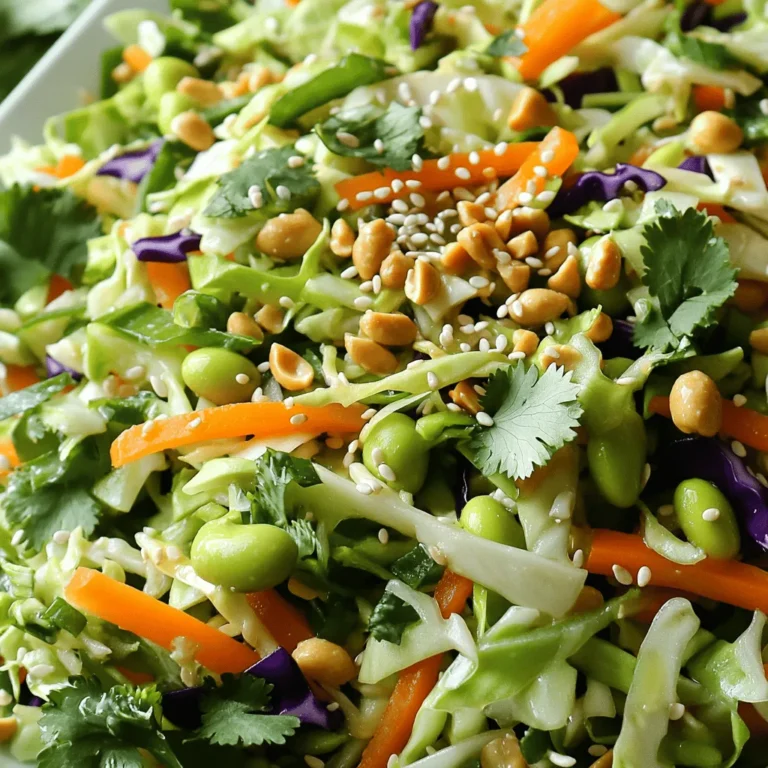
Sesame Crunch Asian Slaw Fresh and Flavorful Salad

- 2 cups rolled oats - 1 cup peanut butter (creamy or crunchy) - 1/3 cup honey or maple syrup - 1/4 cup brown sugar or coconut sugar The main ingredients are simple but powerful. Rolled oats give these cups their base. They add fiber, making you feel full. Peanut butter brings protein and healthy fats. You can pick creamy or crunchy. Sweeteners like honey or maple syrup add just the right touch of sweetness. Brown sugar or coconut sugar can add depth. - 1/2 teaspoon vanilla extract - 1/2 teaspoon cinnamon - 1/4 teaspoon salt Flavor enhancers take your cups to the next level. Vanilla extract makes everything taste better. Cinnamon adds warmth and a cozy feel. A touch of salt brightens the flavors, making them pop. - 1/2 cup chocolate chips (optional) - 1/2 cup dried fruits (raisins, cranberries, or your choice) Optional add-ins give you room to play. Chocolate chips are a fun surprise in every bite. Dried fruits like raisins or cranberries add sweetness and chewiness. You can mix and match to find your favorite combo. - Preheat oven to 350°F (175°C). - Prepare muffin tin with liners or grease it well. - Combine 2 cups of rolled oats, 1/4 cup of brown sugar, 1/2 teaspoon of cinnamon, and 1/4 teaspoon of salt in a bowl. Stir until mixed evenly. - In another bowl, mix 1 cup of peanut butter, 1/3 cup of honey, and 1/2 teaspoon of vanilla. - Heat this mixture for about 20 seconds in the microwave to help with blending. - Pour the warm peanut butter mixture into the bowl with dry ingredients. Mix well until everything is coated. - If you want, fold in 1/2 cup of chocolate chips and 1/2 cup of dried fruits for added flavor. - Scoop the granola mix into the muffin tin, filling each liner about 3/4 full. - Press the mixture down firmly with a spoon or your fingers to pack it in. - Bake for 15-20 minutes until the edges turn golden brown. - Let the cups cool in the pan for about 10 minutes. Then, move them to a wire rack to cool completely. They will firm up as they cool. To keep your granola cups chewy, use less baking time. Bake them until just golden. If you prefer a crunchier texture, bake a bit longer until the edges brown nicely. Pressing down the mixture firmly is key. Use the back of a spoon or your fingers. This packs the ingredients tightly and helps them hold shape after baking. Swapping out the peanut butter can change the flavor. Try almond butter or cashew butter for a new twist. You can also mix in different nuts or seeds. For a fun touch, add coconut flakes or chia seeds. Consider topping your cups with yogurt or fresh fruit for extra flavor. For a lovely presentation, drizzle melted chocolate on top after they cool. Serve them on a bright plate or wooden board. They pair well with milk or a hot cup of tea. For a snack, enjoy them with a side of fresh fruit or yogurt. This adds color and flavor to your snack time! {{image_2}} If you need a nut-free option, you can use sunflower seed butter. It has a mild taste and works well in this recipe. You can also substitute almond butter if you don't have nut allergies. Just keep in mind that almond butter has a stronger flavor. Both options keep the texture and taste creamy. To make these granola cups vegan, swap honey for maple syrup. Maple syrup provides the same sweetness without animal products. Also, choose nut-free options like sunflower seed butter. This way, everyone can enjoy these tasty treats. They’ll still be full of flavor and nutrients. For a gluten-free version, select certified gluten-free oats. Regular oats may contain gluten due to cross-contamination. Confirm that your oats are labeled gluten-free to ensure safety. This small change makes them perfect for those with gluten sensitivities. Enjoy them without worry! To keep your Peanut Butter Granola Cups fresh, store them in airtight containers. This helps prevent them from drying out. I recommend using glass or plastic containers with tight lids. You can also wrap each cup in plastic wrap before placing them in the container. This is great for keeping them soft and tasty. If you want to keep these granola cups for a longer time, freezing is a great option. First, let them cool completely. Then, wrap each cup in plastic wrap. After that, place them in a freezer-safe bag or container. Make sure to label the bag with the date. You can freeze them for up to three months without losing flavor. Peanut Butter Granola Cups last about a week at room temperature. Make sure they stay in a cool, dry spot. If you store them in the fridge, they can last up to two weeks. Keeping them in the fridge helps them stay fresh and firm. Yes, you can use other nut butters. Almond butter works great in this recipe. It has a light flavor and creamy texture. Cashew butter is also a tasty choice. It adds a nice sweetness and creaminess too. Just ensure the nut butter you pick is smooth and creamy for the best results. To make these granola cups gluten-free, choose certified gluten-free oats. Regular oats may have gluten. Be careful with any mix-ins as well. Some dried fruits or chocolate might contain gluten. Always check labels to ensure they are gluten-free. Yes, you can replace the sweeteners. Agave syrup is a good option. It has a mild flavor and works well in this recipe. You can also use stevia for a low-calorie choice. Just remember that stevia is much sweeter than sugar, so use less. Adjust to your taste while mixing. You can add seeds like chia or flax for extra fiber. Protein powder is another great option to boost nutrition. Superfoods like chia seeds or hemp seeds are also great additions. They add healthy fats and protein without changing the taste much. Mix and match these to your liking for added health benefits. These Peanut Butter Granola Cups are easy to make and fun to customize. We explored the main ingredients, from oats to sweeteners. I shared simple steps for mixing, baking, and perfecting texture. You can adapt flavors with various nut butters and add-ins. Remember to store your cups properly to enjoy them longer. Try these tips, and you’ll create tasty snacks that suit your needs. Have fun in the kitchen and enjoy your homemade treats!

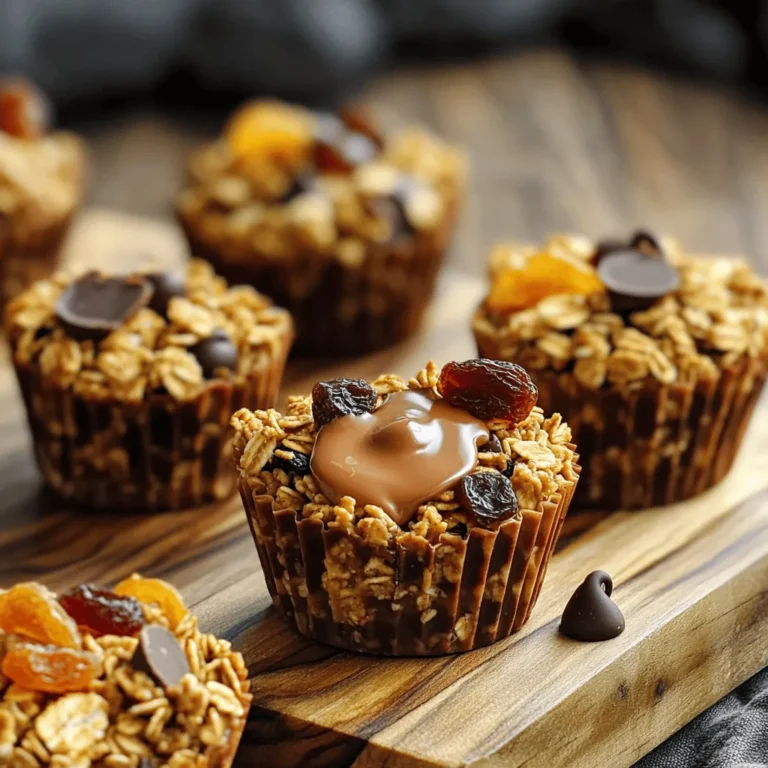
Peanut Butter Granola Cups Healthy Snack Delight

- 8 oz fettuccine pasta - 1 cup pumpkin puree - 1 cup heavy cream Fettuccine pasta is the star of this dish. It holds the creamy sauce well. You can use fresh or dried pasta, but I prefer the dried kind for its firmness. Pumpkin puree adds a rich flavor and a beautiful orange color. You can use canned or fresh pumpkin. Heavy cream gives the sauce its luxurious texture. - 1/2 cup grated Parmesan cheese - 2 tablespoons butter - 2 garlic cloves, minced Grated Parmesan cheese melts into the sauce, adding depth. Use good quality cheese for the best taste. Butter adds richness and helps sauté the garlic. Minced garlic gives the sauce a lovely aroma and flavor. Be careful not to burn it; we want it fragrant, not bitter. - 1 teaspoon Italian seasoning - Salt and pepper to taste - Fresh parsley, chopped Italian seasoning brings warmth and a hint of herbs. Adjust salt and pepper to your taste. Fresh parsley adds a pop of color and a fresh taste. It makes the dish look pretty and bright on the plate. This is how you create a dish full of flavor and color. Each ingredient plays a role in making the creamy pumpkin Alfredo pasta a tasty meal. To start, grab a large pot and fill it with water. Add a good amount of salt. Bring the water to a boil. Once boiling, add 8 oz of fettuccine pasta. Cook it according to the package instructions until it is al dente. This usually takes about 8 to 10 minutes. After cooking, reserve 1/2 cup of the pasta water. Then, drain the pasta and set it aside. Next, it's time to make the Alfredo sauce. Take a large skillet and place it over medium heat. Add 2 tablespoons of butter and let it melt. After it melts, add 2 minced garlic cloves. Sauté the garlic for 1 to 2 minutes. You want it to smell good but not burn. Then, stir in 1 cup of pumpkin puree and 1 cup of heavy cream. Mix it well. Let this mixture simmer gently for about 5 minutes. Stir it often to keep it smooth. Now, we will add the cheese and finish the dish. Sprinkle in 1/2 cup of grated Parmesan cheese and 1 teaspoon of Italian seasoning. Stir until the cheese melts and the sauce is nice and creamy. If the sauce is too thick, you can add some reserved pasta water. This helps adjust the sauce's texture. Once the sauce is ready, add the cooked fettuccine to the skillet. Toss the pasta to coat it well with the creamy pumpkin sauce. Finally, season with salt and pepper to taste. Serve the dish in wide bowls. You can garnish with fresh parsley for a pop of color. Enjoy your creamy pumpkin Alfredo pasta! To get the best sauce, adjust the consistency with pasta water. When you drain the pasta, save some of that starchy water. Add it slowly to the sauce if it feels too thick. This step helps make the sauce creamy and smooth. Next, prevent garlic from burning. Garlic can turn bitter if overcooked. When you sauté it, keep the heat low and stir often. Cook it just until it smells good, about 1-2 minutes. This will keep your sauce flavorful and bright. For serving, use wide bowls. This lets the creamy pumpkin Alfredo shine. Divide the pasta evenly and make sure each plate has enough sauce. Garnishing with fresh parsley adds color and freshness. You can also sprinkle extra Parmesan cheese on top. For a final touch, drizzle a little olive oil. It gives a nice shine to the dish. To save time, cook the pasta while you make the sauce. This way, both are ready at the same time. Keep an eye on the pasta to prevent overcooking. You can also pre-prep ingredients. Mince the garlic and chop parsley ahead of time. Get your pumpkin puree ready before you start. This makes cooking quick and easy. {{image_2}} You can swap fettuccine for whole grain or gluten-free pasta. Whole grain adds fiber and flavor. Gluten-free options are great for those with dietary needs. Both choices work well with the creamy pumpkin sauce. For a heartier dish, consider adding chicken or shrimp. Cook the protein separately and mix it in at the end. This boosts flavor and makes the meal more filling. If you prefer vegetarian options, try chickpeas or tofu. Both add protein without meat. To make this dish vegan, use dairy-free cream. Coconut cream or cashew cream gives a rich texture. You can also add nutritional yeast for a cheesy flavor. This way, everyone can enjoy creamy pumpkin Alfredo. To best store your creamy pumpkin Alfredo pasta, let it cool first. Place it in an airtight container. This helps keep the flavors fresh. You can refrigerate it for up to three days. Make sure to label the container with the date. This way, you will remember when you made it. When it comes to reheating, you have two good options: microwave or stovetop. If you use the microwave, put the pasta in a safe dish. Heat it in short bursts, stirring often. This prevents hot spots. On the stovetop, add a splash of water or cream to the pasta. Warm it over low heat, stirring gently. This keeps the sauce creamy. If you want to freeze the pasta, first let it cool completely. Then, place it in a freezer-safe container. Make sure to leave space for expansion. You can freeze it for up to three months. To enjoy later, thaw it in the fridge overnight before reheating. This helps keep the taste and texture just right. If you want a lighter option, try using half-and-half. You can also use whole milk mixed with a little butter. For a dairy-free choice, coconut cream works well. Just keep in mind that these swaps may change the flavor and texture a bit. Yes! You can use fresh pumpkin. Just peel, cube, and cook it until soft. Then, blend it until smooth. Fresh pumpkin can give a fresher taste to your dish. Make sure to use the same amount as the canned version. Creamy pumpkin Alfredo pasta can last about three to four days in the fridge. Store it in an airtight container to keep it fresh. When you're ready to eat, just reheat it in the microwave or on the stove. This blog covered the tasty Pumpkin Alfredo dish. We looked at the key ingredients like fettuccine, pumpkin puree, and cream, alongside tips to make your sauce perfect. I shared how to cook the pasta and create a creamy, rich sauce. Don't forget to try different proteins or vegan options for variety. Remember, store leftovers well and enjoy them later. With these tricks, you can whip up this dish with ease. Enjoy your cooking!

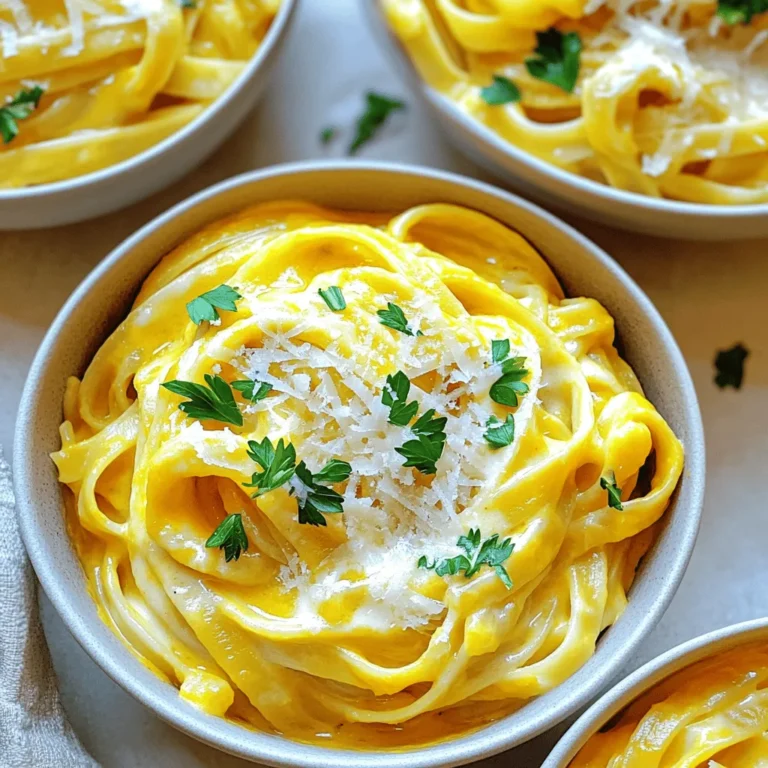
Creamy Pumpkin Alfredo Pasta Simple and Tasty Meal

To make the Chocolate Covered Strawberry Bark, you need the following ingredients: - 2 cups dark chocolate chips - 1 cup white chocolate chips - 1 cup freeze-dried strawberries - 1/2 cup crushed almonds (optional) - A pinch of sea salt These ingredients create a sweet and crunchy treat. The dark chocolate gives a rich flavor. The white chocolate adds a nice contrast. Freeze-dried strawberries bring sweetness and tartness. If you like, crushed almonds add a nice crunch. The sea salt enhances all the flavors. Gather all these items before you start. This will make your cooking process smooth and fun. Using high-quality chocolate makes a big difference. It adds to the taste and texture. Enjoy the process of making this delicious bark! First, get your baking sheet ready. Line it with parchment paper. Make sure it covers the whole sheet. This helps you lift the bark off later. Next, take your dark chocolate chips. Put them in a microwave-safe bowl. Heat them in the microwave for 30 seconds. Stir and repeat until smooth. This keeps the chocolate from burning. Now, pour the melted dark chocolate onto your lined sheet. Use a spatula to spread it evenly. Aim for about 1/4 inch thick. This will give you a nice base. While the chocolate is warm, sprinkle the freeze-dried strawberries on top. Press them in gently. This helps them stick to the chocolate. In a new bowl, melt your white chocolate chips. Use the same microwave method. Heat in 30-second bursts and stir until it is smooth. Once melted, take the white chocolate. Use a spoon or piping bag to drizzle it over the dark chocolate. Make a zigzag pattern for a fun look. Now, sprinkle a pinch of sea salt over the top. If you like, add crushed almonds for some crunch. This adds extra flavor and texture. Place the baking sheet in the fridge. Chill for about 30 minutes. This helps the chocolate set and become firm. Finally, take the bark out of the fridge. Lift it off the parchment paper. Break it into pieces of your choice. Enjoy your sweet treat! For this bark, I love using dark chocolate chips. They give a rich taste. You can use semi-sweet or bittersweet chips. White chocolate adds a nice contrast. Look for high-quality brands for the best flavor. Avoid chocolate with lots of added sugar. It makes the bark too sweet. Once you break the bark into pieces, store it in an airtight container. Use parchment paper between layers to keep it from sticking. Store it in a cool, dry place. If it is warm, put it in the fridge. But keep it covered to avoid moisture. This keeps the bark fresh for up to two weeks. You can serve the bark in fun ways. Place it on a pretty plate for a party. You can also put pieces in clear bags tied with ribbons. This makes a sweet gift. Try pairing it with fresh fruit or ice cream for dessert. The flavors mix well and make a tasty treat! {{image_2}} You can mix things up by using different types of chocolate. Dark chocolate adds a rich taste, while white chocolate brings sweetness. You can also try milk chocolate for a creamier flavor. Each type gives the bark a unique twist. You can even use flavored chocolates, like mint or orange, for extra fun. Dried fruits can make your bark even better. Besides strawberries, you can add dried cherries or raspberries. You might also like dried mango or banana chips for a tropical touch. Just chop them into small pieces and sprinkle them on top. This adds color and taste to your treat. If you need a nut-free option, it's simple! Just skip the crushed almonds. You can replace nuts with seeds like sunflower or pumpkin seeds. These seeds add crunch without the nuts. You can also use more dried fruits to keep the bark interesting and tasty. To keep your chocolate covered strawberry bark fresh, store it in an airtight container. Layer pieces with parchment paper to prevent sticking. This method helps maintain the bark's crispness and flavor. Place the container in a cool, dry place. Avoid direct sunlight, as it can cause the chocolate to melt or bloom. If you want to keep the bark longer, freezing works well. Wrap each piece in plastic wrap. Then, place them in a freezer bag. Make sure to remove as much air as possible. This will help prevent freezer burn. When you're ready to enjoy, let the bark thaw in the fridge for about an hour. This keeps it tasting fresh. Chocolate covered strawberry bark lasts about two weeks at room temperature. In the fridge, it can last up to three weeks. If you freeze it, it can stay good for up to three months. Just remember to check for any signs of spoilage, like a change in smell or appearance. Enjoy your tasty treat! Chocolate covered strawberry bark can last up to two weeks. Store it in an airtight container. Keep it in a cool, dry place. If you notice any changes, it’s best to toss it. You can use fresh strawberries, but they won’t work the same way. Fresh berries add moisture, which can make the bark soft. Freeze-dried strawberries keep their crunch and flavor. They are better for this recipe. You can get creative with toppings! Here are some ideas: - Crushed nuts like walnuts or pecans - Sprinkles or edible glitter - Shredded coconut - Different dried fruits like cranberries or apricots Mix and match for fun flavors! You can find chocolate covered strawberry bark in many places. Look at local candy shops or bakeries. Some online stores also offer it. You can make it at home for a fresh taste! You learned how to make chocolate covered strawberry bark using simple ingredients like dark chocolate, white chocolate, and strawberries. I shared step-by-step instructions that guide you from melting chocolate to breaking the bark into pieces. Tips on storage and variations also help you get the most out of your treat. Get creative with different chocolates and toppings. Whether you share it or enjoy it yourself, this bark is fun and tasty! Try making it today for a sweet treat any time.

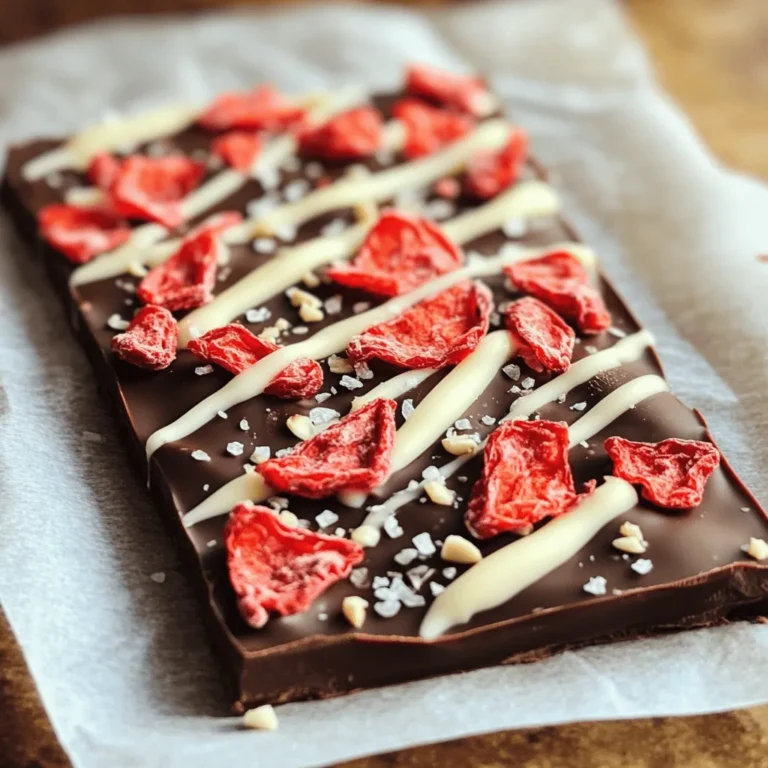
Chocolate Covered Strawberry Bark Sweet Treat Recipe

To make this tasty Pesto Mozzarella Stuffed Chicken, gather these key items: - 4 boneless, skinless chicken breasts - 1 cup fresh basil pesto - 8 oz fresh mozzarella cheese, sliced - 1 cup cherry tomatoes, halved - 2 tablespoons olive oil - 1 teaspoon garlic powder - Salt and pepper to taste - Fresh basil leaves for garnish You will need some basic tools to prepare this dish: - A sharp knife for cutting the chicken - A clean cutting board - An oven-safe skillet for browning and baking - Measuring cups and spoons for accurate amounts - A meat thermometer to check the chicken's doneness Feel free to get creative! Here are some optional items to elevate your dish: - Spinach or arugula for added greens - Sun-dried tomatoes for a tangy twist - A sprinkle of red pepper flakes for heat - Balsamic glaze for a sweet finish This list provides all you need to create a delicious meal. Enjoy the process and let your taste buds guide you! To start, preheat your oven to 375°F (190°C). This helps cook the chicken evenly. Next, take your chicken breasts and place them on a cutting board. Use a sharp knife to cut a pocket into each breast. Make sure not to cut all the way through. It needs to hold the filling. Once you have your pockets, season the chicken both inside and out. Use garlic powder, salt, and pepper. This adds flavor to every bite. Now comes the fun part: stuffing! Take a generous scoop of fresh basil pesto and fill each chicken breast pocket. Add a couple of slices of fresh mozzarella cheese on top of the pesto. The cheese melts beautifully during cooking and adds a creamy texture. Make sure not to overstuff, as the filling may spill out while cooking. For cooking, use an oven-safe skillet. Heat 2 tablespoons of olive oil over medium-high heat. Once hot, carefully place the stuffed chicken breasts in the skillet. Cook them for 2-3 minutes on each side until they turn golden brown. This gives a nice crust. After browning, add halved cherry tomatoes around the chicken in the skillet. Transfer the skillet to your preheated oven. Bake for about 20-25 minutes until the chicken reaches 165°F (75°C). When it’s done, let the chicken rest for about 5 minutes before serving. Garnish with fresh basil leaves for a pop of color and flavor. Enjoy! To make sure your chicken breasts are stuffed well, slice a pocket carefully. Do not cut all the way through. This keeps the filling inside. Stuff each breast with a good amount of pesto and mozzarella. Make sure it fits snugly. If you overstuff, the filling may leak out during cooking. Season your chicken inside and out for the best flavor. Use garlic powder, salt, and pepper. These simple spices enhance the taste of the chicken. You can also try adding lemon zest for a fresh twist. Fresh herbs, like thyme or rosemary, can add depth, too. Cooking at the right temperature is key. Preheat your oven to 375°F (190°C). This ensures even cooking. Bake the chicken for 20 to 25 minutes. Use a meat thermometer to check for doneness. The chicken should reach 165°F (75°C). Let it rest for five minutes after cooking. This helps keep it juicy! {{image_2}} You can switch up the cheese in this dish. Try using provolone or goat cheese. Both add unique flavors. Provolone melts well, giving a creamy texture. Goat cheese brings tanginess that brightens the dish. For a stronger kick, use blue cheese. It pairs nicely with the pesto and chicken. While basil pesto shines, other options exist. You can use sun-dried tomato pesto for a rich taste. Spinach pesto offers a fresh green twist. If you want a nut-free version, try using avocado. Each alternative brings a new flavor, so don’t hesitate to experiment. Adding veggies can enhance your stuffed chicken. Try spinach or arugula for a nice green touch. Sautéed mushrooms add umami depth. Roasted red peppers bring sweetness and color. You can also add zucchini or bell peppers for crunch. Mix and match to find your favorite combo. To keep your Pesto Mozzarella Stuffed Chicken fresh, let it cool first. Once cool, place each piece in an airtight container. You can also wrap them tightly in plastic wrap. Store the chicken in the fridge for up to three days. This keeps the flavors intact and prevents spoilage. When you're ready to enjoy your leftovers, preheat the oven to 350°F (175°C). Place the chicken on a baking sheet. Cover it loosely with foil to keep it moist. Heat for about 15-20 minutes or until warmed through. You can also use a microwave. Heat it for about one minute per piece. Just make sure it’s hot all the way through. If you want to save some for later, freezing is a great option. Wrap each chicken breast tightly in plastic wrap, then place it in a freezer bag. Label the bag with the date. It will stay good for about three months. To thaw, move the chicken to the fridge overnight. You can also use the microwave on the defrost setting. After thawing, reheat as mentioned above. Enjoy your meal again! Yes, you can prepare the chicken ahead of time. You can stuff the chicken breasts with pesto and mozzarella and store them in the fridge. Just make sure to wrap them tightly in plastic wrap. You can keep them for up to 24 hours before cooking. When you're ready, simply cook them as directed. This saves you time on busy days. This dish pairs well with many sides. I suggest serving it with: - Garlic bread - Steamed vegetables - A fresh green salad - Roasted potatoes These sides complement the rich flavors of the chicken. They also add color to your plate, making the meal more appealing. To check if the chicken is done, use a meat thermometer. Insert it into the thickest part of the breast. The internal temperature should reach 165°F (75°C). If you don’t have a thermometer, cut into the chicken. The juices should run clear, and there should be no pink inside. This ensures it is safe to eat. You now have a clear path to making perfect pesto mozzarella stuffed chicken. We covered the key ingredients, cooking methods, and helpful tips to get that dish just right. Remember, the right seasoning and cooking time make all the difference. Feel free to try different cheeses and veggies for your own twist. Proper storage is key to keep leftovers fresh. With these steps, you'll impress everyone at your table, every time. Enjoy your cooking adventure!

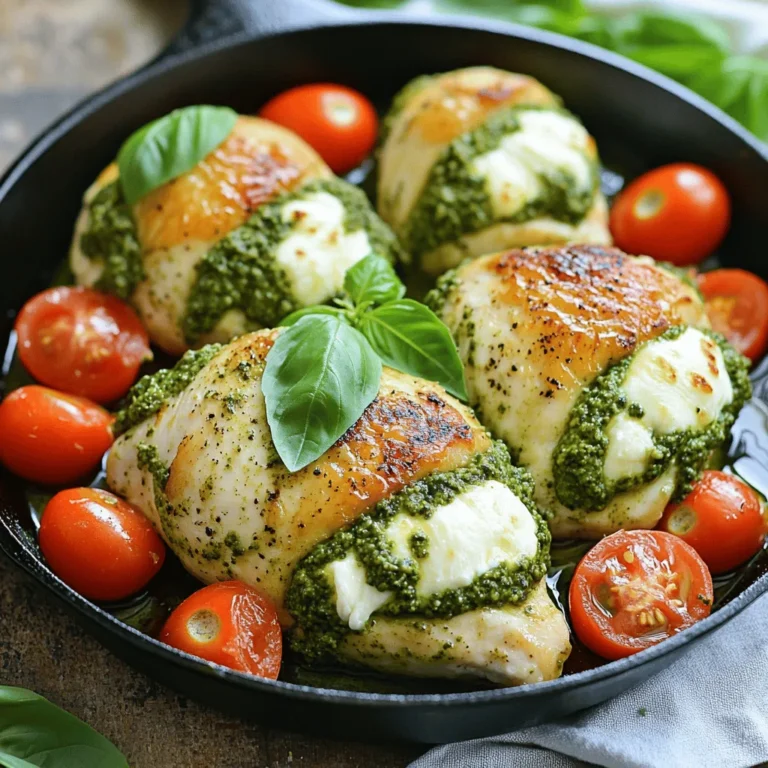
Savory Pesto Mozzarella Stuffed Chicken Recipe

To make Lemon Garlic Shrimp Foil Packs, you need simple, fresh ingredients. Here’s what you will need: - 1 pound large shrimp, peeled and deveined - 4 cloves garlic, minced - 2 tablespoons olive oil - 1 lemon, juiced and zested - 1 teaspoon paprika - 1 teaspoon dried oregano - Salt and pepper to taste - 1 cup cherry tomatoes, halved - 1 cup fresh asparagus, trimmed and cut into 2-inch pieces - 2 tablespoons chopped fresh parsley (for garnish) These ingredients come together to create a bright and tasty dish. The shrimp provide a sweet and savory base. The garlic adds a nice kick. The lemon brings a fresh zest, making it all pop. You can play with the flavors by adding extra seasonings. Here are some ideas: - Red pepper flakes for heat - Fresh basil for an herby touch - Lemon slices for extra citrus - Grated Parmesan for creaminess Feel free to mix and match these options. They let you tailor the dish to your taste. Pairing your Lemon Garlic Shrimp Foil Packs with the right sides makes the meal special. Here are some great choices: - Rice or quinoa for a filling base - Garlic bread to soak up the juices - A fresh green salad for crunch - Steamed vegetables to keep it light These sides make the meal balanced and satisfying. Enjoy creating your perfect plate! First, gather your shrimp and other ingredients. You need one pound of large shrimp, peeled and deveined. Next, take four cloves of garlic and mince them finely. In a large bowl, mix the shrimp with the minced garlic. Add two tablespoons of olive oil and the juice and zest of one lemon. Sprinkle in one teaspoon of paprika and one teaspoon of dried oregano. Lastly, season with salt and pepper to taste. Toss everything together until the shrimp is well coated. Now, let’s get the foil packs ready. Cut four pieces of aluminum foil, each about 12 inches by 12 inches. Lay them flat on a clean surface. Divide the shrimp mixture evenly among the foil pieces. On top of each shrimp portion, add a handful of halved cherry tomatoes and a few pieces of trimmed asparagus. Fold the foil over the shrimp and vegetables tightly to seal each pack. Make sure they are secure to hold in all the flavors. You can cook these foil packs on a grill or in the oven. If using a grill, preheat it to 400°F (200°C). If you prefer the oven, do the same. Place the foil packs on the grill or on a baking sheet for the oven. Cook for about 10 to 12 minutes. The shrimp should turn pink and opaque, while the vegetables become tender. When done, carefully open the packs, letting the steam escape. Garnish with fresh parsley before serving. To make shrimp taste great, use fresh ingredients. Start with large shrimp, peeled and deveined. You want to mix them with garlic, lemon juice, and zest. Paprika and oregano add flavor. Remember to sprinkle salt and pepper to taste. Toss everything well in a bowl. This way, each shrimp gets coated nicely. To keep your vegetables crunchy, don’t overcook them. When you prepare your foil packs, add cherry tomatoes and asparagus. Cut the asparagus into 2-inch pieces for even cooking. Place them on top of the shrimp, but avoid crowding the pack. This method allows steam to escape, keeping veggies firm. Cooking times are key for perfect foil packs. Grill or bake your packs for 10-12 minutes at 400°F (200°C). Check the shrimp; they should turn pink and opaque. The vegetables should be tender but still crisp. If you like your shrimp more cooked, leave them on for a few minutes longer. Just don’t let them get rubbery! {{image_2}} You can switch shrimp for other proteins. Chicken works great in foil packs. Cut the chicken into small pieces. Use the same marinade. Cook it until fully done. Fish is another tasty choice. White fish like cod or tilapia pairs well with lemon. Just be careful with cooking time. Fish cooks faster than shrimp. Feel free to mix up the veggies! Broccoli or bell peppers add nice crunch. You could also use zucchini or green beans. Just remember to cut them small. This way, they will cook evenly. Adjust the cooking time if needed. Adding corn or snap peas can boost flavor too! Want to change the flavor? Add spices like cayenne for heat. A pinch of chili powder gives a nice kick. Fresh herbs like thyme or basil can brighten up the dish. Try adding a splash of white wine for depth. You could also experiment with different citrus juices. Lime or orange can add a fun twist! After enjoying your Lemon Garlic Shrimp Foil Packs, you may have some leftovers. To store them, let the foil packs cool down first. Then, transfer the contents to an airtight container. Make sure to keep shrimp and veggies together. This helps keep the flavors intact. Store the container in the fridge for up to three days. When you want to enjoy your leftovers, reheating is easy. Place the shrimp and veggies in a microwave-safe dish. Cover it with a damp paper towel to keep moisture in. Heat on medium power for about 2-3 minutes, stirring halfway. Check that the shrimp are heated through and hot. If you prefer, you can also reheat in a skillet over medium heat. Just stir until warm. If you want to save your Lemon Garlic Shrimp Foil Packs for longer, freezing is a great option. First, let the foil packs cool completely. Then, transfer the shrimp and veggies to a freezer-safe bag or container. Squeeze out as much air as you can before sealing. You can freeze them for up to three months. When ready to eat, thaw in the fridge overnight. Then, reheat as mentioned above. Yes, you can prepare the shrimp mixture ahead of time. Mix the shrimp, garlic, olive oil, lemon juice, zest, and spices. Store it in the fridge for up to 24 hours. When you're ready, just assemble the foil packs and cook them. To reheat leftovers, use the oven or microwave. If using the oven, preheat it to 350°F (175°C). Place the foil pack on a baking sheet and heat for about 10 minutes. For the microwave, transfer the shrimp and veggies to a safe dish. Heat for 1-2 minutes or until warm. You can cook these foil packs on the grill or in the oven. For the grill, preheat to 400°F (200°C) and cook for 10-12 minutes. In the oven, set it to the same temperature and follow the same cooking time. Both methods yield delicious results! Lemon garlic shrimp foil packs are simple and tasty. We covered the main ingredients and how to customize them. I shared step-by-step instructions and key tips to ensure success. You also learned about different proteins and veggies to swap in. Lastly, I explained how to store extras and answered your common questions. This dish is not only easy to make but also fun to share. Enjoy experimenting with flavors and make it your own!

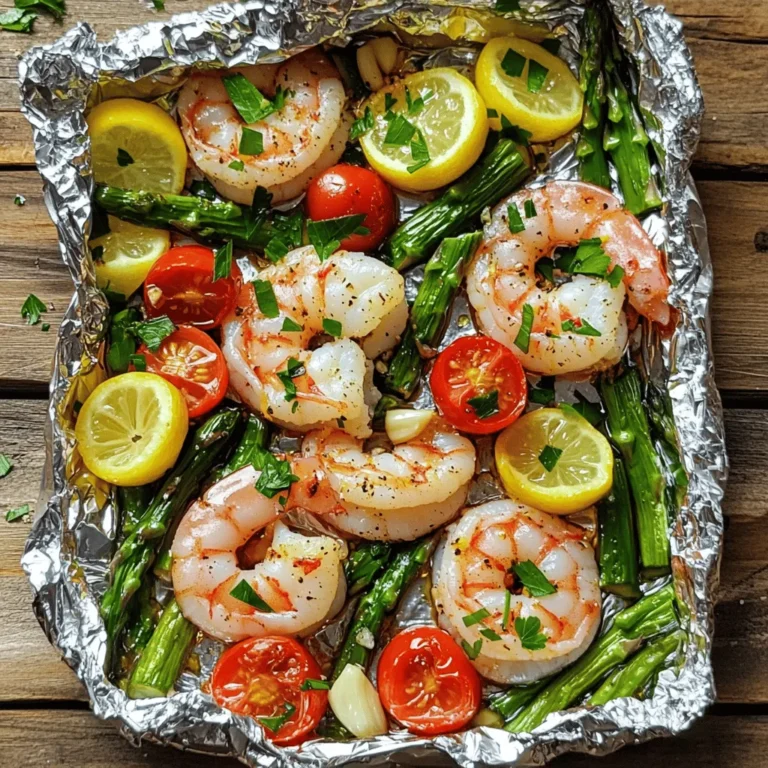
Lemon Garlic Shrimp Foil Packs Tasty and Simple Dish

PREV 1 … 17 18 19 … 57 NEXT
flavor nest kitchen

explore

DessertsDinnerAppetizersDrinks

Our Policies

  • Cookie Policy
  • Copyright Policy
  • Disclaimer
  • GDPR Policy
  • Terms Of Use
Back to Top
  • About
  • Contact Us
  • Privacy Policy
© 2025 flavor nest kitchen