FREE DINNER EBOOK! Get your copy!
  • Cookie Policy
  • GDPR Policy
  • Disclaimer
  • Terms Of Use
  • Visit my other site: Fun Cookie Recipes
flavor nest kitchen
  • Home
  • Dinner
  • Desserts
  • Drinks
  • Appetizers
  • Contact
  • About
  • Privacy Policy
  • Home
  • Dinner
  • Desserts
  • Drinks
  • Appetizers
  • Contact
  • About
  • Privacy Policy
  • Cookie Policy
  • GDPR Policy
  • Disclaimer
  • Terms Of Use
Visit my other site: Fun Cookie Recipes

HOME / CATEGORIES /

Latest

- 2 cups shredded cooked chicken - 1 package (8 oz) cream cheese, softened - 1/2 cup buffalo sauce - 1/2 cup shredded cheddar cheese For these breadsticks, I love using shredded cooked chicken. You can use rotisserie chicken for ease. Cream cheese adds a rich, smooth texture. The buffalo sauce gives a nice spicy kick. I like to mix in shredded cheddar for extra flavor and gooeyness. - 1/4 cup blue cheese crumbles - Fresh parsley for garnish Blue cheese crumbles add a bold taste. If you are not a fan, you can skip it. Chopped parsley makes a fresh, colorful touch on top of the breadsticks. It adds flavor and makes the dish look pretty. - 1 package (1 lb) pizza dough - 1 tablespoon olive oil - 1 teaspoon garlic powder - 1/2 teaspoon onion powder - 1/4 teaspoon salt - 1/4 teaspoon pepper I use pizza dough for a soft and chewy base. Olive oil helps to brown the breadsticks nicely. Garlic powder and onion powder bring out great flavors. A little salt and pepper help balance everything out. This dough is key to making these tasty treats! To make the filling, start with shredded chicken. In a large bowl, mix the chicken with softened cream cheese. Then, add buffalo sauce and stir well. This gives the mixture a spicy kick. Next, fold in shredded cheddar cheese for creaminess. If you like blue cheese, add the crumbles too. This step makes the filling rich and flavorful. Now, let’s roll out the pizza dough. On a floured surface, stretch the dough into a rectangle. Aim for about 1/4 inch thick. This thickness helps the breadsticks cook evenly. Once you have a nice rectangle, cut the dough into strips. Each strip should be about 2 inches wide and 6 inches long. This is where the fun starts! Take a dough strip and place about 2 tablespoons of the buffalo chicken mixture on one end. Carefully roll the dough over the filling. Tuck in the sides as you roll to seal the filling inside. Pinch the ends to keep everything secure. After you finish rolling all the breadsticks, brush the tops with olive oil. This adds a lovely shine and helps them crisp up in the oven. Place the breadsticks on a baking sheet lined with parchment paper. Bake them at 375°F for 15-20 minutes. Watch for a golden brown color. Once done, let them cool for a few minutes. Enjoy your warm, cheesy breadsticks! - Ensuring the perfect dough consistency Use room temperature pizza dough. This makes it easy to roll. If it feels sticky, add a sprinkle of flour. Aim for a smooth surface, about 1/4 inch thick. This will help the breadsticks bake evenly. - How to achieve a golden brown finish Brush the tops with olive oil before baking. This gives them that nice, golden color. Bake them in a preheated oven at 375°F for 15 to 20 minutes. Watch them closely. When they are golden brown, they are ready! - Best dips to serve with breadsticks Serve these breadsticks warm with extra buffalo sauce. Ranch or blue cheese dressing pairs great, too. These dips add extra flavor and creaminess that everyone loves! - Presentation tips for a rustic look Use a basket lined with parchment paper to serve. This adds charm and keeps the breadsticks warm. Garnish with fresh parsley for a pop of color. It makes the dish look fresh and inviting. - Prepare and freeze for later use You can make these breadsticks ahead of time. Stuff and roll them, then place them on a baking sheet. Freeze until solid, then transfer to a bag. They can last up to three months in the freezer. - Reheating instructions for best results To reheat, bake from frozen at 375°F for about 20 to 25 minutes. Check until they’re hot and golden brown. This keeps them crispy on the outside and warm on the inside. {{image_2}} You can spice up your buffalo chicken dip by adding more heat. Use extra buffalo sauce or add diced jalapeños for a kick. To mix up the flavors, try different cheeses too. Instead of cheddar, use Monterey Jack or pepper jack. The creaminess changes the taste and makes it fun. Dip your breadsticks in ranch or blue cheese dressing. Ranch gives a creamy touch, while blue cheese adds a bold flavor. You can also try other sauces like honey mustard or barbecue. Each sauce brings its own twist to your experience. If you need gluten-free options, choose gluten-free pizza dough. Many brands offer tasty choices that work well. For vegetarian friends, swap the chicken with beans or roasted veggies. This way, everyone can enjoy these stuffed breadsticks! To keep your leftover breadsticks fresh, wrap them tightly in plastic wrap or aluminum foil. Place them in an airtight container. This helps keep the moisture in and the breadsticks soft. They can stay fresh in the fridge for up to three days. Make sure to eat them before they dry out! If you want to save breadsticks for later, freezing is a great option. First, let them cool completely. Then, wrap each breadstick in plastic wrap and place them in a freezer-safe bag. They can last in the freezer for up to three months. When you’re ready to eat, take them out and thaw them in the fridge overnight. To reheat, bake them at 375°F (190°C) for about 10-15 minutes. This will make them warm and crispy again. Check your breadsticks for signs of spoilage before eating. If they smell sour or have a strange color, it’s best to throw them away. Also, feel for any slimy texture. Always follow food safety rules to stay safe! Yes, you can use store-bought buffalo chicken dip. It saves time and effort. But homemade dip tastes fresher. Store-bought dips may have less control over spice and flavor. If you love a kick, check the label. Choose one that suits your taste. Shredded rotisserie chicken works best for this recipe. It is already cooked and full of flavor. Just shred the chicken into small pieces. You can use leftover chicken too. Any cooked chicken works well, but rotisserie makes it easy. To make them veggie-friendly, replace chicken with cooked veggies. You can try mushrooms, bell peppers, or spinach. Mix these with the cream cheese and buffalo sauce. This gives you a tasty veggie dip. You can adjust the spices for more flavor. Yes, you can bake them from frozen. Preheat your oven to 375°F (190°C). Place frozen breadsticks on a baking sheet. Bake for about 20-25 minutes. Check if they are golden brown and hot inside. Let them cool a bit before serving. In this post, we explored how to make Buffalo Chicken Dip Stuffed Breadsticks. We covered the main ingredients, along with optional items for extra flavor. I shared step-by-step instructions for preparation, cooking tips, and creative serving suggestions. You can also find ways to store and modify the recipe for different tastes. These breadsticks are a fun and tasty treat. Try them out at your next gathering or snack time!

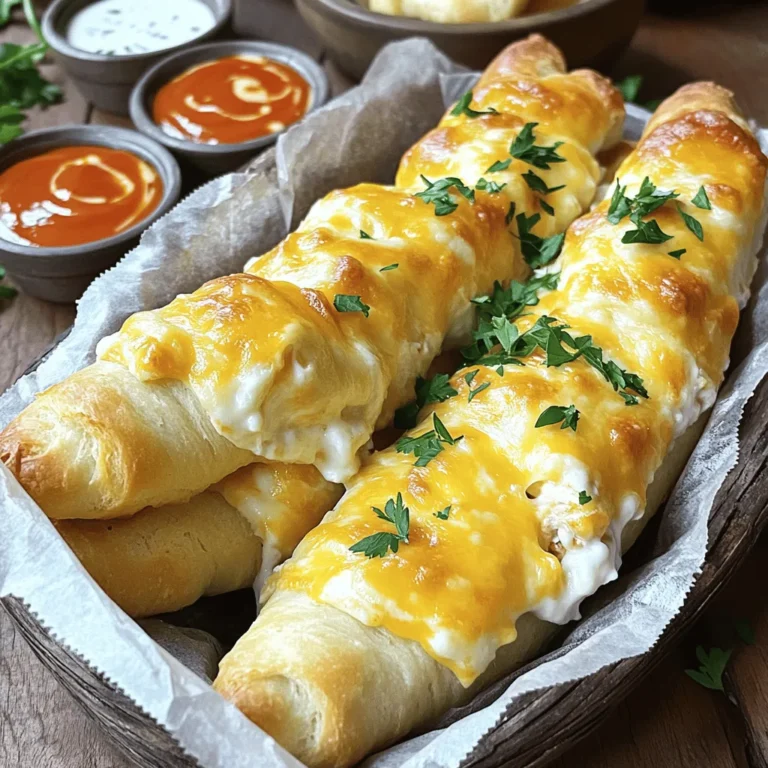
Buffalo Chicken Dip Stuffed Breadsticks Delight

To make these white chocolate raspberry cookies, gather these key ingredients: - 1 cup unsalted butter, softened - 1 cup granulated sugar - 1 cup brown sugar, packed - 2 large eggs - 2 teaspoons vanilla extract - 3 cups all-purpose flour - 1 teaspoon baking soda - 1/2 teaspoon salt - 1 cup white chocolate chips - 1 cup fresh raspberries, halved These ingredients create a soft, chewy cookie with a sweet and tangy flavor. For an extra burst of taste, consider adding: - 1/2 cup of crushed freeze-dried raspberries These freeze-dried raspberries boost the fruit flavor and add a fun texture. You can swap some ingredients if needed: - Use coconut oil instead of butter for a dairy-free option. - Substitute brown sugar for coconut sugar for a different sweetness. - If you don’t have white chocolate chips, try milk chocolate or dark chocolate chips. These swaps can change the flavor while still keeping your cookies delicious. 1. Start by preheating your oven to 350°F (175°C). This step ensures even baking. 2. Line a baking sheet with parchment paper. This helps the cookies release easily. 3. In a large bowl, cream together the softened butter, granulated sugar, and brown sugar until the mixture is light and fluffy. This takes about 2-3 minutes. 4. Add the eggs one at a time. Mix well after each addition. Then, stir in the vanilla extract to add great flavor. 5. In a separate bowl, whisk the all-purpose flour, baking soda, and salt together. This helps to evenly distribute the dry ingredients. 6. Gradually add the dry mix to the wet mix. Mix until just combined. Do not overmix—this keeps the cookies soft. 7. Gently fold in the white chocolate chips and halved raspberries. If you want more raspberry flavor, add the crushed freeze-dried raspberries. Be careful not to break the fresh raspberries too much. 1. Use a tablespoon or cookie scoop to drop heaping spoonfuls of dough onto the prepared baking sheet. Make sure to space them about 2 inches apart. 2. Bake the cookies in the preheated oven for 10-12 minutes. Look for lightly golden edges. The centers will look soft, but they will firm up as they cool. 1. After baking, allow the cookies to cool on the baking sheet for about 5 minutes. This helps them set. 2. Transfer the cookies to a wire rack to cool completely. This keeps them from getting soggy. 3. For a beautiful presentation, arrange the cookies on a platter. Dust them with powdered sugar and add whole raspberries around for a colorful touch. To get the best cookie, start with room temperature butter. Softened butter blends well with sugar. This mix makes cookies light and fluffy. Use a kitchen scale for measuring flour. Too much flour makes cookies dry. When mixing, stop as soon as you see no dry flour. This keeps the cookies tender. Set your oven to 350°F (175°C) before you start. Preheating helps cookies bake evenly. Use parchment paper on your baking sheet. It prevents sticking and makes cleanup easy. Space dough balls 2 inches apart. This gives them room to spread. Bake for 10-12 minutes. Look for lightly golden edges. The centers should be soft. They will firm up as they cool. Once cooled, store cookies in an airtight container. This keeps them soft and fresh. You can add a slice of bread to help them stay moist. If you want to keep cookies longer, freeze them. Wrap each cookie in plastic wrap, then place them in a freezer bag. They can last up to 3 months. When you want one, just thaw at room temperature. Enjoy your treat fresh! {{image_2}} You can switch it up with dark chocolate instead of white chocolate. This adds a rich taste. You can also try other fruits! Strawberries or blueberries work well with the cookie base. Just remember to adjust the sweetness for different fruits. To make gluten-free cookies, use a gluten-free flour blend. This will keep the texture nice. For vegan options, swap butter for coconut oil and eggs for flax eggs. Use dairy-free white chocolate chips for a tasty vegan treat. When serving, make it fun! Arrange cookies on a colorful platter. Dust with powdered sugar for a pretty touch. Add fresh berries around the cookies for a pop of color. You can even serve them with a scoop of vanilla ice cream for a delightful dessert! To keep your white chocolate raspberry cookies fresh, store them in an airtight container. This helps prevent them from drying out. Place parchment paper between layers to avoid sticking. You can keep them at room temperature for up to a week. If you want to save some cookies for later, freezing is easy! First, let the cookies cool completely. Then, place them in a single layer on a baking sheet. Freeze them for about 1 hour. After that, transfer the cookies to a freezer-safe bag. They can last up to three months in the freezer. These cookies taste best within a few days. After that, they may lose some flavor. If you see any signs of moisture or changes in texture, it's time to toss them. Always check for freshness before enjoying. For the best taste, eat them within a week or freeze them for later! Yes, you can use frozen raspberries. They work well in this recipe. Just be aware they may add extra moisture. This can change the texture a bit. If you choose frozen, do not thaw them. Fold them in gently to avoid mushiness. To keep your cookies soft and chewy, avoid overbaking them. Bake until the edges are golden. The centers should look soft. Using brown sugar also helps with chewiness. Lastly, do not skip the resting time after mixing. This lets the dough hydrate. If your dough is too sticky, add a bit more flour. Start with one tablespoon at a time. Mix it in well until the dough is manageable. You can also chill the dough for 30 minutes. Chilling makes it easier to scoop and shape. In this article, we explored key ingredients for making cookies, including both essential and optional components. We walked through easy steps, from preparation to baking and serving. I shared best practices for achieving cookie consistency, along with creative variations and storage tips. Remember, baking cookies is about experimenting and having fun. Use these guides to make delicious treats that you'll love! Enjoy your baking adventure!

White Chocolate Raspberry Cookies Irresistible Delight

- 8 oz fettuccine or spaghetti - 1 cup fresh cilantro, chopped - 1/2 cup sour cream - 1/4 cup cream cheese, softened - 1/2 cup lime juice (about 3 limes) - 1 garlic clove, minced - 1 tablespoon olive oil - Salt and pepper to taste - Zest of 1 lime - 1/4 cup grated Parmesan cheese - Cherry tomatoes, halved (for garnish) For this creamy cilantro lime pasta, you will need some key ingredients. Start with 8 ounces of fettuccine or spaghetti. This will be your pasta base. Next, use 1 cup of fresh cilantro, chopped finely. The cilantro gives a bright flavor. You will also need 1/2 cup of sour cream and 1/4 cup of softened cream cheese. These create the creamy sauce that makes this dish special. Don’t forget the lime juice! You will need 1/2 cup, which comes from about 3 limes. The juice adds a zesty kick. A minced garlic clove and 1 tablespoon of olive oil are also important. They boost the flavor of the sauce. Lastly, keep salt and pepper handy for seasoning. If you want to elevate your dish, consider adding the zest of 1 lime. This will enhance the lime flavor. For a cheesy touch, add 1/4 cup of grated Parmesan cheese. For a pop of color, use cherry tomatoes, halved, as a garnish. {{ingredient_image_1}} 1. Start by boiling salted water in a large pot. The salt adds flavor to the pasta. 2. Add 8 ounces of fettuccine or spaghetti. Cook until it's al dente. This means it should be firm when you bite it. 3. Drain the pasta in a colander. Don’t forget to reserve 1/2 cup of pasta water. This water helps with the sauce later. 1. In a mixing bowl, combine the sour cream, cream cheese, lime juice, minced garlic, lime zest, and olive oil. 2. Whisk all the ingredients together until you have a smooth and creamy sauce. This is where the magic happens! 1. In the same pot you used for the pasta, mix the drained pasta with the creamy sauce. 2. Stir well so that the pasta gets fully coated. If the sauce feels too thick, slowly add some of the reserved pasta water. This helps reach your desired creaminess. 3. Finally, fold in the fresh cilantro. This adds a bright, fresh flavor that pairs perfectly with the creamy sauce. To get the best creamy texture in your pasta, mix the sauce well. I like to use a whisk for this. It helps blend the sour cream, cream cheese, lime juice, and garlic. This ensures every bite is rich and smooth. When you combine the pasta with the sauce, add some reserved pasta water bit by bit. This helps the sauce cling to the pasta. If the sauce feels thick, a little pasta water makes it just right. Balancing lime and cilantro is key. The lime brings a bright taste, while cilantro offers a fresh note. To get this right, start with less lime juice. You can always add more to suit your taste. I also suggest tasting as you go. A pinch of salt can bring out the flavors. If you like spice, a dash of pepper can add warmth without overpowering the dish. For a beautiful plate, twirl the pasta into a nest shape. This looks great and showcases your hard work. You can also sprinkle grated Parmesan on top for extra flavor. For a colorful touch, add halved cherry tomatoes as a garnish. If you want to make it a full meal, serve the pasta with grilled chicken or roasted vegetables. This adds protein and makes the meal more filling. Pro Tips Choose Fresh Ingredients: Always opt for fresh cilantro and limes to enhance the flavor of your dish. Fresh ingredients can make a significant difference in taste. Reserve Pasta Water: Don’t forget to save some pasta water before draining. It’s a great way to adjust the sauce consistency and helps it adhere better to the pasta. Adjust Creaminess: If you prefer a lighter sauce, you can substitute half of the sour cream with Greek yogurt. It adds a tangy flavor while keeping it creamy. Add a Protein: For a heartier meal, consider adding grilled chicken, shrimp, or black beans to the pasta. They pair well with the creamy cilantro lime sauce. {{image_2}} You can switch up the pasta you use for this dish. Fettuccine and spaghetti are great, but why not try penne or linguine? These shapes hold sauce well, making each bite full of flavor. If you need gluten-free options, many brands offer rice or chickpea pasta. These alternatives taste great and work well with the creamy cilantro lime sauce. Want to spice things up? You can add cumin for warmth or jalapeño for heat. Both will give your pasta a fun twist. You can also toss in vegetables like spinach or bell peppers. These add color, crunch, and nutrients to your dish. Just sauté the veggies lightly before mixing them in. They will brighten your pasta and make it even more tasty. If you're looking for vegan options, cashew cream or coconut yogurt works wonders. To make cashew cream, soak raw cashews and blend them until smooth. This creates a rich base for your sauce. Coconut yogurt is another great choice; it adds creaminess and a hint of coconut flavor. Both options keep your pasta creamy without dairy, allowing everyone to enjoy it. To keep your creamy cilantro lime pasta fresh, store it in an airtight container. This helps prevent any moisture loss. Make sure to let the pasta cool to room temperature before sealing. It lasts about 3 to 4 days in the fridge. After that, the flavors may fade, and the texture may change. For reheating, use a stovetop or microwave to warm your pasta. If using the stovetop, add a splash of water or olive oil. This will help restore the creaminess. Heat on low to avoid burning. If using a microwave, cover the dish with a damp paper towel. This keeps moisture in. Aim for a temperature of 165°F to ensure it's hot throughout. Yes, you can freeze creamy pasta, but the texture may change when thawed. To freeze, place the pasta in a freezer-safe container. Leave some space for expansion. It can last up to 2 months in the freezer. When ready to eat, thaw it in the fridge overnight. To reheat, follow the stovetop method, adding a little liquid as needed. You can use Greek yogurt instead of sour cream. It has a similar tang and creaminess. If you want a dairy-free option, try coconut yogurt. It will add a hint of sweetness. You can also use cashew cream for a nutty flavor. Each option works well in the creamy cilantro lime pasta. Yes, you can prepare many parts of this dish ahead of time. Cook the pasta and let it cool. Store it with a bit of olive oil to prevent sticking. You can also mix the creamy sauce and keep it in the fridge. Just combine them before serving. This saves time on busy nights. Absolutely! Creamy cilantro lime pasta stores well. Keep it in an airtight container in the fridge for up to three days. When you're ready to eat, reheat it gently on the stove or in the microwave. Add a splash of water or extra lime juice to keep it creamy. This dish tastes great even on the second day! This blog post covered how to make a creamy pasta dish with fresh flavors. We learned about the main and optional ingredients, step-by-step instructions, and practical tips. Remember to adjust the sauce's texture with reserved pasta water for creaminess. Explore variations to suit your taste, whether by changing pasta types or adding spices. Enjoy this dish as a tasty meal or during meal prep. You now have the knowledge to impress with this flavorful recipe.

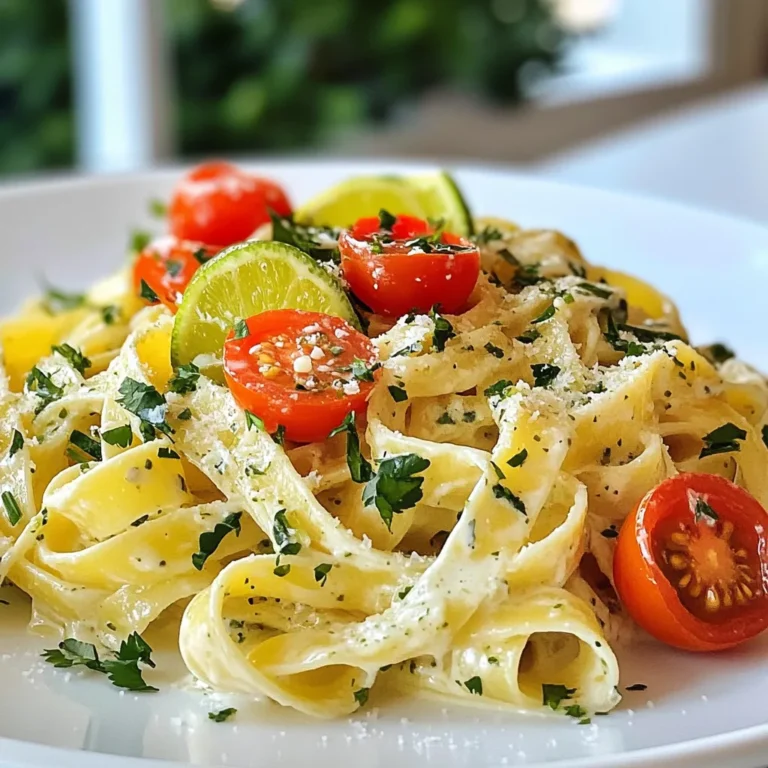
Creamy Cilantro Lime Pasta Flavorful Weeknight Meal

To make Snickerdoodle Crumble Donuts, you need these key ingredients: - 2 cups all-purpose flour - 1 cup granulated sugar - 1 tablespoon baking powder - 1/2 teaspoon salt - 1 tablespoon ground cinnamon - 1/2 cup unsalted butter, melted - 2 large eggs - 1 cup milk - 1 teaspoon vanilla extract - 1/2 cup brown sugar, packed - 1/3 cup rolled oats - 1/4 cup flour (for topping) - 1/4 cup sugar mixed with 1 tablespoon cinnamon (for topping) Each ingredient plays a role. The flour gives structure. Sugar adds sweetness. Butter lends moisture and flavor. Eggs help bind it all together. Milk keeps the batter smooth. Cinnamon brings that classic snickerdoodle taste. You can switch things up with these optional ingredients: - Chocolate chips for a sweet twist - Nuts for added crunch - Different spices like nutmeg for variation Feel free to get creative. These options let you personalize your donuts to your taste. Choosing the best ingredients makes a big difference. Here’s what to look for: - Flour: Use fresh all-purpose flour, ideally stored in a cool, dry place. - Butter: Choose unsalted butter for better control over salt levels. - Sugar: Granulated sugar should be fine and dry. Brown sugar must be packed and soft. - Spices: Use fresh ground cinnamon for the best flavor. Old spices lose their punch. Always check the expiration dates to ensure freshness. Quality ingredients lead to tastier donuts. Start by preheating your oven to 350°F (175°C). This helps the donuts bake evenly. Next, take your donut pan and grease it with cooking spray. This step prevents the donuts from sticking. In a large bowl, whisk together the following dry ingredients: - 2 cups all-purpose flour - 1 cup granulated sugar - 1 tablespoon baking powder - 1/2 teaspoon salt - 1 tablespoon ground cinnamon Make sure these ingredients are well mixed. In another bowl, combine the wet ingredients: - 1/2 cup unsalted butter, melted - 2 large eggs - 1 cup milk - 1 teaspoon vanilla extract Stir until smooth. This keeps the flavors balanced. Now, pour the wet mixture into the dry ingredients. Stir gently until just combined. It’s okay if a few lumps remain. In a separate bowl, prepare the crumble topping by mixing: - 1/2 cup brown sugar, packed - 1/3 cup rolled oats - 1/4 cup flour (for topping) Add the remaining melted butter and mix until crumbly. Next, spoon the donut batter into the prepared donut pan, filling each cavity halfway. Then, sprinkle a generous amount of the crumble topping on each donut. This adds flavor and texture. Place the donut pan in the preheated oven and bake for about 12-15 minutes. You’ll know they are ready when a toothpick comes out clean from the center. Once baked, let the donuts cool in the pan for 5 minutes. After that, transfer them to a wire rack. When cooled, toss the donuts in a mixture of 1/4 cup sugar and 1 tablespoon cinnamon to coat. Enjoy your delightful treats warm or at room temperature! Overmixing can make your donuts tough. When you mix the wet and dry ingredients, stir gently. You want a few lumps in your batter. This helps keep the donuts light and fluffy. If you mix too long, the donuts may not rise well. The crumble topping is key to these donuts. To make it right, mix brown sugar, oats, and flour in a bowl. Then, add melted butter until it looks crumbly. It should not be too wet or too dry. Aim for a texture that holds together but breaks apart easily. This will give your donuts a crunchy topping. Store your Snickerdoodle Crumble Donuts in an airtight container. This keeps them fresh for longer. If you want to enjoy them later, place parchment paper between layers. This prevents sticking. For best taste, eat them within a few days. If they last longer, you can freeze them. Just wrap each donut tightly. When you want one, thaw it at room temperature. {{image_2}} Want to make your Snickerdoodle Crumble Donuts even more fun? Try adding cocoa powder. Replace 1/2 cup of flour with 1/2 cup of cocoa powder. This change gives your donuts a rich chocolate taste. Mix the cocoa with the dry ingredients before combining with the wet. Then, follow the same steps for the crumble topping. The chocolate flavor pairs well with cinnamon sugar, making each bite a treat. If you need gluten-free donuts, it is easy to adapt this recipe. Use a gluten-free flour blend instead of regular flour. Make sure your baking powder is gluten-free as well. The rest of the ingredients can stay the same. This way, you can enjoy delicious donuts without gluten. The texture will still be soft and tasty, perfect for any occasion. To make vegan Snickerdoodle Crumble Donuts, swap a few key ingredients. Replace the eggs with flax eggs. Mix 1 tablespoon of flaxseed meal with 2.5 tablespoons of water for each egg. Use plant-based milk, like almond or oat milk, instead of regular milk. For butter, use coconut oil or vegan butter. These swaps keep the donuts fluffy and moist while being fully vegan. Enjoy them warm with your favorite drink. To keep your Snickerdoodle Crumble Donuts fresh, store them in an airtight container. Use a container that fits the donuts well so they don’t get squished. You can also wrap them in plastic wrap before putting them in the container. This method helps keep moisture in and stops them from drying out. If you want to enjoy warm donuts, reheating is simple. Place a donut on a microwave-safe plate. Heat it in the microwave for about 10-15 seconds. This will make it warm and soft again. For a crispier texture, try reheating in an oven. Preheat the oven to 350°F (175°C) and bake the donut for about 5 minutes. When stored correctly, these donuts last for about 3 days at room temperature. If you keep them in the fridge, they can last up to a week. For longer storage, freeze the donuts. They can stay fresh in the freezer for up to 2 months. Just remember to wrap them well to prevent freezer burn! Snickerdoodle Crumble Donuts stand out with their unique flavor. They combine sweet cinnamon with a crumbly topping. This topping adds texture and a delightful crunch. Regular donuts may not have this extra layer of taste. The mix of cinnamon and sugar gives a warm, cozy feel. Each bite is a blend of soft donut and crunchy crumble. This is what makes them special and hard to resist. Yes, you can freeze Snickerdoodle Crumble Donuts! To freeze, place them in an airtight container. Make sure to separate layers with parchment paper. They can last up to three months in the freezer. When you're ready to enjoy them, simply thaw them at room temperature. You can also reheat them in the oven for a few minutes. This warms them up and restores their texture. The best way to serve Snickerdoodle Crumble Donuts is warm. You can enjoy them right after baking for a soft texture. If they cool, dust them again with cinnamon sugar. This adds extra flavor and a nice touch. Pair them with a cup of coffee or milk. This makes for a perfect snack. For a fun twist, serve them with a scoop of ice cream! In this post, we explored how to make delicious Snickerdoodle Crumble Donuts. We covered essential and optional ingredients and shared tips for quality selection. You learned the step-by-step process, from prepping your oven to baking the donuts. Plus, we discussed variations, storage tips, and answered common questions. Remember, your choice of ingredients and technique matters. Enjoy making these treats, and share them with friends!

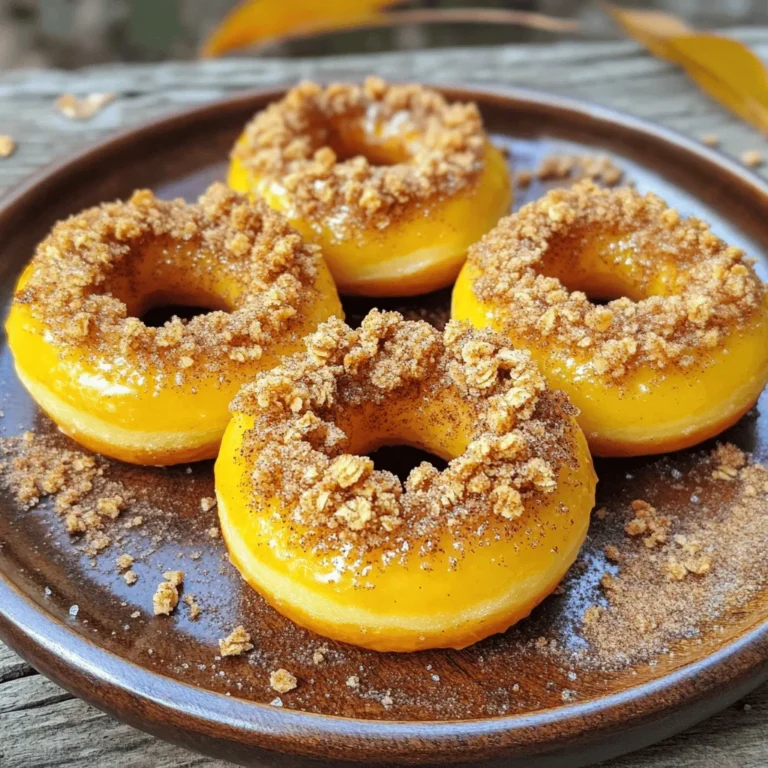
Snickerdoodle Crumble Donuts Irresistibly Delicious Treat

- 2 boneless, skinless chicken breasts - 1 cup jasmine rice - 2 cups chicken broth - 1 tablespoon olive oil - 2 cloves garlic, minced - Zest and juice of 2 limes - 1/2 cup fresh cilantro, chopped - 1 teaspoon cumin - 1 teaspoon chili powder - Salt and pepper to taste - 1 cup cherry tomatoes, halved - 1/2 cup black beans, rinsed and drained - 1 avocado, sliced - Lime wedges for serving The main ingredients come together to create a bright and fresh dish. The chicken provides protein and holds the marinade well. Jasmine rice adds softness and a slight sweetness. Chicken broth ensures the rice absorbs rich flavor. Olive oil helps to sauté the garlic, which adds depth. Lime juice and zest give that zesty kick, while fresh cilantro adds a burst of herbaceous taste. Cumin and chili powder round out the flavor with warmth. - Additional cilantro - Sliced jalapeños - Sour cream or yogurt These optional garnishes can elevate your bowls even more. Extra cilantro adds freshness. Sliced jalapeños provide heat for those who like spice. A dollop of sour cream or yogurt balances the lime's acidity. Feel free to mix and match based on your taste! To marinate the chicken, mix lime zest, lime juice, olive oil, minced garlic, cumin, chili powder, salt, and pepper in a bowl. Add the two chicken breasts, making sure they are fully coated in the marinade. I recommend letting the chicken marinate for at least 30 minutes. If you have more time, marinate it for up to 2 hours in the fridge. This helps the chicken soak in all the great flavors. Start by rinsing one cup of jasmine rice under cold water. Rinse it until the water runs clear. In a saucepan, combine the rinsed rice with two cups of chicken broth. Bring it to a boil, then reduce the heat. Cover and let it simmer for 15 minutes. After cooking, let the rice rest for 5 minutes, still covered. This resting time makes the rice fluffy. Once marinated, heat a grill pan or skillet over medium-high heat. Cook the chicken for about 6 to 7 minutes on each side. The chicken should no longer be pink in the center. To check doneness, use a meat thermometer. The ideal temperature is 165°F. After cooking, let the chicken rest for a few minutes before slicing it. Resting keeps the chicken juicy. To assemble your bowls, start with a layer of fluffy jasmine rice. Next, add sliced grilled chicken on top. Then, sprinkle halved cherry tomatoes, black beans, and sliced avocado. Make sure to create colorful layers. This not only looks nice but also adds different textures and flavors. Finish your bowls by garnishing them with chopped cilantro. Squeeze fresh lime juice over the top for a burst of flavor. Serve the bowls with lime wedges on the side. These add even more zest and a fresh touch to each bite. Enjoy! To boost the taste of your cilantro lime chicken rice bowls, try adjusting the spices. If you like heat, add more chili powder or a pinch of cayenne. For a deeper flavor, mix in smoked paprika or even a dash of chipotle powder. Adding more veggies can also elevate your dish. Consider bright bell peppers, sweet corn, or diced zucchini. These will add color and texture, making your bowls more vibrant and fun. If you want to swap out chicken, consider using shrimp or firm tofu. Both options soak up the marinade well and offer a different taste. For a plant-based meal, tempeh works great too. For rice, jasmine is lovely, but you can use brown rice or quinoa. These grains will add fiber and nutrients while still pairing well with the other flavors. You can grill or use a skillet to cook your chicken. Grilling gives it a smoky flavor and nice char marks. If you use a skillet, you can achieve a great crust with just a little olive oil. To get the best char on your chicken, ensure your grill or skillet is hot. Sear the chicken for 6-7 minutes on each side. Look for a nice brown color to know it’s getting that perfect char. Use a meat thermometer to check for doneness; the center should reach 165°F. {{image_2}} For a vegetarian twist, you can swap chicken for tofu or tempeh. Both options absorb flavors well. To prepare tofu, press it to remove excess moisture. Cut it into cubes and marinate it just like the chicken. Use the same marinade, but consider adding a dash of soy sauce for depth. For tempeh, slice it thin and marinate it as well. Both options take on the tasty cilantro and lime flavors. Cook them in a skillet until golden brown. This gives you a hearty base for the rice bowl. You can easily customize your rice bowls by adding seasonal veggies. Think fresh bell peppers, zucchini, or corn. Just sauté or roast these veggies to enhance their texture and flavor. You can mix and match to suit your taste. Also, consider customizing toppings. For crunchy texture, add sliced radishes or crispy onions. If you love heat, sprinkle on some jalapeños. You can also use different sauces, like sriracha or a creamy dressing, to switch things up. To bring in international flavors, think about adding spices from various cuisines. For an Asian twist, use ginger and sesame oil in your marinade. You can also sprinkle sesame seeds on top for a nice finish. If you prefer a Mexican flair, add smoked paprika or diced jalapeños. You could also mix in some corn and black beans for a more traditional feel. These small changes can turn your cilantro lime chicken rice bowls into a global delight. You can store leftovers in the refrigerator. Place the chicken and rice in a sealed container. They will stay fresh for about three to four days. Keep the chicken and rice separate if possible. This helps maintain texture and flavor. To freeze the components, let them cool first. Place chicken and rice in separate airtight bags. Remove as much air as possible to prevent freezer burn. You can freeze the chicken for up to three months. For the rice, it lasts about one month. To defrost, place in the fridge overnight. You can also use a microwave for quick defrosting. The best way to reheat chicken is in the oven. Preheat your oven to 350°F. Place the chicken on a baking sheet. Heat for about 15 minutes or until warm. For rice, use a microwave. Add a splash of water to keep it moist. Cover the bowl with a damp paper towel. This will help keep the rice fluffy. Remember to taste and adjust seasoning if needed. Marinate the chicken for 30 minutes for good flavor. You can go up to 2 hours in the fridge for even more zest. This time lets the lime and spices soak in. You can use brown rice or quinoa. Both are great options. Brown rice adds more fiber, while quinoa is gluten-free. If you need a low-carb choice, try cauliflower rice. Yes! You can prep these bowls ahead of time. Cook the chicken and rice, then store them in airtight containers. Keep the toppings like avocado fresh until you serve. This makes meal prep easy. To add heat, mix in some jalapeños or red pepper flakes. You can also use a spicy sauce like sriracha. Adjust it to fit your taste and enjoy the extra kick. Consider serving corn salsa or a simple green salad. These sides add freshness. You can also pair it with tortilla chips for crunch. They complement the chicken rice bowls well. In this post, we explored a tasty chicken bowl recipe. We covered key ingredients, step-by-step instructions, and tips to enhance flavor. Remember, marinating the chicken is key for great taste. You can customize your bowls with various toppings and spices. For leftovers, store and reheat properly to keep them fresh. This dish is fun to make and easy to adjust. Enjoy creating your perfect bowl!

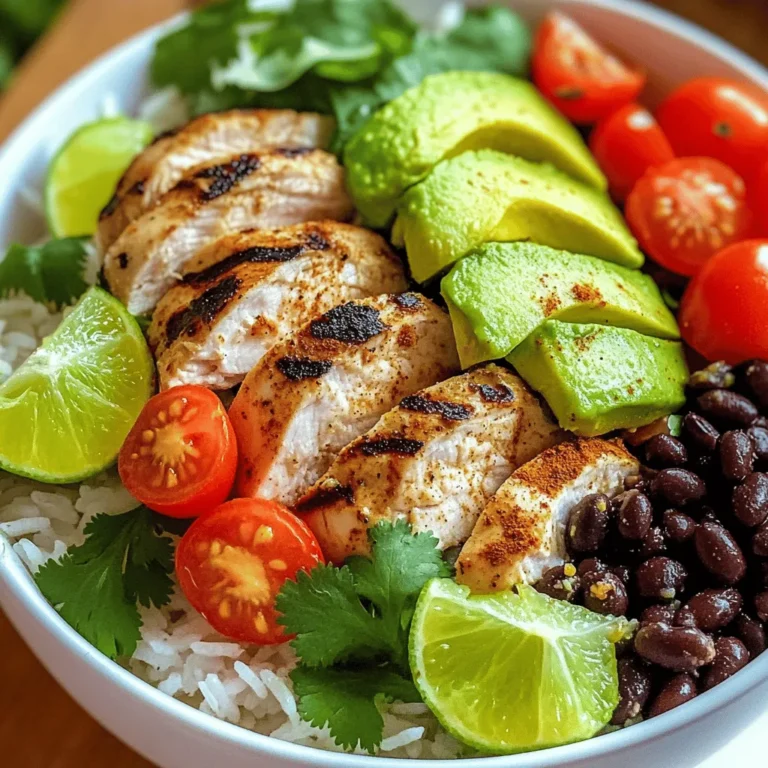
Cilantro Lime Chicken Rice Bowls Flavorful and Simple

- 24 Oreo cookies, crushed - 2 cups heavy whipping cream - 1 cup powdered sugar - 1 teaspoon vanilla extract - 1/2 cup cream cheese, softened - 1/2 cup chocolate chips (optional) For this Cookies and Cream Icebox Cake, you will need a few simple ingredients. First, grab 24 Oreo cookies. These will give the cake its rich chocolate flavor. Next, you will need 2 cups of heavy whipping cream. This is key for a light and fluffy texture. You will also need 1 cup of powdered sugar to sweeten the cream. A teaspoon of vanilla extract adds a lovely aroma and flavor. Don't forget the cream cheese! You need 1/2 cup, softened to mix easily. If you love chocolate, add 1/2 cup of chocolate chips on top for extra crunch. Finally, keep some extra Oreo cookies for garnish. - Mixing bowls - Electric mixer - Rectangular baking dish - Plastic wrap To make this cake, you will need a few tools. Start with mixing bowls to combine your ingredients. An electric mixer is essential for whipping the cream, as it makes the job easier and faster. A rectangular baking dish, about 9x13 inches, is perfect for layering your cake. Lastly, plastic wrap will help cover the dish while it chills in the fridge. First, grab a large bowl. Combine 2 cups of heavy whipping cream, 1 cup of powdered sugar, and 1 teaspoon of vanilla extract. Now, use an electric mixer on medium-high speed. Whip this mixture until soft peaks form. This means it should be thick but still smooth. In another bowl, beat 1/2 cup of softened cream cheese until it is creamy and smooth. Slowly add the whipped cream mixture to the cream cheese. Gently fold them together until they mix well. Now, let’s build our cake! Take a rectangular baking dish, about 9x13 inches. Spread a layer of the cream cheese mixture evenly at the bottom. Next, dip each Oreo cookie in milk for 1 to 2 seconds. Make sure not to soak them. Place the dipped Oreos on top of the cream cheese layer. Repeat this process to create even layers. After the Oreos, spread more cream cheese mixture on top. Keep layering until you finish all your ingredients. End with a layer of cream mixture on top. If you want, sprinkle chocolate chips for extra texture. Once your cake is layered, cover the dish with plastic wrap. Place it in the fridge to chill. I recommend letting it sit for at least 4 hours, or even overnight for the best texture. The longer it chills, the better the flavors meld. When you’re ready to serve, garnish the top with crushed Oreos for a delightful crunch. Enjoy your Cookies and Cream Icebox Cake! To whip cream well, start with cold tools. Chill your mixing bowl and beaters for best results. Pour the heavy cream into the bowl. Then, add powdered sugar and vanilla extract. Mix on medium-high speed. Stop when soft peaks form. This means the cream should hold its shape but still be smooth. When you fold the whipped cream into the cream cheese, be gentle. Use a spatula to scoop from the bottom. Lift the mixture over the top. This helps keep the air in the cream. Don't stir too hard. You want a light and fluffy texture. If you need a dairy-free version, try coconut cream. Chill a can of coconut milk overnight. Scoop out the solid part and whip it like regular cream. For gluten-free options, use gluten-free cookies. Many brands now make tasty gluten-free Oreos. This way, everyone can enjoy your cake. To make your cake even better, think about toppings. Add crushed Oreos or sprinkles on top. You can also layer in some chocolate chips for extra crunch. If you want a twist, try different cookies. Mint Oreos add a fresh taste. Or use peanut butter cookies for a nutty flavor. Be creative and have fun! {{image_2}} You can change the flavor of your Cookies and Cream Icebox Cake easily. Try a mint version for a fresh twist. Use mint Oreo cookies instead of regular ones. This adds a cool taste that pairs well with the cream. Simply mix crushed mint Oreos into the cream layer for even more flavor. Another great option is the peanut butter version. Swap some cream cheese for peanut butter. It gives a rich and nutty flavor. You can also mix crushed peanut butter cookies in the layers. This adds a crunchy texture that everyone will love. Layering is key to a great icebox cake. You can use different cookies for variety. Try vanilla wafers or chocolate wafers instead of Oreos. Each cookie brings a unique taste that changes the cake. Explore different creams or fillings too. Instead of just whipped cream, mix in flavored yogurt or pudding. This adds a fun twist to each bite. Adding fruit like sliced strawberries or bananas will brighten each layer. Make your cake even more fun with creative presentations. Serve it in individual glasses for a personal touch. Layer the cake mixture and cookies in the glass. This makes a pretty and tasty treat for parties. Garnishing is also important. Use whole or crushed Oreo cookies on top for a nice look. You can also drizzle chocolate or caramel sauce over the top. This not only looks great but adds extra flavor too. To keep your Cookies and Cream Icebox Cake fresh, use an airtight container. This will prevent the cake from drying out or absorbing other smells from the fridge. If you don’t have a container, cover the dish tightly with plastic wrap. Store it in the refrigerator for best results. If you want to save some cake for later, you can freeze it. Wrap the cake well in plastic wrap, then place it in a freezer-safe container. This helps protect it from freezer burn. When you are ready to enjoy it, take it out and place it in the fridge for about 6 hours to thaw. You can also leave it on the counter for about 1-2 hours until it softens. In the fridge, your Cookies and Cream Icebox Cake will stay fresh for about 5 days. After that, it may lose its taste and texture. Look for signs of spoilage, such as changes in color or an off smell. If you see mold, it’s best to toss it out. Keeping an eye on these details will help ensure you enjoy every last bite! The Cookies and Cream Icebox Cake needs to chill for at least 4 hours. For the best flavor and texture, I recommend letting it set overnight. This allows the cream to firm up and the flavors to blend. When you cut into it after this time, you’ll find a smooth, creamy delight. Yes, you can use other cookies if you like. Some great options are chocolate wafer cookies or even mint-flavored cookies. Just remember to adjust the soaking time in milk to keep the layers intact. Get creative and mix flavors to find your favorite! Absolutely! Making this dessert ahead of time is a smart idea. It saves you time on the day you want to serve it. Plus, the longer it sits, the better the flavors meld together. Just cover it well and store it in the fridge until you're ready to share. You have all the tools to make a delightful Cookies and Cream Icebox Cake. We covered the main ingredients, step-by-step instructions, and added tips for better texture and flavor. Whether you choose classic Oreos or switch things up, this dessert is easy and fun. With the right storage, you can enjoy it longer. Don’t hesitate to try different flavors and layers. This cake is a crowd-pleaser that you can customize for anyone. Happy baking!

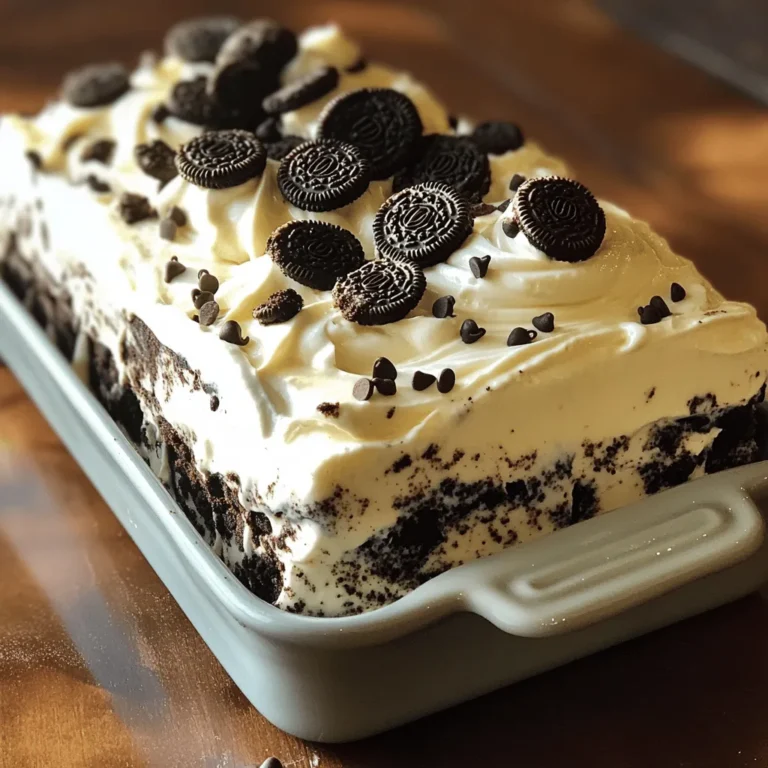
Cookies and Cream Icebox Cake Easy Delightful Treat

- 4 medium sweet potatoes, peeled and cut into 1-inch cubes - 4 cloves garlic, minced - 2 tablespoons olive oil To start, sweet potatoes are the star of this dish. Their natural sweetness pairs perfectly with garlic. I love using four medium sweet potatoes. This amount gives you a hearty serving for four. Next, I add four cloves of minced garlic. Garlic adds a bold, savory flavor that shines through the sweet potatoes. For richness, I use two tablespoons of olive oil. This helps the sweet potatoes roast beautifully. - 1 teaspoon dried rosemary - 1 teaspoon dried thyme - 1 teaspoon smoked paprika Now, let’s talk about the herbs and seasonings. I use one teaspoon of dried rosemary and one teaspoon of dried thyme. Both herbs add an earthy note that balances the sweetness. Smoked paprika brings a warm, smoky flavor. I also use one teaspoon of this spice to enhance the dish. Together, these herbs and spices create a delightful flavor blend. - Salt and pepper to taste - Fresh parsley, chopped for garnish Finally, I season with salt and pepper to taste. These basic seasonings highlight the sweet potatoes and herbs. I recommend using fresh parsley as a garnish. It adds a pop of color and freshness. This simple touch elevates the dish, making it not just tasty but also visually appealing. 1. First, preheat your oven to 425°F (220°C). This helps the sweet potatoes cook evenly. 2. Line a baking sheet with parchment paper. This makes cleanup easy and helps prevent sticking. 3. In a large mixing bowl, add the sweet potato cubes. Then, add the minced garlic, olive oil, dried rosemary, dried thyme, smoked paprika, salt, and pepper. 1. Toss everything together well. Make sure the sweet potatoes are fully coated with the oil and herbs. This step is key for great flavor. 2. Spread the seasoned sweet potatoes in a single layer on the prepared baking sheet. Make sure they are not crowded. This helps them roast well. 1. Roast in the preheated oven for 25-30 minutes. Flip the sweet potatoes halfway through. This ensures they brown evenly. 2. Once they are golden brown and tender, remove them from the oven. Let them cool for a couple of minutes. 3. Transfer to a serving dish and garnish with freshly chopped parsley. Serve warm for the best taste. To get the best roast, start with the right oven temperature. Preheat your oven to 425°F (220°C). This high heat helps the sweet potatoes become tender and golden. Cut the sweet potatoes into 1-inch cubes for even cooking. Toss them with olive oil and spices. This mix ensures every piece gets flavor. For an extra flavor boost, add minced garlic to the mix. Garlic turns sweet and sweet potatoes become savory when roasted. Smoked paprika adds a nice depth. Try different herbs like fresh parsley or thyme for more taste. You need a few basic tools for this recipe. A sharp knife helps you cut the sweet potatoes easily. A large mixing bowl is key to mixing all the ingredients well. Use a sturdy baking sheet to hold all the sweet potatoes. Parchment paper is a must. It keeps the sweet potatoes from sticking to the baking sheet. This makes cleanup a breeze and keeps your sweet potatoes perfect. Garlic herb roasted sweet potatoes shine as a side dish. They pair well with roasted chicken or grilled fish. You can also serve them with a fresh salad for a light meal. To enhance the presentation, use a large serving dish. Sprinkle fresh parsley on top for a pop of color. Serve them warm for the best flavor experience. You can also add a squeeze of lemon for brightness. {{image_2}} You can switch up the herbs for new flavors. Try using fresh herbs like rosemary or thyme instead of dried. Fresh herbs add a bright taste that really shines. You can mix and match herbs based on what you have. Basil and oregano can be fun choices too. Experiment with your favorite herbs to find what you like best! Not just sweet potatoes work here. You can use regular potatoes or even purple ones. They will cook well and taste great too. If you want a twist, add other root veggies like carrots or parsnips. This adds color and taste to your dish. Mixing different veggies makes it exciting and fun! You can easily make this dish vegan. Just skip any butter and use olive oil, which you already do! To make it gluten-free, you don’t need to change anything. This recipe is naturally gluten-free, so enjoy without worry. For low-sodium options, just cut down on salt. You can also use herbs and spices to enhance flavor without the extra salt. Enjoy all these variations to suit your needs! After enjoying your garlic herb roasted sweet potatoes, store the leftovers. First, let them cool completely. Place them in an airtight container. Keep the container in the fridge. They will stay fresh for about three to five days. If you want to keep them longer, freezing is a great option. Spread the sweet potatoes in a single layer on a baking sheet. Freeze them for about an hour. Then, transfer them to a freezer bag. Remove as much air as you can. They can last up to three months in the freezer. To reheat your sweet potatoes, the oven is best. Preheat it to 375°F (190°C). Spread the sweet potatoes on a baking sheet. Heat for about 10-15 minutes, until warm. You can also use a microwave, but the oven keeps them crispy. To maintain crispiness, avoid covering them. You can also sauté them in a pan over medium heat for a quick warm-up. In the fridge, roasted sweet potatoes last about three to five days. If they start to smell bad, it’s time to throw them away. Look for any signs of mold or odd colors. If they feel slimy or mushy, do not eat them. Freshness is key to enjoying this flavorful dish! To make garlic herb roasted sweet potatoes, start by preheating your oven to 425°F (220°C). Line a baking sheet with parchment paper for easy cleanup. Next, peel and cut four medium sweet potatoes into 1-inch cubes. In a large bowl, mix the sweet potato cubes with four minced garlic cloves, two tablespoons of olive oil, one teaspoon of dried rosemary, one teaspoon of dried thyme, and one teaspoon of smoked paprika. Add salt and pepper to taste. Toss everything until the sweet potatoes are well coated. Spread them in a single layer on the baking sheet and roast for 25-30 minutes. Flip halfway through to ensure even cooking. Once golden brown and tender, remove them from the oven. Let them cool for a couple of minutes, then garnish with fresh parsley before serving. Yes, you can use fresh herbs instead of dried ones. Fresh herbs give a bright flavor. If you choose to use fresh herbs, remember that they are usually more potent than dried. Use about three times more fresh herbs for the best taste. For this recipe, try two to three tablespoons of fresh rosemary and thyme. Chop them finely and mix them in just like you would the dried herbs. Garlic herb roasted sweet potatoes pair well with many dishes. They complement roasted chicken or fish beautifully. You can also serve them alongside grilled vegetables for a healthy meal. If you want a vegetarian option, try them with a quinoa salad. Add a dollop of yogurt or a sprinkle of feta cheese for extra flavor. These sweet potatoes can also work well in tacos or bowls with beans and greens. Garlic herb roasted sweet potatoes are simple and delicious. We covered the key ingredients like sweet potatoes, garlic, and olive oil. The steps for roasting are straightforward, ensuring great results. I shared tips for enhancing flavor and texture, and even some fun variations. Remember, you can easily alter herbs and vegetables to suit your taste. Don't forget proper storage to keep leftovers fresh! Enjoy your cooking and impress your family with this tasty dish!

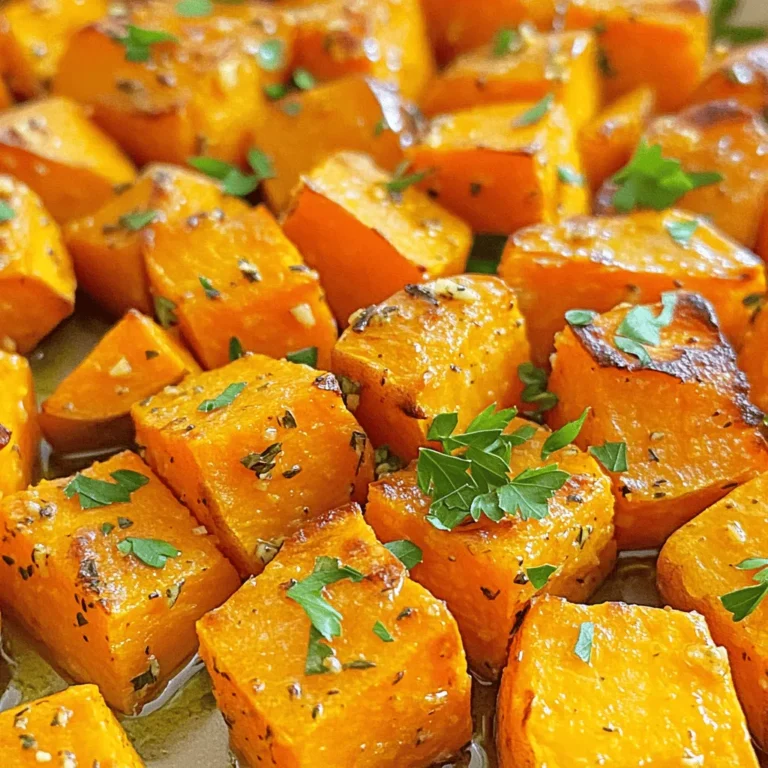
Garlic Herb Roasted Sweet Potatoes Flavorful Delight

- 1 head of cauliflower, cut into florets - 1 cup all-purpose flour - 1 cup almond milk (or any non-dairy milk) - 1 cup breadcrumbs (preferably panko) - 1 cup buffalo sauce - 1 teaspoon garlic powder - 1 teaspoon smoked paprika - Salt and pepper to taste - 8 small corn or flour tortillas - 1 avocado, sliced - 1 cup shredded lettuce - ½ cup diced tomatoes - ¼ cup chopped cilantro - Lime wedges for serving The star of this dish is the cauliflower. It is hearty and absorbs flavors well. The flour gives the batter a nice crunch, while the almond milk helps it stick. Using panko breadcrumbs makes everything crispier. The buffalo sauce adds that spicy kick that everyone loves. Don’t forget the toppings! Sliced avocado adds creaminess. Shredded lettuce gives a nice crunch. Diced tomatoes brighten the dish, and cilantro adds freshness. Lime wedges bring a zesty touch. Each ingredient plays a key role in making these tacos tasty and fun. First, set your oven to 425°F (220°C). This step ensures even cooking. While the oven warms up, grab a baking sheet and line it with parchment paper. This helps the cauliflower not stick. Next, cut the head of cauliflower into florets. Aim for pieces that are about the same size. This ensures they cook evenly. In a mixing bowl, combine one cup of all-purpose flour, one teaspoon of garlic powder, one teaspoon of smoked paprika, salt, and pepper. Mix these dry ingredients well. Then, slowly add one cup of almond milk to the bowl. Whisk until you get a smooth batter. Now it's time to coat the cauliflower. Toss the florets into the batter. Make sure each piece is covered well. Remove the cauliflower from the batter. Roll each floret in one cup of breadcrumbs. I recommend using panko for extra crunch. Place the coated florets on your lined baking sheet. Space them out to allow air to circulate. Bake the cauliflower for 25-30 minutes. Flip them halfway through to ensure golden brown color. In the last five minutes, take the cauliflower out and drizzle one cup of buffalo sauce over the florets. Toss them gently to coat. Return them to the oven for five more minutes. While the cauliflower bakes, warm eight small corn or flour tortillas in a skillet or microwave. Now, for assembly! Place a generous amount of buffalo cauliflower on each tortilla. Top them with sliced avocado, shredded lettuce, diced tomatoes, and chopped cilantro. Serve with lime wedges on the side for a zesty kick. Enjoy your tasty tacos! To get your buffalo cauliflower nice and crispy, follow these tips: - Baking Technique Preheat your oven to 425°F (220°C). Line your baking sheet with parchment paper. This helps the cauliflower crisp up while baking. Spread the coated cauliflower florets in a single layer. Make sure they don’t touch each other. Flip them halfway for even cooking. - Using Panko Breadcrumbs Panko breadcrumbs are key for great texture. They are lighter and crispier than regular breadcrumbs. Use them to coat the cauliflower. This will give you a crunchy bite that pairs well with the spicy buffalo sauce. You can make your tacos even tastier with these ideas: - Customizing Buffalo Sauce Levels Adjust the buffalo sauce to fit your taste. If you like it hot, use more sauce. If you prefer mild, add less. You can also mix in honey or maple syrup for a sweet touch. This balances the heat and makes it more complex. - Suggested Additional Toppings Top your tacos with fresh ingredients. Sliced radishes add crunch. Pickled onions give a tangy flavor. You can also add crumbled feta cheese for a creamy finish. These extras make your tacos colorful and packed with flavor. {{image_2}} - Gluten-Free Options You can easily make this recipe gluten-free. Use gluten-free flour instead of regular flour. For breadcrumbs, opt for gluten-free panko. This will keep the texture and flavor intact. Your tacos will still be crispy and delicious. - Dairy-Free Alternatives If you want a dairy-free version, almond milk is a great choice. You can also use oat milk or soy milk. These options work well in the batter. Avoid regular milk and cheese to maintain a dairy-free dish. - Pairing with Sides These tacos pair well with a simple salad or some fresh corn on the side. You could also serve them with sweet potato fries. The sweetness balances the spicy buffalo flavor perfectly. - Taco Bar Ideas Set up a taco bar for fun! Offer toppings like diced red onions, jalapeños, and different sauces. This way, everyone can customize their tacos. Add bowls of salsa, guacamole, or even pineapple chunks for a sweet twist. After enjoying your Buffalo Cauliflower Tacos, store any leftovers right away. Put them in an airtight container. Keep them in the fridge for up to three days. This helps keep the tacos fresh and tasty. For reheating, I suggest using an oven or air fryer. This method keeps the cauliflower crispy. Preheat your oven to 350°F (175°C). Place the tacos on a baking sheet and heat for about 10 minutes. If using an air fryer, heat at 350°F (175°C) for about 5-7 minutes. If you want to save the tacos for later, freezing is a great option. Start by letting the tacos cool completely. Wrap each taco in foil or plastic wrap. Then, place them in a freezer-safe bag. This way, they can stay fresh for up to three months. When you’re ready to eat, remove the tacos from the freezer. Thaw them in the fridge overnight. For reheating, use the same method as before: oven or air fryer. This keeps your Buffalo Cauliflower Tacos delicious and crispy even after freezing. How many calories are in Buffalo Cauliflower Tacos? Buffalo Cauliflower Tacos have about 200 to 300 calories each. The exact number can change based on how you prepare them. If you use more toppings or sauces, the calories will rise. I recommend checking your specific ingredients for the most accurate count. Can I make Buffalo Cauliflower Tacos ahead of time? Yes, you can make these tacos ahead of time. You can prepare the cauliflower and store it in the fridge. Just bake it the next day for a fresh and crispy taste. You can also warm the tortillas in advance. Just keep them covered to avoid drying out. What drinks pair well with this dish? Buffalo Cauliflower Tacos go well with many drinks. Try a light beer or a zesty margarita. A refreshing lemonade also works great. If you prefer non-alcoholic options, iced tea or sparkling water with lime adds a nice touch. Enjoying these drinks makes the meal even better! This blog post covered how to make Buffalo Cauliflower Tacos. We explored main ingredients, including cauliflower and batter components. You learned step-by-step instructions for prepping, battering, and baking. Tips focused on crispiness and flavor enhancements. We also shared variations for different diets and storage tips for leftovers. These tacos are fun, tasty, and easy to make. They offer a delicious twist on a classic favorite. You can impress friends and family with this dish while enjoying a great meal.

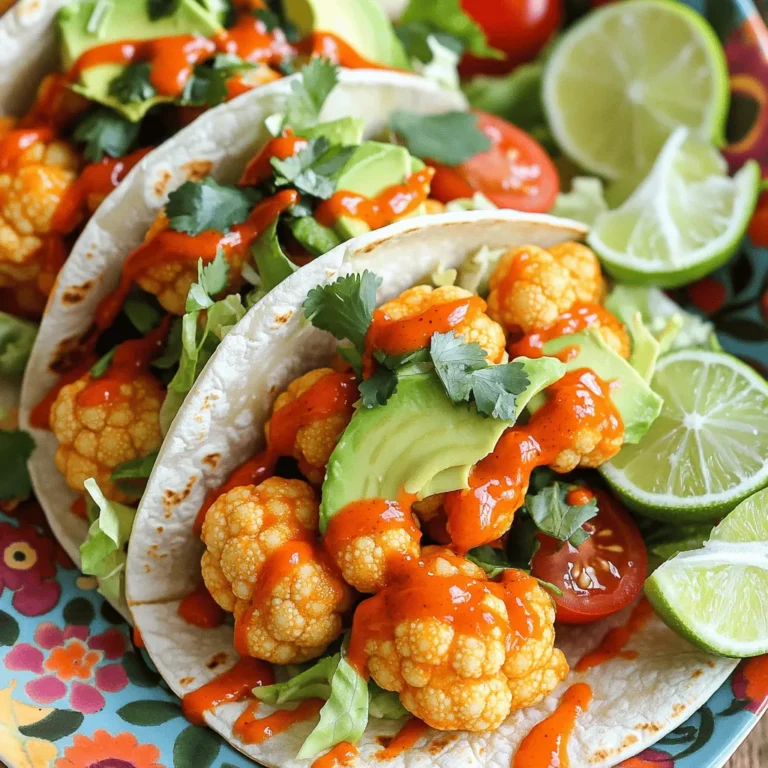
Savory Buffalo Cauliflower Tacos Easy and Flavorful

- 1 ½ cups graham cracker crumbs - ½ cup unsalted butter, melted - 2 tablespoons granulated sugar - 16 oz cream cheese, softened - ¾ cup granulated sugar - 2 large eggs - 1 teaspoon vanilla extract - Zest of 1 lemon - ¼ cup fresh lemon juice - 1 cup fresh blueberries - 2 tablespoons cornstarch When making Lemon Blueberry Cheesecake Bars, choose high-quality cream cheese for the best flavor. Softened cream cheese mixes well, creating a creamy texture. Fresh blueberries bring vibrant color and taste. Use ripe, sweet fruits for the best result. Fresh lemon juice and zest add bright flavor and aroma. Opt for unsalted butter to control the saltiness in your crust. If you need gluten-free options, use gluten-free graham crackers. You can crush them just like regular ones. For dairy-free bars, try using vegan cream cheese. This swap still gives a creamy texture. If eggs are an issue, you can use flaxseed meal mixed with water as a binder. Mix 1 tablespoon of flaxseed meal with 2.5 tablespoons of water to replace one egg. Start by preheating your oven to 350°F (175°C). This ensures the bars bake evenly. Next, grease a 9x9-inch baking pan. Line it with parchment paper, leaving some paper hanging over the sides. This will help you lift the bars out later. In a medium bowl, mix the graham cracker crumbs, melted butter, and 2 tablespoons of sugar. Stir until the crumbs are fully coated. Press this mixture into the bottom of your pan. Make sure it’s packed tightly to form a solid crust. Bake it for 10 minutes, then take it out and let it cool. In a large bowl, beat the softened cream cheese using a mixer. Mix for about 2-3 minutes until it’s smooth and creamy. Gradually add ¾ cup of sugar while mixing. Then, add the eggs one at a time. Mix until everything is well combined. Stir in the vanilla extract, lemon zest, and lemon juice until the mixture is smooth. In another bowl, toss the fresh blueberries with cornstarch. This helps the blueberries stay intact. Gently fold the blueberries into the cheesecake mixture. Pour the cheesecake mixture over the cooled crust. Spread it out evenly. Bake in the oven for 35-40 minutes. Check if the center is set but still slightly jiggly. Once you remove the bars from the oven, let them cool to room temperature. After cooling, refrigerate them for at least 4 hours or overnight. This allows the bars to set completely. When ready to serve, lift the cheesecake out using the parchment paper. Cut into bars and enjoy them chilled. To get the best texture, always use room-temperature cream cheese. This helps blend it smoothly. Mix slowly to avoid air bubbles. Air bubbles can cause cracks. For flavor, fresh lemon juice and zest are key. They give a bright taste. Always measure your ingredients accurately for best results. One common mistake is overmixing the batter. This can make your bars too airy. Also, avoid baking the bars too long. They should be slightly jiggly in the center when done. Don’t skip chilling time. Chilling helps them set perfectly. Lastly, be careful when folding in the blueberries. Gently mix to keep them whole. When serving, lift the bars using the parchment paper. Cut them into even squares for a nice look. For a pretty touch, add lemon slices on top. You can also sprinkle fresh blueberries around the bars. A drizzle of lemon glaze can add extra flavor and style. Serve on a colorful platter for a fun presentation. {{image_2}} You can change the flavor of these cheesecake bars by using different fruits. Try raspberries, strawberries, or peaches for a fun twist. If you want a stronger citrus taste, add more lemon zest or a splash of orange juice. Each fruit brings its own unique taste, making every batch a new delight! To make these bars gluten-free, swap graham crackers for gluten-free crumbs. You can find these at most grocery stores. For a vegan option, use plant-based cream cheese and replace the eggs with flaxseed meal mixed with water. This keeps the texture while making it friendly for all diets. If you want smaller treats, use a muffin tin instead of a baking pan. Line each cup with paper liners for easy removal. Fill each liner with your cheesecake mix and bake for about 25 minutes. Once cooled, these mini bars make perfect snacks or party treats! To keep your Lemon Blueberry Cheesecake Bars fresh, store them in the fridge. First, make sure the bars are completely cool. Then, cover them with plastic wrap or foil. You can also place them in an airtight container. This helps prevent them from drying out. If you want to serve them later, keep them chilled until ready to enjoy. When stored properly, these cheesecake bars last about 5 days in the refrigerator. After that, they may lose some flavor and texture. If you’re unsure, always check for any signs of spoilage before eating. Trust your senses; if it smells or looks off, it’s best to discard it. You can freeze Lemon Blueberry Cheesecake Bars for longer storage. Slice the bars first, then wrap each piece tightly in plastic wrap. Place the wrapped bars in a freezer-safe bag or container. They can last up to 3 months in the freezer. When you’re ready to enjoy them, take out the bars and thaw them in the fridge overnight. This helps keep their texture creamy. If you’re in a hurry, you can also let them sit at room temperature for about an hour. Enjoy your bars chilled for the best taste! It takes about 4 hours for the cheesecake bars to set in the fridge. For the best results, I recommend letting them chill overnight. This longer time helps the flavors blend well and gives a firmer texture. Yes, you can use frozen blueberries. They work well in this recipe. Just toss them in cornstarch before adding them to the mixture. This will help absorb extra moisture and keep your bars from becoming soggy. To avoid cracks, make sure to mix the cream cheese until smooth. Don’t overbeat the eggs; add them slowly. Bake at a lower temperature and avoid sudden changes in heat. If you see cracks forming, don’t panic! You can cover them with a layer of whipped cream or fresh fruit. If your bars are too soft, they may need more time in the oven. Check them after the recommended baking time. The center should jiggle slightly but not be liquid. If they are still soft after cooling, return them to the oven for a few more minutes. This article covered everything you need for Lemon Blueberry Cheesecake Bars. We reviewed the ingredients, including notes on selecting fresh items and allergen substitutions. Clear instructions guided you through preparation, mixing, and baking. I also shared tips to enhance texture and flavor and discussed fun variations and storage advice. Now you can confidently make these delicious treats. Enjoy making them and impress everyone with your new skills!

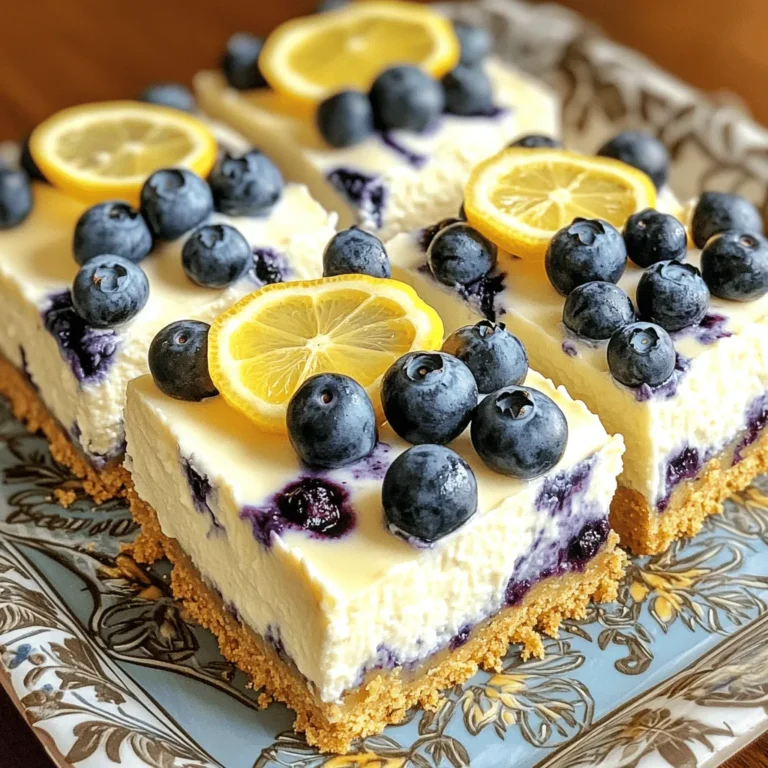
Lemon Blueberry Cheesecake Bars Tasty and Easy Recipe

- 2 boneless skinless chicken breasts - 1 can (15 oz) white beans, drained and rinsed - 1 can (4 oz) diced green chilies - 1 medium onion, diced - 2 cloves garlic, minced - 1 cup chicken broth - 1 cup corn (fresh or frozen) The chicken breasts are the star here. They provide a juicy base for the chili. White beans add creaminess and heartiness. Diced green chilies bring a mild heat, and onions and garlic give depth to the flavor. - 1 teaspoon ground cumin - 1 teaspoon chili powder - 1 teaspoon paprika - 1/2 teaspoon salt - 1/4 teaspoon black pepper The spices are key to making this chili pop. Ground cumin adds warmth, while chili powder gives it a rich flavor. Paprika provides a subtle smokiness. Salt and pepper bring everything together. - Fresh cilantro - Sour cream or Greek yogurt - Juice of 1 lime Garnishes can elevate your dish. Fresh cilantro adds brightness and color. Sour cream or Greek yogurt adds creaminess and coolness. A squeeze of lime juice at the end brightens all the flavors. Start by heating 1 tablespoon of olive oil in a skillet over medium heat. Add 1 diced medium onion and sauté for about 5 minutes until the onion turns translucent. Then, add 2 minced garlic cloves and cook for another minute. This adds a rich base flavor to your chili. Transfer the onion and garlic mix to your slow cooker. Next, take 2 boneless skinless chicken breasts and place them directly in the slow cooker. On top of the chicken, add in the following ingredients: - 1 can (15 oz) white beans, drained and rinsed - 1 can (4 oz) diced green chilies - 1 cup chicken broth - 1 cup corn (fresh or frozen) - 1 teaspoon ground cumin - 1 teaspoon chili powder - 1 teaspoon paprika - 1/2 teaspoon salt - 1/4 teaspoon black pepper Stir gently to combine all ingredients, making sure the chicken is mostly submerged in the broth. This helps the chicken stay moist and flavorful. Cover the slow cooker with its lid. Set it to cook on low for 6-8 hours or on high for 4-5 hours. You want the chicken to be cooked through and tender. About an hour before it's done, check the chicken for doneness. It should shred easily with a fork when fully cooked. Once the chicken is done, carefully remove it from the slow cooker. Use two forks to shred the chicken into bite-sized pieces. This step is key for mixing it back into the chili. Return the shredded chicken to the pot and stir it in well. Now, add the juice of 1 lime to the chili. This brightens the flavors and adds a fresh touch. Taste your chili and adjust the seasonings as needed. You can add more salt or spices if you like. Ladle the chili into bowls. For extra flavor, top each serving with fresh cilantro and a dollop of sour cream or Greek yogurt if you wish. This adds creaminess and balances the heat of the dish. Enjoy your warm and hearty Slow Cooker White Bean Chicken Chili! To make your white bean chicken chili shine, use spices wisely. Ground cumin, chili powder, and paprika are key. They add depth and warmth. Start with the amounts in the recipe, but feel free to adjust. If you want more heat, add extra chili powder. Cook the chicken until it is tender. The slow cooker does the work here. For best results, aim for 6-8 hours on low. If you're short on time, cook on high for 4-5 hours. Always check that the chicken is fully cooked and shreddable. To make your chili creamier, consider adding sour cream or Greek yogurt at the end. This gives a rich texture. You can also use cream cheese for a thicker mix. Experiment with different beans as well. Great northern beans work well, but you can try black beans for a twist. Each bean brings its own flavor and creaminess. Choosing the right slow cooker matters. A 6-quart model is perfect for this recipe. It gives enough space for all the ingredients without overflowing. Adjust cooking times based on your slow cooker model. Some cook faster than others. Always check the chicken's doneness with a fork. If it shreds easily, it's ready. {{image_2}} You can switch the chicken for turkey or beef. Both options work well. Turkey gives a lean taste, while beef adds richness. For a vegetarian option, use jackfruit or mushrooms. These choices will add depth and flavor to your dish. Feel free to mix up the beans! You can use black beans or pinto beans for a different taste. Each bean adds its own flavor and creaminess. You can also add more vegetables. Bell peppers or zucchini will boost the chili's nutrition and color. Simply chop them and toss them in with the other ingredients. Want more heat? Add cayenne pepper or crushed red pepper flakes. Start with a small amount and taste as you go. If the chili is too spicy, you can tone it down. Just leave out the diced green chilies or reduce the chili powder. This way, you can control the heat to your liking. To store the leftovers, let the chili cool first. Place it in an airtight container. This keeps it fresh. Glass containers or BPA-free plastic work best. They seal well and prevent spills. You can store the chili in the fridge for up to three days. If you want to save some for later, freezing is a great option. Divide the chili into portions. Use freezer-safe bags or containers. Be sure to leave some space for expansion. When you want to eat it, take it out of the freezer. Thaw it overnight in the fridge. You can reheat it on the stove or in the microwave. Make sure it's hot all the way through. You can keep this chili in the fridge for three days. In the freezer, it lasts up to three months. Check for signs of spoilage before eating. Look for off smells or changes in color. If it smells sour or has an odd look, it’s best to toss it. Yes, you can use frozen chicken breasts. Just be aware that cooking time will increase. Make sure the chicken reaches 165°F to be safe to eat. It is best to add extra broth or liquid to help it cook evenly. This chili goes well with many sides. Here are a few great options: - Cornbread - Rice - Tortilla chips - Fresh avocado - Salad with lime dressing These sides add texture and flavor to your meal. To add heat to your chili, consider these suggestions: - Add diced jalapeños or serrano peppers. - Mix in cayenne pepper or crushed red pepper flakes. - Use spicy diced green chilies instead of mild ones. - Stir in hot sauce before serving for a kick. Adjust the spice level to fit your taste. Yes, you can make this chili in an Instant Pot. Here’s how: 1. Use the sauté function to cook the onions and garlic. 2. Add the chicken and other ingredients. 3. Seal the pot and cook on high pressure for 15-20 minutes. 4. Quick-release the pressure, shred the chicken, and stir in lime juice. This method saves time and still gives you great flavor. This blog post covered how to make a tasty Slow Cooker White Bean Chicken Chili. We discussed the main ingredients like chicken, beans, and spices. You learned step-by-step instructions, tips for flavor, and variations to suit your taste. Use the storage tips to keep your chili fresh for later. Enjoy every bowl with your favorite toppings. This dish is not just easy; it’s also satisfying. Your friends and family will love it. Dive into this recipe and start cooking today.

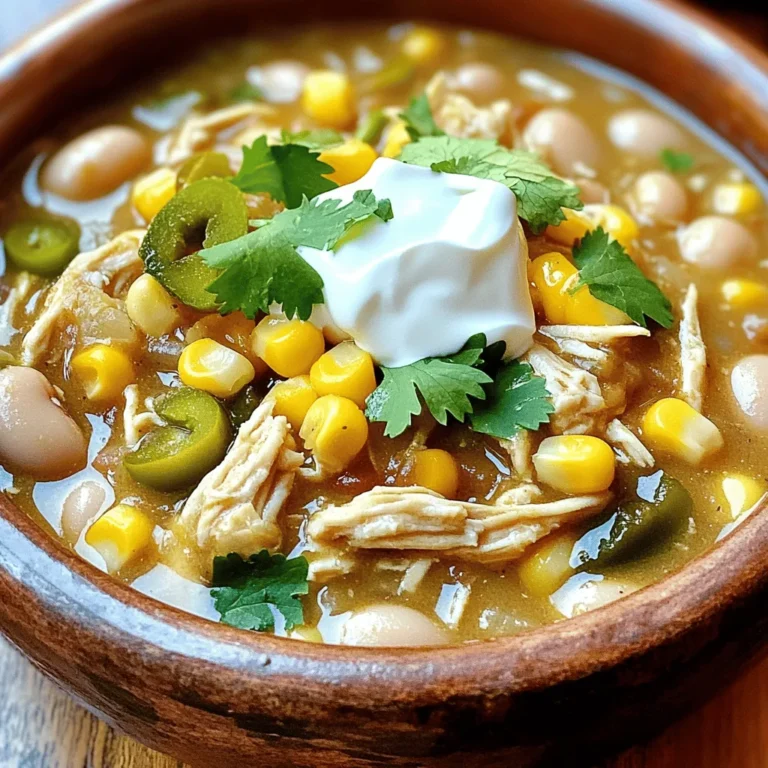
Slow Cooker White Bean Chicken Chili Flavor Boost

PREV 1 … 18 19 20 … 57 NEXT
flavor nest kitchen

explore

DessertsDinnerAppetizersDrinks

Our Policies

  • Cookie Policy
  • Copyright Policy
  • Disclaimer
  • GDPR Policy
  • Terms Of Use
Back to Top
  • About
  • Contact Us
  • Privacy Policy
© 2025 flavor nest kitchen