FREE DINNER EBOOK! Get your copy!
  • Cookie Policy
  • GDPR Policy
  • Disclaimer
  • Terms Of Use
  • Visit my other site: Fun Cookie Recipes
flavor nest kitchen
  • Home
  • Dinner
  • Desserts
  • Drinks
  • Appetizers
  • Contact
  • About
  • Privacy Policy
  • Home
  • Dinner
  • Desserts
  • Drinks
  • Appetizers
  • Contact
  • About
  • Privacy Policy
  • Cookie Policy
  • GDPR Policy
  • Disclaimer
  • Terms Of Use
Visit my other site: Fun Cookie Recipes

HOME / CATEGORIES /

Latest

For this Sheet-Pan Cajun Shrimp & Corn, you will need: - 1 pound large shrimp, peeled and deveined - 2 cups corn kernels (fresh or frozen) - 1 red bell pepper, sliced - 1 yellow bell pepper, sliced - 1 medium red onion, sliced The key to the bold flavor lies in the seasonings and oils: - 3 tablespoons olive oil - 2 tablespoons Cajun seasoning - 1 teaspoon garlic powder - 1 teaspoon smoked paprika - Salt and pepper, to taste These ingredients create a tasty mix that brings the dish to life. To elevate your meal, consider these optional garnishes: - 2 tablespoons fresh parsley, chopped - Lemon wedges, for serving These fresh touches brighten the dish and add zing. For side dishes, pair with warm bread or a light salad. A crisp drink, like iced tea or lemonade, complements the meal well. Enjoy the flavors! 1. Start by prepping your ingredients. Peel and devein the shrimp if needed. Slice the red and yellow bell peppers and the red onion. If using frozen corn, measure out two cups. 2. Preheat your oven to 400°F (200°C). Line a large sheet pan with parchment paper. This helps with easy cleanup later. 1. In a mixing bowl, combine the shrimp, corn, sliced bell peppers, and red onion. 2. Drizzle three tablespoons of olive oil over the mixture. Sprinkle two tablespoons of Cajun seasoning, one teaspoon of garlic powder, one teaspoon of smoked paprika, and some salt and pepper. Toss everything well to coat. 3. Spread the shrimp and vegetable mix evenly across the sheet pan in a single layer. 4. Bake in your preheated oven for 10 to 12 minutes. The shrimp should turn pink and opaque, while the vegetables become tender. 1. To plate, serve the shrimp and corn mix straight from the pan. This keeps things casual and fun. 2. Before serving, squeeze fresh lemon juice over the dish. This adds a bright flavor. 3. Garnish with chopped parsley for a fresh touch. Enjoy your meal! To ensure your shrimp are cooked perfectly, watch the time closely. Shrimp cook fast. Bake them just until they turn pink and opaque. This takes about 10 to 12 minutes. If you overcook them, they will become tough. To avoid overcooking the vegetables, cut them into even pieces. This helps them cook at the same rate. Keep an eye on them while baking. Check for tenderness but still keep some crunch. For extra flavor, try adding spices like cayenne pepper or onion powder. They can bring more depth to your dish. If you want a smoky taste, add a bit more smoked paprika. To adjust spice levels, use less Cajun seasoning for a milder taste. You can also mix in a bit of honey for sweetness if the heat is too much. Always taste as you go to find the right balance for you. {{image_2}} You can switch up the protein in this dish. Try using chicken or tofu instead of shrimp. Both options work well and soak up flavors nicely. For chicken, cut it into bite-sized pieces to cook evenly. For tofu, use firm or extra-firm varieties. Feel free to mix in different veggies too. Zucchini, asparagus, or cherry tomatoes can add color and taste. Use what you have on hand or your favorites. Just remember to keep the cooking time consistent for even results. Want to change the taste? You can easily switch up the seasoning blend. Instead of Cajun, try a taco seasoning or a blend of Italian herbs. This gives a new twist to the dish while keeping it quick and easy. If you want a creamy addition, try mixing in some cream cheese or sour cream. This will add richness and a nice texture. For a cheesy touch, sprinkle some shredded cheese over the top before baking. Cheddar or pepper jack can add a fun flavor boost. To store your Cajun shrimp and corn, let it cool first. Place the leftovers in an airtight container. This keeps the shrimp and veggies fresh. You can store it in the fridge for three to four days. If you want to keep it longer, freeze it. In the freezer, it stays good for up to three months. Remember to label your container with the date. This way, you know when to eat it. For reheating, the oven works best. Preheat it to 350°F (175°C). Spread the shrimp and corn on a baking sheet. Heat for about 10 minutes. This method keeps the texture nice. You can also use a microwave, but it may not keep the same crunch. If you microwave, heat in short bursts. Check every 30 seconds until warm. To keep the flavor, add a splash of lemon juice before serving. This boosts the taste and freshness! Can I use frozen shrimp? Yes, you can use frozen shrimp. Just thaw them first. Place shrimp in cold water for about 15 minutes. This helps them cook evenly. What is the best way to ensure shrimp are tender? Cook shrimp just until they turn pink. This usually takes about 10-12 minutes. Overcooked shrimp can become rubbery. Keep an eye on them while baking. How to adjust recipe for larger servings To make more servings, double or triple the shrimp and veggies. Use multiple sheet pans if needed. Just make sure to space them out to cook evenly. Can I make this dish in advance? You can prep the ingredients ahead of time. Mix them and store in the fridge. Bake just before serving for the best taste. What can I use instead of Cajun seasoning? If you don’t have Cajun seasoning, use paprika and chili powder. You can also mix garlic powder, onion powder, and a bit of cayenne for heat. Are there any dairy-free alternatives for accompaniments? Yes! You can use avocado or a sprinkle of nuts for creaminess. Fresh herbs also add flavor without dairy. This blog post covers exciting shrimp recipes, including key ingredients, garnishes, and cooking steps. You learned how to prepare shrimp with fresh vegetables and tasty seasonings. There are tips for perfect cooking and fun variations to explore. You can even store leftovers easily and reheat them well. Remember, cooking should be fun and adaptable. Play with flavors, try new ingredients, and enjoy each bite. You can make this meal your own and impress anyone who joins you at the table. Trust your skills; deliciousness is just a recipe away.

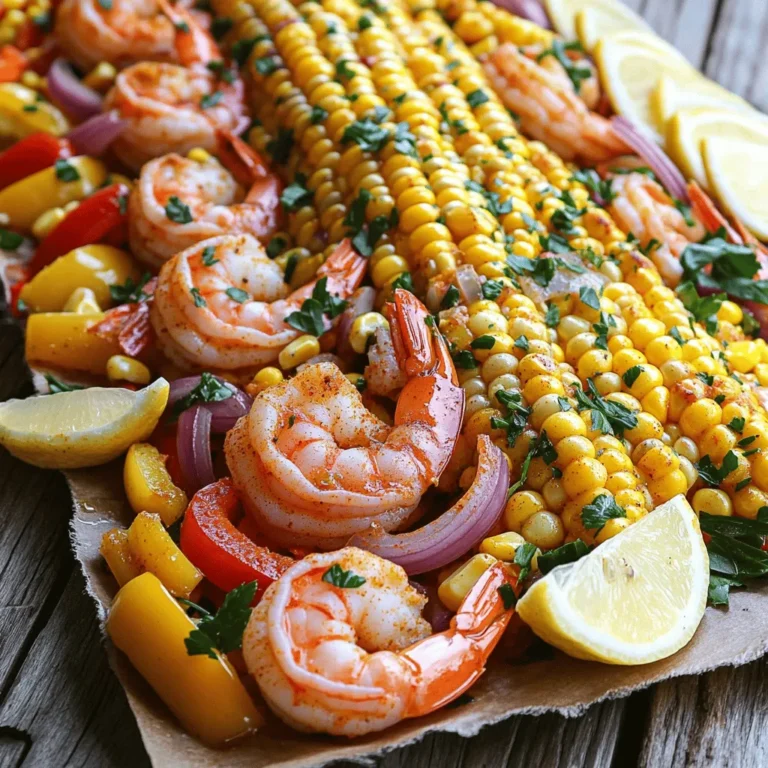
Sheet-Pan Cajun Shrimp & Corn Flavorful and Quick Meal

- 1 cup rolled oats - 1/2 cup almond flour - 1/4 cup natural almond butter - 1/4 cup honey or maple syrup - 1 tsp vanilla extract - 1/4 tsp salt These main ingredients create a strong base for your energy bites. Rolled oats give chewiness and fiber. Almond flour adds a nice nutty taste and protein. Almond butter brings creaminess and healthy fats. Honey or maple syrup adds sweetness. Vanilla extract enhances the flavor, while salt balances it all. - 1/2 cup mini rainbow sprinkles - 1/4 cup shredded coconut - 2 tablespoons chia seeds Adding mini rainbow sprinkles makes these bites festive and fun. Shredded coconut adds a tropical twist. Chia seeds boost nutrition with fiber and Omega-3s. You can mix and match these extras to fit your taste. If you need nut-free options, swap almond butter for sun butter. You can also use sunflower seeds in place of almond flour. For a vegan treat, use maple syrup instead of honey. These swaps keep the bites tasty, no matter your diet. To start, you need to mix the dry ingredients. In a large mixing bowl, combine 1 cup of rolled oats and 1/2 cup of almond flour. Stir them well until they blend nicely. This mix will form the base of your energy bites. Next, it's time to combine the wet ingredients. Add 1/4 cup of natural almond butter, 1/4 cup of honey or maple syrup, 1 teaspoon of vanilla extract, and 1/4 teaspoon of salt to the dry mix. Stir everything together until it's sticky but easy to handle. This mixture should feel soft and moist. Now, let’s form the energy bites. Use your hands to scoop out small portions of the mixture. Aim for about 1 inch in diameter. This size is perfect for popping in your mouth. Roll them into balls gently to keep their shape. When you have rolled all the mixture into bites, place them on a baking sheet lined with parchment paper. This step keeps them from sticking and makes cleanup easy. After forming the bites, they need to set. Put the baking sheet in the fridge for about 30 minutes. This chilling time helps them firm up. You’ll find that they hold their shape better when they cool. Once they have set, store the bites in an airtight container. This keeps them fresh and ready for snacking. You can enjoy these bites right away or save them for later! The texture of your energy bites is key. They should feel sticky but still hold together well. If they are too dry, add a bit more almond butter or honey. If they are too wet, sprinkle in more almond flour or oats. Balance is vital for that perfect bite. Add a dash of cinnamon or nutmeg to boost flavor. You can also try different nut butters. Peanut butter or cashew butter can give a unique taste. Experimenting is fun and makes each batch special. Make your treats pop with colorful cupcake liners. They add a festive touch. For serving, arrange your energy bites on a bright plate. Sprinkle extra rainbow sprinkles around them. This makes your snack look even more inviting and fun! {{image_2}} You can have fun with different flavors. Try making chocolate birthday cake energy bites. Just add cocoa powder to the mix. Start with 2 tablespoons and adjust to taste. This gives a rich, sweet twist to the bites. Another tasty option is to make citrus-infused energy bites. Use orange or lemon zest for a fresh flavor. Add about a teaspoon to the mixture. The citrus brightens the taste and adds a nice zing. If you want to change the texture, look for alternatives to almond flour. You can use oat flour or coconut flour instead. Both options work well and keep the bites gluten-free. For sweetness, consider substituting honey with agave nectar. It offers a similar sweetness but is vegan. Just use the same amount as honey in your recipe. Want to give your bites a nutritional boost? Add protein powder. A scoop of vanilla or chocolate protein powder fits perfectly. It makes the bites more filling and great for energy. Incorporating superfoods is another smart choice. Flaxseed is an excellent option. Just add 1-2 tablespoons to the mix. It adds fiber and healthy fats, making your bites even better for you. Store your No-Bake Birthday Cake Energy Bites in an airtight container. This keeps them fresh and tasty. You can place them in the fridge or freezer. If you choose the fridge, they will stay good for a week. For longer storage, freeze them. Just make sure to separate layers with parchment paper. In the fridge, these energy bites last about one week. If you freeze them, they can last up to three months. For the best taste, eat them within a month of freezing. Each energy bite is about a perfect snack size. Enjoy one or two for a quick pick-me-up. You can also pair them with fresh fruit or yogurt for a healthy snack. This adds more nutrition and flavor to your snack time. Yes, you can easily make these energy bites gluten-free. Use certified gluten-free rolled oats instead of regular oats. Check your almond flour to ensure it’s gluten-free as well. This change keeps the recipe safe for those with gluten sensitivities. You can adjust the sweetness by changing the amount of honey or maple syrup. If you want less sweetness, use less syrup. For a sweeter bite, add a bit more. Another option is to use a sweetener like agave nectar, which has a mild flavor. Absolutely! These energy bites are great for kids. They contain rolled oats, which provide fiber. Almond butter adds healthy fats and protein. Rainbow sprinkles make them fun and appealing. Kids will love these tasty snacks, and they are easy to make together. These energy bites are simple and fun to make. You learned about key ingredients like oats, almond flour, and nut butter. I shared tips for how to mix and roll your bites and how to store them. You can tweak flavors and ingredients to fit your tastes or needs, like making them nut-free or vegan. Now, enjoy making these bites! They are great for snacks, delightful for kids, and easy to share.

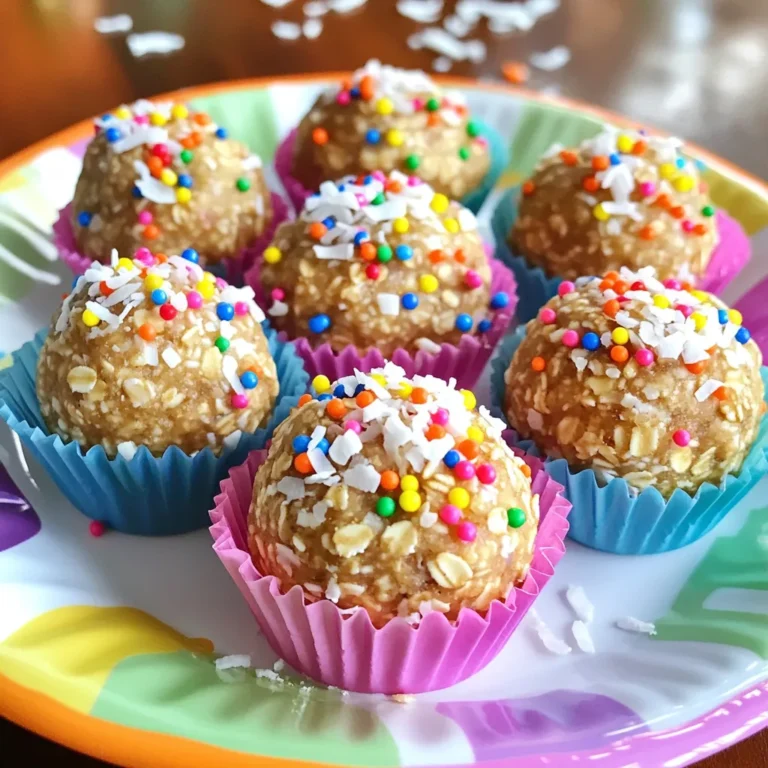
No-Bake Birthday Cake Energy Bites Delightful Snack

- 1 cup orzo pasta - 2 cups fresh spinach, chopped - 1 cup mushrooms, sliced (button or cremini) - 1 small onion, diced - 2 cloves garlic, minced - 2 tablespoons olive oil - 1 cup vegetable broth - 1 teaspoon dried thyme - 1 teaspoon lemon zest - ¼ teaspoon red pepper flakes (optional) - Salt and pepper to taste - Grated Parmesan cheese for serving (optional) Orzo pasta is the star here. It cooks quickly and absorbs flavors well. Fresh spinach adds color and nutrients. I love how it wilts down and blends in. Mushrooms bring an earthy taste that makes this dish feel hearty. I often use button or cremini mushrooms, but any variety works. Onion and garlic add layers of flavor that make this dish shine. Olive oil keeps it rich and helps with cooking. Vegetable broth enhances the taste and keeps it plant-based. Dried thyme adds a hint of herbal freshness, while lemon zest gives a bright kick. Red pepper flakes offer some heat, but you can skip them if you prefer mild dishes. Lastly, Parmesan cheese is optional but adds a creamy finish. If you don't have orzo, try another small pasta like ditalini or acini di pepe. You can swap spinach for kale or Swiss chard, but adjust cooking time as they may take longer to wilt. For a different flavor profile, use different mushrooms like shiitake or portobello. If you want a vegan dish, skip the cheese, or use a plant-based alternative. You can also replace vegetable broth with chicken broth for a non-vegan option. {{ingredient_image_1}} Start by gathering all your ingredients. You will need orzo pasta, fresh spinach, mushrooms, onion, garlic, olive oil, vegetable broth, thyme, lemon zest, red pepper flakes, salt, and pepper. Dice the onion and mince the garlic. Slice the mushrooms and chop the spinach. This prep makes cooking easier. 1. Heat 2 tablespoons of olive oil in a large skillet over medium heat. 2. Add the diced onion. Sauté it for about 3-4 minutes until it turns clear. 3. Next, stir in the minced garlic and sliced mushrooms. Cook for about 5 minutes until the mushrooms soften. 4. Add 1 cup of orzo to the skillet. Stir it for 1-2 minutes to toast it lightly. This step gives the orzo a nice flavor. 5. Pour in 1 cup of vegetable broth, 1 teaspoon of thyme, salt, pepper, and red pepper flakes if you like spice. Bring this mixture to a gentle simmer. 6. Cover the skillet. Cook for about 10 minutes, stirring often. The orzo should absorb most of the liquid and be firm to bite. 7. After 10 minutes, stir in the chopped spinach and 1 teaspoon of lemon zest. Cook for 2-3 minutes until the spinach wilts. 8. Remove the skillet from heat. Let it sit for a minute before serving. If you want softer orzo, add a bit more broth and cook a few extra minutes. If you prefer it firmer, check it a minute or two earlier. Always taste as you go. This way, you can adjust the salt and pepper to your liking. For extra flavor, try adding more lemon zest or a splash of lemon juice just before serving. To boost flavors in your Spinach Mushroom Orzo Skillet, use fresh herbs. Fresh thyme or basil adds bright notes. You can also squeeze fresh lemon juice for zest. For a kick, try adding more red pepper flakes. Mixing in a splash of white wine while cooking gives depth. Don’t forget to season each layer. Add salt and pepper as you cook. One big mistake is not toasting the orzo. This step brings out nutty flavors. Another mistake is adding too much liquid too fast. Keep an eye on the broth, and let it absorb slowly. Overcooking the spinach can make it mushy. Add the spinach just a few minutes before serving. Lastly, don’t skip the seasoning. Taste as you go for balance. For perfect consistency, keep the orzo al dente. It should have a slight bite. Stir regularly as it cooks to avoid sticking. If it seems dry, add more broth, a little at a time. Letting the dish sit after cooking makes it creamy. The orzo will soak up extra liquid. Serve it warm, topped with Parmesan cheese for extra flavor. Pro Tips Fresh Ingredients: Use fresh spinach and mushrooms for the best flavor and texture. Fresh produce enhances the overall taste of the dish. Toasting Orzo: Lightly toasting the orzo before adding the liquid brings out its nutty flavor, adding depth to your dish. Adjusting Consistency: If the orzo absorbs too much liquid, simply add a splash more vegetable broth or water to achieve the desired consistency. Flavor Variations: Experiment with different herbs and spices, such as basil or oregano, to customize the flavor profile to your liking. {{image_2}} This Spinach Mushroom Orzo Skillet is easy to make vegan. Just skip the Parmesan cheese. You can also use a vegan cheese substitute for extra creaminess. Nutritional yeast is a great choice, adding a cheesy flavor without dairy. You can enjoy this dish just as much without animal products. Want to add protein? Chicken and shrimp work well here. For chicken, use diced breast and cook it with the onions. For shrimp, add them during the last few minutes of cooking. Both options will make the dish heartier and more filling. Just adjust the cooking time to ensure they are fully cooked. Feel free to swap in seasonal veggies. Zucchini, bell peppers, or asparagus can add color and flavor. Just cut them into small pieces. Add them after the mushrooms to keep them crisp. This way, you can enjoy fresh tastes all year round. Mix and match your favorite veggies for a new twist each time. To keep your Spinach Mushroom Orzo Skillet fresh, cool it to room temperature. Then, place it in an airtight container. You can store it in the fridge for up to three days. Make sure to label the container with the date. This helps you keep track of how long it has been stored. When you are ready to eat the leftovers, reheat them on the stove. Add a splash of vegetable broth or water to the skillet. This helps the orzo stay moist. Heat it over medium-low heat, stirring often, until it’s warm. You can also use the microwave. Heat in short bursts, stirring in between, until hot. You can freeze the Spinach Mushroom Orzo Skillet for later. Just let it cool completely. Then, place it in a freezer-safe container. Leave some space at the top, as the orzo will expand. It can last in the freezer for up to three months. When you want to eat it, thaw it overnight in the fridge. Then, reheat as mentioned above. Cooking orzo takes about 10 minutes. You add it to simmering broth with other ingredients. Stir it often to avoid sticking. The orzo should be tender but still firm, a state called al dente. If you want a softer texture, cook it for another minute or two. Yes, you can use frozen spinach. Just make sure to thaw and drain it first. Frozen spinach is often just as healthy as fresh. It also saves time since you skip the washing and chopping steps. Add it to the skillet at the same point as fresh spinach. Stir it in until warmed through. This dish pairs well with many sides. Try a simple green salad for freshness. Garlic bread or crusty rolls also make a nice addition. For protein, serve grilled chicken or shrimp on the side. A squeeze of lemon on top adds a bright flavor too. This post covered how to make a tasty Spinach Mushroom Orzo Skillet. We looked at key ingredients and how to switch them if needed. I shared step-by-step cooking instructions, plus tips for best texture and flavor. You learned about vegan options and ways to add protein. Lastly, we discussed storage and reheating tips. Remember, cooking is fun and lets you explore flavors. Enjoy making this dish your own!

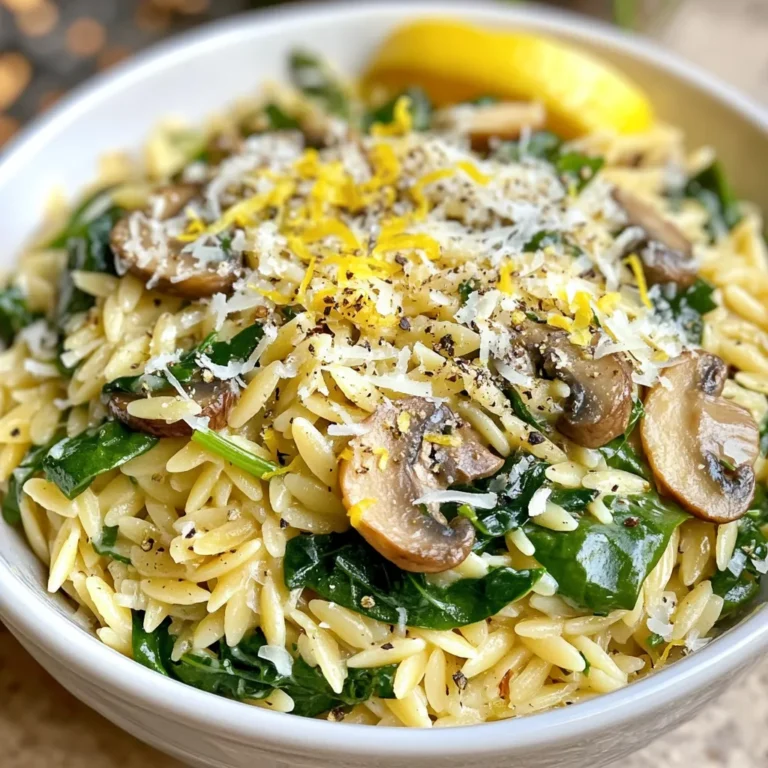
Spinach Mushroom Orzo Skillet Flavorful Dinner Recipe

- 1 lb boneless, skinless chicken thighs, diced - 1 tablespoon olive oil - 2 cloves garlic, minced - 1 tablespoon fresh ginger, grated - 1/4 cup low-sodium soy sauce - 2 tablespoons honey - 1 tablespoon rice vinegar - 1 tablespoon sesame oil You start with chicken thighs because they have great flavor. Dicing them makes for easy cooking. Next, olive oil gives a nice base. Garlic and ginger add a punch of taste. The soy sauce brings saltiness, while honey adds sweetness. Rice vinegar gives a tangy kick, and sesame oil adds richness. - 1 cup carrots, grated - 1/2 cup green onions, chopped - 1 head of butter lettuce or iceberg lettuce (for cups) Grated carrots bring a crunch and color. Green onions add freshness and a mild onion flavor. For the cups, you want sturdy lettuce. Butter lettuce is soft and sweet. Iceberg offers a nice crunch. - Salt and pepper - Alternative sweeteners for honey Adding salt and pepper enhances all the flavors. If you want to swap honey, use maple syrup or agave. These can give similar sweetness. Always taste your mix and adjust to your liking. {{ingredient_image_1}} To start, you need to dice the chicken thighs. Use a sharp knife to cut the chicken into small, even pieces. Aim for about half an inch in size. This helps the chicken cook faster and evenly. Next, prepare the garlic and ginger. Peel two cloves of garlic and mince them finely. For the ginger, take a small piece and grate it with a microplane. This will add a nice kick to your dish. Now, heat a large skillet over medium heat. Add one tablespoon of olive oil to the skillet. When the oil is hot, add the diced chicken thighs. Season them with salt and pepper. Cook the chicken for about 5-7 minutes. Look for a nice brown color on the outside and make sure it's thoroughly cooked. Once the chicken is golden brown, stir in the minced garlic and grated ginger. Cook for another 1-2 minutes. This allows the flavors to mix and become aromatic. In a small bowl, whisk together the soy sauce, honey, rice vinegar, and sesame oil. Pour this sauce over the chicken in the skillet. Make sure to coat all the chicken pieces well. Cook everything together for an extra 2-3 minutes. This will help the sauce thicken just a bit. After the chicken is ready, mix in a cup of grated carrots, half a cup of chopped green onions, and a quarter cup of sesame seeds. Stir everything well so the veggies blend nicely with the chicken. Finally, rinse and separate the lettuce leaves. Use them as cups to hold your teriyaki chicken mixture. Spoon the chicken mix into each leaf and serve right away. Enjoy your flavorful meal! To keep your chicken juicy, do not overcrowd the skillet. If you add too much chicken, it cooks unevenly. This can lead to dry pieces. Cook in batches if needed. Aim for a medium heat. This gives the chicken time to brown without burning. Cook the chicken for about 5-7 minutes until it is browned and cooked through. Marinating your chicken adds great flavor. A simple mix of soy sauce, honey, and rice vinegar works well. You can marinate for at least 30 minutes. Adding fresh herbs like cilantro or basil can also boost flavor. Consider using garlic and ginger for a punch. These aromatics complement the teriyaki sauce nicely. To present your dish well, use clean lettuce cups. Rinse and separate the leaves carefully. Spoon the chicken mixture into each cup. Top with grated carrots and green onions for color. Pair these cups with a side of rice or a simple salad. This creates a balanced meal and enhances your dining experience. Pro Tips Marinate for Extra Flavor: Let the chicken marinate in the teriyaki sauce for at least 30 minutes before cooking to enhance the flavors. Use Fresh Ingredients: Fresh garlic and ginger provide the best flavor. Avoid using pre-minced varieties for maximum impact. Choose the Right Lettuce: Butter lettuce is more tender and pliable than iceberg, making it ideal for cups that can hold more filling. Customize Your Filling: Feel free to add other vegetables like bell peppers or cucumbers for added crunch and nutrition. {{image_2}} For a tasty vegetarian twist, swap chicken for tofu or tempeh. Both options soak up flavors well. Use extra-firm tofu for a nice texture. Just cut it into cubes and sauté until golden. Tempeh offers a nutty taste and great protein. You can also adjust the sauce by replacing soy sauce with a plant-based option, like coconut aminos. This keeps it friendly for plant-based diets. Butter lettuce and iceberg lettuce are common choices, but feel free to explore! Romaine lettuce adds a nice crunch. Cabbage leaves can also work well, offering a sturdy wrap. If you crave something different, try collard greens or bok choy. Each option gives a unique flavor and texture to your cups. You can spice things up with chili sauce for a kick. Just mix in a little to your sauce for heat. If you prefer something sweet, use teriyaki sauce instead of the one in the recipe. You can even add some pineapple juice for a fruity twist. These simple changes let you create your perfect teriyaki chicken lettuce cups! Store leftovers in an airtight container. This keeps your teriyaki chicken fresh. You can keep it in the fridge for up to three days. If you want to keep it longer, consider freezing. To keep the flavors strong, let the chicken cool before sealing it. To reheat chicken, use a skillet over medium heat. Add a splash of water to keep it moist. Stir it often until it's hot. For lettuce, avoid the microwave. Instead, eat the cups fresh to keep them crunchy. If needed, reassemble them right before serving. To freeze the chicken mixture, place it in a freezer-safe container. Make sure to leave some space for expansion. It can last up to three months. To thaw, put it in the fridge overnight. Reheat in a skillet for best results. Yes, you can prep this dish in advance. To do this, cook the chicken and mix it with the sauce. Store it in an airtight container in the fridge for up to two days. When you are ready to eat, just warm the chicken mixture in a skillet. Prepare the lettuce cups fresh to keep them crisp. For the best cups, I recommend using butter lettuce or iceberg lettuce. Butter lettuce is soft and has a nice shape for holding the filling. Iceberg is crunchy and also works well. Both types are sturdy enough to hold the savory chicken without tearing. To make Teriyaki Chicken Lettuce Cups gluten-free, simply swap out the soy sauce. Use a gluten-free soy sauce or tamari instead. This substitution keeps the flavor intact while making it safe for gluten-free diets. Absolutely! You can use different proteins for this dish. Ground beef or pork works well and adds a nice flavor. If you prefer seafood, try using shrimp or fish. Just adjust the cooking time based on the protein you choose to ensure it's fully cooked. Teriyaki chicken lettuce cups are a fun and tasty dish. We discussed key ingredients like chicken, sauces, and fresh produce. You learned how to prep, cook, and add flavors. Tips for juicy chicken and serving ideas help make this dish shine. Feel free to get creative with variations, or store leftovers for later. These cups are flexible and can suit many tastes. Enjoy your cooking adventure with teriyaki chicken lettuce cups!

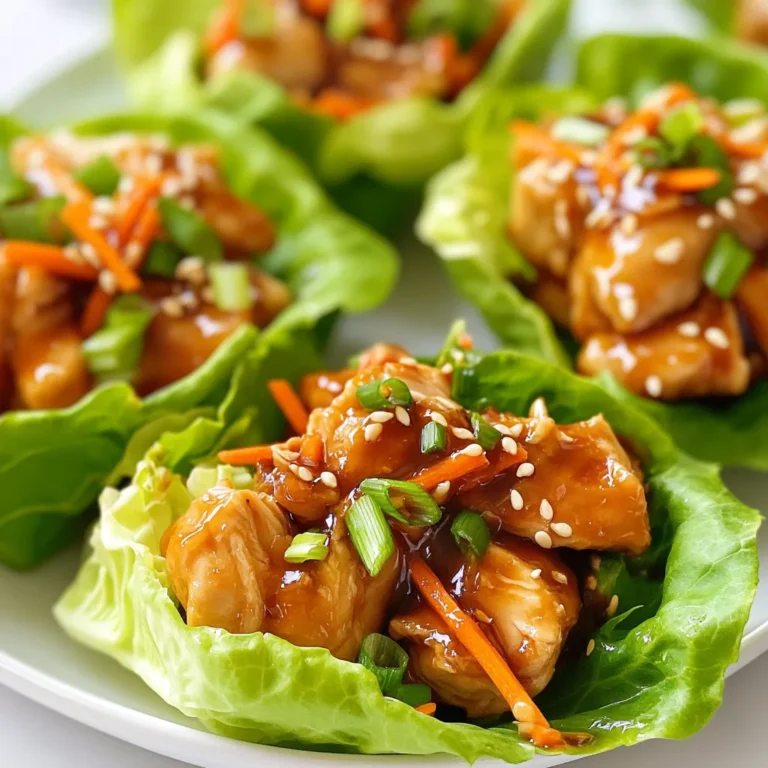
Teriyaki Chicken Lettuce Cups Easy and Flavorful Recipe

- 8 oz (225 g) pasta (penne or fusilli works well) - 1 can (15 oz) white beans (cannellini or great northern), drained and rinsed - 2 cups vegetable broth - 1 cup cherry tomatoes, halved - 2 cups baby spinach - 3 cloves garlic, minced - 1 teaspoon dried basil - 1 teaspoon dried oregano - 1 tablespoon olive oil - Salt and pepper to taste - Fresh parsley, chopped (for garnish) - Grated Parmesan cheese (optional, for serving) Choosing the right pasta is key. I like using penne or fusilli because they hold sauce well. White beans add creaminess and protein. Cherry tomatoes bring a sweet burst of flavor. Baby spinach wilts quickly and adds color. Fresh garlic gives that aromatic kick that we all love. You can swap the pasta for gluten-free options if needed. If you want more protein, add cooked chicken or shrimp. For a spicy kick, toss in red pepper flakes. You can also mix in seasonal veggies like zucchini or bell peppers for added crunch and nutrition. To start, gather all your ingredients. You need: - 8 oz pasta (like penne or fusilli) - 1 can white beans (cannellini or great northern) - 2 cups vegetable broth - 1 cup cherry tomatoes, halved - 2 cups baby spinach - 3 cloves garlic, minced - 1 teaspoon dried basil - 1 teaspoon dried oregano - 1 tablespoon olive oil - Salt and pepper to taste - Fresh parsley, chopped (for garnish) - Grated Parmesan cheese (optional) Now, drain and rinse the white beans. This helps remove extra salt. Halve the cherry tomatoes. Mince the garlic. These steps make everything ready for cooking. Heat the olive oil in a large pot over medium heat. Once hot, add the minced garlic. Cook it for about one minute. You want it fragrant, not burnt. Next, toss in the halved cherry tomatoes. Cook them for 2-3 minutes until they soften. This adds great flavor to your dish. Now, add the pasta, white beans, vegetable broth, dried basil, dried oregano, salt, and pepper. Stir everything well to mix. Bring this mixture to a boil, then lower the heat to a simmer. Cover the pot and let it cook for 10-12 minutes. Stir occasionally to keep the pasta from sticking. When the pasta is al dente, fold in the baby spinach. Let it wilt for about 2 minutes. This adds color and nutrition to your meal. Taste the dish and adjust the seasoning if needed. Serve the pasta hot in bowls. Garnish with chopped parsley for freshness. If you like, sprinkle some grated Parmesan cheese on top. For an extra kick, add a drizzle of olive oil and a pinch of red pepper flakes. This makes your dish pop with flavor and looks great! Enjoy your meal! To get the best texture, use the right pasta. I recommend penne or fusilli. These shapes hold sauce well. Cook the pasta until it is al dente. This means it should be firm to the bite. Stir the pasta often while it cooks. This helps prevent sticking. If you find it too dry, add a splash of vegetable broth. This keeps everything nice and creamy. To boost the flavor, use fresh garlic. Fresh herbs also make a big difference. Add more dried basil and oregano if you like. A pinch of red pepper flakes can add a nice kick. When serving, drizzle a bit of olive oil on top. This adds richness. For added depth, try using roasted cherry tomatoes instead of fresh ones. This dish can be made allergy-friendly easily. Swap the pasta for a gluten-free option if needed. You can use gluten-free penne or fusilli. If you're avoiding dairy, skip the Parmesan cheese. Instead, top it with nutritional yeast for a cheesy flavor. Always check labels on broth and canned beans for allergens. This ensures everyone at your table can enjoy the meal. {{image_2}} You can use many types of pasta in this dish. I love penne or fusilli, but you can choose your favorite. Try whole wheat pasta for a nutty flavor. Gluten-free pasta works too if you need it. Just cook it according to the package directions. Want a heartier meal? Add some protein! Chicken breast or shrimp fits in well. For chicken, cook it in the pot first, then set it aside. Add it back in when you mix in the spinach. Shrimp cooks fast, so add it during the last few minutes. Both options add flavor and make the dish more filling. Seasonal veggies can brighten up this dish. In spring, add peas or asparagus. In summer, zucchini or bell peppers shine. In fall, try butternut squash or kale. Each veggie brings its own taste and texture. Feel free to get creative and use what you have on hand! After cooking, let the pasta cool down. Place it in an airtight container. It will stay fresh in the fridge for up to three days. Make sure to store it without the cheese on top. This keeps the dish from getting soggy. You can freeze One Pot Tuscan White Bean Pasta. First, let it cool completely. Then, transfer it to a freezer-safe container. It can last in the freezer for up to three months. When you’re ready to eat, thaw it overnight in the fridge before reheating. To reheat, you can use the stove or microwave. On the stove, add a splash of broth. Warm it over low heat until hot. Stir often to keep it from sticking. In the microwave, heat in short bursts. Stir in between to make sure it warms evenly. Enjoy your meal just like the first time! Yes, you can easily make this dish vegan. Just skip the Parmesan cheese. The white beans and veggies add enough flavor. If you want a cheesy taste, try nutritional yeast. It blends well and is a great vegan option. For this dish, I recommend short pasta like penne or fusilli. These shapes hold the sauce better. Plus, they mix well with the beans and veggies. You can also use whole wheat or gluten-free pasta if you prefer. To keep your pasta from sticking, stir it often while it cooks. Use enough broth so the pasta has room to move. Once the pasta is cooked, mix in the spinach right away. This helps keep everything loose and tasty. This article covered key points for making the perfect pasta dish, from ingredients to storage. You learned how to choose the best ingredients and personalize your meal. The cooking steps ensure great flavor and texture. We discussed ways to make it allergy-friendly and even how to store it. Now, you have all the tools to create a delicious pasta that suits your taste. Enjoy experimenting with variations, and remember: cooking is about having fun and making it your own!

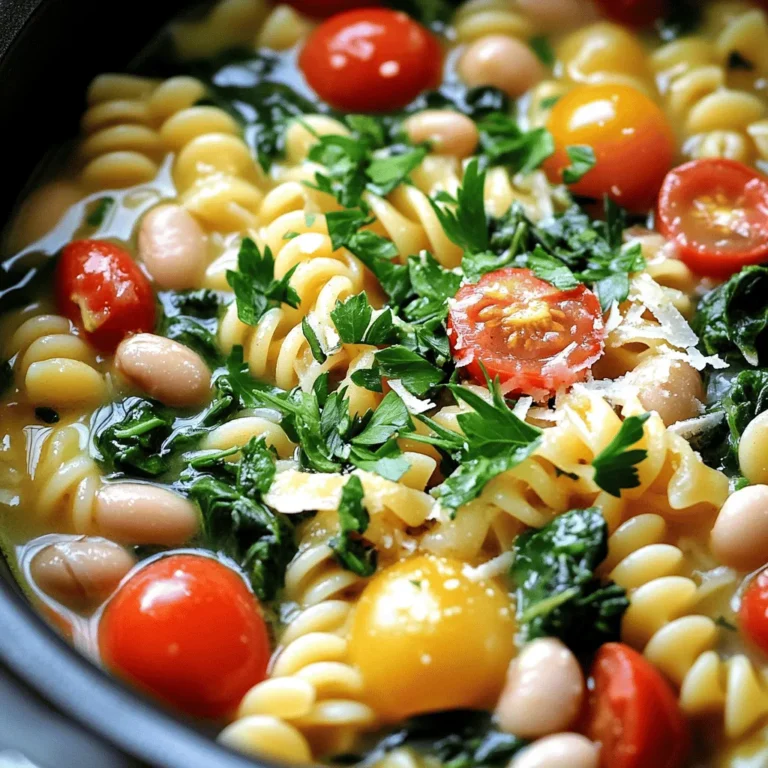
One Pot Tuscan White Bean Pasta Easy Dinner Delight

- 1.5 lbs baby potatoes - 4 tablespoons olive oil - 4 cloves garlic, minced - 1 cup grated Parmesan cheese - 1 teaspoon dried oregano - Salt and pepper to taste - Fresh parsley, chopped (for garnish) To make crispy garlic Parmesan smashed potatoes, you first need the right ingredients. Baby potatoes are great because they cook evenly. Olive oil adds a rich flavor and helps get that crispy texture. Garlic gives a strong taste that pairs well with the cheese. Parmesan cheese is key for a savory kick. Dried oregano adds a nice herbal note. Salt and pepper bring everything together. Fresh parsley on top makes the dish look bright and fresh. Gather all these ingredients before you start cooking. Having everything ready makes the process smooth and fun. You’ll enjoy making this dish and sharing it with others! - Preheat the oven to 425°F (220°C). - In a large pot, bring salted water to a boil. Add the baby potatoes. Cook for 15-20 minutes. Check with a fork for tenderness. - Drain the potatoes and let them cool slightly. - On a large baking sheet lined with parchment paper, place the potatoes. - Use the bottom of a glass or a potato masher. Gently smash each potato until flattened but still intact. - In a small bowl, mix together olive oil, minced garlic, oregano, salt, and pepper. - Brush the garlic oil mixture generously over each smashed potato. - Sprinkle grated Parmesan cheese evenly over the potatoes. - Bake in the preheated oven for 25-30 minutes. Look for golden brown and crispy edges. To make your potatoes perfectly crispy, start with the right oven temperature. Preheat your oven to 425°F (220°C). This heat crisps the edges while keeping the inside soft. For the best crisp, bake them for 25 to 30 minutes. Check at 25 minutes; if they need more time, let them go a little longer. Want to boost flavor? Add more herbs and spices! Try rosemary or thyme for new tastes. You can also mix in red pepper flakes for heat. If you want different cheese, use aged cheddar or pecorino. Each option changes the dish's character while keeping it delicious. These smashed potatoes fit well with many main dishes. Serve them alongside grilled chicken or steak. They also shine as a fun appetizer. Pair them with a dip like sour cream or a spicy aioli. Guests will love the crispy texture and rich flavors! {{image_2}} You can use different potatoes for this dish. Yellow potatoes are creamy and buttery. They create a smooth texture when cooked. Red potatoes are waxy and hold their shape well. They add a nice bite. Sweet potatoes can be a fun twist. They offer a sweet flavor and vibrant color. Just follow the same cooking steps for all potato types. If you want a vegan version, you can skip the Parmesan. Nutritional yeast is a great substitute. It gives a cheesy flavor without dairy. You can also use vegan cheese. It melts well and adds a nice touch. For toppings, try using chopped nuts or seeds. They add crunch and flavor. For those on a gluten-free diet, this recipe is already safe! All the ingredients are gluten-free. You can enjoy crispy potatoes without worry. If you want low-carb options, try using cauliflower. It smashes well and bakes nicely. You can follow the same steps as with potatoes. This way, you still get a tasty, crispy dish. To keep your crispy garlic Parmesan smashed potatoes fresh, place them in an airtight container. This keeps moisture out and flavor in. Store them in the fridge for up to four days. If you want them to last longer, freezing is a great option. When reheating, the oven gives the best results. Preheat your oven to 375°F (190°C). Place the potatoes on a baking sheet and heat them for about 10-15 minutes. This helps regain their crispiness. If you need a quicker method, use the microwave. Heat them for 30 seconds, check, and stir if needed. Just know they may not be as crispy this way. Yes, you can freeze these potatoes! Allow them to cool completely before freezing. Place them in a single layer on a baking sheet first, then freeze for about an hour. After that, transfer them to a freezer-safe bag. They can last for up to three months in the freezer. To thaw, place them in the fridge overnight. Reheat them in the oven for the best texture. You will know the potatoes are done when they are soft. Use a fork to pierce them. If the fork goes in easily, they are ready. They should feel tender but not mushy. This usually takes about 15 to 20 minutes in boiling water. Yes, you can prepare these potatoes ahead of time. Cook and smash the potatoes first. Then, store them in the fridge. When you're ready, brush them with the garlic oil mixture and cheese. Bake them right before serving for that crispy touch. If you need a substitute for Parmesan cheese, try using Pecorino Romano. This cheese has a similar flavor but is a bit saltier. You can also use nutritional yeast for a vegan option. It adds a cheesy taste without dairy. We covered how to make tasty smashed potatoes. Start with simple ingredients like baby potatoes and garlic. Then, follow the easy steps to bake them until golden. Don't forget the tips for crispiness and flavor. You can even try fun variations, like sweet potatoes or dairy-free options. Store any leftovers properly for later. With this guide, you can enjoy perfect smashed potatoes every time. Happy cooking!

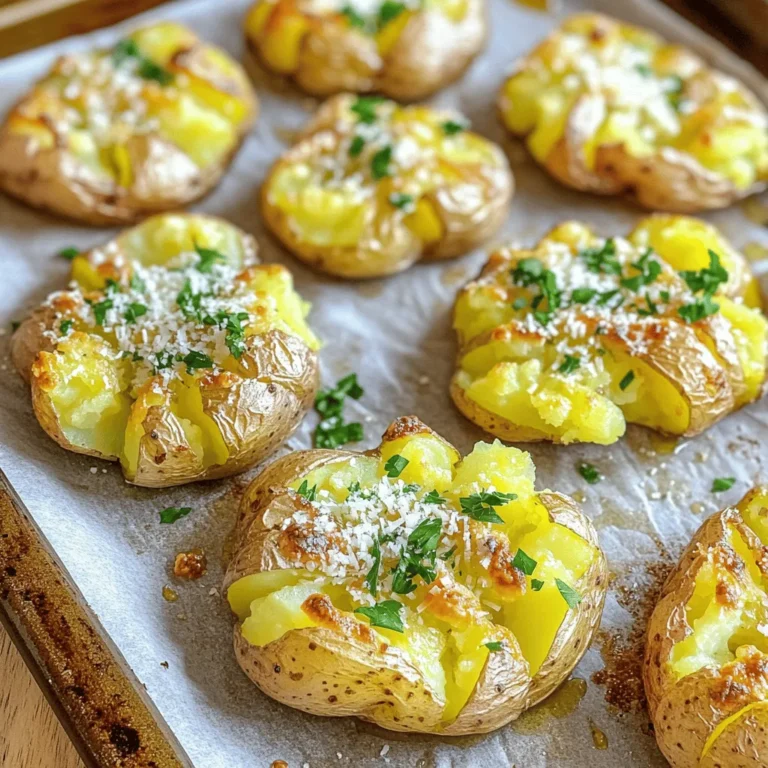
Crispy Garlic Parmesan Smashed Potatoes Delight

To make Maple Glazed Carrot Cake Oatmeal, you will need: - 1 cup rolled oats - 2 cups water or milk (dairy or non-dairy) - 1 medium carrot, grated - 1/2 cup diced apples (preferably a sweet variety) - 1/4 cup raisins or dried cranberries - 1 teaspoon ground cinnamon - 1/2 teaspoon ground nutmeg - 1/4 teaspoon salt - 2 tablespoons pure maple syrup - 1 tablespoon chopped walnuts or pecans (for topping) - Optional: Greek yogurt or dairy-free yogurt for serving If you lack an ingredient, here are simple swaps: - Use steel-cut oats instead of rolled oats for more chew. - Swap water for almond milk or oat milk for creaminess. - Replace raisins with chopped dates for a sweeter touch. - Use pumpkin spice if you lack cinnamon and nutmeg. - Choose sunflower seeds instead of walnuts for a nut-free option. When picking your ingredients, focus on freshness: - Choose rolled oats with a good smell and no off-color. - Look for firm, unblemished carrots; they should be bright orange. - Pick apples that feel crisp; avoid soft or mushy ones. - Select raisins or cranberries that are plump and moist. - Check nuts; they should smell nutty, not rancid. These tips ensure a tasty and vibrant oatmeal dish. Start by grabbing a medium saucepan. Add 1 cup of rolled oats and 2 cups of water or milk. I prefer milk for creaminess. Place the saucepan over medium heat. Stir gently as it heats. Watch for a gentle boil, which should happen quickly. Once boiling, add the fun stuff! Toss in the grated carrot, diced apples, and raisins. These add sweetness and texture. Next, sprinkle in 1 teaspoon of ground cinnamon, 1/2 teaspoon of nutmeg, and 1/4 teaspoon of salt. Mix well. These spices make it taste like carrot cake! Now, reduce the heat to low. Let it simmer for 5-7 minutes. Stir occasionally to keep it creamy. The oats should soak up the liquid and soften. When it's thick and creamy, stir in 2 tablespoons of pure maple syrup for sweetness. Taste it to see if you want more syrup. If it looks too thick, add a splash of milk. Let it sit for a minute to thicken more before serving. To boost flavor in your Maple Glazed Carrot Cake Oatmeal, use spices. Ground cinnamon gives warmth and sweetness. Nutmeg adds a nice depth. You can also try ginger for a spicy kick. Start with the amounts in the recipe. Adjust to your taste as you cook. A pinch of allspice can also create a unique twist. Remember, spices can change the whole dish! Sweetness is key in this oatmeal. The recipe calls for two tablespoons of maple syrup. This amount works well, but you might want more or less. Taste your oatmeal before serving. If it needs more sweetness, add more syrup. For a different flavor, consider honey or agave syrup. You can also use mashed banana for natural sweetness. Each option brings its own charm to the dish. A beautiful presentation makes meals more enjoyable. Serve the oatmeal in vibrant bowls for a pop of color. Top with chopped walnuts or pecans for crunch. A dollop of Greek yogurt adds creaminess and looks great. You can also sprinkle some extra cinnamon on top. For added fun, place a few slices of apple on the side. These simple touches elevate your breakfast and make it feel special. {{image_2}} You can easily make this oatmeal gluten-free. Just use certified gluten-free oats. For a dairy-free version, use almond milk, oat milk, or coconut milk instead of regular milk. Both options taste great and keep the dish creamy. Get creative with toppings! You can add fresh fruit like bananas or berries for a burst of flavor. Chia seeds or flaxseeds add nutrition and crunch. Try coconut flakes or even dark chocolate chips for a sweet twist. Each topping brings a new taste to your bowl. You can change this recipe with the seasons. In spring, add fresh strawberries or rhubarb. During summer, mix in peaches or plums. Fall is perfect for pumpkin puree and spices like ginger. In winter, try adding dried fruits like apricots or figs for warmth and comfort. Each season gives you a new way to enjoy your oatmeal. To keep your Maple Glazed Carrot Cake Oatmeal fresh, let it cool down first. Once cool, transfer it to an airtight container. Store it in the fridge for up to three days. Keeping it sealed helps prevent it from drying out. You can also place a piece of plastic wrap over the top before sealing for extra freshness. When you’re ready to eat your oatmeal again, scoop out a portion and place it in a bowl. Add a splash of water or milk to help it rehydrate. Microwave it on high for one to two minutes. Stir halfway through to heat evenly. You can also reheat it on the stove over low heat, stirring until warm. If you want to keep it longer, consider freezing your oatmeal. Portion it into freezer-safe containers. It can last up to three months in the freezer. When you want to enjoy it, thaw it overnight in the fridge. Reheat it as mentioned before. This way, you can enjoy a warm, tasty breakfast even on busy days! Yes, you can use quick oats. They cook faster than rolled oats. Quick oats will give a softer texture. Just reduce the cooking time to about 1-2 minutes. This helps keep the oatmeal creamy. To make this oatmeal vegan, swap dairy milk for a plant-based milk. Almond, oat, or soy milk works well. Use maple syrup for sweetness, which is already vegan. You can also skip yogurt or choose a plant-based yogurt. You can add many fruits for extra flavor. Bananas, berries, or pears are great choices. Diced peaches or mango also work well. Feel free to mix and match to find your favorite. This blog post covered everything you need to make delicious Maple Glazed Carrot Cake Oatmeal. We listed key ingredients, offered smart substitutes, and shared tips for picking fresh produce. You learned step-by-step instructions, cooking tips, and ways to boost flavor. We highlighted gluten-free and dairy-free options, plus storage practices for your tasty leftovers. In short, this oatmeal recipe is flexible and fun. Enjoy trying all the variations and flavors. It's a tasty treat for any time of the year!

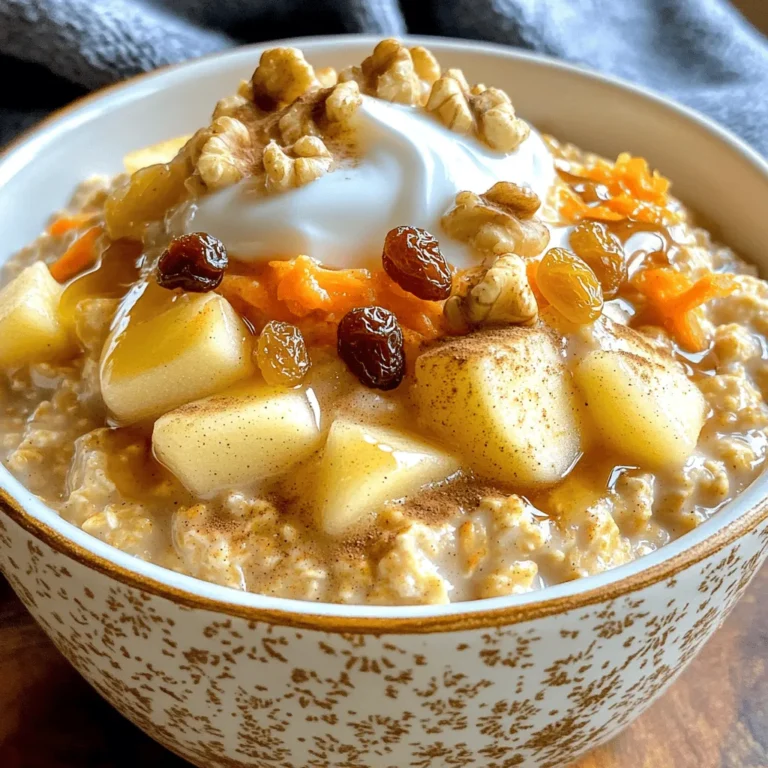
Maple Glazed Carrot Cake Oatmeal Flavorful Breakfast

- 1 cup rolled oats - 1 cup vanilla protein powder - 1/2 cup almond butter (or nut butter of choice) - 1/4 cup honey or maple syrup - 1/4 cup unsweetened almond milk (or any milk substitute) - 1/2 cup colorful sprinkles - 1 teaspoon vanilla extract - Pinch of salt These ingredients create a fun and tasty treat. I love using rolled oats as a base. They add great texture and fiber. Vanilla protein powder gives these balls a protein boost. It also adds a sweet touch. You can choose your favorite nut butter, too. Almond butter is my go-to, but any nut butter works well. Honey or maple syrup acts as the sweetener. Both give a nice flavor. Unsweetened almond milk or any milk substitute keeps the mixture moist. The colorful sprinkles make these balls festive and fun. They add a pop of color and joy. Finally, a pinch of salt enhances all the flavors. Each ingredient plays a key part in making these no-bake birthday cake protein balls delicious. It’s a simple list, but together they create a delightful treat you can enjoy anytime. Start by taking a large bowl. Add 1 cup of rolled oats. Then, mix in 1 cup of vanilla protein powder. Make sure to blend them well. This step helps to spread flavors evenly. Next, add in 1/2 cup of almond butter. You can use any nut butter you like. Then, pour in 1/4 cup of honey or maple syrup. This gives sweetness. Add 1/4 cup of unsweetened almond milk and 1 teaspoon of vanilla extract. Don't forget a pinch of salt to enhance the taste. Stir all the wet and dry ingredients together. Now, use a spatula or your hands to mix everything. You want a dough-like consistency. If it feels dry, add a splash of almond milk. If it’s too wet, sprinkle in a bit more oats. Keep mixing until it all comes together. Once mixed, fold in 1/2 cup of colorful sprinkles. Make sure they are spread evenly. Then, refrigerate the mixture for about 15 minutes. This helps it firm up. After chilling, scoop tablespoon-sized portions and roll them into balls. Place them on a parchment-lined sheet. If you want, roll the balls in more sprinkles for fun. Finally, chill them for an extra 30 minutes to set. Enjoy these tasty bites! To get the best texture for your protein balls, focus on moisture. If your mix feels too dry, add more almond milk a little at a time. If it feels too wet, sprinkle in more rolled oats. The right balance makes the balls easy to roll and eat. You can change the flavor with different protein powders or nut butters. Try chocolate protein powder for a richer taste. Sunflower seed butter works well for a nut-free option. Each change adds a fun twist to your protein balls. Enjoy these protein balls straight from the fridge. They make a great snack on the go. You can also pair them with yogurt or fruit for a fun dessert. Roll them in more sprinkles for an extra treat. {{image_2}} You can make these protein balls fit your needs. For gluten-free options, use gluten-free oats. This simple swap keeps the recipe safe for those with gluten issues. For vegan substitutions, swap honey for maple syrup. Also, choose a plant-based protein powder. These changes help everyone enjoy the treat. Want to mix it up? Add chocolate chips, nuts, or dried fruit for new flavors. Chocolate chips bring a sweet touch. Nuts add a nice crunch. Dried fruit gives a chewy texture. Each addition creates a unique twist that makes the protein balls even more fun. Sprinkles are a great way to celebrate. Use seasonal or holiday-themed toppings for a festive flair. For example, red and green sprinkles work well for Christmas. Use pastel colors for Easter. This fun touch makes the protein balls look special and adds to the joy of sharing them. To keep your No Bake Birthday Cake Protein Balls fresh, use airtight containers. They help keep moisture out, which is key. You can store them in the fridge for easy snacking. If you want to save them longer, consider freezing them. Just place them in a freezer-safe bag or container. This way, you can enjoy these treats for weeks. These protein balls can last about one week in the fridge. If you freeze them, they can stay good for up to three months. Just remember to label the container with the date. This helps you track how long they’ve been stored. You don’t need to reheat these protein balls. If you find them a bit hard after freezing, let them sit at room temperature for a few minutes. This helps them soften a bit. If they dry out, a splash of almond milk can help refresh them. Just mix it in lightly. Enjoy your tasty treat! Yes, you can use any nut butter you like. Peanut butter, cashew butter, or sunflower seed butter all work well. Each nut butter adds its own taste. Almond butter gives a nice, mild flavor. Peanut butter adds a richer taste. Experiment to find your favorite! The total time is about one hour. It takes just 15 minutes to mix and prep the dough. Then, you chill it for 15 minutes. Finally, shape the balls and chill again for 30 minutes. This quick recipe fits into any busy day! Yes, you can skip the protein powder. Simply add more oats for texture. You can also use ground flaxseed or chia seeds for added nutrition. The flavor will change a bit, but they will still taste great! Adjust the sweetness if needed. Absolutely! These protein balls are a fun and healthy snack for kids. They are easy to make and packed with good ingredients. The colorful sprinkles make them exciting. Plus, they are a great way to fuel active kids. Enjoy making them together! These protein balls are easy to make and fun to customize. You learned about the key ingredients, step-by-step instructions, and helpful tips. You can personalize these snacks with flavors and ingredients you love. Don’t forget to store them right for freshness. Experiment and enjoy these treats anytime! Healthy snacks can be both tasty and simple. Dive into making them your own and share with friends. These protein balls might just become your new favorite snack!

No Bake Birthday Cake Protein Balls Delightful Treat

To make Garlic Herb Butter Steak Bites, gather these main ingredients: - 1 lb sirloin steak, cut into bite-sized pieces - 4 tablespoons unsalted butter - 4 cloves garlic, minced - 1 teaspoon fresh thyme, chopped - 1 teaspoon fresh rosemary, chopped - 1 teaspoon smoked paprika - Salt and pepper to taste - 1 tablespoon olive oil These ingredients come together for a simple yet delicious meal. The sirloin steak is tender and perfect for quick cooking. The butter and herbs add rich flavor. For extra flair, consider these optional garnishes and sides: - Fresh parsley, chopped (for garnish) - Mashed potatoes or rice - Steamed veggies like broccoli or green beans These additions can elevate your dish. They make it look beautiful and add nice texture. The key seasonings and herbs are crucial for great taste. - Salt and pepper enhance the natural flavor of the steak. - Smoked paprika gives a mild heat and a smoky flavor. - Fresh thyme and rosemary add a fresh, earthy taste. Using fresh herbs makes a big difference. They bring out the best flavors in the dish. Enjoy cooking! Start with 1 pound of sirloin steak. Cut it into bite-sized pieces. Use a paper towel to pat the steak dry. This helps create a nice sear. Next, season the steak well. Use salt, pepper, and 1 teaspoon of smoked paprika. Mix the seasonings evenly over the steak bites. Heat a large skillet on medium-high heat. Add 1 tablespoon of olive oil once the skillet is hot. Place the steak bites in a single layer. Avoid crowding the pan, or they won't cook well. Sear the steak for 2 to 3 minutes on each side. Cook until they reach your desired doneness. Once done, remove the steak bites and set them aside. Lower the heat to medium. In the same skillet, add 4 tablespoons of unsalted butter. Let the butter melt. Then, add 4 minced garlic cloves, 1 teaspoon of chopped thyme, and 1 teaspoon of chopped rosemary. Stir well and sauté for 1 to 2 minutes. You want the garlic to smell great but not burn. Return the steak bites to the skillet. Toss them in the garlic herb butter for 1 minute. This coats the steak well. Finally, remove from heat and garnish with fresh chopped parsley before serving. To get a great sear on steak bites, start by drying the meat. Use a paper towel to pat the sirloin pieces. This removes moisture. Moisture can lead to steaming, not searing. Next, heat the skillet on medium-high. Add olive oil once the skillet is hot. Place the steak bites in a single layer. This avoids crowding. Cook for 2-3 minutes on each side for a nice brown crust. Feel free to adjust the spices to fit your taste. If you love heat, add some cayenne pepper. Prefer a fresher taste? Consider using fresh basil or oregano. You can also swap smoked paprika for regular paprika if you like. Taste the steak bites before serving. Adjust salt and pepper if needed. You can make these steak bites in advance. Cook them fully and let them cool. Store them in an airtight container. They last in the fridge for three days. To reheat, use a skillet on medium heat. Add a little butter to keep them moist. Heat for a few minutes until warm. You can also microwave them but be careful not to overcook. {{image_2}} You can use many cuts for steak bites. Sirloin is great, but try flank or ribeye. Flank steak has a nice flavor. Ribeye is tender and juicy. Both cuts work well with the garlic herb butter. You can even use tenderloin if you want something fancy. Always cut the steak into bite-sized pieces for even cooking. You can switch up the herbs in this recipe. If you don’t have thyme, use oregano or basil. Both add a fresh taste. Dill also works well if you want a different flavor. Try adding a pinch of parsley for extra color. Mix and match herbs to fit your taste. Fresh herbs are best, but dried herbs can work too. Want to add a kick? You can include red pepper flakes for heat. Start with a small amount and add more if you like. If you're not a fan of spicy food, skip the flakes. You can also add smoked paprika for a smoky flavor. This gives the beef an extra depth without too much heat. Adjust spices to make the dish yours! To store your leftover garlic herb butter steak bites, place them in an airtight container. Make sure they cool down first. You can keep them in the fridge for up to three days. When you store them, try to layer the steak bites with some of the garlic herb butter. This keeps them moist. If you want to freeze the steak bites, wait until they cool. Place them in a freezer-safe bag or container. Remove as much air as you can before sealing. You can freeze them for up to three months. For best taste, eat them sooner rather than later. To reheat, use a skillet on low heat. Add a bit of butter or olive oil to keep the bites from drying out. Stir them gently for about five minutes until heated through. You can also use a microwave, but be careful not to overcook them. Heat for short bursts and check often. This way, they stay juicy and tasty! The best skillet for Garlic Herb Butter Steak Bites is a cast-iron skillet. It heats evenly and holds heat well. This helps sear the steak perfectly. If you don't have cast iron, a heavy stainless steel skillet works too. Avoid nonstick pans for this recipe since they don't get hot enough. A good skillet creates a nice crust on the steak bites. Yes, you can make this dish without butter. Use olive oil instead for cooking the steak. It adds flavor but won't be as rich. You can also use ghee or vegan butter if you prefer. Just know that the taste will change a bit. The garlic and herbs still give great flavor even without butter. To check doneness, use a meat thermometer. For medium-rare, aim for 130-135°F. For medium, look for 140-145°F. If you don’t have a thermometer, cut into a piece. The inside should be pink for medium-rare and light pink for medium. Remember, steak continues to cook after you remove it from the heat. Let it rest for a few minutes for the best results. In this blog post, we explored how to make delicious Garlic Herb Butter Steak Bites. We covered the main ingredients, step-by-step cooking instructions, and helpful tips. You can customize flavors and even store leftovers for later. Enjoy these tender bites as a main dish or appetizer. This dish is simple, tasty, and sure to impress. With practice, you will master the perfect steak every time. Happy cooking!

Garlic Herb Butter Steak Bites Skillet Simple Recipe

- Lemon juice and zest: Lemon juice adds a bright, tangy flavor. The zest gives a fragrant aroma. Together, they brighten the cheesecake and enhance its taste. - Fresh blueberries: Blueberries are juicy and sweet. They create a beautiful swirl in the bars. Plus, they add nutrients and antioxidants. - Cream cheese: Cream cheese makes the filling rich and creamy. It gives the bars their cheesecake texture. Softened cream cheese blends well with the other ingredients. - Alternative sweeteners: You can use honey or maple syrup instead of sugar. This adds a different flavor and can reduce refined sugar. - Gluten-free options for crust: Swap graham cracker crumbs with gluten-free crumbs. Almond flour or gluten-free cookies work great for the crust. - Dairy-free substitutes: Use dairy-free cream cheese for a vegan option. Coconut cream is another good alternative for a creamy texture. - Mixing bowls: You will need a few mixing bowls for combining ingredients. One for the crust and another for the filling works best. - Baking pan: A 9x9-inch baking pan is perfect for these bars. It helps them cook evenly and allows easy lifting with parchment paper. - Electric mixer: An electric mixer makes it easy to blend the cream cheese. It ensures a smooth texture without lumps. 1. Preheating the oven and preparing the pan Start by preheating your oven to 350°F (175°C). This step is key for even baking. Next, take a 9x9-inch baking pan. Grease it well and line it with parchment paper. Leave some paper hanging over the edges. This makes it easy to lift out the bars later. 2. Creating the graham cracker crust In a medium bowl, mix 1 ½ cups graham cracker crumbs, ⅓ cup sugar, and ½ cup melted unsalted butter. Stir until everything blends well. Press this mixture firmly into the bottom of the prepared pan. Bake for 10 minutes and let it cool while you prepare the filling. 1. Blending cream cheese and sugar In a large bowl, beat 16 oz of softened cream cheese on medium speed. Keep mixing until it's smooth and creamy. Gradually add in 1 cup of granulated sugar. Mix well until fully combined. 2. Incorporating eggs and flavorings Add 2 large eggs, one at a time. Mix well after each addition. Then add 1 tsp of vanilla extract, the zest of 1 lemon, and 3 tbsp of lemon juice. Blend this mixture until it is completely smooth. 1. Tips for achieving the perfect swirl effect In a separate bowl, toss 1 cup of fresh blueberries with 2 tbsp of cornstarch. This helps the blueberries stay in place. Gently fold the blueberries into the cream cheese mixture. When pouring the mixture over the cooled crust, spread it evenly. 2. Baking times and signs of doneness To create the swirl, drop spoonfuls of the remaining blueberry mixture onto the cheesecake layer. Use a butter knife to swirl it gently for a beautiful pattern. Bake the bars for 30-35 minutes. The edges should be set, but the center can still jiggle slightly. After baking, turn off the oven and crack the door. Let the cheesecake cool inside for about 1 hour. Now you’re ready to enjoy your Lemon Blueberry Cheesecake Swirl Bars! To get the best texture, follow these simple steps: - Cooling Techniques Post-Baking: After baking, turn off the oven and crack the door. This helps the bars cool slowly. It prevents cracks and keeps them smooth. Let them sit for about an hour before moving them to the fridge. - Importance of Refrigeration: Chill the bars for at least four hours. If you can, leave them overnight. This waiting time helps the flavors blend and firm up the texture. For a lovely presentation, consider these ideas: - Topping Options: Add a dollop of whipped cream on top. You can also sprinkle fresh blueberries or a bit of lemon zest for color. A drizzle of lemon glaze adds a nice touch too. - Serving Recommendations: Cut the bars into neat squares for serving. Use a sharp knife and wipe it clean between cuts for smooth edges. Serve them on a bright plate to show off their colors. Watch out for these common errors: - Overmixing the Filling: Mix just until smooth. Overmixing adds too much air, which can cause cracks while baking. - Not Allowing the Cheesecake to Cool Gradually: Don’t rush the cooling process. Sudden temperature changes can lead to cracks. Always let it cool in the oven first. {{image_2}} You can change the fruit in these bars for fun twists. Try raspberries or strawberries for a new taste. Each fruit adds its own unique flavor. You can also mix fruits together for a burst of color and taste. For cream cheese, consider using flavor-infused options. Mix in vanilla bean or almond extract for a different depth. You could even swirl in a little chocolate or caramel sauce. These choices can elevate your dessert. If you want a vegan version, swap the eggs for flaxseed or chia seeds mixed with water. Use a vegan cream cheese to keep the rich taste. For a low-carb option, replace sugar with a low-carb sweetener like erythritol. Use almond flour for the crust instead of graham crackers. These adaptations make the bars tasty for everyone. Serve these bars in fun, individual jars for a cute twist. Layer the crust, filling, and fruit to make it look pretty. This way, each person gets their own dessert. Another idea is to plate the bars creatively. Cut them into fun shapes or serve them with fresh fruit on top. A drizzle of lemon glaze can also make them pop. These styles will impress your guests and make dessert more exciting. To keep your Lemon Blueberry Cheesecake Swirl Bars fresh, store them in the fridge. Place the bars in an airtight container. This will help them stay moist and avoid picking up other smells. If you want to store them longer, freezing is a great option. For freezing, wrap each bar tightly in plastic wrap. After wrapping, place them in a freezer-safe bag. This will help protect them from freezer burn. These bars last about 5 days in the fridge. You will know they are spoiled if they start to smell off or develop a strange color. Always check for mold, especially if they sit for too long. When frozen, they can last up to 3 months. Just remember to label your bags with the date. To thaw frozen bars, move them to the fridge for a few hours or overnight. This method helps keep their texture. If you want to serve them warm, you can microwave each bar for about 10-15 seconds. This will make them soft and tasty again. Enjoy your Lemon Blueberry Cheesecake Swirl Bars chilled or warm! To make these bars gluten-free, simply substitute the regular graham crackers with gluten-free graham crackers. Many brands offer tasty options that work well. Just make sure to check the package for gluten-free labels. This small change keeps the texture and taste delightful while catering to gluten-sensitive friends and family. Yes, you can use frozen blueberries. They work just fine! When using frozen fruit, do not thaw them before adding. This keeps them from getting mushy. Toss the frozen blueberries with cornstarch as you would fresh ones. The cornstarch helps absorb extra moisture. This way, your bars stay creamy and delicious. If you don’t have cornstarch, you can use all-purpose flour instead. Use about 2 tablespoons of flour to thicken the berry mixture. You can also try arrowroot powder or tapioca starch if you have those on hand. Just remember to mix it well with the berries. This helps create that lovely swirl and keeps the texture nice. This blog post covers making delicious blueberry cheesecake bars with simple steps. We discussed key ingredients like lemon juice, blueberries, and cream cheese, along with helpful substitutions for various diets. Proper equipment, preparation, and baking techniques are crucial for success. I shared tips to avoid common mistakes and enhance your cheesecake's flavor. Remember, these bars offer fun variations and can be easily stored. Enjoy experimenting with your own twists, and savor every bite!

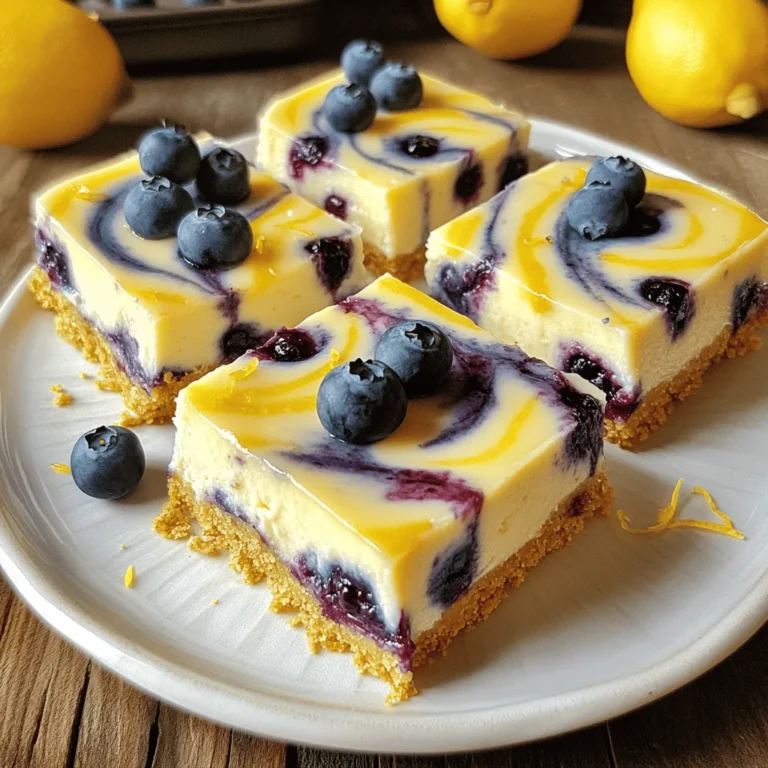
Lemon Blueberry Cheesecake Swirl Bars Irresistible Treat

PREV 1 … 24 25 26 … 57 NEXT
flavor nest kitchen

explore

DessertsDinnerAppetizersDrinks

Our Policies

  • Cookie Policy
  • Copyright Policy
  • Disclaimer
  • GDPR Policy
  • Terms Of Use
Back to Top
  • About
  • Contact Us
  • Privacy Policy
© 2025 flavor nest kitchen