FREE DINNER EBOOK! Get your copy!
  • Cookie Policy
  • GDPR Policy
  • Disclaimer
  • Terms Of Use
  • Visit my other site: Fun Cookie Recipes
flavor nest kitchen
  • Home
  • Dinner
  • Desserts
  • Drinks
  • Appetizers
  • Contact
  • About
  • Privacy Policy
  • Home
  • Dinner
  • Desserts
  • Drinks
  • Appetizers
  • Contact
  • About
  • Privacy Policy
  • Cookie Policy
  • GDPR Policy
  • Disclaimer
  • Terms Of Use
Visit my other site: Fun Cookie Recipes

HOME / CATEGORIES /

Latest

To make a great Pumpkin Spice French Toast Casserole, gather these key ingredients: - 1 loaf of challah bread, cut into 1-inch cubes - 4 large eggs - 2 cups milk (dairy or non-dairy) - 1 cup pumpkin puree - 1/2 cup brown sugar - 1 teaspoon vanilla extract - 1 tablespoon pumpkin spice mix (or a mix of cinnamon, nutmeg, and ginger) - 1/2 teaspoon salt These ingredients combine for a creamy and spiced flavor that makes this dish so special. The challah bread adds a soft texture that soaks up all the goodness. You can make this casserole even better with some optional add-ins: - 1/2 cup chopped pecans - Chocolate chips - Raisins or dried cranberries Adding chopped pecans gives a nice crunch. Chocolate chips add sweetness, while raisins bring a chewy texture. Feel free to mix and match based on what you like. If you want a vegan version, swap out a few ingredients: - Use 4 flax eggs instead of regular eggs (1 tablespoon ground flaxseed mixed with 2.5 tablespoons water for each egg) - Use almond milk, oat milk, or coconut milk instead of dairy milk - Replace brown sugar with coconut sugar These swaps keep the recipe tasty and friendly for everyone. You won’t lose the rich flavor or creamy texture, and it will still be delightful! First, set your oven to 350°F (175°C). This temperature will cook the casserole evenly. Next, take a 9x13 inch baking dish and grease it well. You can use butter or cooking spray. This step keeps the casserole from sticking. In a large bowl, crack four large eggs. Add two cups of milk, either dairy or non-dairy. Mix in one cup of pumpkin puree for that great fall flavor. Then, pour in half a cup of brown sugar. This adds a nice sweetness. Don’t forget one teaspoon of vanilla extract. Finally, stir in one tablespoon of pumpkin spice mix and half a teaspoon of salt. Whisk it all together until smooth. Now, take your loaf of challah bread and cut it into one-inch cubes. Gently add the bread cubes into the egg mixture. Use a spatula to fold the bread into the mixture. Make sure each piece gets coated well. If you want some crunch, fold in half a cup of chopped pecans. Pour the bread and egg mixture into the greased baking dish. Spread the mixture out evenly. Cover the dish with aluminum foil. Let it sit for about 20-30 minutes. This soaking time helps the bread absorb the flavors. After soaking, uncover the dish and place it in the oven. Bake for 45-50 minutes. You know it’s done when the top is golden brown and the casserole is set. Let it cool for a few minutes before you serve it. To get the best flavor, soak the bread well. After mixing the egg and pumpkin, fold in the bread gently. Make sure each piece is coated. Cover the dish and let it sit for 20-30 minutes. This helps the bread absorb all those tasty flavors. For a beautiful top, bake the casserole uncovered. This allows it to brown nicely. Keep an eye on it during the last 10 minutes. If it looks dark but is not set, cover it with foil. This way, you avoid burning while the inside cooks. Cut the casserole into squares for serving. Drizzle warm maple syrup on top for sweetness. A sprinkle of powdered sugar adds a nice touch. If you want extra creaminess, add a dollop of whipped cream. Serve it warm to enjoy the best flavors! {{image_2}} You can use different types of bread for your casserole. Challah is soft and sweet, but other options work too. Try brioche for a rich flavor. Sourdough adds a nice tang. Whole wheat gives a hearty touch. Gluten-free bread is also an option for those who need it. Pumpkin spice is great, but you can mix it up! Add more cinnamon for a warm kick. Nutmeg brings a cozy feel. Consider cardamom for a unique twist. For extra sweetness, toss in some chocolate chips or dried fruit. These flavors can make your casserole special. To make this dish gluten-free, choose gluten-free bread. There are many brands available. You can also use cornbread for a different taste. Just make sure all other ingredients are gluten-free. This way, everyone can enjoy your casserole without worry. To keep your pumpkin spice French toast casserole fresh, let it cool first. Once cool, cover it tightly with plastic wrap or aluminum foil. You can also use an airtight container. Store it in the fridge for up to three days. If you want to enjoy it later, freezing is a great option. When you’re ready to eat the leftovers, take the casserole out of the fridge. Preheat your oven to 350°F (175°C). Place the casserole in an oven-safe dish. Cover it with foil to prevent drying out. Heat it for about 20-25 minutes. For a bit of extra warmth, you can microwave individual pieces for about 30 seconds, checking to see if it's warmed through. To freeze the casserole, cut it into portions. Wrap each piece tightly in plastic wrap, then place them in a freezer bag. Be sure to label the bag with the date. The casserole can stay in the freezer for up to three months. When you’re ready to eat, thaw it in the fridge overnight. Then reheat it as mentioned above. Enjoy your cozy treat anytime! Yes, you can prepare this casserole the night before. Just mix the ingredients and pour them over the bread. Cover it and place it in the fridge. This allows the bread to soak overnight. In the morning, just pop it in the oven. It saves time and makes mornings easier. If you don't have challah, you can use brioche or any thick bread. French bread also works well. Just make sure the bread is sturdy enough to hold the egg mixture. This helps to get a nice texture in the casserole. The casserole can last up to four days in the fridge. Just store it in an airtight container. When ready to eat, you can warm it up in the oven or microwave. This makes for an easy breakfast or snack! Yes! You can use non-dairy milk instead of regular milk. Almond milk or oat milk works great. You can also use a dairy-free butter for greasing the dish. This way, everyone can enjoy this tasty casserole. This blog post walks you through making a tasty Pumpkin Spice French Toast Casserole. We covered key ingredients, step-by-step instructions, and helpful tips. I shared variations, storage methods, and answered common questions. This casserole is easy to make and fun to share. Don't be afraid to get creative with flavors or ingredients. Enjoy every bite of your delicious creation!

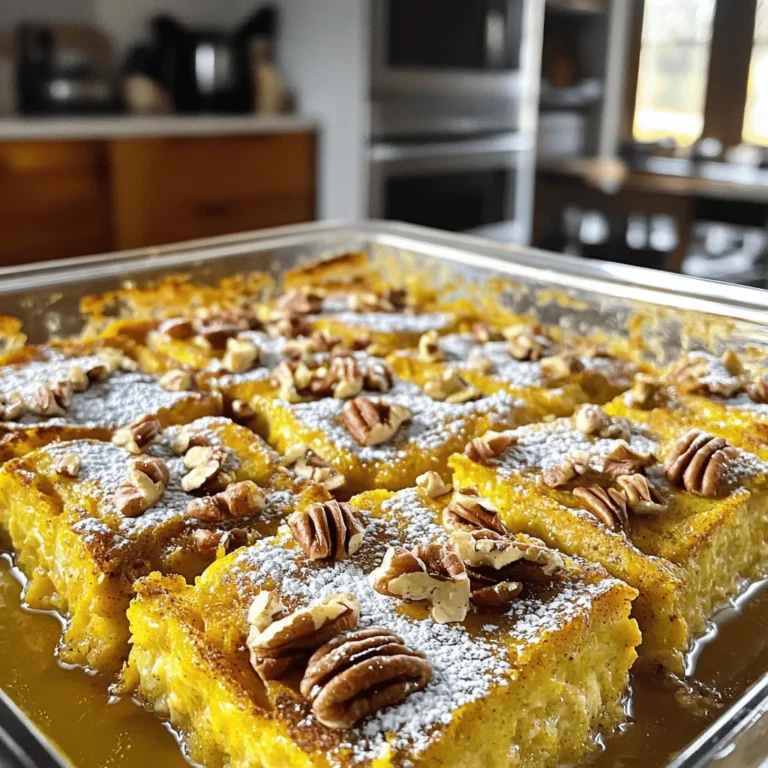
Pumpkin Spice French Toast Casserole Delight Recipe

- 1 pound chicken tenders - 1 cup bread crumbs (preferably panko) - 3 tablespoons everything bagel seasoning - 1/2 cup all-purpose flour - 2 large eggs - 1 tablespoon water - Salt and pepper to taste - Cooking spray or olive oil spray These ingredients create a tasty twist on classic chicken tenders. The panko bread crumbs give a delightful crunch. Everything bagel seasoning adds a unique flavor blend, making these tenders special. When choosing chicken, look for fresh tenders. They cook evenly and stay juicy. If you can, opt for organic or free-range chicken for better flavor. For the breading, I love panko. It’s lighter and crispier than regular bread crumbs. The texture makes each bite satisfying. You can find panko in most grocery stores. Everything bagel seasoning is the star here. It combines sesame seeds, poppy seeds, garlic, and onion. This mix gives the chicken a savory kick. You can even make your own if you like. Using all-purpose flour helps the breading stick better. The eggs create a nice coating for the crumbs to stick. Don't skip the water in the egg mix. It helps thin the mixture, making it easier to coat the chicken. Always season with salt and pepper. This simple step boosts the overall flavor. Lastly, cooking spray ensures the tenders get that nice golden color without excess oil. Gather these items, and you’re ready to make delicious air fryer everything bagel chicken tenders! 1. Seasoning the chicken tenders: Start by seasoning the chicken tenders with salt and pepper on both sides. This step adds flavor and depth to your dish. 2. Setting up the breading station: Next, set up your breading station. You will need three shallow bowls. In the first bowl, place 1/2 cup of all-purpose flour. In the second bowl, whisk together 2 large eggs and 1 tablespoon of water. In the third bowl, mix 1 cup of panko bread crumbs with 3 tablespoons of everything bagel seasoning. This combination gives the chicken a tasty crunch. 1. Dredging in flour: Take each chicken tender and dredge it in the flour. Make sure to shake off any excess flour. This helps the egg mixture stick better. 2. Egg mixture coating: Next, dip the floured chicken into the egg mixture. Let any extra egg drip off. This coating is key for holding the bread crumbs. 3. Final breadcrumb coating: Finally, coat the chicken tenders in the seasoned bread crumbs. Press gently to help the crumbs stick well. This step ensures you get that delicious crunch when you cook them. 1. Preheating the air fryer: Before cooking, preheat your air fryer to 400°F (200°C) for about 3 to 5 minutes. This helps the chicken cook evenly and get crispy. 2. Cooking instructions and flipping: Spray the air fryer basket with cooking spray. Place the breaded chicken tenders in a single layer. Make sure they are not crowded, so they cook evenly. Lightly spray the tops with cooking spray for extra crispiness. Air fry the chicken tenders for 10 to 12 minutes. Flip them halfway through to ensure both sides brown nicely. The chicken should reach 165°F (74°C) to be safe to eat. To make your Air Fryer Everything Bagel Chicken Tenders truly shine, you need to focus on the breading. Here are some key tips: - Ensuring crumbs adhere well: After coating the chicken in flour, shake off the excess. This helps the egg wash stick better. When you dip the chicken in the egg, let any extra drip off too. Finally, when you press the chicken into the seasoned bread crumbs, apply some pressure. This makes sure the crumbs stay put. - Achieving extra crispiness: To boost crunch, use panko bread crumbs. They are lighter and give a great texture. A light spray of cooking oil on the breaded tenders before air frying helps, too. It promotes browning and crispiness. Cooking techniques play a big role in how your chicken turns out. Here’s what to keep in mind: - Best temperature and timing: Preheat your air fryer to 400°F (200°C) for about 3-5 minutes. This ensures even cooking right from the start. Cook the chicken tenders for 10-12 minutes. - Flipping tips for even cooking: Halfway through cooking, flip the tenders. This helps them brown nicely on both sides. Use tongs to flip gently, avoiding any damage to the breading. Once your chicken tenders are done, it’s time to serve them up right! - Ideal dipping sauces: Serve these tenders with tasty dips. Ranch or honey mustard are great choices. They complement the everything bagel flavor well. - Presentation tips for an appealing plate: Arrange your chicken tenders on a clean white plate or a wooden board. Garnish with fresh parsley for color. This makes your dish look inviting and delicious. {{image_2}} You can switch up the protein in this dish. Try using chicken breasts or thighs instead of tenders. Both options work great and keep that juicy flavor. If you want a plant-based option, use tofu or vegetables. Firm tofu holds up well when breaded, and vegetables like zucchini or eggplant can be a fun choice too. Get creative with flavors! Use different seasoning blends to change the taste. Try ranch seasoning for a zesty kick, or Italian herbs for a fresh twist. You can also add herbs or spices to the breadcrumb mix. Fresh parsley, dill, or garlic powder can add depth. Experiment until you find your favorite! If you need gluten-free options, you can still enjoy this recipe. Use gluten-free breadcrumbs instead of regular ones. They will give you that same crunch. You can also try alternative flour types like almond flour or coconut flour. Both work well and add their unique flavor. Enjoy your tasty dish without worry! To keep your chicken tenders fresh, first cool them to room temperature. This step stops moisture that can make them soggy. Place the cooled tenders in a shallow container. Use an airtight container or wrap them tightly in plastic wrap. This method locks in flavor and keeps them from drying out. When you want to enjoy your leftover chicken tenders, use your air fryer for the best results. Preheat the air fryer to 350°F (175°C). Place the chicken in the basket in a single layer. Heat for about 5-7 minutes. This method keeps them crispy and tasty. You can also use a microwave, but the tenders may lose their crunch. To freeze chicken tenders, first let them cool completely. Arrange them in a single layer on a baking sheet. Freeze for about an hour until they are firm. Then, transfer the tenders to a freezer bag or airtight container. Make sure to remove as much air as possible. When you’re ready to eat, thaw them overnight in the fridge. Reheat in the air fryer to restore their crispiness. Air fryer chicken tenders last about 3 to 4 days in the fridge. Store them in an airtight container. Make sure they cool down before sealing. This keeps them fresh and safe to eat later. If you see any signs of spoilage, toss them out. You can use regular breadcrumbs, but panko gives better crunch. Panko is lighter and flakier. This texture helps your chicken tenders crisp up nicely in the air fryer. Regular breadcrumbs can make them denser and less crunchy. If you have panko, I recommend using it for the best results. The best temperature for chicken tenders is 400°F (200°C). This high heat cooks them quickly and evenly. It also makes the outside golden and crispy while keeping the inside juicy. Cooking at a lower temperature may not give you the same nice crunch. Always check that the internal temperature reaches 165°F (74°C) for safety. You now have a clear plan to make crispy air fryer chicken tenders. Start with simple ingredients like chicken, breadcrumbs, and seasoning. Follow the step-by-step instructions for breading and cooking. Don't forget the helpful tips to ensure perfect crispiness. You can even explore variations to suit your taste. Store leftovers properly for later enjoyment. With these techniques, you'll impress anyone with your cooking. Enjoy your tender, tasty treat!

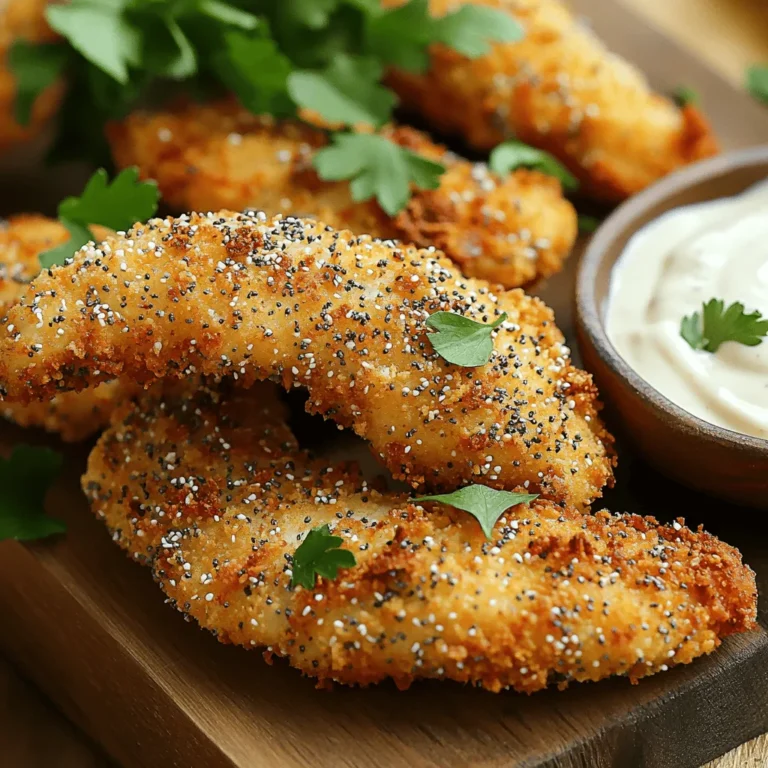
Air Fryer Everything Bagel Chicken Tenders Delight

- 2 cups rotini pasta - 2 cups cooked chicken, shredded - 1 cup buffalo sauce The main ingredients bring this dish to life. Rotini pasta holds the sauce well. Shredded chicken adds protein and flavor. Buffalo sauce gives it that spicy kick everyone loves. - 1 cup cream cheese, softened - 1 cup mozzarella cheese, shredded - 1 cup cheddar cheese, shredded Cream cheese makes the dish creamy and smooth. Mozzarella and cheddar add a rich, cheesy flavor. Together, these dairy ingredients create a delightful texture. - 1/2 cup ranch dressing - 1/2 cup green onions, chopped - 1 teaspoon garlic powder - 1 teaspoon onion powder - Salt and pepper to taste Ranch dressing balances the heat from the buffalo sauce. Green onions add a fresh crunch. Garlic powder and onion powder enhance the dish's flavor. Don’t forget to season with salt and pepper for taste! Start by boiling water in a large pot. Add 2 cups of rotini pasta once the water is bubbling. Cook the pasta according to the package guide until it is al dente. This means it should still have a slight bite. After cooking, drain the pasta well and set it aside for later. While the pasta cooks, grab a mixing bowl. Combine 1 cup of softened cream cheese, 1/2 cup of ranch dressing, and 1 cup of buffalo sauce. Add 1 teaspoon of garlic powder and 1 teaspoon of onion powder. Season with salt and pepper. Mix everything well until it is smooth and creamy. In a large bowl, mix the drained pasta with 2 cups of shredded chicken. Pour in the cream sauce you just made. Stir until all the pasta and chicken are well coated. Next, fold in half of the mozzarella cheese and half of the cheddar cheese. Pour this mixture into a greased 9x13-inch baking dish. Spread it out evenly. Then, sprinkle the remaining mozzarella and cheddar cheese on top. Preheat your oven to 350°F (175°C). Bake your dish for 25 to 30 minutes. You want the cheese to be bubbly and golden. Once done, take it out of the oven and let it cool for a few minutes. Before serving, garnish it with chopped green onions and fresh parsley for a pop of color. - Ensuring pasta is al dente: Cook the rotini pasta just until it is firm but tender. Follow the package time but check a minute early. This keeps the pasta from becoming mushy in the bake. - Making the cream sauce smooth: Soften the cream cheese before mixing. Use a whisk to blend the cream cheese with ranch and buffalo sauce. This ensures a creamy and smooth sauce that coats the pasta well. - How to garnish effectively: Use chopped green onions and fresh parsley for color. Sprinkle them on top just before serving to add a fresh look. - Serving suggestions: Serve the pasta bake in individual bowls. This makes it easier for guests to enjoy. Pair with a simple side salad or some crunchy bread. - Overbaking the dish: Keep an eye on the bake. Remove it when the cheese is bubbly and golden. Overbaking can dry out the pasta and make it less tasty. - Not mixing ingredients properly: Make sure to stir the chicken, pasta, and sauce well. An even mix ensures every bite is full of flavor. If you skip this step, some bites may be bland. {{image_2}} You can change the pasta type for this dish. Rotini works well, but penne or fusilli is great too. Each pasta brings a unique texture, so feel free to try what you love. For protein, if you want something different, you can use turkey or even tofu. Shredded beef is another tasty choice. It adds a nice twist to the dish. To spice things up, add jalapeños or red pepper flakes. This will make your pasta bake extra bold. You can also mix in hot sauce for more heat. Adjust based on your taste. For a healthier version, use reduced-fat cream cheese or ranch dressing. You can also replace some cheese with Greek yogurt. These swaps keep the flavor while cutting calories. If you're gluten-free, choose gluten-free pasta. Many brands offer tasty options that fit well in this dish. Just follow the cooking instructions on the package. For vegetarian or vegan options, replace chicken with beans or lentils. Use plant-based cream cheese and cheese. This way, you keep all the creamy goodness without any animal products. To keep leftovers fresh, store them in an airtight container. This helps avoid moisture loss. You can also cover the dish tightly with plastic wrap or aluminum foil. The creamy buffalo chicken pasta bake lasts for about 3 to 4 days in the fridge. Just make sure to let it cool down before storing. If you want to save some for later, freezing works great! First, let the bake cool completely. Then, place it in a freezer-safe container. You can also divide it into smaller portions for easy meals later. The dish can last up to 3 months in the freezer. To reheat, take it out and let it thaw in the fridge overnight. Then, bake it at 350°F (175°C) for about 20-25 minutes. Cover it with foil to keep it moist. Remove the foil for the last 5 minutes to get the cheese crispy again. Enjoy your tasty meal! To make the dish less spicy, you can adjust the buffalo sauce. Here are some tips: - Use less buffalo sauce. Start with half a cup instead of a full cup. - Mix in more cream cheese or ranch dressing to cool down the heat. - Add a touch of sugar to balance the spice. - Try a milder buffalo sauce or a different hot sauce. These steps help you enjoy the flavor without too much heat. Yes, using leftover rotisserie chicken is a smart idea. Here are some benefits and tips: - It saves time since the chicken is already cooked. - Shred the chicken and mix it right in with the pasta. - You can use any flavor of rotisserie chicken. This adds extra taste. - Make sure it's shredded well for even mixing. Leftover chicken makes this dish quick and easy. Some great sides can complete your meal. Here are my favorites: - A fresh green salad adds crunch and color. - Garlic bread is perfect for soaking up sauce. - Steamed vegetables like broccoli or green beans keep it healthy. - Coleslaw brings a nice, cool contrast to the warm pasta. These sides make your dinner fun and varied. In this article, we explored how to make a delicious Buffalo Chicken Pasta Bake. We covered main ingredients like rotini, chicken, and buffalo sauce. We also discussed dairy items, seasonings, and how to prepare everything step-by-step. You can enjoy this dish hot from the oven or save leftovers for later. Don't forget to try variations based on your taste! Follow the tips to avoid common mistakes and ensure a great meal. Happy cooking!

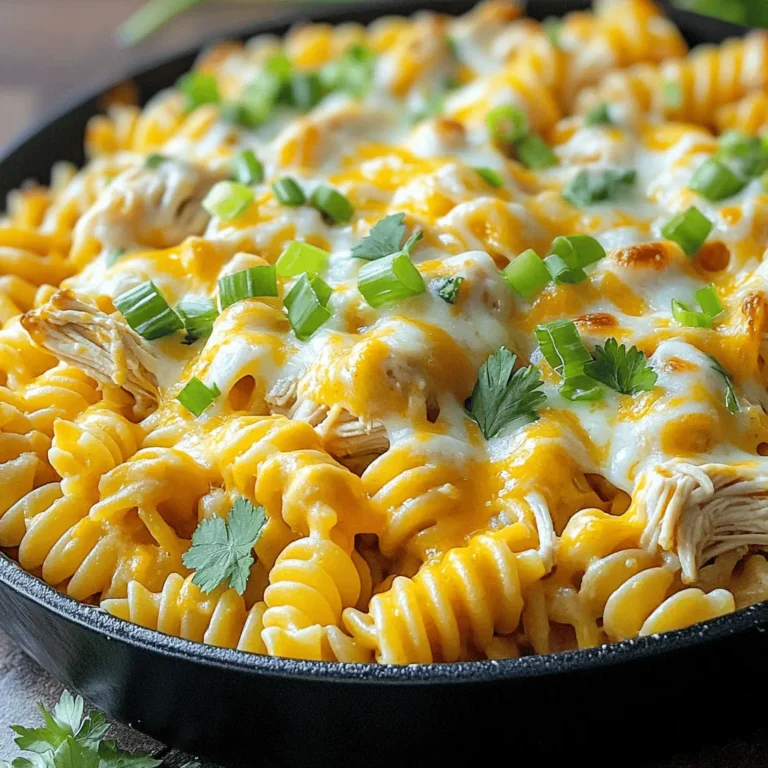
Creamy Buffalo Chicken Pasta Bake Quick and Flavorful

To make this rich and cozy Maple Cinnamon Hot Cocoa, gather these ingredients: - 2 cups whole milk (or dairy-free alternative) - 2 tablespoons cocoa powder - 2 tablespoons pure maple syrup - ½ teaspoon ground cinnamon (plus extra for garnish) - ¼ teaspoon vanilla extract - A pinch of sea salt - Whipped cream or marshmallows for topping You can add your own twist to this hot cocoa. Consider these optional ingredients: - A splash of coffee for a mocha flavor - A dash of nutmeg for warmth - A spoonful of peanut butter for creaminess - Chocolate chips for extra richness If you don't have an ingredient, try these substitutions: - Use almond milk or oat milk instead of whole milk. - Swap maple syrup with honey or agave for sweetness. - Replace cocoa powder with melted dark chocolate. - Use coconut cream instead of whipped cream for a dairy-free topping. These ingredients make the perfect base for a warm drink. Customize it to suit your taste! Start by heating 2 cups of whole milk in a small saucepan. Use medium heat and stir gently. This helps to warm the milk without burning it. Keep an eye on it; you want it warm but not boiling. Whisk it lightly until it feels just right. This step is key, as it sets the base for your hot cocoa. Once the milk is warm, you can add the fun stuff. Add 2 tablespoons of cocoa powder for rich flavor. Next, pour in 2 tablespoons of pure maple syrup for sweetness. Then, add ½ teaspoon of ground cinnamon for warmth. Don’t forget the ¼ teaspoon of vanilla extract for depth. Lastly, a pinch of sea salt enhances all the flavors. Whisk this mixture until it is smooth and combined. You want it to look creamy and delicious. Now it is time to serve! Pour the hot cocoa into mugs. You can add whipped cream or marshmallows on top for extra indulgence. For the finishing touch, sprinkle a little ground cinnamon on top. This adds a nice visual and a hint of spice. Enjoy your cozy drink! To make your Maple Cinnamon Hot Cocoa even better, add a few extras. You can try a splash of peppermint extract for a festive twist. A spoonful of nutmeg pairs well with cinnamon, adding a warm spice note. If you like chocolate, try adding a few chocolate chips. They melt quickly and make the drink richer. The key to creamy hot cocoa is the milk. Whole milk gives the best texture, but you can use a dairy-free option too. Almond or oat milk works great. Heat the milk slowly and avoid boiling it. This keeps it smooth and prevents curdling. If you want extra creaminess, whisk in a tablespoon of heavy cream or a nut butter. Whisking is important for a smooth cocoa. Start with a whisk or a fork when mixing ingredients. This helps break up clumps of cocoa powder. Whisk gently at first, then increase speed as it warms. Be sure to whisk continuously to avoid sticking on the bottom. If you have a frother, use it for a fun, frothy finish! {{image_2}} You can make this hot cocoa dairy-free. Use almond milk, oat milk, or coconut milk instead of whole milk. Each option gives a unique taste. Almond milk keeps it light. Oat milk adds creaminess. Coconut milk brings a tropical twist. These swaps still taste great! Want to change the flavor? Add some peppermint or nutmeg. A few drops of peppermint extract can make it minty fresh. Just one-fourth teaspoon does the trick. Nutmeg adds warmth and spice. Sprinkle a little on top for a special touch. You can mix and match to find your favorite blend! Maple syrup is sweet and rich, but you can try other sweeteners. Honey or agave syrup can work well. For a low-calorie option, use stevia or monk fruit sweetener. Adjust the amount to your taste. Each sweetener changes the flavor, giving you more ways to enjoy it! You can store Maple Cinnamon Hot Cocoa in the fridge. Use a sealed container to keep it fresh. Let it cool before putting it away. It will stay good for up to three days. To reheat your cocoa, pour it into a small saucepan. Heat it gently over low heat. Stir it often to prevent burning. You can also use a microwave. Heat it for 30 seconds at a time, stirring in between. Make sure it is warm but not boiling. For the best taste, enjoy your cocoa within three days. After that, the flavor may fade. If you notice any changes, it’s best to toss it out. Always trust your sense of smell and taste! Enjoy your warm drink fresh whenever possible. Yes, you can use a sugar substitute. Look for options like stevia or monk fruit. These sweeteners can give you a nice taste without the carbs. Remember, some substitutes are sweeter than maple syrup. Start with less and taste as you go. Adjust to find the right balance that you like. There are many fun toppings. You can use marshmallows, chocolate shavings, or even crushed cookies. Try adding a sprinkle of cinnamon or nutmeg for extra flavor. Caramel drizzle can add a sweet twist. Get creative and make it your own! Yes, you can make it ahead of time! Simply prepare the hot cocoa and let it cool. Store it in the fridge for up to three days. When you're ready to enjoy it, just heat it on the stove or in the microwave. Stir well and serve with your favorite toppings. You learned how to make a delicious Maple Cinnamon Hot Cocoa. We discussed ingredients, step-by-step preparation, and tips for a great flavor. Remember, you can customize with various options. Don't forget about storage and reheating tips to keep it fresh. My final advice: experiment with flavors to find your perfect cup. Enjoy your tasty creation!

Maple Cinnamon Hot Cocoa Rich and Cozy Recipe

To make Maple Pecan Overnight Oats, you need: - 1 cup rolled oats - 1 cup almond milk (or any milk of your choice) - 2 tablespoons pure maple syrup - 1 tablespoon chia seeds - 1/2 teaspoon vanilla extract - 1/2 teaspoon ground cinnamon - 1/4 cup pecans, roughly chopped - Fresh berries (strawberries, blueberries, or raspberries) for topping These ingredients work together to create a sweet and nutty flavor. The oats absorb the milk and syrup, making them creamy and delicious. You can easily swap some ingredients. Here are a few ideas: - Use oat milk or coconut milk instead of almond milk. - Replace maple syrup with honey or agave syrup for sweetness. - If you don’t have chia seeds, use flax seeds for a similar effect. - Any nuts can work in place of pecans, like walnuts or almonds. - Fresh fruit can change the flavor. Try bananas or peaches instead of berries. These substitutions keep the recipe flexible and fun. You can adjust it based on what you have at home. This recipe serves two people, making it great for breakfast or a snack. Each serving provides: - Calories: About 350 - Protein: 10g - Fat: 12g - Carbohydrates: 54g - Fiber: 8g - Sugar: 10g These oats are rich in nutrients. They give you energy and keep you full. The healthy fats from pecans and chia seeds add to the overall nutrition. Enjoy this tasty meal as part of a balanced diet! {{ingredient_image_1}} Start by gathering all your ingredients. This makes the process smooth and easy. In a mixing bowl, combine 1 cup of rolled oats, 1 cup of almond milk, 2 tablespoons of pure maple syrup, 1 tablespoon of chia seeds, 1/2 teaspoon of vanilla extract, and 1/2 teaspoon of ground cinnamon. Mix everything well. You want the oats to soak up the flavors. Next, add 1/4 cup of roughly chopped pecans and stir again. This helps spread the pecans evenly throughout the mixture. Once your oat mixture is ready, it’s time to store it. Divide the mixture into two jars or airtight containers. Make sure the pecans are evenly distributed in each jar. Seal the containers to keep the oats fresh. Place them in your fridge overnight, or for at least 6 hours. This step is crucial because it allows the oats to absorb the liquid and soften. The longer they sit, the creamier they become. In the morning, take your jars out of the fridge. Give the oats a good stir. If they look a bit thick, just add a splash of almond milk. This helps achieve your preferred consistency. Now comes the fun part! Top your oats with fresh berries like strawberries, blueberries, or raspberries. If you like it sweeter, drizzle a little more maple syrup on top. Enjoy your tasty and healthy breakfast! To get the right texture, use the right oats. Rolled oats work best for overnight oats. They soak up the liquid well and stay creamy. If you find your oats too thick in the morning, just add a splash of almond milk. Stir it in slowly until you reach your desired creaminess. You want them to be smooth but not runny. Maple pecan overnight oats are tasty on their own, but you can make them even better. Try adding a pinch of salt to bring out the sweetness of the maple syrup. You can also add more spices, like nutmeg, for a warm flavor. Want a little crunch? Add more chopped pecans on top. Fresh berries like strawberries or blueberries add color and extra flavor. A drizzle of maple syrup on top makes it even sweeter. Meal prepping is a smart way to save time. You can make multiple jars at once. Just double or triple the recipe. Store each jar in the fridge for up to five days. Having breakfast ready makes mornings easier. You can grab a jar and eat on the go. Plus, it keeps you healthy and full of energy. Pro Tips Customize Your Sweetness: Adjust the amount of maple syrup based on your personal taste preference; you can also try using honey or agave syrup for a different flavor. Mix in More Flavors: Feel free to add other spices like nutmeg or cardamom, or even a spoonful of cocoa powder for a chocolatey twist! Make It Ahead: These overnight oats can be stored in the fridge for up to 5 days, making them a great option for meal prep. Experiment with Toppings: Besides fresh berries, try adding sliced bananas, shredded coconut, or a dollop of yogurt for extra texture and flavor. {{image_2}} You can swap pecans for other nuts. Walnuts bring a rich flavor. Almonds add a nice crunch. Hazelnuts offer a sweet, nutty taste. Each nut changes the dish a bit. Add fresh fruit for a tasty twist. Bananas make the oats creamier. Apples give a nice crunch. Try adding peaches or mangoes for a tropical vibe. Berries like strawberries or blueberries complement the maple flavor well. If you want less sugar, try honey or agave syrup. Coconut sugar brings a caramel taste. For a sugar-free option, use stevia or monk fruit. Each sweetener can change the flavor and sweetness level. Store your maple pecan overnight oats in the fridge. Keep them in airtight containers. This helps keep them fresh. They will stay tasty for up to five days. If you make a big batch, divide it into smaller portions. This way, you can grab a jar each morning. While it's best to enjoy overnight oats fresh, you can freeze them. Use freezer-safe containers to store your oats. They can last up to three months. To eat, simply thaw them in the fridge overnight. Then, mix in a splash of almond milk for creaminess before serving. Rolled oats have a long shelf life. When stored in a cool, dry place, they last for about one year. After making your overnight oats, the mixture should last in the fridge for five days. Always check for any off smells or changes in texture before eating. Yes, you can use steel-cut oats, but they need more time to soak. Steel-cut oats are hearty and take longer to soften. I recommend letting them soak overnight or even longer. The texture will be chewier compared to rolled oats. If you like a thicker breakfast, steel-cut oats are a great choice. Overnight oats last about 3 to 5 days in the fridge. Store them in airtight containers to keep them fresh. After a few days, the oats may lose some texture. They still taste good but might not be as creamy. Always check for any off smells or odd textures before eating. Yes, you can skip chia seeds if you want. They help thicken the oats and add fiber, but they are not required. If you omit them, you might want to add a bit more rolled oats or reduce the liquid slightly. Experiment to find the best texture for you. You have many tasty options for toppings! Here are some ideas: - Fresh berries like strawberries, blueberries, or raspberries - Sliced bananas or apples - A sprinkle of nuts or seeds - A drizzle of extra maple syrup or honey - A dollop of yogurt for creaminess Feel free to mix and match to find your favorite combination! In this blog post, I covered how to make overnight oats. We looked at the key ingredients and substitutions for better nutrition. I shared clear steps to prepare and serve oats, along with helpful tips for the right texture and flavors. We explored fun variations and how to store your oats effectively. Now you can enjoy delicious and healthy overnight oats in many ways. These easy recipes will make breakfast simple and satisfying. Try them out to find your favorite mix!

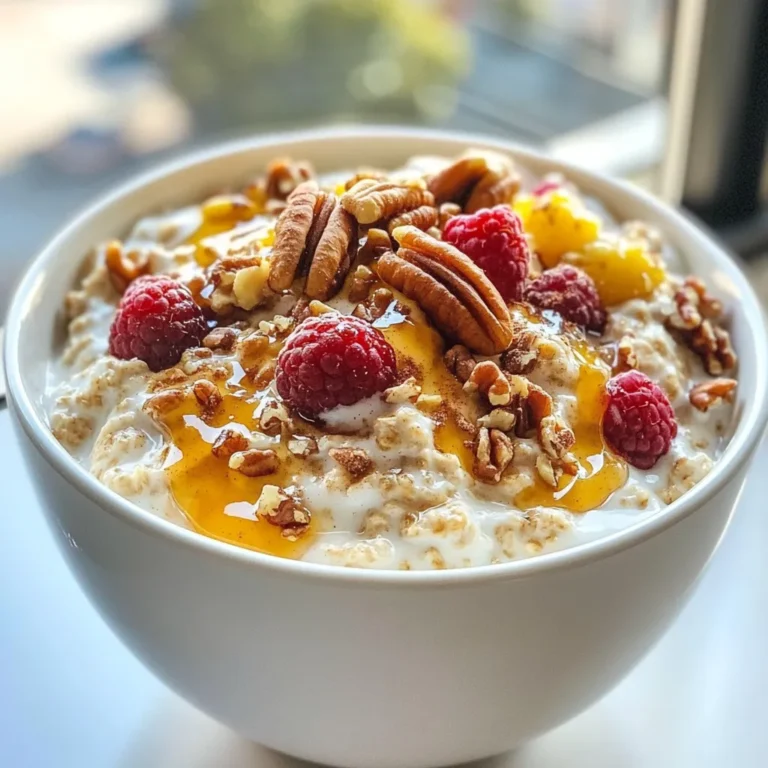
Maple Pecan Overnight Oats Simple and Tasty Recipe

For the meatballs, you need: - 1 pound ground chicken or turkey - 1/2 cup breadcrumbs - 1/4 cup fresh cilantro, chopped - 1 tablespoon ginger, grated - 2 cloves garlic, minced - 1 tablespoon fish sauce - 1 tablespoon lime juice - 1 tablespoon red curry paste - Salt and pepper to taste These ingredients combine to create juicy meatballs with a burst of flavor. The ginger and garlic add warmth, while the fish sauce gives it depth. Lime juice brings brightness, and red curry paste adds the signature Thai heat. For the curry sauce, you will need: - 1 can (14 oz) coconut milk - 1 cup vegetable broth - 1 bell pepper, sliced (any color) - 1 cup snap peas The coconut milk provides a creamy base. The vegetable broth adds richness. Sliced bell peppers and snap peas bring color and crunch to the dish. Together, they make a vibrant and tasty curry sauce. Garnishes can make your dish shine. Consider: - Cooked jasmine rice (for serving) - Lime wedges (for garnish) Jasmine rice serves as the perfect bed for the meatballs. Squeezing lime juice on top enhances the dish's flavors. These simple touches elevate the meal and make it visually appealing. {{ingredient_image_1}} To start, grab a large bowl. Add 1 pound of ground chicken or turkey. Next, mix in 1/2 cup of breadcrumbs and 1/4 cup of fresh cilantro, chopped. Then, add 1 tablespoon of grated ginger and 2 cloves of minced garlic. Don't forget 1 tablespoon of fish sauce and 1 tablespoon of lime juice. Now, stir in 1 tablespoon of red curry paste along with salt and pepper to taste. Mix everything gently until combined. You want the flavors to blend without overworking the meat. Now, let's shape the mixture into meatballs. Roll the mixture into 1-inch balls. You should get about 20 meatballs. Place each meatball on a lined baking sheet. Preheat your oven to 400°F (200°C). Bake the meatballs for 15 to 20 minutes. They should turn golden brown and be cooked through. This step gives them a nice crust and keeps them juicy inside. While the meatballs bake, it’s time to make the sauce. Heat a large skillet over medium heat. Pour in 1 can of coconut milk and 1 cup of vegetable broth. Stir these together well. Next, add in sliced bell pepper and snap peas. Bring this mix to a gentle simmer and cook for about 5 minutes. This step softens the vegetables and helps their flavors shine through. Once the meatballs are done, gently place them into the simmering sauce. Let them simmer for another 5 minutes. This allows the meatballs to soak up the rich flavors of the curry. Taste your dish and adjust the seasoning. Add more curry paste if you want extra heat. Serve the meatballs over a bed of cooked jasmine rice. Drizzle the curry sauce on top for a delicious finish. For a fresh touch, garnish with lime wedges. This adds a zesty kick to each bite. Enjoy your flavorful Thai red curry meatballs! To keep meatballs moist, use ground chicken or turkey. These meats are lean and can dry out. Mix in breadcrumbs and fresh cilantro for added moisture. Don't overmix the meatball mixture. Just combine until all ingredients blend. This helps keep them tender. Baking at 400°F (200°C) for 15-20 minutes gives a nice crust. Use a meat thermometer to check for a safe internal temperature of 165°F (74°C). When cooking curry, use full-fat coconut milk for creaminess. It adds richness to the sauce. Heat the coconut milk and vegetable broth slowly. Stir often to prevent sticking. Add sliced bell pepper and snap peas to keep them crunchy. Simmer gently for 5 minutes to soften the veggies without losing their color. Once the meatballs are in the sauce, let them simmer for 5 more minutes. This allows all the flavors to mix well. To adjust spice levels, start with the red curry paste. Add a tablespoon for mild heat. If you want more spice, stir in extra curry paste. Taste as you go to find your perfect balance. You can also add lime juice for brightness. It helps cut the heat and adds flavor. Keep some lime wedges handy when serving. They make a great garnish and add a fresh twist. Pro Tips Use Fresh Ingredients: Always opt for fresh herbs and vegetables to enhance the flavor of your curry. Fresh cilantro and crisp bell peppers make a significant difference. Adjust the Spice Level: If you like it spicier, feel free to add more red curry paste or a chopped chili to the sauce. You can adjust the heat to your preference! Let it Simmer: Allow the meatballs to simmer in the sauce for a few extra minutes to absorb all the rich flavors of the curry. This step is crucial for a tasty dish. Serve with Lime: Don’t skip the lime wedges! A squeeze of fresh lime juice over the meatballs just before eating brightens up the dish and adds a refreshing touch. {{image_2}} You can easily make a vegetarian version of Thai red curry meatballs. Use lentils or chickpeas in place of meat. Start with 1 cup of cooked lentils or mashed chickpeas. Mix them with breadcrumbs, cilantro, ginger, garlic, and red curry paste. Form the mixture into meatballs. Bake them just like the original recipe. The flavors will still shine through in the curry sauce. Feel free to switch proteins in this recipe. Ground beef or pork works well. Use the same amount, one pound. For a vegan twist, try using plant-based ground meat. It's a great substitute and keeps the flavor intact. Just remember to adjust the seasoning to suit the protein you choose. You can change up the vegetables in the curry too. Broccoli, zucchini, or carrots are great options. Use about 1 cup of your chosen vegetable, sliced. They will add color and nutrition to the dish. Just add them to the sauce as you would the bell pepper and snap peas. Each vegetable brings its own unique taste to the curry. Store leftover meatballs in an airtight container. Keep them in the fridge. They will last for about three days. Make sure to let them cool before sealing. This helps keep them fresh and tasty. To freeze meatballs, place them on a baking sheet. Make sure they are not touching. Freeze them for about one hour. Once frozen, transfer them to a freezer bag. Label the bag with the date. They can last up to three months in the freezer. To reheat meatballs, you can use the oven or microwave. For the oven, heat it to 350°F (175°C). Place the meatballs on a baking dish. Cover with foil to keep them moist. Heat for about 15-20 minutes. For the microwave, place them on a plate. Heat for 1-2 minutes, checking after each minute. Enjoy them warm over rice or in the sauce! Yes, you can make Thai Red Curry Meatballs ahead. Prepare the meatballs and bake them. Once cooked, let them cool. Store them in the fridge for up to three days. You can also freeze them for up to three months. When ready to eat, thaw and reheat in the curry sauce. I love serving these meatballs with jasmine rice. The rice absorbs the rich curry sauce well. You can also add a side of steamed vegetables or a fresh salad. Lime wedges add a nice touch to brighten the dish. To increase spice, add more red curry paste. Start with an extra half tablespoon and taste. You can also add fresh chilies or chili flakes to the sauce. For extra heat, try a dash of sriracha or hot sauce. Yes, you can use gluten-free breadcrumbs or crushed rice crackers. These options work well in the meatball mixture. Be sure to check the labels to ensure they are gluten-free. I recommend using full-fat coconut milk for the best flavor. It adds creaminess and richness to your curry. Light coconut milk can work, but it may not be as flavorful or creamy. Look for brands with no additives for a pure taste. Thai red curry meatballs offer rich flavors and simple steps to make. We explored the main ingredients for the meatballs and curry sauce. I shared tips on baking and serving ideas to enhance the dish. Variations let you customize this meal for any diet or taste. Don’t forget about proper storage to enjoy leftovers later. Now that you know how to make these delightful meatballs, it's time to cook. Enjoy the process and savor every bite!

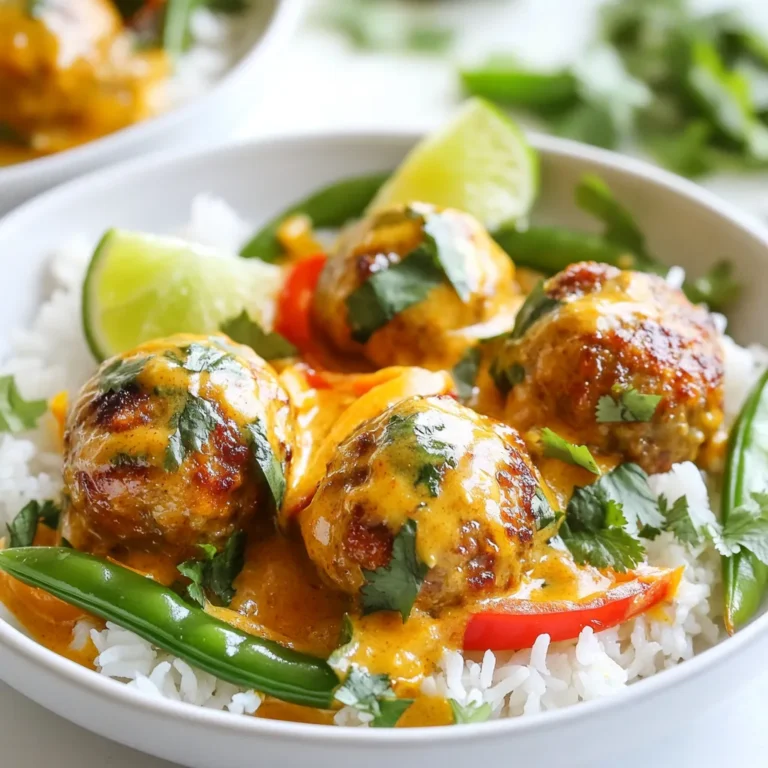
Thai Red Curry Meatballs Flavorful and Easy Recipe

- 12 oz pasta (spaghetti, fettuccine, or penne) - 2 ripe avocados - 1 cup fresh cilantro leaves - 2 cloves garlic - 2 tablespoons lemon juice - 1/4 cup olive oil - Seasoning: salt, black pepper, red pepper flakes - Optional garnishes: cherry tomatoes, Parmesan cheese To make creamy avocado cilantro pasta, gather these fresh ingredients. Choose your favorite pasta type. I like using penne for its bite. Ripe avocados give the sauce a smooth texture. Fresh cilantro brings a bright flavor. Garlic adds a tasty punch. Lemon juice gives balance and freshness. Olive oil helps blend everything together. Don't forget the salt and pepper for seasoning. If you like some heat, add red pepper flakes. You can also use cherry tomatoes and Parmesan to make it even better. Enjoy the vibrant colors and flavors as you prepare this delightful meal! To start, bring a large pot of salted water to a boil. Salt helps flavor the pasta. Add 12 ounces of your favorite pasta, like spaghetti or penne. Cook it according to the package instructions. Aim for an al dente texture, which means the pasta should be firm but not hard. This usually takes about 8 to 12 minutes. Once done, reserve 1 cup of the pasta water. Then, drain the pasta and set it aside. Next, let’s make the creamy avocado sauce. Gather these ingredients: - 2 ripe avocados - 1 cup fresh cilantro leaves - 2 cloves garlic, minced - 2 tablespoons lemon juice - 1/4 cup olive oil - 1/2 teaspoon salt - 1/4 teaspoon black pepper - 1/4 teaspoon red pepper flakes (optional) In a food processor or blender, combine the avocados, cilantro, garlic, lemon juice, olive oil, salt, black pepper, and red pepper flakes if you want some heat. Blend until the mixture is smooth and creamy. If it’s too thick, add a little reserved pasta water. Blend again until you reach your desired consistency. Now, it’s time to mix everything together. In a large bowl, combine the cooked pasta and the creamy avocado sauce. Toss the pasta well until it is evenly coated. If the sauce feels too thick, add more reserved pasta water a little at a time. This will help the sauce cling to the pasta better. For serving, divide the creamy avocado cilantro pasta onto plates. A shallow bowl works great for this. Top each serving with halved cherry tomatoes for color and sprinkle with freshly grated Parmesan cheese if you like. This dish is best served immediately for the best flavor and texture. Enjoy your delicious meal! To make your creamy avocado cilantro pasta even better, consider adding protein. Grilled chicken or sautéed shrimp work well. You can also try diced tofu for a plant-based option. Additional herbs and spices can boost the flavor. Fresh basil or parsley pairs nicely with cilantro. A sprinkle of garlic powder can add depth, too. If you enjoy heat, add more red pepper flakes for a spicy kick. For a healthier version, use whole-grain or gluten-free pasta. Whole-grain pasta adds fiber, while gluten-free options suit those with allergies. You can also substitute ingredients for dietary needs. Use sunflower seed butter instead of nut-based options for a nut-free meal. Greek yogurt can replace some avocado for a tangy twist while keeping it creamy. You can prepare the avocado sauce ahead of time. Just store it in an airtight container with a bit of lemon juice on top. This helps keep it fresh. If you want to make the pasta in advance, cook the pasta, then toss it with olive oil. This prevents sticking. When ready to serve, mix in the avocado sauce and warm it gently on low heat. {{image_2}} You can use many types of pasta for this dish. Spaghetti, fettuccine, or penne all work well. Each shape impacts the taste and texture. For instance, spaghetti gives a light feel. Fettuccine adds a thicker bite. Penne holds more sauce inside. Try whole grain or gluten-free pasta for a healthy twist. To make the sauce even richer, add other creamy ingredients. Greek yogurt gives a tangy flavor. Heavy cream makes it super smooth. If you want a dairy-free option, use cashew cream or a nut-based yogurt. These add creaminess without dairy. Using seasonal vegetables can brighten your dish. Cherry tomatoes are great, but add bell peppers or zucchini when in season. Fresh herbs like basil or mint can also enhance the dish. Don't forget to try other toppings like toasted nuts for a crunchy texture. To keep your creamy avocado cilantro pasta fresh, store it in an airtight container. Place it in the fridge right after serving. This way, it stays cool and tasty. The dish will stay fresh for up to three days. After that, the avocado may brown and the pasta can dry out. When reheating, use the microwave or a small pan on low heat. Add a splash of water or olive oil to keep the pasta moist. This helps it regain its creamy texture. After reheating, taste it and adjust the flavors. You may want to add a bit more salt or lemon juice for a fresh kick. You can freeze this dish, but the texture may change. To freeze, place the pasta in a freezer-safe bag and remove as much air as you can. It will last for about a month. When ready to eat, let it thaw in the fridge overnight. Reheat gently and add a splash of lemon juice to brighten the flavors. You can use silken tofu for a creamy base. It blends well and is smooth. Another option is to use cashew cream. Soak cashews, then blend them with water until smooth. These alternatives will keep your dish rich and creamy. Yes, this pasta recipe is vegan! It uses avocados, cilantro, and olive oil, which are all plant-based. You can enjoy this dish without any animal products, making it great for vegans. To add some heat, try using more red pepper flakes. You can also mix in chopped jalapeños or a dash of hot sauce. Adjust to your taste. Start with a little, then add more if you like it hotter. Yes, you can prepare the avocado sauce ahead of time. Store it in the fridge in an airtight container for up to two days. Cook the pasta fresh when you are ready to eat. This keeps everything tasting great. This pasta goes well with a fresh green salad. A simple side of roasted veggies also works nicely. For drinks, try pairing it with a light white wine or sparkling water with lime. This blog post has covered a simple and tasty avocado cilantro pasta. You learned about the key ingredients, step-by-step instructions, and tips for making it your own. We also looked at variations to fit your taste and dietary needs. Lastly, I gave advice on storing and reheating your dish. Enjoy making this dish and impressing your family and friends! With these tips, you'll create a delicious meal every time.

Creamy Avocado Cilantro Pasta Delightful Easy Meal

To make delicious Peanut Butter Chocolate Chia Pudding, you need simple and wholesome ingredients. Here’s what you’ll gather: - 1/2 cup chia seeds - 2 cups almond milk (or any dairy-free milk) - 1/4 cup natural peanut butter - 1/4 cup cocoa powder - 1/4 cup maple syrup (adjust to taste) - 1 teaspoon vanilla extract - A pinch of salt - Suggested toppings: sliced bananas, crushed nuts, and extra chocolate shavings These ingredients work together to create a creamy and rich pudding. Chia seeds are tiny but powerful. They absorb liquid and turn into a gel-like texture, perfect for pudding. Almond milk or any milk you prefer adds creaminess. The natural peanut butter gives it a nutty flavor, while cocoa powder brings that chocolate goodness. Maple syrup adds sweetness, and vanilla extract rounds out the flavors. Don’t forget the pinch of salt! It enhances the overall taste. For toppings, feel free to get creative. Sliced bananas add freshness, crushed nuts give crunch, and chocolate shavings add a touch of luxury. Each ingredient plays a role in making this treat not just tasty, but fun to enjoy. First, gather your ingredients. You need chia seeds, almond milk, peanut butter, cocoa powder, maple syrup, vanilla extract, and a pinch of salt. Next, in a mixing bowl, combine the chia seeds and almond milk. Add the peanut butter, cocoa powder, maple syrup, vanilla extract, and salt. Now, whisk the mixture well. Make sure all ingredients blend together. You want to eliminate any clumps of chia seeds or cocoa powder. A good mix is key to a smooth pudding. After mixing, cover the bowl with plastic wrap or a lid. This step is important. Refrigerate for at least 4 hours or overnight. This allows the chia seeds to soak up the liquid and form a pudding-like texture. When you're ready to serve, take the pudding out of the fridge. Give it a good stir to break up any clumps that may have formed. Then, spoon the pudding into individual dishes. You can use small bowls or jars for a fun presentation. For toppings, get creative! Sliced bananas add sweetness. Crushed nuts give a nice crunch, while chocolate shavings provide extra chocolate flavor. Mix and match your favorite toppings for a unique twist. The chilling time is crucial for this recipe. You need at least 4 hours for the chia seeds to absorb the almond milk. If you leave it overnight, the pudding will be even thicker. This waiting time enhances the flavors and creates a creamy texture. Enjoying a well-chilled dessert makes this pudding truly delightful. Mixing your ingredients is key to a smooth pudding. Start by adding your chia seeds, almond milk, peanut butter, cocoa powder, maple syrup, vanilla extract, and a pinch of salt into a bowl. Use a whisk to blend everything. Whisk hard until there are no clumps of chia seeds or cocoa powder. This makes your pudding creamy and rich. Maple syrup is your main sweetener here. If you like it sweeter, add more syrup. Taste as you go. You can also use less if you prefer it less sweet. Just be careful not to lose the chocolatey flavor. If almond milk is not your thing, try other dairy-free milks. Cashew milk, coconut milk, or oat milk work well too. Each adds a unique flavor to your pudding. Adjusting the milk can change the texture slightly, so find what you like best. {{image_2}} You can change the flavor of your pudding easily. Try using almond butter instead of peanut butter. It adds a nice twist. You can also switch sweeteners. Honey or agave syrup works well if you want something different. Each option gives a new taste to your pudding. Toppings can make your pudding even better. Fresh fruit like strawberries or raspberries adds color and taste. You can also use granola for a crunchy texture. Coconut flakes give a tropical feel. Mix and match toppings to find your favorite combination. If you want a vegan pudding, ensure your ingredients are plant-based. Use almond milk or any other dairy-free milk. Check that your peanut butter and sweeteners are vegan. This way, you can enjoy a rich, creamy dessert that fits your diet. To keep your peanut butter chocolate chia pudding fresh, use airtight containers. Glass jars work great. They seal tightly and let you see the pudding inside. Store the pudding in the fridge for up to five days. After that, it may lose taste and texture. You can freeze the pudding if you want to save it for later. To freeze, spoon the pudding into freezer-safe containers. Leave some space at the top, as the pudding will expand. It can stay in the freezer for up to three months. When you want to eat it, move it to the fridge overnight to thaw. You can eat the pudding cold or warm it up. To restore texture, microwave it for about 20 seconds. Stir well and check if it's warm enough. Avoid overheating, as it can change the pudding's creamy feel. Enjoy the rich taste either way! Yes, you can use regular milk in this recipe. It will change the flavor a bit. Almond milk adds a nutty taste, while regular milk gives a creamier feel. The consistency will also differ slightly. It may be thicker with regular milk, but still delicious. This recipe is great for meal prep! It stays good in the fridge for about five days. Just store the pudding in airtight containers. You can enjoy it for breakfast or as a snack anytime. To make it low-calorie, you can swap some ingredients. Use less peanut butter or choose a light version. You can also reduce the maple syrup. Try using a sugar substitute like stevia. These changes help cut down on calories and sugar while keeping it tasty! This blog post covered a tasty chia pudding recipe. We explored key ingredients and steps for perfect texture. You learned customizable options for flavor and sweetness. I shared tips on storage and meal prep for convenience. In summary, this recipe is easy to make and fun to adapt. Enjoy experimenting with toppings and flavors. Happy cooking!

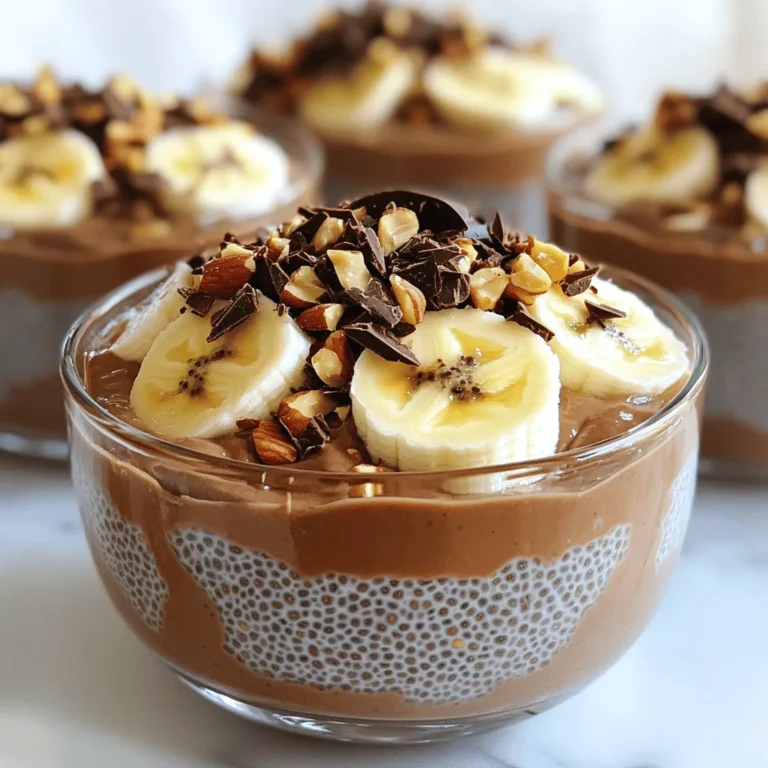
Peanut Butter Chocolate Chia Pudding Delight

To make this tasty dish, you need just a few simple items: - 1 cup rolled oats - 1 cup almond milk (or any milk of your choice) - 1/2 cup Greek yogurt (plain or vanilla) - 1 cup fresh strawberries, sliced - 2 tablespoons honey or maple syrup - 1 teaspoon vanilla extract - 1 tablespoon chia seeds - 1/4 teaspoon salt These ingredients blend well to create a creamy and fruity breakfast. The oats soak up the milk and yogurt overnight, making them soft and delicious. When you're ready to eat, you can add some fun toppings: - Crushed graham crackers - Fresh mint leaves for garnish These toppings give your oats that classic shortcake feel. The crunch of the graham crackers adds a nice texture. If you have special dietary needs, here are some great swaps: - Use coconut milk for a dairy-free option. - Substitute dairy yogurt with a plant-based yogurt. - Swap honey for agave syrup for a vegan choice. These substitutions let everyone enjoy this treat, no matter their diet. Start by gathering your ingredients. You need rolled oats, almond milk, Greek yogurt, honey or maple syrup, vanilla extract, chia seeds, and salt. In a large bowl, mix the rolled oats and almond milk. Add Greek yogurt, honey, vanilla, chia seeds, and salt. Stir well until everything blends together. Make sure there are no dry oats left. This mix is the base for your strawberry shortcake overnight oats. Now it’s time to add strawberries. Take your fresh strawberries and slice them into small pieces. Gently fold these sliced strawberries into the oat mixture. Make sure to save some slices for the top later. Mixing well helps distribute the sweet strawberry flavor throughout the oats. Next, divide the mixture into jars or containers. Fill them up but leave a little space at the top. The oats will expand as they soak up the liquid. Seal each jar tightly and place them in the fridge. Let them chill overnight or for at least four hours. This step softens the oats. In the morning, stir the oats again. If they are too thick, add more almond milk until you like the texture. Now, you are ready to enjoy your tasty strawberry shortcake overnight oats! To get the best texture in your overnight oats, use rolled oats. These oats soak up the almond milk well. If your mixture seems too thick after chilling, just add more almond milk. This way, you can make it creamy and smooth. You can boost the taste with a few simple tweaks. Try using vanilla-flavored Greek yogurt for extra flavor. You can also mix in a pinch of cinnamon for warmth. Fresh mint leaves add a nice touch too. They bring a fresh taste that pairs well with strawberries. Making these oats in bulk saves time. You can double or triple the recipe easily. Just use more jars to store them. Keep the toppings separate until you're ready to eat. This keeps your oats fresh and tasty. Enjoy your ready-to-eat breakfast all week long! {{image_2}} You can mix up the fruit in your overnight oats. Try bananas, blueberries, or peaches. Each fruit adds its own tasty twist. For example, bananas make it sweet and creamy. Blueberries add a nice burst of flavor. Peaches give a juicy, summer feel. Feel free to experiment with what you love! If you want a vegan version, swap Greek yogurt for coconut yogurt. Use plant-based milk, like almond or oat milk. You can also replace honey with maple syrup or agave nectar. These swaps keep the taste great while fitting your diet. You won’t miss out on flavor or texture. Adding protein powder is simple and smart. Choose a flavor that goes well with strawberries. A vanilla or unflavored protein works best. Stir in one scoop when mixing your oats. This way, you boost nutrition and keep energy high. It’s a great option for those busy mornings! To keep your strawberry shortcake overnight oats fresh, store them in airtight containers. Glass jars work well. Make sure the lids fit snugly to prevent air from getting in. Place the jars in the fridge as soon as you make them. This helps the oats absorb the milk and flavors. You can enjoy your overnight oats for up to five days in the fridge. They taste best within the first two days. If you notice any unusual smell or color, it is best to throw them away. You can add more fresh strawberries or toppings each day to keep them exciting. These oats are great cold, but you can warm them if you prefer. To reheat, transfer the oats to a microwave-safe bowl. Heat for about 30 seconds to one minute. Stir well to make sure they warm evenly. If they seem too thick, add a splash of almond milk to loosen them up. Enjoy them warm or cold! Yes, you can use instant oats. Instant oats cook faster and absorb liquid quickly. However, they may make the texture softer. If you prefer a chewy bite, stick with rolled oats. You can store overnight oats for up to five days in the fridge. Make sure to keep them in airtight containers. This helps maintain flavor and texture. Just remember to add fresh fruits or toppings right before serving. Yes, you can make these oats without yogurt. You can replace it with more almond milk. This will keep the mixture creamy. You could also use a plant-based yogurt for a dairy-free option. You now know how to make strawberry shortcake overnight oats. We covered key ingredients and useful tips for meal prep. You learned how to enhance flavors and swap for dietary needs. Variations offer fun ways to change tastes, too. Use this knowledge to create a tasty snack. Enjoy the process and experiment with your favorite fruits. Trust that you can make these oats your own. Keep them chilled, and you'll have a tasty treat ready to eat!

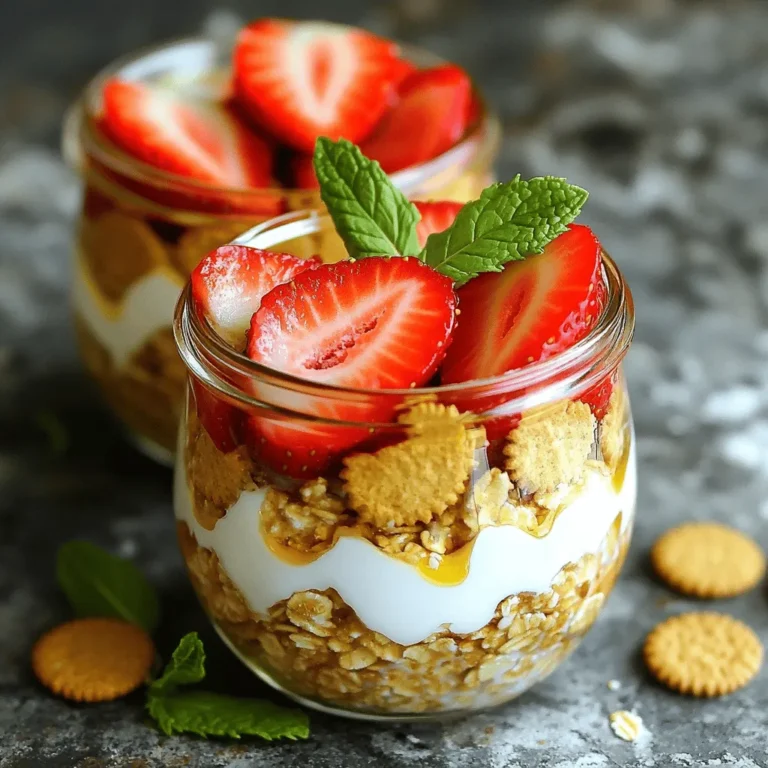
Strawberry Shortcake Overnight Oats Easy and Tasty Recipe

- 12 large cremini or button mushrooms - 4 oz cream cheese, softened - 1/2 cup shredded sharp cheddar cheese - 1/4 cup diced jalapeños - 1/4 cup breadcrumbs - 1/4 tsp garlic powder - 1/4 tsp onion powder - Salt and pepper to taste - Olive oil for drizzling - 2 tbsp chopped fresh cilantro (optional) Jalapeño Popper Stuffed Mushrooms need fresh and simple ingredients. Start with 12 large mushrooms. You can use cremini or button mushrooms. The choice is yours. Next, you need 4 ounces of softened cream cheese. This helps create a creamy filling. Then, add 1/2 cup of shredded sharp cheddar cheese. It gives a nice flavor kick. Don't forget the jalapeños! Use 1/4 cup of diced jalapeños. You can choose fresh or pickled. Adjust the amount to fit your taste. For texture, include 1/4 cup of breadcrumbs. This will add crunch to your dish. You will also need some spices like 1/4 teaspoon of garlic powder and 1/4 teaspoon of onion powder. Add salt and pepper to taste for more flavor. Finally, drizzle some olive oil over the mushrooms. This adds richness. Optionally, you can garnish with 2 tablespoons of chopped fresh cilantro. It adds a fresh pop of color and taste. These ingredients come together to create a tasty party snack. They are sure to impress your guests! 1. Preheat your oven to 375°F (190°C). This step is key for even cooking. 2. Clean the mushrooms gently with a damp paper towel. This helps remove dirt without waterlogging them. After cleaning, remove the stems and set the caps aside. 1. In a mixing bowl, combine the softened cream cheese with the shredded cheddar cheese. Make sure the cream cheese is soft for easy mixing. 2. Add diced jalapeños to the cheese mixture. You can use fresh or pickled jalapeños based on your taste. 3. Sprinkle in garlic powder, onion powder, salt, and pepper. Mix until everything blends well. 1. Fill each mushroom cap with the cream cheese mixture. Make sure to heap it slightly for a generous bite. 2. In another bowl, mix breadcrumbs with a drizzle of olive oil. This makes the topping crispy. 3. Top each stuffed mushroom with the breadcrumb mixture. This adds a nice crunch. 4. Place the stuffed mushrooms on a baking sheet lined with parchment paper. Drizzle a little olive oil over the tops to enhance flavor. 1. Bake in the preheated oven for 20-25 minutes. The mushrooms should be tender, and the tops should turn golden brown. 2. Once done, remove them from the oven and let them cool for a few minutes. If desired, garnish with chopped fresh cilantro for a pop of color and flavor. To make the filling just right, start by checking your cream cheese. It should be soft but not too runny. If it is too thick, the mix will be hard to spread. Let it sit out for a bit to soften, or microwave it for five seconds. Next, adjust the jalapeño heat. If you like it spicy, use fresh jalapeños. For a milder taste, pickled jalapeños work well. You can even remove the seeds from fresh jalapeños for less heat. Choosing the right breadcrumbs matters for a crispy topping. I like using panko breadcrumbs because they create a nice crunch. Regular breadcrumbs can work too, but they may not be as crispy. When you drizzle olive oil on the breadcrumbs, it helps them brown better. Just a little oil goes a long way. Make sure to mix it well so every crumb gets coated. This tasty snack pairs well with many things. I love serving them with a side of ranch or blue cheese dressing. Fresh cilantro adds a nice touch too. Serve these stuffed mushrooms warm. They taste best right out of the oven. If you let them sit too long, they lose their crispiness. Enjoy them fresh for the best flavor! {{image_2}} You can change the cheese in this recipe for fun. Try using pepper jack for extra heat. This cheese melts well and adds a creamy texture. You can also use mozzarella for a mild flavor. If you want to go dairy-free, use vegan cream cheese. Many brands offer great taste and texture. Nutritional yeast also adds a cheesy flavor without dairy. Feel free to add more veggies to the filling. Chopped bell peppers or green onions add color and crunch. You can also mix in cooked spinach for a healthy twist. If you enjoy meat, crumbled bacon makes a tasty addition. It adds a smoky flavor that pairs well with the creaminess. Just be sure to cook it fully before mixing it in. For gluten-free options, use gluten-free breadcrumbs. Many brands offer tasty choices made from rice or oats. You can also grind gluten-free crackers to use as a substitute. If you need a binder, try using ground flaxseed mixed with water. This works well to hold everything together. Another option is to use mashed beans for added protein and fiber. Once you finish your tasty Jalapeño Popper Stuffed Mushrooms, store the leftovers in the fridge. Place them in a sealed container to keep them fresh. You can use glass or plastic containers. Make sure to eat them within three days for the best taste. To keep your stuffed mushrooms crispy when reheating, use the oven. Preheat it to 350°F (175°C). Place the mushrooms on a baking tray. Bake for about 10-15 minutes until they are warm and crispy again. If you are short on time, you can reheat them in the microwave. Just put them on a microwave-safe plate. Heat them for about 30-60 seconds. However, they may not be as crispy. Enjoy your leftovers! Yes, you can prepare these stuffed mushrooms ahead. Here’s how to do it: - Prep the filling: Make the cream cheese mixture and fill the mushroom caps. - Storage: Place them on a baking sheet. Cover with plastic wrap. - Fridge time: You can store them in the fridge for up to 24 hours. - Baking: When ready, bake them straight from the fridge. Add an extra 5 minutes to the baking time. If you don’t have cream cheese, don’t worry! Here are some great substitutes: - Sour cream: It adds a tangy flavor and creamy texture. - Greek yogurt: This option is healthy and keeps it smooth. - Ricotta cheese: It has a light texture and works well in this dish. - Vegan cream cheese: For a plant-based option, look for this in stores. Want more heat? Here are my tips: - Add more jalapeños: Use fresh or pickled jalapeños for extra spice. - Spicy cheese: Swap sharp cheddar for pepper jack cheese. - Hot sauce: Mix in your favorite hot sauce into the filling. - Chili powder: Add a little chili powder to the mixture for a kick. Stuffed mushrooms are a tasty and fun dish. We covered ingredients, step-by-step instructions, and helpful tips. You can mix ingredients, adjust spices, and store leftovers easily. Various cheeses and extra veggies can enhance the flavor. For heating, the oven works best to keep them crispy. Try these ideas to impress your friends. Enjoy making stuffed mushrooms your way!

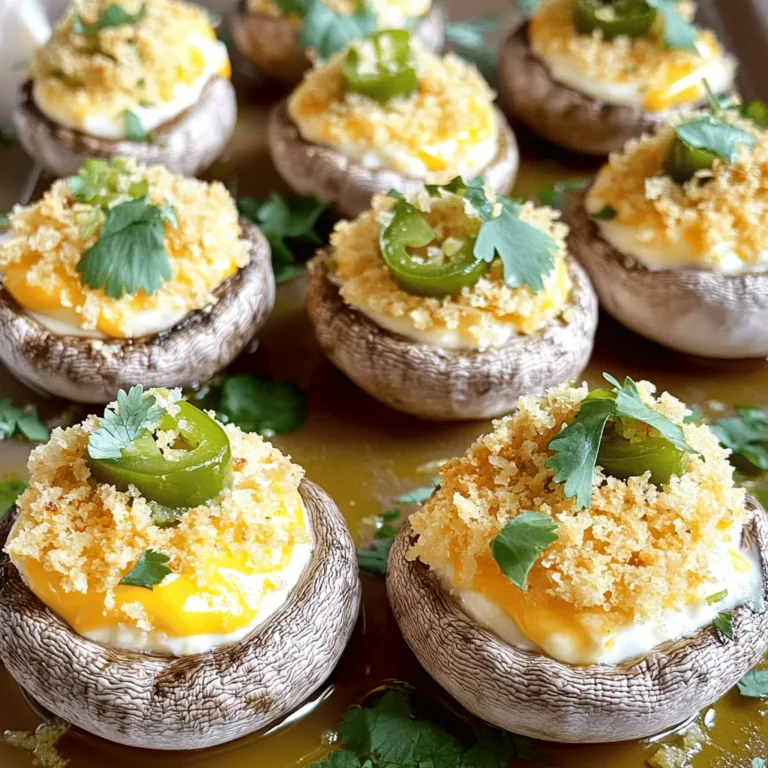
Jalapeño Popper Stuffed Mushrooms Tasty Party Snack

PREV 1 … 25 26 27 … 57 NEXT
flavor nest kitchen

explore

DessertsDinnerAppetizersDrinks

Our Policies

  • Cookie Policy
  • Copyright Policy
  • Disclaimer
  • GDPR Policy
  • Terms Of Use
Back to Top
  • About
  • Contact Us
  • Privacy Policy
© 2025 flavor nest kitchen