FREE DINNER EBOOK! Get your copy!
  • Cookie Policy
  • GDPR Policy
  • Disclaimer
  • Terms Of Use
  • Visit my other site: Fun Cookie Recipes
flavor nest kitchen
  • Home
  • Dinner
  • Desserts
  • Drinks
  • Appetizers
  • Contact
  • About
  • Privacy Policy
  • Home
  • Dinner
  • Desserts
  • Drinks
  • Appetizers
  • Contact
  • About
  • Privacy Policy
  • Cookie Policy
  • GDPR Policy
  • Disclaimer
  • Terms Of Use
Visit my other site: Fun Cookie Recipes

HOME / CATEGORIES /

Latest

To make Salted Caramel Pumpkin Cheesecake Bites, gather these ingredients: - 1 cup graham cracker crumbs - 4 tablespoons unsalted butter, melted - 1 cup cream cheese, softened - 1/2 cup pure pumpkin puree - 1/2 cup powdered sugar - 1 teaspoon vanilla extract - 1 teaspoon pumpkin pie spice - 1/4 cup salted caramel sauce, plus extra for drizzling - Pinch of salt - 1/4 cup chopped pecans (optional, for garnish) These ingredients work together to create rich flavors and a creamy texture. If you need alternatives, here are some options: - Use almond flour instead of graham cracker crumbs for a gluten-free crust. - Replace cream cheese with Greek yogurt for a lighter option. - Use maple syrup or honey instead of powdered sugar for natural sweetness. - Substitute pecans with walnuts or leave them out entirely if you prefer. These swaps can change the taste and texture while keeping the recipe easy. Here are some helpful notes about the ingredients: - Graham Crackers: Look for brands with simple ingredients. This helps ensure a tasty crust. - Cream Cheese: Use full-fat cream cheese for the best creamy texture. Brands like Philadelphia work well. - Pumpkin Puree: Choose pure pumpkin puree, not pumpkin pie filling, for the right flavor. - Caramel Sauce: Store-bought caramel sauce is fine, but homemade adds a special touch. - Pecans: If you want to use chopped pecans, toast them lightly for added crunch and flavor. These notes will help you select the best ingredients for your cheesecake bites. Enjoy the process! To start, gather your ingredients for the crust. You need graham cracker crumbs and melted butter. In a mixing bowl, combine one cup of graham cracker crumbs with four tablespoons of melted unsalted butter. Mix these until the crumbs look like wet sand. Next, line a mini muffin pan or silicone mold with cupcake liners. Take about one tablespoon of the crust mixture and press it into the bottom of each liner. Make sure it is packed tightly. This forms the base for your cheesecake bites. Now, let’s move on to the filling. In a clean bowl, beat one cup of softened cream cheese with an electric mixer. Mix until it is creamy and smooth. Then, add in half a cup of pure pumpkin puree, half a cup of powdered sugar, one teaspoon of vanilla extract, one teaspoon of pumpkin pie spice, and a pinch of salt. Beat this mixture until all the ingredients are fully combined and fluffy. This step is key to getting the right texture. The filling should be light and airy, perfect for your bites. Next, spoon the pumpkin cheesecake mixture over the prepared graham cracker crusts. Fill each cup just to the top. Once all the cups are filled, it’s time to set them. Place the muffin pan in the refrigerator for at least two hours. This helps the cheesecake to firm up. After the bites are set, carefully remove them from the pan. Drizzle each bite with salted caramel sauce. If you like, sprinkle some chopped pecans on top for extra crunch. These steps make your cheesecake bites look and taste amazing. Enjoy your delicious creation! To get the best texture in your cheesecake bites, use softened cream cheese. This makes mixing easy and helps avoid lumps. Beat it well until smooth and creamy. When you add pumpkin puree, mix gently to keep air in the batter. This keeps your bites light and fluffy. Chill them for at least two hours. This time helps them set nicely. If you want a firmer bite, let them chill longer. When serving your cheesecake bites, presentation matters. Use a pretty platter to display them. Drizzle extra salted caramel sauce over the top for a sweet touch. You can also sprinkle some pumpkin pie spice on each bite for added flavor. For a nice crunch, add chopped pecans on top. Serve them with a small bowl of caramel sauce on the side. This lets guests add more if they like. One common mistake is not chilling the bites long enough. If they are not set, they will fall apart when you serve them. Another mistake is using cold cream cheese. This can lead to lumps in your mixture. Make sure to mix well after adding the pumpkin. Also, press the crust firmly into the muffin pan. This helps the crust hold together when you remove the bites. Avoid overfilling the cups; leave a little space for the cheesecake to expand. {{image_2}} You can add fun spices to these bites. Try a pinch of nutmeg for warmth. Cinnamon adds a nice touch too. You might also want to use ginger for a spicy kick. These flavors mix well with pumpkin. Each tweak brings a new taste to enjoy. If you have gluten allergies, use gluten-free graham crackers. You can also swap cream cheese for a dairy-free version. Look for cashew or almond cream cheese. For nut allergies, skip the pecans. You can use sunflower seeds instead for crunch. These swaps help everyone enjoy the treat. Garnishes make your bites pop. Drizzle more salted caramel on top for sweetness. You can also sprinkle cocoa powder for a rich look. Edible flowers add a fancy touch. For a festive feel, use candy corn around the bites. These fun additions will impress your guests. To keep your salted caramel pumpkin cheesecake bites fresh, store them in the fridge. Place them in an airtight container. This method helps prevent drying and keeps flavors intact. You can stack them gently with parchment paper in between the layers. They stay good for about 4 to 5 days. If you want to keep these bites longer, freezing is a great option. First, let them set in the fridge for at least 2 hours. Then, remove them from the pan. Wrap each bite tightly in plastic wrap. After that, place them in a freezer-safe bag or container. They can last up to 2 months in the freezer. When you want to enjoy them, thaw in the fridge overnight. These cheesecake bites are best served cold, but you can bring them back to life. If they seem a bit soft after thawing, place them in the fridge for a couple of hours. This helps them firm up again. You can drizzle more salted caramel sauce on top before serving for extra flavor. Enjoy them cold, and they will taste just as delightful! Yes, you can. Try using crushed cookies, like Oreos or Nilla wafers. They add a fun twist. You can even use nuts for a gluten-free option. Just make sure to mix them with melted butter like in the original recipe. These cheesecake bites can last up to five days in the fridge. Store them in an airtight container to keep them fresh. The longer they sit, the more the flavors blend together. However, they taste best when eaten fresh. Absolutely! You can make these cheesecake bites a day in advance. Just store them in the fridge until you are ready to serve. This makes them a great option for parties or gatherings. You can focus on other tasks while knowing these bites are ready to go. You now have a clear plan for making delicious pumpkin cheesecake bites. We covered key ingredients and offered helpful alternatives. You learned how to prepare a graham cracker crust and make the perfect filling. Remember the tips for texture and avoid common mistakes. You can get creative with flavors and garnishes too. Lastly, follow best practices for storage and reheating. Enjoy these treats with friends or family, and feel proud of your baking skills. Happy cooking!

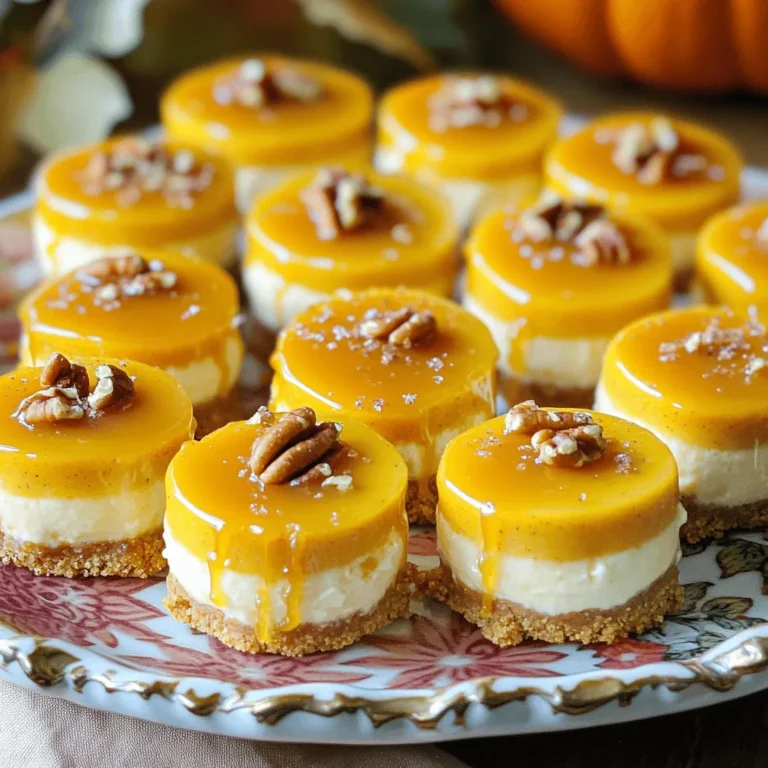
Salted Caramel Pumpkin Cheesecake Bites No Bake Delight

To make pumpkin cheesecake muffins, you need the following items: - 1 cup all-purpose flour - ½ cup brown sugar - ½ cup granulated sugar - 1 teaspoon baking powder - ½ teaspoon baking soda - ½ teaspoon cinnamon - ¼ teaspoon nutmeg - ¼ teaspoon salt - 1 large egg - ½ cup pumpkin puree - ⅓ cup vegetable oil - 1 teaspoon vanilla extract - 4 oz cream cheese, softened - 1 tablespoon powdered sugar - 1 tablespoon milk Using fresh ingredients makes a big difference in flavor. Fresh pumpkin puree brings warmth and depth to the muffins. Fresh spices, like cinnamon and nutmeg, add rich aroma and taste. Use new baking powder and baking soda for good rising. Fresh eggs help the muffins stay fluffy and moist. When you use high-quality ingredients, you improve the whole dish. You can easily swap some ingredients if needed. Here are some ideas: - Flour: Use whole wheat flour for a healthier option. - Sugar: Replace brown sugar with coconut sugar for a different flavor. - Oil: Use melted coconut oil instead of vegetable oil. - Egg: For a vegan option, use a flax egg (1 tablespoon ground flaxseed + 3 tablespoons water). - Cream Cheese: Swap cream cheese for dairy-free cream cheese or Greek yogurt if desired. These substitutions can help you customize your muffins while keeping them delicious. First, I set my oven to 350°F (175°C). This ensures the muffins bake evenly. Next, I grab a muffin tin. I line it with paper liners or spray it with non-stick spray. This step makes it easy to remove the muffins later. In a large bowl, I whisk together the dry ingredients. I combine 1 cup of all-purpose flour, ½ cup of brown sugar, ½ cup of granulated sugar, 1 teaspoon of baking powder, and ½ teaspoon of baking soda. I then add ½ teaspoon of cinnamon, ¼ teaspoon of nutmeg, and ¼ teaspoon of salt. Mixing these well makes the base flavorful. In another bowl, I crack one large egg. I beat it well before adding ½ cup of pumpkin puree, ⅓ cup of vegetable oil, and 1 teaspoon of vanilla extract. I mix these until they are smooth and well combined. This mix adds moisture to the muffins. I pour the wet ingredients into the dry mix. Using a spatula, I gently stir them together. I stop mixing when I see a few lumps. Overmixing can make the muffins tough, and I want them soft and fluffy. In a small bowl, I take 4 oz of softened cream cheese. I add 1 tablespoon of powdered sugar and 1 tablespoon of milk. I beat this mixture until it is smooth. This filling will add a creamy surprise in the center of each muffin. I scoop about 2 tablespoons of muffin batter into each cup of the muffin tin. Using a spoon, I create a small well in the center of each batter scoop. This well will hold the cream cheese filling. Next, I place about 1 tablespoon of the cream cheese mixture into each well. Then, I top it with another tablespoon of muffin batter. This keeps the filling hidden, creating a delightful surprise when I bite into the muffin. I put the muffin tin in the oven and bake for 18 to 20 minutes. I check for doneness with a toothpick. If it comes out clean, they are ready. Once baked, I let the muffins cool in the pan for 5 minutes. Then, I transfer them to a wire rack to cool completely. To get that perfect bakery-style texture, follow these steps: - Use room temperature ingredients. This helps the batter mix better and rise well. - Do not overmix the batter. Stir just until combined. A few lumps are okay! - Fill muffin cups about two-thirds full. This allows room for rising and keeps the muffins fluffy. Avoid these common mistakes for the best results: - Skipping the cream cheese filling. It adds rich flavor and a creamy texture. - Not measuring ingredients correctly. Use cups and spoons to ensure accuracy. - Opening the oven door too soon. This can cause muffins to sink in the middle. Here are some fun ways to serve your muffins: - Dust with powdered sugar for a sweet touch. - Serve on a decorative platter with mini pumpkins for a fall vibe. - Pair with coffee or tea for a cozy snack time treat. {{image_2}} You can make these pumpkin cheesecake muffins healthier. Try using whole wheat flour instead of all-purpose flour. Whole wheat adds fiber and nutrients. You can replace the sugar with a sugar substitute like stevia or erythritol. This helps reduce calories. For a dairy-free option, use almond milk and a dairy-free cream cheese. Want to amp up the flavor? Add chocolate chips or nuts to the batter. Dark chocolate chips give a rich taste that pairs well with pumpkin. Chopped walnuts or pecans add a nice crunch too. You could even swirl in some caramel sauce for extra sweetness. These muffins can change with the seasons. For a fall twist, add spices like ginger or cloves. In winter, a sprinkle of nutmeg can warm things up. You could also top the muffins with a light cream cheese frosting. This makes them festive for holiday gatherings. To keep your pumpkin cheesecake muffins fresh, store them in an airtight container. This helps prevent drying out. Place a paper towel at the bottom to absorb moisture. You can store them at room temperature for up to three days. If you live in a humid area, consider refrigerating them. Just remember to wrap each muffin tightly in plastic wrap. Freezing these muffins is easy and keeps them tasty. First, let them cool completely. Then, wrap each muffin in plastic wrap. Place the wrapped muffins in a freezer-safe bag. Label the bag with the date. You can freeze them for up to three months. When you want to enjoy one, just take it out of the freezer. To reheat your muffins, remove them from the container. You can use the microwave or the oven. For the microwave, heat each muffin for about 15-20 seconds. If you prefer the oven, preheat it to 350°F (175°C). Wrap the muffin in foil and heat for about 10 minutes. This keeps them moist and warm. Enjoy your delicious pumpkin cheesecake muffins! Pumpkin cheesecake muffins last about four days when stored at room temperature. Keep them in an airtight container to stay fresh. If you want them to last longer, store them in the fridge. This can add a day or two to their life. Yes, you can use homemade pumpkin puree! It adds a rich flavor to your muffins. Just make sure to drain any excess liquid for the best texture. Fresh pumpkin is great, and it’s fun to make from scratch. You can substitute cream cheese with Greek yogurt or mascarpone cheese. Both will give a creamy texture. If you want a dairy-free option, try using cashew cream. Just blend soaked cashews until smooth. Yes, these muffins freeze very well! Let them cool completely, then wrap each muffin in plastic wrap. Store them in a freezer bag. They can last for up to three months in the freezer. To enjoy, just thaw them at room temperature. Absolutely! You can make mini muffins by using a mini muffin tin. Fill each cup halfway and adjust the baking time. Bake for about 12-15 minutes. This way, you get bite-sized treats that are perfect for sharing. This article walks you through making delicious pumpkin cheesecake muffins. You learned about key ingredients, the importance of freshness, and how to mix everything for the best taste. We discussed tips to avoid common mistakes and shared serving ideas. You can easily customize these muffins to fit your taste or dietary needs. Remember, storing and reheating your muffins properly keeps them fresh. Now, it's time to bake and enjoy tasty treats that bring joy to any occasion.

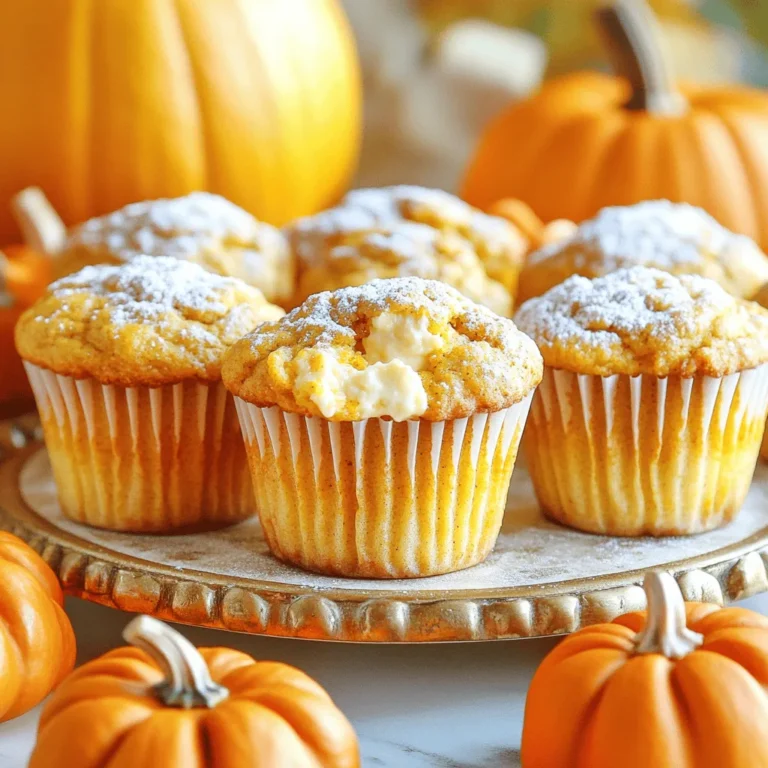
Pumpkin Cheesecake Muffins Bakery Style Delight

- 1 pound potato gnocchi - 2 cups fresh broccoli florets - 2 cups vegetable broth I love using potato gnocchi because it is soft and fluffy. It gives the dish a comforting feel. Fresh broccoli florets add bright color and nutrients. They also provide a nice crunch. Vegetable broth acts as a flavorful base. It ties all the ingredients together, making each bite taste great. - 1 cup heavy cream - 1 ½ cups shredded sharp cheddar cheese - 1 small onion, diced - 2 cloves garlic, minced Heavy cream makes the dish rich and smooth. It creates a creamy texture that coats the gnocchi well. Sharp cheddar cheese adds a bold flavor. It melts beautifully into the sauce, enhancing the taste. Onion and garlic bring warmth and depth. They create a lovely aroma while cooking. - 1 tablespoon olive oil - ½ teaspoon onion powder - ½ teaspoon garlic powder - Salt and pepper to taste - Optional: Red pepper flakes for garnish Olive oil helps sauté the onion and garlic. It adds extra flavor to the dish. Onion powder and garlic powder boost the taste. They add layers of flavor without extra chopping. Salt and pepper are key for balancing the dish. If you want a kick, red pepper flakes are a fun touch. 1. Heat 1 tablespoon of olive oil in a large pot over medium heat. 2. Add 1 small diced onion and sauté for about 3-4 minutes. The onion should turn translucent. 3. Stir in 2 minced garlic cloves and cook for 1-2 minutes. Don’t let the garlic burn. 1. Pour in 2 cups of vegetable broth and bring it to a boil. 2. Once boiling, add 1 pound of potato gnocchi. Cook according to package instructions, usually 2-3 minutes. 3. Add 2 cups of fresh broccoli florets right before the gnocchi is done. Cook until the broccoli is tender and bright green. 1. Lower the heat and slowly pour in 1 cup of heavy cream. Stir to mix well. 2. Gradually add 1 ½ cups of shredded sharp cheddar cheese. Stir until the cheese melts and forms a creamy sauce. 3. Season the dish with ½ teaspoon onion powder, ½ teaspoon garlic powder, salt, and pepper to taste. 4. If you like a little heat, sprinkle in some red pepper flakes. 5. Let everything simmer together for 2-3 minutes, ensuring the sauce is warm and well combined. To get the best texture from your gnocchi, be sure to cook them in boiling water. Follow the package instructions closely, usually cooking for just 2-3 minutes. Perfect gnocchi should float and feel soft yet firm. To avoid overcooked broccoli, add it to the pot just before the gnocchi finishes cooking. This keeps the florets bright and crunchy. You want that vibrant green color, which shows they are perfectly cooked. For a stunning dish, serve your creamy gnocchi in bowls. Top with a sprinkle of extra cheddar cheese. A dash of red pepper flakes adds a nice pop of color and a hint of spice. Serve immediately while it's hot for the best taste. Best accompaniments include a simple side salad or crusty bread. They balance the richness of the gnocchi. A glass of crisp white wine pairs well, enhancing the flavors of the dish. To adjust flavors, try adding herbs like thyme or basil. You can also use different cheeses, like mozzarella for a milder taste. If you want more veggies, consider adding spinach or peas for extra color and nutrition. For additional toppings, think about crispy bacon bits or sautéed mushrooms. These add texture and depth to your dish. You can also sprinkle fresh parsley or chives for a fresh finish. {{image_2}} You can make great changes to this dish. Add more veggies for color and taste. Try bell peppers, spinach, or peas. Each veggie brings a unique flavor. For cheese lovers, consider using different cheeses. Gruyère adds a nutty taste. Cream cheese gives a rich texture. You can mix and match to find your favorite combo. Want to add protein? Chicken, shrimp, or tofu work well. If using chicken, cook it first. Dice it and add when you mix in the cream. Shrimp cooks quickly. Toss it in with the broccoli for the last minute. For tofu, choose firm or extra-firm. Cube it and sauté before adding to the pot. If you need gluten-free options, look for gluten-free gnocchi. Many brands offer good choices. Just check the label to be sure. You can also swap heavy cream. Use coconut cream for a dairy-free option. Almond milk can work too, but it may be less creamy. Adjust seasoning for the best flavor. After you enjoy your creamy broccoli cheddar gnocchi, let it cool down. I recommend cooling it at room temperature for about 30 minutes. Once cool, store it in the fridge. Use a tight-fitting container to keep it fresh. Glass or plastic containers work well. This dish stays good for about three days in the fridge. When it's time to eat the leftovers, a gentle reheat is best. You can use the stove or microwave. For the stove, add a splash of water or cream in a pot. Heat it on low, stirring often. In the microwave, use a microwave-safe bowl. Heat in short bursts, stirring in between. This keeps your dish creamy and prevents it from drying out. Yes, you can freeze this dish! To freeze, first cool it completely. Then, pack it in airtight containers or freezer bags. Make sure to squeeze out as much air as you can. Label your containers with the date. It can stay in the freezer for up to three months. To thaw, move it to the fridge overnight. Then, reheat it slowly as mentioned before. Enjoy your creamy broccoli cheddar gnocchi even after it's been frozen! Yes, you can prepare this creamy broccoli cheddar gnocchi ahead of time. Cook the gnocchi and broccoli as the recipe states. Let them cool before storing in the fridge. When you are ready to eat, reheat the dish and add the cheese and cream. This helps keep the gnocchi soft and fresh. If you want a lighter dish, try using half-and-half or whole milk. You can also use a mix of Greek yogurt and milk. This keeps the creaminess while cutting the calories. Almond milk or coconut cream can work too, but they will change the flavor a bit. Look for gnocchi to float to the top of the pot. This shows they are cooked. If they stay at the bottom, give them more time. Cook for about 2-3 minutes or until they are soft and tender. Enjoy your perfect gnocchi! This blog post shows how to make a creamy potato gnocchi and broccoli dish. We covered key ingredients like gnocchi, broccoli, and sharp cheddar. You learned step-by-step instructions, plus tips for cooking and serving. Also, we discussed fun variations to try, like different vegetables or protein options. Now, you can create a delicious meal that fits your taste. Enjoy making it your own and sharing it with others!

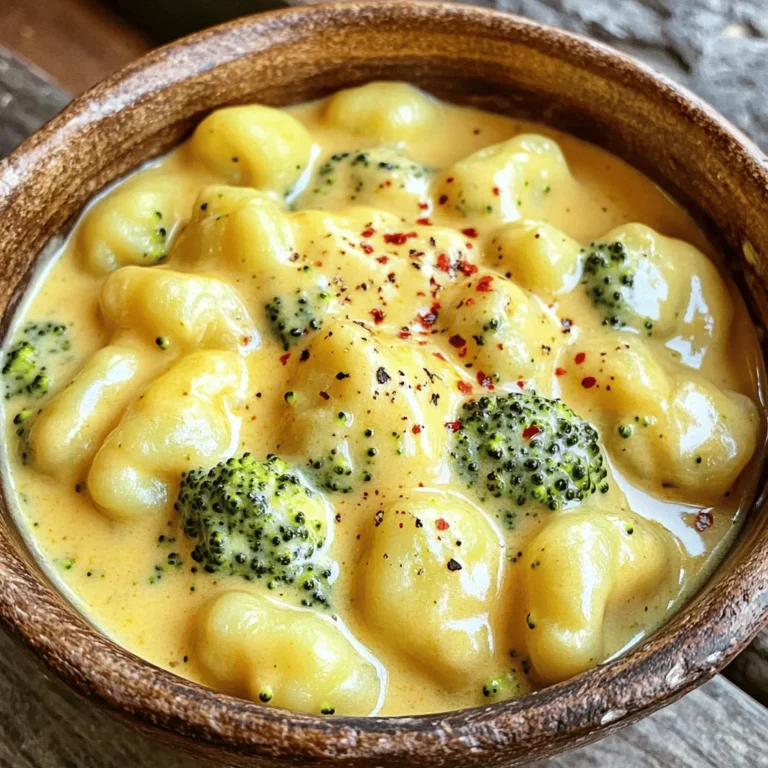
Creamy Broccoli Cheddar Gnocchi One Pot Delight

To create a great Szechuan beef stir fry, you need some key ingredients. Here’s a list to get you started: - 1 lb flank steak, thinly sliced against the grain - 2 tablespoons cornstarch - 3 tablespoons vegetable oil (divided) - 1 red bell pepper, sliced - 1 green bell pepper, sliced - 1 cup broccoli florets - 1 medium onion, thinly sliced - 4 cloves garlic, minced - 1 tablespoon fresh ginger, grated - 3 tablespoons soy sauce - 2 tablespoons chili paste (adjust for heat preference) - 1 tablespoon rice vinegar - 1 tablespoon sesame oil - 2 tablespoons sugar - 1 tablespoon sesame seeds (for garnish) - Chopped green onions (for garnish) These ingredients pack a punch of flavor and texture. While the essential ingredients are great on their own, you can add a few optional items for more depth. Consider these: - Red pepper flakes for extra heat - Water chestnuts for crunch - Snap peas for a pop of color - Cashews for a nutty flavor These additions can make your dish even more exciting. Not all ingredients are a must. You can swap some based on what you have. Here are a few ideas: - Use sirloin or chicken instead of flank steak. - Swap bell peppers for carrots or zucchini. - Try tamari instead of soy sauce for a gluten-free option. - Use honey instead of sugar for a different sweetness. These swaps help you create a dish that fits your taste and pantry. Start by slicing the flank steak thinly against the grain. This helps it stay tender. Place the beef slices in a large bowl. Sprinkle 2 tablespoons of cornstarch over the beef. Toss well until each piece is coated. This coating creates a crispy texture when cooked. Heat 2 tablespoons of vegetable oil in a large skillet or wok. Use medium-high heat for the best results. Once the oil is hot, add the beef in a single layer. Let it cook for 3-4 minutes without stirring. This allows the beef to become crispy. Flip the beef and cook for another 2-3 minutes until browned. Once done, remove the beef from the skillet and set it aside. In the same skillet, add 1 tablespoon of vegetable oil. Now, toss in the sliced onions, red, and green bell peppers, along with the broccoli florets. Stir-fry these veggies for about 4-5 minutes. You want them to be tender-crisp, which gives a nice texture to the dish. Next, add 4 cloves of minced garlic and 1 tablespoon of grated ginger. Stir quickly for about 30 seconds. This step makes your kitchen smell great as the garlic and ginger become fragrant. In a small bowl, whisk together the sauces. Combine 3 tablespoons of soy sauce, 2 tablespoons of chili paste, 1 tablespoon of rice vinegar, 1 tablespoon of sesame oil, and 2 tablespoons of sugar. Pour this sauce over the stir-fried vegetables. Stir well to mix all the flavors. Now, return the crispy beef to the skillet. Stir everything to coat the beef and veggies in the sauce. Cook for 1-2 more minutes until everything is heated through. Finally, remove from heat and garnish with sesame seeds and chopped green onions before serving. Enjoy your Crispy Szechuan Beef Stir Fry, better than takeout! To get that crunchy beef, start by coating the flank steak in cornstarch. This step is key for a crispy texture. Make sure each slice is well-coated. When you cook the beef, avoid stirring too soon. Let it sit in the hot pan for a few minutes. This helps it crisp up. Flip it only once to get both sides nice and brown. Use high heat when cooking this stir fry. Heat your skillet or wok until it's hot before adding oil. This quick cooking method locks in flavors. Make sure to use enough oil to prevent sticking. High heat cooks the beef fast, keeping it tender inside while making the outside crispy. Garnishing makes your dish look great and adds flavor. Add sesame seeds and chopped green onions on top before serving. These not only look nice but also add a fresh taste. Serving on colorful plates or bowls can enhance the visual appeal. Try placing the stir fry over a bed of rice or noodles for a pop of color. {{image_2}} Flank steak is great, but you can swap it out. Try chicken, shrimp, or tofu. Each option offers a unique taste. Chicken is lean and cooks quickly. Shrimp adds a nice sweetness, while tofu absorbs flavors well. Cut the protein into thin strips for even cooking. Feel free to mix up the veggies for your stir fry. Broccoli, bell peppers, and onions are tasty, but others work too! Think about adding carrots, snap peas, or mushrooms. You can even sneak in some spinach or kale for extra nutrition. Just remember to keep the veggies crisp and colorful. The spice level can make or break your dish. Start with less chili paste if you prefer mild heat. You can always add more later. For a hotter kick, try adding crushed red pepper or fresh chili slices. Taste as you go to find what works for you. This way, everyone can enjoy the dish just right! To keep your Szechuan beef fresh, let it cool first. Place it in an airtight container. Store it in the fridge for up to three days. Make sure to keep the beef and veggies together for the best taste. Reheating can be tricky. Use a skillet over medium heat. Add a little oil before placing the leftovers in the pan. Stir them gently until heated through. This method helps retain that crispy texture we all love. Avoid the microwave, as it can make the beef soggy. You can freeze Szechuan beef stir fry, but it’s best to do so without the veggies. The beef can last up to three months in the freezer. Use freezer-safe bags or containers for storage. When ready to eat, thaw the beef overnight in the fridge. Then, quickly stir-fry with fresh veggies for the best results. Yes, you can make this recipe in advance. Cook the beef and veggies separately and store them in the fridge. When you are ready to eat, heat them up together. This way, you keep the beef crispy and the veggies fresh. You can also prepare the sauce ahead of time. Just store it in a jar and mix it in when ready to serve. Crispy Szechuan beef stir fry pairs well with several sides. Here are some great options: - Steamed white rice - Fried rice with eggs and peas - Noodles tossed in soy sauce - A simple cucumber salad - Spring rolls for a crunchy bite These sides add texture and balance to your meal. You can easily modify this recipe. For gluten-free options, use tamari instead of soy sauce. If you are vegetarian, swap the beef for tofu, and follow the same steps. You can also reduce sugar if you want a healthier option. If you are allergic to sesame, skip the sesame oil and seeds. Customizing the dish makes it fit your needs. This blog helps you create a tasty Crispy Szechuan Beef Stir Fry. We covered essential ingredients, from flank steak to flavorful spices. You learned easy steps for cooking beef and perfecting vegetables. I shared tips for achieving crispiness and garnishing ideas to impress. Explore variations and meal prep options for more flexibility. By using these steps, you can cook this dish with ease and confidence. Enjoy making this fun recipe!

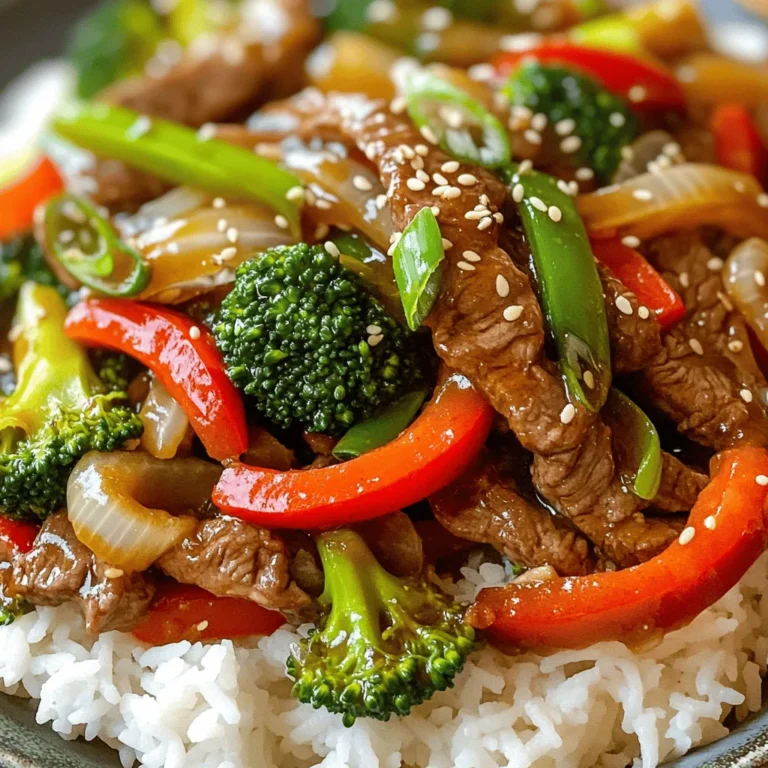
Crispy Szechuan Beef Stir Fry Better Than Takeout Delight

To make this creamy tomato garlic shrimp orzo, gather these fresh ingredients: - 1 cup orzo pasta - 1 pound shrimp, peeled and deveined - 1 can (14 oz) diced tomatoes, undrained - 4 cloves garlic, minced - 1 cup heavy cream - 2 tablespoons olive oil - 1 teaspoon red pepper flakes (optional) - Salt and pepper to taste - Fresh basil leaves, for garnish - Grated Parmesan cheese, for serving Using fresh ingredients makes the dish pop. The shrimp and garlic give strong flavors. Fresh basil adds a nice touch. However, you can use pantry items too. Canned tomatoes and orzo are great staples. Heavy cream often lasts long in the fridge. It’s smart to keep these handy. If you need substitutes, don’t worry! Here are some quick ideas: - Orzo: Use any small pasta shape like ditalini or couscous. - Shrimp: Chicken or tofu works well if you want a change. - Heavy cream: Use half-and-half or a non-dairy cream for a lighter option. - Fresh basil: Dried basil can replace fresh, but use less. - Red pepper flakes: If you want no heat, skip them altogether. These swaps keep the dish tasty while fitting your needs! To start, fill a pot with water and add salt. Bring the water to a boil. Once boiling, add 1 cup of orzo pasta. Cook it based on the package instructions, usually about 8 to 10 minutes. Stir the orzo occasionally to prevent sticking. When it’s done, drain the pasta in a colander and set it aside. Next, grab a large skillet and heat 2 tablespoons of olive oil over medium heat. Add 4 cloves of minced garlic to the oil. Sauté it for about 30 seconds until it smells great. Now, add 1 pound of shrimp to the skillet. Sprinkle salt, pepper, and 1 teaspoon of red pepper flakes if you want some heat. Cook the shrimp for 2 to 3 minutes. They should turn pink and opaque. After that, pour in a can of undrained diced tomatoes. Stir everything together and let it simmer for 2 minutes. Lower the heat and add 1 cup of heavy cream slowly. Stir to mix well. Let it simmer for 2 to 3 more minutes until the sauce becomes creamy. Now it’s time to put it all together! Take the cooked orzo and add it to the skillet. Stir well to coat the pasta in the creamy tomato sauce. Taste it and adjust the seasoning if needed. Finally, remove the skillet from the heat. Serve your creamy tomato garlic shrimp orzo hot. Garnish it with fresh basil leaves and a sprinkle of grated Parmesan cheese for extra flavor. Enjoy your meal! To boost the flavor of your creamy tomato garlic shrimp orzo, use fresh herbs. Fresh basil adds a bright touch at the end. You can also sprinkle in some lemon zest for a zesty kick. If you like heat, adjust the red pepper flakes. Add more or less to fit your taste. A splash of white wine can deepen the flavor, too. Cook shrimp quickly for the best texture. They only need 2-3 minutes on medium heat. Make sure they turn pink and opaque. Avoid overcooking them; they can become rubbery fast. Use a hot skillet to get a nice sear on the shrimp. This adds flavor and a pleasing look to your dish. For a rich and creamy sauce, slowly add the heavy cream. Stir gently to blend it well. If the sauce feels too thick, add a splash of pasta water. This keeps it smooth and helps the sauce cling to the orzo. Taste as you go. Adjust salt and pepper to get the perfect balance. {{image_2}} You can easily boost the nutrition of this dish. Adding vegetables makes it colorful and tasty. Spinach is a great choice. You can toss in fresh spinach at the end of cooking. It wilts quickly and adds a nice touch. You might also try bell peppers. Chop them small and add them with the garlic. They will soften and blend well into the sauce. Zucchini is another option. Just slice it thin and stir it in while cooking the shrimp. Adding vegetables not only makes the dish healthier, but it also gives more flavor and texture. If you like heat, you can spice this dish up. The recipe calls for red pepper flakes. You can adjust the amount to your taste. If you want it hotter, add more. For a milder flavor, leave out the red pepper flakes. You can add a touch of lemon juice after cooking. This adds brightness without the heat. Experiment with different spices too. Smoked paprika or cayenne pepper can bring more warmth without being too spicy. You can easily make this dish vegan and dairy-free. First, swap the shrimp for a plant-based protein. Chickpeas work great and add a nice texture. Instead of heavy cream, use coconut cream or cashew cream. These will give you the same richness. You can find these at most grocery stores. Don't forget to check for the right pasta! Make sure your orzo is egg-free. Many brands offer vegan orzo options, making it easy to enjoy this dish in a new way. To keep your creamy tomato garlic shrimp orzo fresh, store it in an airtight container. Make sure the dish cools down to room temperature before sealing. This helps keep moisture out and prevents spoilage. Leftovers last for up to three days in the fridge. Always label your container with the date so you know when you made it. When you're ready to enjoy your leftovers, reheat them on the stove for the best taste. Use a skillet and add a splash of water or cream to keep it moist. Heat over medium-low heat, stirring often. You can also use a microwave. Place the orzo in a microwave-safe bowl, cover it, and heat in short bursts. Stir in between to ensure even warming. If you want to store your shrimp orzo for later, freezing is a great option. Place the cooled dish in a freezer-safe container. Make sure to leave some space at the top for expansion. Your dish will stay good for about two months in the freezer. To thaw, move it to the fridge the night before you plan to eat it. Reheat it as mentioned earlier for the best flavor and texture. You can tell when shrimp is cooked by looking at its color. Cooked shrimp turns pink and opaque. It usually takes about 2-3 minutes in the skillet. If the shrimp is still gray and translucent, it needs more time. Always check that it is firm to the touch. Avoid overcooking, as it can become rubbery. Yes, you can use other pasta shapes if you want. Orzo is fun and quick, but other types work too. Small pasta shapes like penne or farfalle are great choices. Just adjust the cooking time based on the type you pick. Make sure it cooks al dente for the best texture. To make it ahead, cook the orzo and shrimp separately. Store them in the fridge. You can combine them with the sauce just before serving. This keeps everything fresh and tasty. You can also reheat it gently on the stove. Add a splash of cream to bring back the creaminess. This blog covered the key ingredients, steps, and tips for making a delicious shrimp dish. You learned how to choose fresh ingredients, enhance flavor, and store leftovers. Remember, cooking is about experimenting with flavors and textures. Try different variations to match your taste. By following these tips, you can create a tasty meal every time. Enjoy your cooking journey and keep exploring new recipes with confidence.

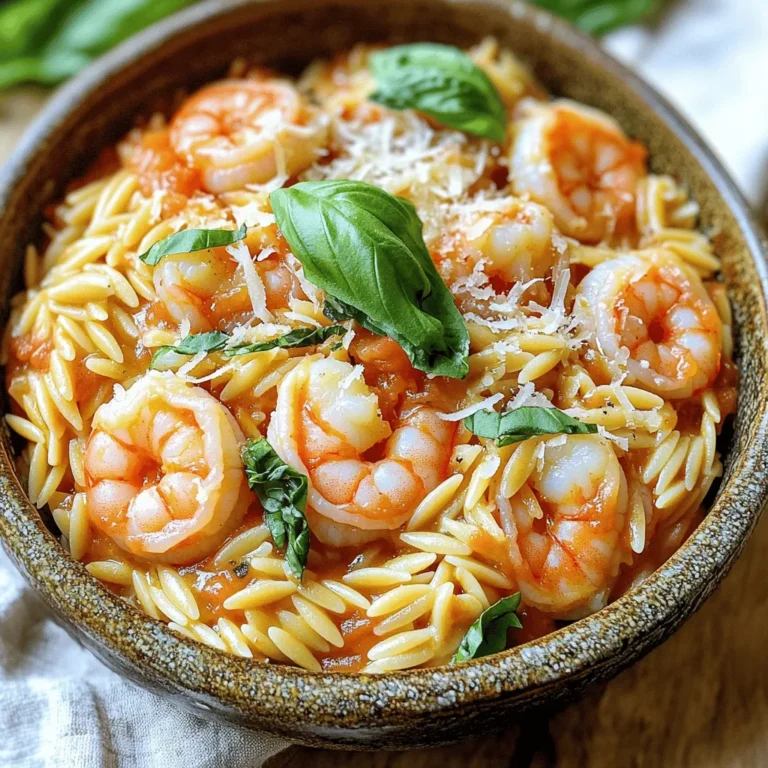
Creamy Tomato Garlic Shrimp Orzo 15 Minutes Delight

- 1 cup apple butter - 1/2 cup freshly squeezed lemon juice - 2 cups sparkling water - 1 tablespoon maple syrup (for extra sweetness) - Fresh mint leaves (for garnish) - Thin apple slices (for garnish) Apple Butter Bourbon Smash is simple and delightful. The main ingredients create a sweet and tangy drink, perfect for any gathering. You start with one cup of apple butter. This gives your drink a rich apple flavor. Next, you add half a cup of freshly squeezed lemon juice. This juice adds a bright, zesty kick. Together, these two ingredients mix well and taste great. The final main ingredient is two cups of sparkling water. This adds fizz and lightness. The bubbles make the drink refreshing and fun. For those who want a bit more sweetness, I suggest adding one tablespoon of maple syrup. This is optional, but it can enhance the flavor. Just stir it in with the other ingredients. Garnishing the drink makes it look fancy. Add fresh mint leaves for a pop of color and flavor. Thin apple slices also make a nice touch. They float on top and look beautiful. These ingredients come together to create a drink that is tasty and visually appealing. You can mix and match, but these basics will give you a great start. - Step 1: Combine apple butter and lemon juice. In a large pitcher, add 1 cup of apple butter and 1/2 cup of freshly squeezed lemon juice. Stir well until smooth. This mix gives the drink its sweet and tangy base. - Step 2: Mix in maple syrup. If you like sweetness, add 1 tablespoon of maple syrup. Stir again to blend it in. This step is optional, but it adds a nice touch. - Step 3: Fill glasses with ice. Grab four glasses and fill them with ice cubes. The ice keeps your drink cold and refreshing. - Step 4: Pour apple butter mixture over ice. Take the apple butter mix and pour it over the ice. Fill each glass about two-thirds full. This is where the fun starts! - Step 5: Top with sparkling water. Next, pour 2 cups of sparkling water into the glasses. Gently stir to mix without losing the fizz. The bubbles make it lively. - Step 6: Garnish and serve. Finally, add fresh mint leaves and thin apple slices on top. This adds color and flavor. Your Apple Butter Bourbon Smash is ready to enjoy! To make your Apple Butter Bourbon Smash truly shine, start with well-blended apple butter. If it's too thick, it can clump up. Use a whisk or fork to break it down first. This will help it mix well with the lemon juice. Freshly squeezed lemon juice is key. It gives a bright and zesty flavor. Avoid bottled juice for the best taste. Choose the right glassware to show off your drink. Tall glasses work great, as they let you see the layers. This drink looks pretty with the mint and apple slices on top. Pair your cocktail with light snacks. Cheese and crackers or fresh fruit go well. They balance the flavors and keep your guests happy. Enjoy this refreshing drink with good company! {{image_2}} You can make the Apple Butter Bourbon Smash even better with a few simple tweaks. Adding spices can boost the flavor. I love to sprinkle in a pinch of cinnamon or nutmeg. This brings warmth and depth to the drink. Using different fruit butters can also change things up. Try peach or pear butter for a new twist. Each fruit offers its own unique taste. This keeps your drink fresh and exciting every time you make it. Sometimes, you may want to swap ingredients for various reasons. One option is to change the sweetener. You can use honey instead of maple syrup. Honey adds a nice floral note that pairs well with apple. For those who want a non-alcoholic version, it’s easy to do. Just leave out the bourbon. You can add more sparkling water or use a soda for fizz. This way, everyone can enjoy this tasty drink, no matter their preference. To keep your apple butter mixture fresh, store it in the fridge. Use an airtight container to prevent any odors from other foods. This way, you can enjoy the drink for a few days. For the garnishes, like mint leaves and apple slices, it's best to store them separately. Keep mint in a glass of water like a flower. This keeps it fresh and crisp. Place apple slices in a small bag with a bit of lemon juice to stop browning. The apple butter mixture lasts about five days in the fridge. After that, it may lose its taste. The mint leaves stay fresh for about three days. If they turn brown or slimy, it’s time to toss them. Apple slices should be eaten within a day or two. Look for any dark spots or mushy bits to know if they are bad. Storing your ingredients correctly helps you enjoy your Apple Butter Bourbon Smash at its best! Yes, you can make the apple butter mix ahead of time. Just combine the apple butter and lemon juice in a pitcher. Store it in the fridge for up to one day. When ready to serve, just add ice and sparkling water. This keeps it fresh and fizzy. I recommend using a smooth bourbon with a sweet taste. Brands like Maker's Mark or Woodford Reserve work well. Their flavors blend nicely with the apple butter and lemon juice. You want a bourbon that enhances the drink, not overpowers it. Yes! To make a non-alcoholic version, skip the bourbon entirely. Use extra sparkling water for a light drink. You can also add a splash of apple cider for more flavor. This way, everyone can enjoy the tasty mix! This blog post shared a fun and simple recipe for an Apple Butter Bourbon Smash cocktail. We explored the main ingredients like apple butter and lemon juice and learned how to mix and serve them. I also gave you tips for smooth mixing and variations to try. Don’t forget, you can customize this drink with spices or different sweeteners. Enjoy making it and impressing your friends with your new skills! Remember, the key is to have fun in the kitchen while sipping on this refreshing cocktail.

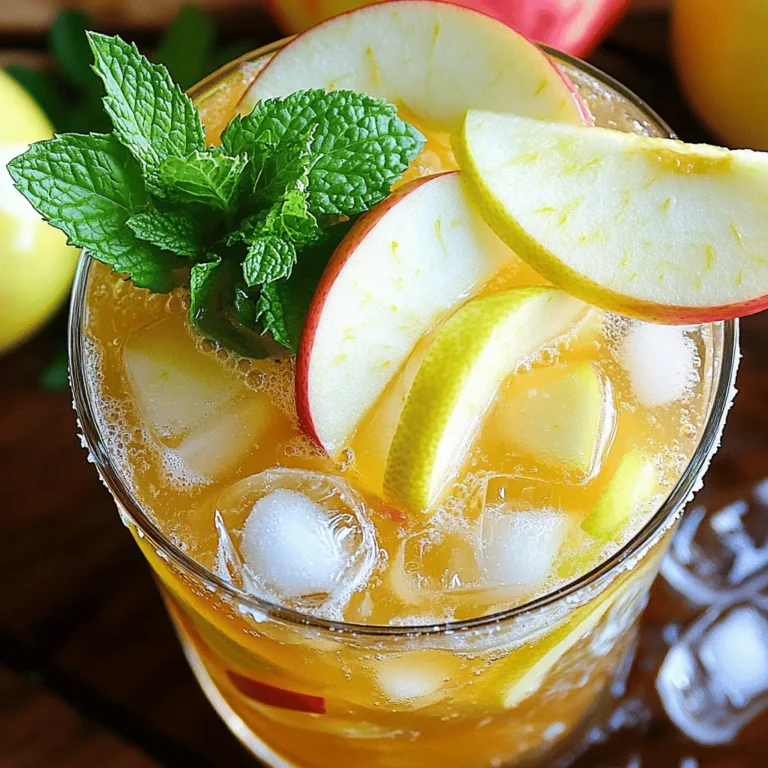
Apple Butter Bourbon Smash Refreshing Seasonal Drink

- Chicken breasts and their preparation You need 4 boneless, skinless chicken breasts. Rinse them under cold water and pat them dry. This helps the seasonings stick well. - Vegetables: sweet potatoes, bell peppers, and onion Use 2 large sweet potatoes. Peel and cube them into bite-sized pieces. You will need 2 bell peppers, one red and one yellow. Slice them into strips for even cooking. Add 1 red onion. Cut it into wedges to add flavor. - Seasonings and sauces Gather 1/4 cup of your favorite BBQ sauce. You can use any style you like. For the seasonings, use 2 tablespoons of olive oil. Add 1 teaspoon of smoked paprika and 1 teaspoon of garlic powder. Sprinkle salt and pepper to taste. Finally, chop fresh parsley for garnish. This mix of chicken, sweet potatoes, and colorful peppers makes a tasty meal. The BBQ sauce adds a sweet and smoky flavor that everyone loves. 1. Preheating the oven: Start by preheating your oven to 400°F (200°C). This step is key for even cooking. 2. Seasoning the chicken: In a mixing bowl, take the chicken breasts. Add olive oil, smoked paprika, garlic powder, salt, and pepper. Toss everything together until the chicken is evenly coated. This helps enhance the flavor. 3. Preparing the vegetables: In a separate bowl, combine the cubed sweet potatoes, sliced bell peppers, and red onion. Drizzle with olive oil, salt, and pepper. Toss until all the veggies are coated. This ensures they roast nicely. 1. Placement of chicken and vegetables: Grab a large sheet pan. Place the seasoned chicken in the center. Spread the sweet potato and pepper mix around it. This arrangement helps all the flavors blend. 2. Applying BBQ sauce: Brush the BBQ sauce over the chicken breasts. Make sure they are well coated for a tasty finish. 1. Roasting time and temperature: Slide the sheet pan into the preheated oven. Roast for 25-30 minutes. This cooking time allows the chicken to cook through and the veggies to become tender. 2. Checking for doneness: Use a meat thermometer to check the chicken. It should reach an internal temperature of 165°F (75°C). The veggies should look slightly caramelized and soft. This step ensures your meal is safe and delicious. To keep your chicken juicy, use a few simple tricks. First, coat the chicken in olive oil and spices. This helps to lock in moisture. Second, avoid overcooking. Use a meat thermometer to check for 165°F. This ensures the chicken is safe to eat while still tender. For roasting vegetables, cut them into even pieces. This helps them cook at the same rate. Use a good amount of olive oil. It adds flavor and helps them caramelize. Make sure to spread them out on the pan. Crowding can lead to steaming instead of roasting. Want to boost the flavor? Add extra spices like cumin or chili powder. These add warmth and depth. You can also try a marinade. Letting the chicken soak in flavor makes a big difference. Using different types of BBQ sauce can change the dish completely. Sweet sauces add a nice glaze, while tangy sauces add zest. Explore different flavors and find your favorite. You can even mix sauces for a unique taste. {{image_2}} For a fun twist, you can change the veggies. Try using broccoli, zucchini, or carrots. Each adds its own taste and texture. You can mix and match based on what you have at home. If you want a different protein, chicken thighs work great here. They are juicy and full of flavor. You can also use turkey or tofu for a lighter option. Just adjust the cooking time based on what you choose. To change the taste, try different seasoning blends. Cajun spice adds a nice kick. Italian herbs give it a fresh feel. Experiment with what you like best. You can also use unique BBQ sauces. A honey BBQ sauce brings sweetness. A spicy chipotle sauce adds heat. Find a sauce that fits your mood. This way, each meal feels new and exciting! To keep your BBQ chicken, sweet potatoes, and peppers fresh, store leftovers in the fridge. Place the food in an airtight container. It will stay good for up to 3 days. If you want to save it for longer, freeze it. Use a freezer-safe container or a heavy-duty freezer bag. Make sure to remove as much air as possible before sealing. When it's time to eat your leftovers, heat them right. The best way is in the oven. Preheat the oven to 350°F (175°C). Place the chicken and veggies on a baking sheet. Cover it with foil to keep moisture in. Heat for about 15-20 minutes. You can also use a microwave. Place a portion on a microwave-safe plate. Cover it with a damp paper towel. Heat for 2-3 minutes or until hot. This helps keep the flavor and texture nice. Enjoy your meal again! How do I know when the chicken is fully cooked? You can check the chicken by using a meat thermometer. The chicken should reach 165°F (75°C) inside. The meat should also look white and no longer pink. If you cut into it, juices should run clear. Can I use frozen chicken or vegetables? Yes, you can use frozen chicken and vegetables. Just be aware that cooking time may change. You might need to roast for a bit longer. Make sure the chicken still reaches 165°F (75°C) before serving. What side dishes pair well with this recipe? This dish goes well with a simple green salad or some garlic bread. You can also serve it with quinoa or brown rice. These sides add flavor and texture to your meal. How can I make this meal healthier? To make this meal healthier, try using less BBQ sauce. You can also add more veggies like broccoli or zucchini. Using skinless chicken and reducing oil can help too. This blog post covers a tasty sheet pan meal. You learned about key ingredients like chicken and veggies. I shared simple steps for prepping and cooking. You also got tips for keeping your food juicy and flavorful. Plus, I added storage advice and answers to common questions. As you try this recipe, know you can adjust it to fit your taste. Enjoy making your meal fun and delicious!

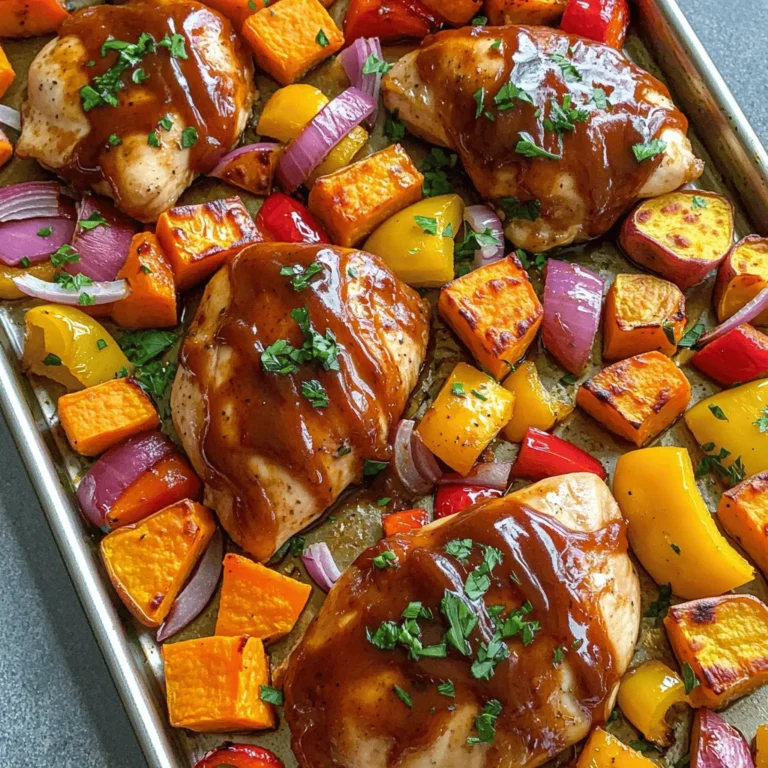
BBQ Chicken Sweet Potato Pepper Sheet Pan Delight

Here is what you need for the Pumpkin Spice Cinnamon Roll Trifle Cups: - 4 large cinnamon rolls, baked and cooled - 1 cup pumpkin puree - 1 cup cream cheese, softened - 1/2 cup powdered sugar - 1 teaspoon vanilla extract - 1 cup whipped cream - 1 teaspoon pumpkin pie spice - 1/4 cup chopped pecans (optional) - Caramel sauce for drizzling These ingredients create a tasty base for your trifle. The cinnamon rolls add a soft, sweet touch, while the pumpkin puree gives a rich flavor. Cream cheese adds creaminess, and whipped cream makes it light. Each layer brings something special. The pecans add a nice crunch, but they are optional. Finally, caramel sauce gives a sweet finish that ties it all together. - Bake and cool cinnamon rolls according to package instructions. - Chop cinnamon rolls into bite-sized pieces. First, I bake the cinnamon rolls. I follow the package instructions for the best results. After baking, I let them cool completely. This step is key to making the trifle. Once they are cool, I chop the rolls into bite-sized pieces. This makes it easy to layer them in the cups. - Combine pumpkin puree, cream cheese, powdered sugar, vanilla, and pumpkin spice. - Mix until smooth and fold in whipped cream. Next, I prepare the pumpkin filling. I take a bowl and add the pumpkin puree, softened cream cheese, powdered sugar, vanilla extract, and pumpkin spice. I mix these until smooth. This step is fun because the flavors blend together nicely. After that, I gently fold in the whipped cream. This creates a light and fluffy filling that adds great texture. - Layer chopped cinnamon rolls and pumpkin cream mixture. - Repeat layering until cups are full. Now comes the fun part: assembling the trifle cups! I start by adding a spoonful of chopped cinnamon rolls to the bottom of each cup. Then, I add a layer of the pumpkin cream mixture on top. I repeat this process until the cups are full. I make sure to finish with a layer of pumpkin cream for a nice look. If I want, I can sprinkle chopped pecans on top for extra crunch. A drizzle of caramel sauce adds a sweet touch. To make your trifle cups light and airy, folding is key. Here’s how: - Start with your pumpkin mixture in a large bowl. - Take a dollop of whipped cream and add it to the pumpkin mix. - Gently fold it in using a spatula. - Repeat until all whipped cream is mixed in. - Be careful not to stir too hard. This keeps the air in. For layering, follow these steps: - Use clear cups to show off the layers. - Begin with a layer of cinnamon rolls. - Then, add a scoop of the pumpkin cream. - Repeat this until the cup is full. - Finish with a layer of pumpkin cream on top. Great garnishes make your trifle cups pop. Here are some ideas: - Drizzle caramel sauce on top for sweetness. - Sprinkle cinnamon for extra flavor. - Add chopped pecans for a crunchy touch. For a pretty display: - Serve in clear cups to highlight the layers. - Use small pumpkins or pecans as a garnish. - Keep it simple to let the colors shine. These small touches will make your trifle cups truly delightful! {{image_2}} You can change the spice mix to fit your taste. Instead of pumpkin pie spice, try using: - Cinnamon - Nutmeg - Ginger - Allspice These spices give a warm and cozy flavor. If you love chocolate, swap the pumpkin cream for chocolate or vanilla cream. This change makes it rich and sweet. You can mix in cocoa powder for a deep chocolate flavor, or keep it simple with vanilla. You can make this treat fit special diets. For gluten-free options, look for gluten-free cinnamon rolls. Many brands offer great taste without gluten. For those who avoid dairy, you can use dairy-free cream cheese and whipped cream. Brands like Tofutti and So Delicious provide tasty alternatives. These swaps make the trifle cups friendly for many diets. Enjoy your creation without worry! To store leftover trifle cups, cover them tightly with plastic wrap. This keeps moisture in and prevents drying out. You can also use an airtight container if you have one. Place the covered cups in the fridge for the best results. For keeping ingredients fresh, store the cinnamon rolls in a cool, dry place. If you have extra pumpkin cream, keep it in a sealed container in the fridge. It can last for a few days. Always check for any signs of spoilage before using. I recommend refrigerating trifle cups for about 30 minutes before serving. This helps the flavors mix well and makes them cool and refreshing. You can make these cups ahead of time. They taste great after sitting in the fridge for a few hours or overnight. Just remember to add any toppings right before serving to keep them fresh and crunchy. Can I use homemade cinnamon rolls? Yes, you can use homemade cinnamon rolls. They will add a personal touch. Just ensure they are baked and cooled before cutting them into pieces. How long will the trifle cups last in the fridge? The trifle cups will stay fresh for about three days in the fridge. Keep them covered to prevent drying out. Can I substitute pumpkin puree with fresh pumpkin? Yes, you can use fresh pumpkin. Cook and mash it well to get a smooth texture. It may change the flavor slightly. What to do if the mixture is too thick? If the mixture is too thick, you can add a bit of milk or cream. Mix it in slowly until you reach your desired consistency. How to fix layering issues during assembly? If layers mix together, try using a spoon to create space between them. Build layers gently to keep them separate. This blog post guides you through making a tasty pumpkin trifle with cinnamon rolls. You learned about each ingredient, from pumpkin puree to whipped cream. I shared step-by-step instructions for preparing and assembling the trifle. Plus, I provided tips for fluffy layers and serving suggestions. You can even customize the recipe with different flavors or dietary needs. Now you're ready to impress everyone with this fun dessert. Enjoy creating and sharing your delicious trifle.

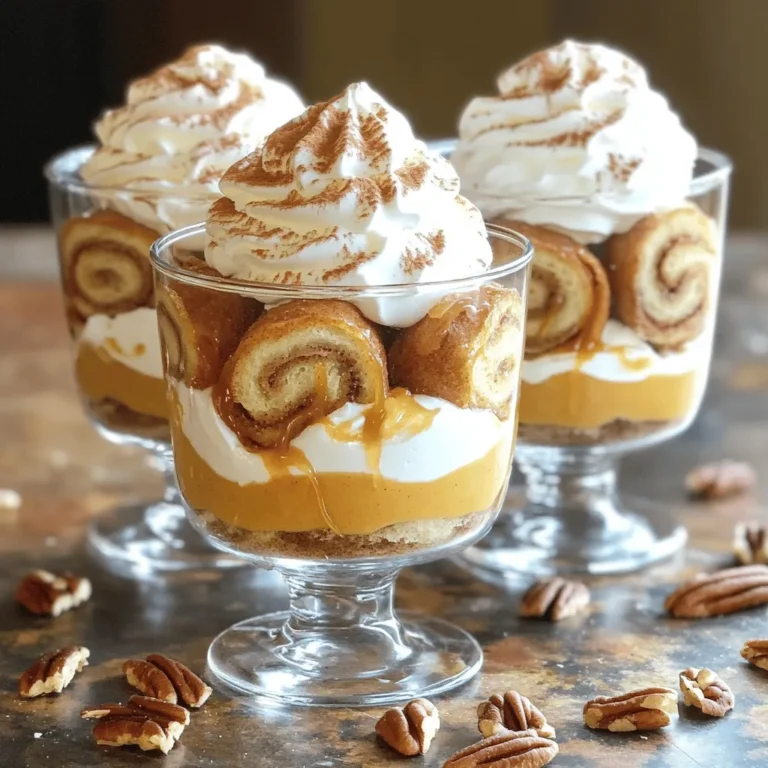
Pumpkin Spice Cinnamon Roll Trifle Cups Delightful Treat

To make these tasty Cajun shrimp skewers, you need: - 1 pound large shrimp, peeled and deveined - 2 tablespoons olive oil - 2 tablespoons Cajun seasoning - 1 teaspoon garlic powder - 1 teaspoon smoked paprika - 1/2 teaspoon cayenne pepper (adjust to taste) - Salt and pepper to taste The shrimp should be fresh or thawed properly. The spices bring out bold flavors. The olive oil helps the seasonings stick well to the shrimp. Olive oil is my go-to for this recipe. It adds flavor and moisture. You can also try avocado oil for a lighter taste. For a twist, you might mix in some lemon juice or lime juice into the marinade. This adds a nice citrus kick. Adding some vegetables makes the skewers colorful and healthy. I like to use: - 1 red bell pepper, cut into chunks - 1 yellow bell pepper, cut into chunks - 1 small red onion, cut into wedges You can also add zucchini or cherry tomatoes for extra flavor. Serve these skewers with a side of rice or a fresh salad. Don’t forget lemon wedges for a zesty finish! Start by taking a large bowl. In this bowl, mix together 2 tablespoons of olive oil, 2 tablespoons of Cajun seasoning, 1 teaspoon of garlic powder, and 1 teaspoon of smoked paprika. Add 1/2 teaspoon of cayenne pepper for heat. You can adjust this to your taste. Season with salt and pepper. Stir everything well until the marinade looks smooth. Next, add 1 pound of peeled and deveined shrimp to the bowl. Make sure each shrimp is well coated in the marinade. Let them sit for at least 15 minutes. This helps the shrimp soak up all that great flavor. While your shrimp marinates, get your vegetables ready. Cut 1 red bell pepper and 1 yellow bell pepper into chunks. Also, cut a small red onion into wedges. If you are using wooden skewers, soak them in water for 30 minutes. This step stops them from burning in the air fryer. Now, take the marinated shrimp and your veggies, and get ready to assemble the skewers. First, preheat your air fryer to 400°F (200°C) for about 5 minutes. Once hot, start threading the marinated shrimp, bell pepper chunks, and red onion wedges onto the skewers. Alternate them to make it colorful. Place the skewers in the air fryer basket in a single layer. You may need to do this in batches. Cook the skewers for 8-10 minutes. Flip them halfway through to ensure even cooking. When the shrimp turn pink and look cooked, they are ready. Carefully take them out and let them cool slightly before serving. Enjoy those tasty flavors! To get the best flavor, use fresh spices. Cajun seasoning adds a punch. I recommend mixing in garlic powder, smoked paprika, and cayenne pepper. Adjust cayenne to your taste. This spice mix gives the shrimp a nice kick. Marinate the shrimp for at least 15 minutes. This helps flavors soak in well. For a richer taste, let them sit longer, even up to an hour. Preheat your air fryer to 400°F (200°C) for five minutes. This step helps cook the shrimp evenly. Arrange the skewers in a single layer in the basket. Avoid crowding them to allow hot air to circulate. Flip the skewers halfway through cooking. This ensures even browning. Cook the shrimp for 8-10 minutes. Look for a pink color to know they are done. Serve the skewers on a bright platter. Garnish with fresh parsley or cilantro for color. This adds a nice pop to the dish. Lemon wedges on the side give a zesty touch. You can also add a cool dip, like ranch or garlic sauce. Pair with rice or a fresh salad for a full meal. Enjoy your delicious creation! {{image_2}} You can switch up the Cajun seasoning for different flavors. Try using taco seasoning for a zesty twist. You can also use Italian herbs like oregano and basil for a fresh taste. If you like heat, add more cayenne or even some chili powder. Mixing in lemon zest can brighten the dish. Experimenting with spices keeps the recipe fun and new. While bell peppers and onions are great, feel free to mix in other veggies. Zucchini or cherry tomatoes work well on skewers. You can also try mushrooms for an earthy flavor. Broccoli florets or asparagus give a nice crunch too. Using seasonal vegetables adds color and nutrients. This makes your meal more balanced and appealing. To turn your skewers into a full meal, serve them with rice or quinoa. A simple green salad pairs nicely too. You can also add a dipping sauce like garlic aioli or spicy ranch. For extra flavor, serve with grilled corn on the side. These additions make your meal hearty and satisfying. Enjoying a variety of textures and flavors keeps every bite exciting. To store leftover Cajun shrimp skewers, place them in an airtight container. Make sure they cool down before sealing. This helps keep them fresh. You can store them in the fridge for up to three days. If you want to keep them longer, consider freezing. When reheating, I suggest using the air fryer again. Set it to 350°F (175°C) and heat for five minutes. This helps restore the crispy texture. You can also use a skillet over medium heat. Just flip them often to avoid burning. For freezing, wrap the skewers tightly in plastic wrap. Then, place them in a freezer-safe bag. This keeps the shrimp safe from freezer burn. You can freeze them for up to three months. Just remember to thaw them in the fridge before reheating. Yes, you can use frozen shrimp. Just remember to thaw them first. Place the shrimp in cold water for about 15-20 minutes. Once thawed, peel and devein them if needed. This will help the shrimp absorb the marinade better. The shrimp will turn pink when they are done. They should also curl into a 'C' shape. If they look gray or opaque, they need more time. Cook them for about 8-10 minutes in the air fryer. Flipping them halfway ensures even cooking. Cajun shrimp skewers pair well with rice or quinoa. You can also serve them with a fresh salad. Grilled corn on the cob is a great choice too. Don't forget to have lemon wedges on the side to squeeze over the skewers. It adds a nice zing! In this post, we explored making Cajun shrimp skewers. We discussed key ingredients, marinating steps, and air fryer tips for the best flavor. I shared fun variations and how to store leftovers for later. Cajun shrimp skewers are easy to make and taste great. You can customize them to fit your needs. With these tips, you can cook a meal that impresses and satisfies. Enjoy your cooking journey!

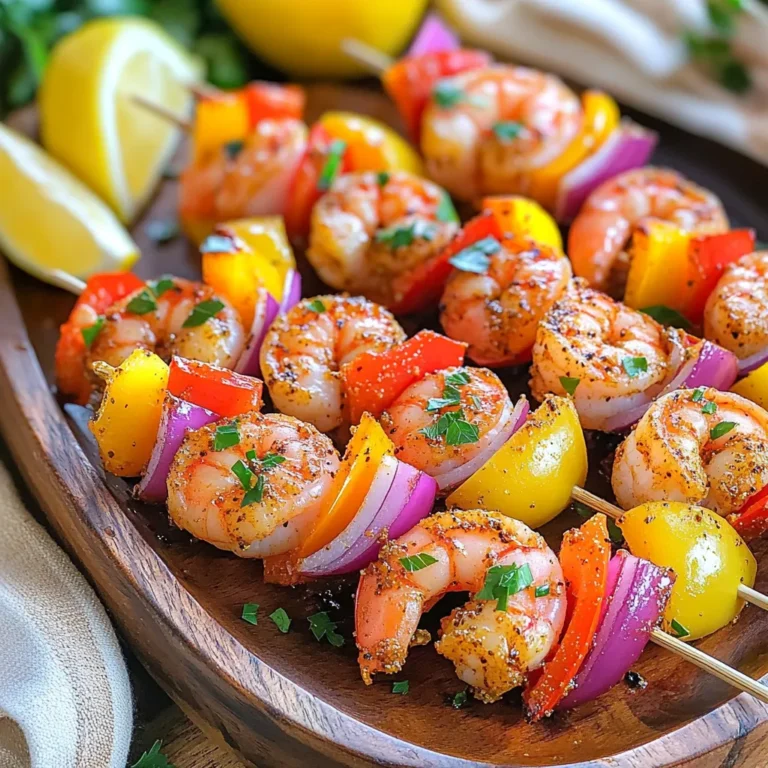
Air Fryer Cajun Shrimp Skewers Flavorful and Easy Recipe

- 1 cup graham cracker crumbs - 16 oz cream cheese, softened - 1 cup heavy cream The graham cracker crumbs form the base of your parfait. They give a nice crunch. I love using unsalted butter to bind the crumbs together. Cream cheese adds a creamy texture. It also gives a rich taste. Heavy cream makes the cheesecake light and fluffy. Whipping it helps add air. This step is key for a smooth finish. - Mint leaves for garnish - Additional toppings ideas (e.g., chocolate shavings, whipped cream) Mint leaves add a pop of color. They also bring a fresh taste. You can use chocolate shavings for a sweet twist. Whipped cream on top can make it even more delicious. Feel free to get creative! Mixing and matching toppings can personalize your parfaits. First, you need to mix the graham cracker crumbs and melted butter. In a medium bowl, combine 1 cup of graham cracker crumbs with 4 tablespoons of melted unsalted butter. Stir until the crumbs are fully coated. Next, it’s time to layer the crust in serving glasses. Take your mixture and add about 1/4 cup to the bottom of each glass. Press down gently to create a firm base. This crust will add a nice crunch to your parfait. Now, let’s make the cheesecake mixture. In a large mixing bowl, beat 16 ounces of softened cream cheese with an electric mixer until it’s smooth. It should be creamy and free of lumps. Next, add 1 cup of powdered sugar and 1 teaspoon of vanilla extract to the cream cheese. Mix until everything is fully combined and smooth. In a separate bowl, whip 1 cup of heavy cream until stiff peaks form. This means the cream will hold its shape well. Gently fold the whipped cream into the cream cheese mixture. Be careful not to deflate the whipped cream; we want it fluffy and light. Now comes the fun part: assembling the parfaits. Start by layering half of the cream cheese mixture on top of the graham cracker crust in each glass. Then, make a raspberry puree. In a small bowl, mash 1 cup of fresh raspberries with 2 tablespoons of lemon juice. You can leave some chunks for a nice texture. Spoon the raspberry puree over the cream cheese layer in each glass. Repeat the layers with the remaining cream cheese mixture and raspberry puree until the glasses are filled. Finally, finish each parfait with fresh raspberries and a sprig of mint if you like. These touches will make your parfaits look even more delicious and inviting. To get a great texture in your raspberry cheesecake parfaits, ensure your cream cheese is softened before mixing. Soft cream cheese blends easily and creates a smooth filling. Let it sit at room temperature for about 30 minutes before using. When whipping cream, use a cold bowl and cold beaters. This helps the cream whip faster. Beat the cream until stiff peaks form but don’t overwhip. Stop when it looks fluffy and holds its shape well. To create beautiful layers in your parfaits, use clear glasses or jars. This way, everyone can see the lovely layers you made. Start with about 1/4 cup of crust, then add a layer of cream cheese mixture, followed by raspberry puree. Repeat these layers until the glasses are full. Using different sized glasses can add charm to your serving. Try tall, thin glasses for a modern look or wide, short ones for a cozy feel. Mixing sizes adds visual interest and makes your dessert even more inviting. {{image_2}} You can switch up the fruit in your parfaits. Instead of raspberries, try strawberries or blueberries. Each fruit adds its own twist and flavor. You can also use citrus zest to give the cream cheese a refreshing kick. Lemon or lime zest can brighten the taste. These small changes can make your parfaits feel new and exciting. If you need a gluten-free option, use gluten-free graham cracker crumbs for the crust. Many brands offer this choice, so you won't miss out on flavor. For a vegan version, look for plant-based cream cheese and whipped cream. They work well in this recipe. You can still have a delicious dessert that fits your dietary needs. To keep your no-bake raspberry cheesecake parfaits fresh, store them in the fridge. Use airtight containers or cover the glasses with plastic wrap. This helps prevent them from absorbing any odors from the fridge. These parfaits stay fresh for up to three days. After that, the layers may start to separate, and the texture won't be as nice. Can you freeze the parfaits? Yes, but it's best to freeze only the cheesecake mixture, not the whole parfait. To freeze, layer the cheesecake mixture in a suitable container. Leave space at the top for expansion. Cover tightly, and it will keep for about a month. To thaw, move the container to the fridge for several hours or overnight. Once thawed, reassemble the layers with fresh raspberries. This keeps the parfaits looking and tasting great. Avoid refreezing, as it can harm the texture and flavor. Yes, you can make these parfaits ahead of time. They stay fresh in the fridge. Prepare them one day before. Just layer them in your serving glasses and cover with plastic wrap. Keep them chilling until you're ready to serve. This saves time and makes serving easy. To reduce sweetness, cut back on the powdered sugar. Start with half a cup instead of one cup. Taste the cream cheese mixture and add more if needed. You can also use tart raspberries. This helps balance the sweetness well. If you want a different base, try crushed cookies like Oreos or digestive biscuits. For a gluten-free option, use almond flour or gluten-free cookies. These alternatives can add unique flavors and textures to your parfaits. This blog post shows how to create delicious cheesecake parfaits. We covered essential ingredients like graham cracker crumbs, cream cheese, and heavy cream. You learned how to prepare the crust, mix the cheesecake, and assemble layers. We also shared tips on achieving smooth textures and great layers. In my final thoughts, these parfaits are easy to experiment with. You can try different fruits and flavors to make them your own. Enjoy making this tasty dessert again and again!

No-Bake Raspberry Cheesecake Parfaits Light and Tasty

PREV 1 … 30 31 32 … 57 NEXT
flavor nest kitchen

explore

DessertsDinnerAppetizersDrinks

Our Policies

  • Cookie Policy
  • Copyright Policy
  • Disclaimer
  • GDPR Policy
  • Terms Of Use
Back to Top
  • About
  • Contact Us
  • Privacy Policy
© 2025 flavor nest kitchen