FREE DINNER EBOOK! Get your copy!
  • Cookie Policy
  • GDPR Policy
  • Disclaimer
  • Terms Of Use
  • Visit my other site: Fun Cookie Recipes
flavor nest kitchen
  • Home
  • Dinner
  • Desserts
  • Drinks
  • Appetizers
  • Contact
  • About
  • Privacy Policy
  • Home
  • Dinner
  • Desserts
  • Drinks
  • Appetizers
  • Contact
  • About
  • Privacy Policy
  • Cookie Policy
  • GDPR Policy
  • Disclaimer
  • Terms Of Use
Visit my other site: Fun Cookie Recipes

HOME / CATEGORIES /

Latest

- 8 ounces rice noodles or whole wheat noodles - 1 red bell pepper, thinly sliced - 1 cup broccoli florets - 1 cup snap peas - 1 carrot, julienned - 2 cloves garlic, minced - 1 inch piece of ginger, minced - 1/4 cup creamy peanut butter - 2 tablespoons soy sauce or tamari for gluten-free - 1 tablespoon sriracha (adjust for heat) - 1 tablespoon lime juice - 1 tablespoon honey or maple syrup - 2 green onions, chopped - Sesame seeds First, cook the rice noodles. Follow the package instructions for the best results. Once done, drain them and rinse under cold water. This keeps them from sticking together. After rinsing, set the noodles aside for later. Next, grab a large skillet or wok. Heat one tablespoon of vegetable oil over medium-high heat. Make sure the oil gets hot enough but not smoking. This step is key to getting a nice sear on your veggies. Now, add two cloves of minced garlic and one inch of minced ginger to the hot oil. Sauté for about one minute until you smell their wonderful aroma. Then, toss in the sliced red bell pepper, one cup of broccoli florets, one cup of snap peas, and one julienned carrot. Stir-fry these for about five to seven minutes. You want the veggies to be tender yet still crisp. In a small bowl, mix together 1/4 cup of creamy peanut butter, 2 tablespoons of soy sauce, 1 tablespoon of sriracha, 1 tablespoon of lime juice, and 1 tablespoon of honey or maple syrup. Stir until the mixture is smooth. If it feels too thick, add a splash of water to adjust the consistency. Add the cooked noodles to the skillet with the sautéed vegetables. Pour the spicy peanut sauce over everything. Toss it all together to ensure each noodle gets coated with that tasty sauce. Continue to stir-fry everything for another two to three minutes. This heats the dish through. Once done, plate your stir fry and garnish with chopped green onions and a sprinkle of sesame seeds. Enjoy your meal! To make a great stir-fry, you need high heat. This helps cook the food quickly. Use a large skillet or wok to get the best results. Heat the oil until it shimmers. This means it’s hot enough. Ingredient prep matters too. Cut your vegetables into equal sizes. This ensures they cook evenly. Mince the garlic and ginger finely for more flavor. Have everything ready before you start cooking. Stir-frying is quick! Want more spice? Add extra sriracha to the sauce. You can also use chili flakes for a different heat. If you like sweet, mix in more honey or maple syrup. This will balance the spice. Try adding sesame oil for a nutty flavor. It adds depth to your dish. You can also sprinkle in some ground peanuts for crunch. These small changes can elevate your meal. Serve this stir-fry with rice or quinoa. These sides soak up the sauce well. For a fresh touch, add a side salad. A light salad pairs nicely with the dish. When serving for family or meal prep, use large bowls. This makes it easy to serve. You can also pack it in containers for lunches. Just remember to garnish each serving with green onions and sesame seeds. This adds color and flavor. {{image_2}} For those who need gluten-free options, use tamari instead of soy sauce. Tamari has a similar taste without gluten. You can also swap rice noodles for gluten-free noodles. This keeps the dish safe and tasty. If you follow a vegan diet, replace honey with maple syrup. This keeps the sweetness while making it vegan. You can also check if your peanut butter is vegan. Many brands are, so read the label. Want to add protein? Tofu is a great choice. Use firm or extra-firm tofu. Press it to remove water, then cube and fry until golden. This gives a nice texture. Chicken works well too. Dice it into bite-sized pieces and cook it in the skillet before adding veggies. Cook until it’s no longer pink. Shrimp is another option. Just add it to the skillet after the veggies. Cook until they turn pink and are firm. You can swap out veggies based on what you like or what’s in season. Zucchini, bell peppers, or snap peas work great. Spinach or kale can add greens and flavor. Just make sure to adjust cooking times. Softer veggies need less time in the pan. Enjoy making the dish yours! To store leftovers, let the stir fry cool. Place it in an airtight container. This keeps it fresh for up to three days in the fridge. It is important to store it quickly to avoid bacteria growth. Label the container with the date to track freshness. When reheating, use a skillet or microwave. For the skillet, heat it over medium-low. Add a splash of water or broth. This keeps the noodles moist and flavorful. Stir often for even heating. If using a microwave, heat in 30-second bursts. Stir after each interval until hot. You can freeze the stir fry for up to three months. Use a freezer-safe container or bag. Make sure to remove as much air as possible. To thaw, place it in the fridge overnight. Reheat it in a skillet for the best texture. Avoid refreezing once thawed to maintain quality. If you need a nut-free option, try sunflower seed butter or tahini. Both give a creamy texture. You can also use soy nut butter, which is safe for kids with nut allergies. These options keep the dish tasty and smooth. To reduce heat, cut back on the sriracha. Start with just one teaspoon. You can also use sweet chili sauce instead. This gives flavor without extra spice. Adding more honey or maple syrup can help balance the heat too. Yes! You can swap rice noodles for whole wheat or egg noodles. Just keep an eye on cooking times. Whole wheat noodles usually take a few extra minutes. Egg noodles cook fast, so check them often to avoid mushiness. This dish stays fresh in the fridge for about three days. Store it in an airtight container to keep it from drying out. When reheating, add a splash of water to keep the noodles moist. Absolutely! To make it more appealing to kids, cut veggies into fun shapes. Reduce the sriracha or leave it out completely. You can also serve it with extra peanut sauce on the side for dipping. Kids love to dip! This blog covers the essential ingredients and steps for making a tasty Spicy Peanut Noodle Stir Fry. You learned about noodles, fresh veggies, and a rich peanut sauce. I shared tips to perfect your stir-fry, which flavors to enhance, and how to store leftovers. Remember to customize the dish to your taste, whether with protein or different vegetables. This recipe is flexible and fun for all cooks. Enjoy your cooking journey and make it your own!

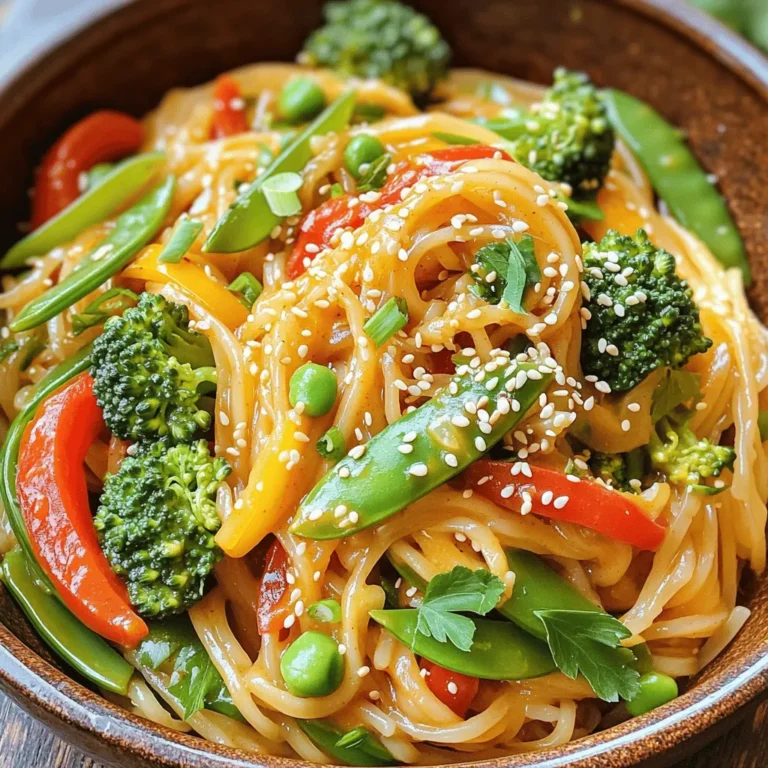
Spicy Peanut Noodle Stir Fry Flavorful and Simple Meal

- 1 loaf of brioche bread, cut into cubes - 6 large eggs - 2 cups milk (whole or almond) - 1/2 cup pure maple syrup The main ingredients bring together a rich and sweet flavor. Brioche bread forms the base, soaking up all the custard goodness. Using eggs gives it a fluffy texture, while milk adds creaminess. Pure maple syrup gives the dish its sweet taste, making each bite delightful. - 1 teaspoon vanilla extract - 1 teaspoon ground cinnamon - 1/2 teaspoon nutmeg - 1/4 teaspoon salt Flavoring ingredients enhance the dish. Vanilla extract adds warmth, while cinnamon and nutmeg bring cozy spice notes. Salt balances sweetness, ensuring the flavors shine without being too overpowering. - 1 cup chopped pecans - Powdered sugar (for dusting, optional) - Fresh berries (for serving, optional) Optional additions can elevate your casserole. Chopped pecans add crunch and nuttiness, giving great texture. A dusting of powdered sugar on top adds a sweet finish. Fresh berries provide a pop of color and freshness, making it even more enjoyable. 1. First, preheat your oven to 350°F (175°C). This step warms up your oven, making sure the casserole cooks evenly. 2. Next, grease a 9x13-inch baking dish. You can use butter or non-stick spray. This keeps the casserole from sticking. 3. In a large mixing bowl, create the egg mixture. Whisk together 6 large eggs, 2 cups of milk, 1/2 cup of pure maple syrup, 1 teaspoon of vanilla extract, 1 teaspoon of ground cinnamon, 1/2 teaspoon of nutmeg, and 1/4 teaspoon of salt until everything is well mixed. 1. Now, soak the brioche bread. Take a loaf of brioche bread and cut it into cubes. Add it to the egg mixture. Gently fold the bread in until all pieces are coated. Let it soak for about 15 minutes. This allows the bread to absorb all those tasty flavors. 2. After soaking, stir in 1 cup of roughly chopped pecans. Make sure they are evenly spread throughout the mixture for a nice crunch. 3. Pour the bread mixture into the greased baking dish. Spread it out evenly to ensure even cooking. 1. Cover the dish with aluminum foil. This helps to keep the moisture in while it bakes. Place it in the oven and bake for 30 minutes. 2. After 30 minutes, remove the foil and finish baking. Let it bake for an additional 15-20 minutes. The top should turn golden brown, and the custard should set. 3. Once done, remove the dish from the oven and let it cool for about 10 minutes. If you like, dust it with powdered sugar before serving. You can also add fresh berries on top for a burst of color and flavor. - Choosing the right bread: Use brioche for a rich, soft texture. It soaks up the egg mixture well. You can try challah too. Just make sure it’s fresh. Stale bread can work but may not yield the best result. - Soaking time for best results: Let the bread soak for about 15 minutes. This time helps the bread absorb the egg mixture. If you soak it too long, the bread can get mushy. You want it to be soft but still hold its shape. - Checking for doneness: Bake until the top is golden brown. The custard should be set, not runny. Insert a toothpick into the center. If it comes out clean, it’s done. If not, give it a few more minutes. - Ideal toppings: Dust with powdered sugar for a sweet touch. Fresh berries add color and flavor. You can also drizzle extra maple syrup on top for a richer taste. - Pairing with beverages: Serve with coffee or tea for a cozy breakfast. Fresh juice can also be a great match. Try a sparkling water for a refreshing twist. - Garnishing options: Add mint leaves for a pop of color. You can also sprinkle some chopped pecans on top for added crunch. This makes your dish look fancy and inviting. {{image_2}} Gluten-free options You can swap out the brioche for gluten-free bread. Many stores sell gluten-free loaves. Just make sure to check the label. This small change lets you enjoy the casserole without gluten. Vegan substitutes To make it vegan, replace the eggs with flaxseed meal. Use 1 tablespoon of flaxseed mixed with 3 tablespoons of water for each egg. Almond milk works great instead of regular milk. You can also use maple syrup as your sweetener. Extra spices or flavorings Feel free to get creative! Add a splash of almond extract for a nutty twist. You can also mix in pumpkin pie spice or cardamom for a different flavor. These spices blend well with maple and pecans. Fruit alternatives You can change the berries for other fruits. Try sliced bananas or diced apples. Just remember, softer fruits may cook faster. Add them in the last few minutes of baking for best results. Breakfast vs. dessert variations This casserole shines as both breakfast and dessert. For breakfast, serve it warm with syrup. For dessert, add vanilla ice cream on top. It transforms the dish into a sweet treat everyone will love. Individual servings You can also bake this in smaller dishes. Use ramekins or muffin tins for single servings. This makes for a fun and easy way to serve guests. Plus, it helps with portion control! To keep your Maple Pecan French Toast Casserole fresh, store it in the fridge. Use an airtight container to prevent drying out. Make sure it cools down completely before you cover it. This casserole stays good for about 3 to 4 days in the fridge. When you want to enjoy your leftovers, the oven is the best way to reheat. Preheat your oven to 350°F (175°C). Place the casserole in a baking dish and cover it with foil. Heat for about 20 minutes. This keeps the texture nice and soft. You can also use the microwave if you're in a hurry. Just heat it in short bursts to avoid drying it out. Enjoy it warm! Can I make this ahead of time? Yes, you can make this dish ahead. Prepare it the night before. Just cover it well and place it in the fridge. Bake it in the morning to enjoy a warm breakfast. How do I know when it’s done baking? Look for a golden brown top. The custard should not jiggle. You can also poke it with a knife. If it comes out clean, it’s done. What can I use instead of brioche bread? You can use challah or even a good quality French bread. Both will give a nice texture and taste. Can I use a different type of syrup? Yes, you can use honey or agave syrup. Each will change the flavor slightly but will still taste great. What’s a vegan substitute for eggs? You can use flaxseed meal. Mix 1 tablespoon of flaxseed with 2.5 tablespoons of water. Let it sit for a few minutes to thicken. Can I freeze Maple Pecan French Toast Casserole? Yes, you can freeze it. Bake it first, then cool completely. Wrap it tightly, and it will last for up to three months. What’s the best way to serve this dish? Serve it warm with fresh berries and a drizzle of maple syrup. A dusting of powdered sugar adds a nice touch. Enjoy it with coffee or tea for a perfect meal! This Maple Pecan French Toast Casserole is easy and delicious. We covered key ingredients, step-by-step instructions, and helpful tips. You can adjust flavors and even make it gluten-free or vegan. Leftovers are simple to store and reheat. Enjoy this dish for breakfast or dessert. It’s a great way to impress family and friends. Try it out, and feel free to get creative with your toppings. Happy cooking!

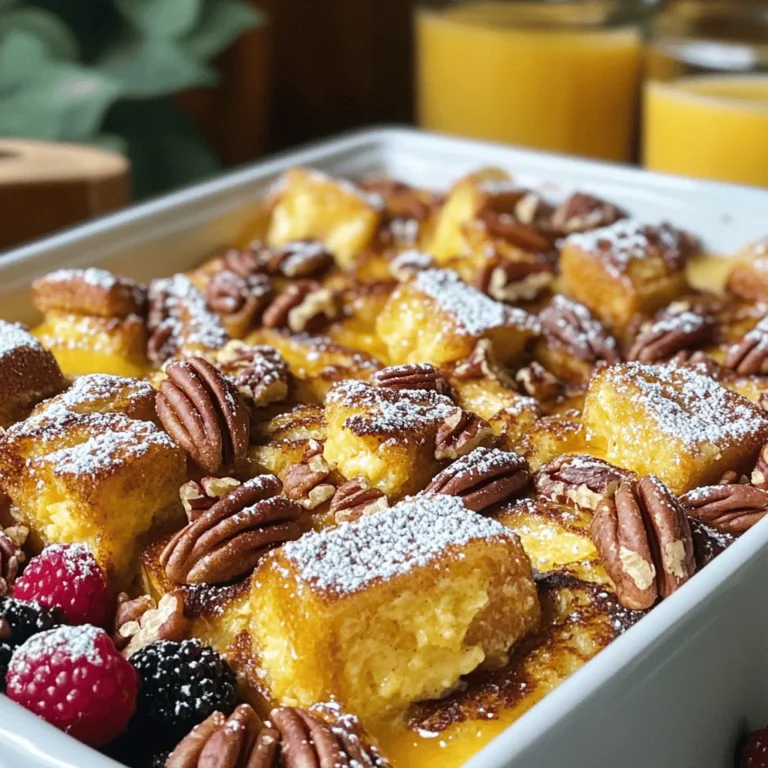
Maple Pecan French Toast Casserole Simple Delight

- 1 lb chicken breast, cut into bite-sized pieces - 1 cup crushed pretzels - 1/2 cup breadcrumbs - 1/4 cup all-purpose flour - 1 teaspoon paprika - 1 teaspoon garlic powder - Salt and pepper to taste - 2 large eggs, beaten - 1/3 cup honey - 1/3 cup Dijon mustard - 1 tablespoon apple cider vinegar The key to making Honey Mustard Pretzel Chicken Bites lies in the ingredients you use. First, fresh chicken breast gives a juicy base. Cut the chicken into bite-sized pieces. This size makes them easy to eat and perfect for dipping. Next, crushed pretzels become the star of the coating. They add a salty crunch that pairs well with the chicken. Use regular or gluten-free pretzels. It’s your choice! Breadcrumbs are essential for extra texture. They help create a golden crust when baked. For the dry mix, all-purpose flour, paprika, garlic powder, salt, and pepper enhance the flavor. The spices add depth without overpowering the dish. You'll need eggs to help the coating stick. Two large eggs, beaten, work perfectly here. The honey and Dijon mustard make a delightful sauce. Honey gives sweetness, while Dijon adds tang. A splash of apple cider vinegar balances the flavors well. Gather these ingredients, and you’re ready to make a tasty treat! - Preheat oven to 400°F (200°C). - Prepare a baking sheet by lining it with parchment paper. This step helps prevent sticking and makes clean-up easy. - First, prepare the flour mixture. In a shallow bowl, mix together the flour, paprika, garlic powder, salt, and pepper. This mixture adds flavor to the chicken. - Next, beat two large eggs in another bowl until they are well mixed. This will help the coating stick. - In a third bowl, combine crushed pretzels and breadcrumbs. This mix will give your chicken a crunchy texture. - For coating, take each piece of chicken. Dip it first in the flour mixture, then in the beaten eggs, and finally coat it well with the pretzel and breadcrumb mix. Lay the coated chicken pieces on the prepared baking sheet. - Bake in the preheated oven for 15 to 20 minutes. Check for doneness by making sure the chicken is cooked through and the coating is golden and crispy. Use a meat thermometer if needed; chicken should reach 165°F (75°C). To get that crispy texture, make sure to coat the chicken well. Start with the flour mix. This helps the egg stick better. After the egg, roll the chicken in the pretzel and breadcrumb mix. Press down a bit to make it stick. That crunch is key! For dipping, you can use one hand for wet and one for dry. This keeps your hands cleaner. Want to spice things up? Add some cayenne pepper to the flour mix. It gives a nice kick! You can also use dried herbs, like thyme or oregano, for added flavor. If you want a different sauce, try mixing honey with barbecue sauce. It gives a sweet and smoky taste. You will need a few tools. A baking sheet lined with parchment paper works great. Use three shallow bowls for the coatings. A whisk is handy for the eggs. Grab a spatula or tongs for easy handling of the chicken. For clean-up, soak the bowls right after use. It makes washing easier! {{image_2}} You can change up the coating for your chicken bites. Panko is a great choice instead of regular breadcrumbs. Panko gives a crunchier texture. It adds a bit of fun to each bite. For those needing gluten-free options, you can use crushed gluten-free pretzels. Combine them with gluten-free breadcrumbs. This way, everyone can enjoy the dish. The honey mustard sauce is tasty, but you can mix it up. Try adding a bit of sriracha for heat. You can also mix in some maple syrup for a sweeter twist. If you want to explore other dips, ranch dressing pairs well. BBQ sauce is also a fun alternative. Each sauce brings a new flavor to your chicken bites. You can cook these bites in different ways. An air fryer works great for a quicker option. Preheat the air fryer to 380°F (193°C). Cook the bites for about 10-12 minutes. They will come out crispy and golden. If you prefer grilling, make sure to preheat your grill. Cook the chicken bites for about 4-5 minutes on each side. You can also pan-fry them in a skillet with a bit of oil. This method adds flavor and keeps them juicy. To keep your Honey Mustard Pretzel Chicken Bites fresh, place them in the fridge. Store them in an airtight container. This helps prevent moisture loss and keeps the bites crispy. It's best to eat them within three days for the best flavor and texture. You can freeze these chicken bites for later. First, let them cool completely. Then, place them in a single layer on a baking sheet. Freeze for about an hour, so they don’t stick together. Once frozen, transfer them to a freezer-safe bag. Remove as much air as possible. They can last up to three months in the freezer. To reheat your chicken bites without losing that crispy coating, use the oven. Preheat it to 375°F (190°C). Place the bites on a baking sheet and heat for about 10-15 minutes. This keeps them crunchy and tasty. If you use a microwave, they may get soggy. If you must use a microwave, heat them in short bursts. Check often to avoid overcooking. Honey Mustard Pretzel Chicken Bites stay fresh for about 3 to 4 days in the fridge. Just keep them in an airtight container. This way, they maintain their flavor and moisture. Yes, you can prepare the chicken bites ahead of time. You can coat them and store them in the fridge before baking. Just make sure to bake them fresh when you’re ready to serve. These chicken bites match well with various sides. Here are some great options: - Fresh salad - Sweet potato fries - Veggie sticks with dip - Mac and cheese Absolutely! You can use yellow mustard or whole grain mustard if you prefer. Each type will give a different taste but will still be delicious. Yes, you can make a vegan version. Use tofu or chickpeas instead of chicken. Swap eggs with a flaxseed mixture and use a plant-based honey substitute for the sauce. In this post, we explored how to make Honey Mustard Pretzel Chicken Bites. We covered the main ingredients, step-by-step instructions, and tips for perfecting your dish. Don’t forget the different coating options and sauce variations for extra fun. These bites are a crowd-pleaser and easy to make. Keep them fresh in your fridge or freezer for later. Enjoy cooking this simple yet tasty meal!

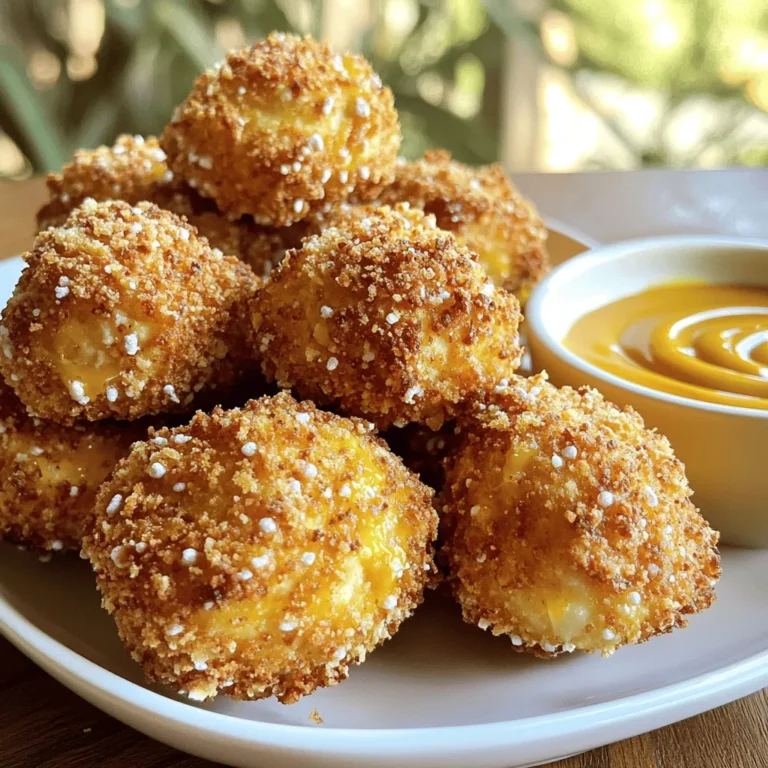
Honey Mustard Pretzel Chicken Bites Easy and Tasty

- 1 can chickpeas - 1 ripe avocado - Fresh chopped vegetables (red onion, celery, bell pepper) You will need a can of chickpeas. This is the star of your sandwich. Chickpeas are rich in protein and fiber. They provide a hearty base. Next, grab a ripe avocado. Its creamy texture blends well and adds richness. Finally, chop some fresh vegetables. Red onion, celery, and bell pepper add crunch and color. - Lemon juice - Tahini - Salt and pepper For flavor, use fresh lemon juice. It adds brightness and balances the creaminess. You can add tahini too for a nutty taste. Salt and pepper will enhance the flavors. Adjust these to fit your taste. - Whole grain bread - Leafy greens (spinach, arugula) Whole grain bread makes a great base. It adds fiber and keeps you full. You can use leafy greens like spinach or arugula for added nutrition. These greens bring freshness and color to your sandwich. First, take one can of chickpeas. Drain and rinse them well. In a mixing bowl, add the drained chickpeas and one ripe avocado. Use a fork to mash the avocado and chickpeas together. You want a chunky texture, so don’t mash them too much. Next, chop 1/4 cup of red onion, 1/4 cup of celery, and 1/4 cup of bell pepper. Add these chopped veggies to your bowl. Mix everything together until it is well combined. This adds a nice crunch to your salad. Now, it’s time to add flavor. Drizzle in 1 tablespoon of fresh lemon juice. If you like, add 1 tablespoon of tahini for a creamier texture. Stir the mixture until all the ingredients are coated. Taste the salad and add salt and pepper as needed. This step is key to making it delicious. Toast 4 slices of whole grain bread until they turn golden brown. While the bread is toasting, prepare to layer your sandwich. Take one slice of toasted bread and add a generous scoop of the chickpea avocado salad. Next, add a handful of leafy greens, like spinach or arugula. Top it off with another slice of bread. Press down gently to hold everything in place. Finally, slice the sandwich in half and enjoy your tasty meal right away! To get that perfect chunky consistency, start with a fork. Lightly mash the chickpeas and avocado together in a bowl. Leave some chickpeas whole for bite. This adds a nice texture. The right ingredient ratio is key. Use one ripe avocado for every can of chickpeas. This keeps your salad creamy but not too wet. Want to spice things up? Consider adding cumin or paprika. They bring warmth and depth to the salad. If you don’t have tahini, try using Greek yogurt or almond butter. Both add creaminess and a unique flavor twist. Pair your sandwich with a side of fresh fruit or veggie sticks. This balances the meal and adds color. For drinks, iced tea or sparkling water makes a great match. To make your sandwich look pretty, add a few leafy greens. A layer of spinach or arugula peeking out adds a fresh pop. Slice the sandwich on a diagonal for a nice touch. {{image_2}} You can change up your chickpea avocado salad sandwich in many fun ways. Try adding cucumbers for a fresh crunch. Carrots also work well for sweetness and color. If you want to skip the avocado, use hummus or a nut butter instead. These options still give you a creamy texture and great flavor. For those who follow a vegan diet, this recipe is perfect as is. Chickpeas and veggies are always vegan-friendly. If you need a gluten-free option, swap the whole grain bread for gluten-free bread. You still get all the taste without the gluten! Want to try something new? Make chickpea salad wraps! Use large lettuce leaves to hold the salad instead of bread. This keeps it light and fresh. You can also create chickpea avocado salad bowls. Just add a scoop of the salad to a bowl and top it with your favorite toppings, like nuts or seeds. Enjoy the same flavors in a fun new way! To keep your Chickpea Avocado Salad Sandwich fresh, wrap it tightly in plastic wrap. You can also store it in an airtight container. Refrigerate any leftovers within two hours. The salad mixture can stay good for up to three days in the fridge. Always separate the salad from the bread if you want to maintain crispness. If you want to enjoy this salad later, you can freeze the chickpea mixture. Place it in a freezer-safe container. It will stay fresh for up to three months. When you are ready, thaw it in the fridge overnight. For reheating, use a microwave on low power. This helps keep the flavors intact. The Chickpea Avocado Salad Sandwich lasts about two days in the fridge. Watch for signs of spoilage, like a sour smell or discoloration. If the avocado turns brown or mushy, it's time to toss it. Always check the salad mixture before eating to ensure it is safe. Making this sandwich is quick! It takes about 10 minutes to prep and 5 minutes to assemble. That gives you a total of 15 minutes from start to finish. You’ll love how fast it is! Yes, you can! You can prepare the chickpea avocado salad ahead of time. Store it in an airtight container in the fridge. It stays fresh for up to 2 days. Just make sure to add the salad to the bread right before eating. This keeps the bread nice and crunchy. Absolutely! This sandwich is packed with nutrition. Chickpeas are high in protein and fiber, which help keep you full. They also support heart health. Avocados are rich in healthy fats, vitamins, and minerals. They help improve skin health and provide energy. Overall, this sandwich is a tasty and healthy option for any meal! This blog post highlights how to create a delicious Chickpea Avocado Salad Sandwich. You learned about the key ingredients, including chickpeas, avocado, and fresh veggies, and how to mix them with spices and seasonings. I shared tips for achieving the best texture and flavor, plus serving ideas and storage methods. In conclusion, you can enjoy this tasty sandwich in many ways. Remember, the options are endless. Customize it to fit your taste and dietary needs. Get creative and make it your own!

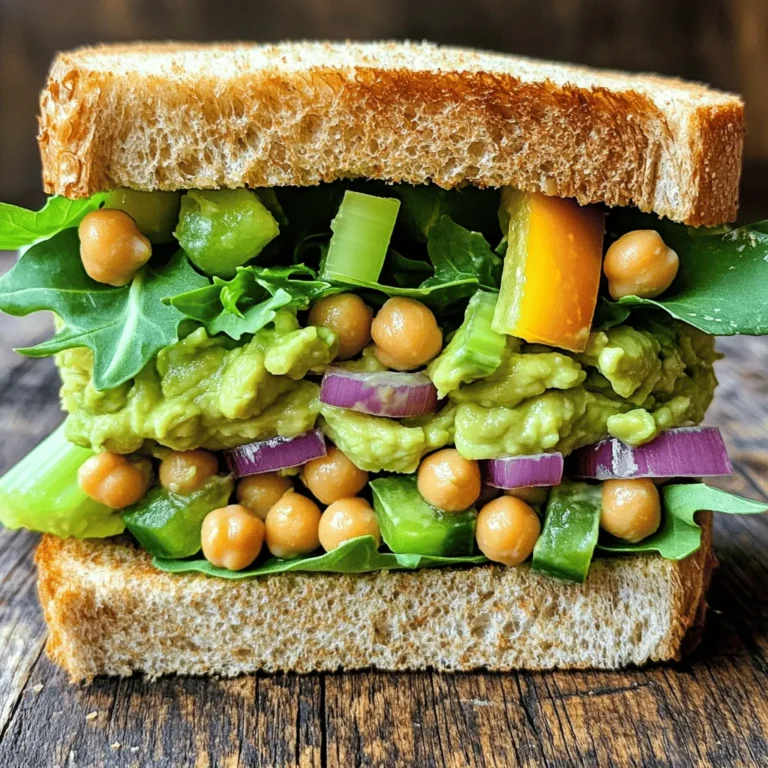
Chickpea Avocado Salad Sandwich Easy and Tasty Meal

- 1 cup grated carrots - 1/2 cup rolled oats - 1/2 teaspoon baking powder - 1/2 teaspoon baking soda - 1 teaspoon cinnamon - 1/4 teaspoon nutmeg - 1/4 teaspoon salt - 1/4 cup honey or maple syrup - 1/4 cup unsweetened applesauce - 1/4 cup Greek yogurt These main ingredients create the base of our breakfast bars. Grated carrots add moisture and natural sweetness. Rolled oats provide fiber, making these bars filling. Baking powder and baking soda help the bars rise. The spices, cinnamon and nutmeg, give a warm flavor. Honey or maple syrup act as sweeteners, while applesauce and Greek yogurt keep the texture light and fluffy. - 1/3 cup chopped walnuts - 1/4 cup raisins or dried cranberries Adding these optional ingredients can boost flavor and texture. Chopped walnuts add crunch and healthy fats. Raisins or cranberries bring a chewy sweetness. You can mix and match based on your taste. - Calories per serving: Approximately 150 - Key nutrients: Fiber, protein, vitamins A and C Each serving gives you a nutritious start to your day. The fiber from oats and carrots helps digestion. Protein from Greek yogurt keeps you satisfied longer. Carrots are rich in vitamins A and C, supporting your immune system. Enjoy these bars, knowing you fuel your body with healthy ingredients! 1. Prepping the oven and baking pan First, set your oven to 350°F (175°C). While it heats, grab an 8x8-inch baking pan. Line it with parchment paper. This helps the bars come out easily after baking. 2. Mixing dry ingredients In a large bowl, combine these dry ingredients: - 1 cup grated carrots - 1/2 cup rolled oats - 1/2 teaspoon baking powder - 1/2 teaspoon baking soda - 1 teaspoon cinnamon - 1/4 teaspoon nutmeg - 1/4 teaspoon salt Stir well to mix everything evenly. 1. Whisking wet ingredients In another bowl, whisk together: - 1/4 cup honey or maple syrup - 1/4 cup unsweetened applesauce - 1/4 cup Greek yogurt Mix until smooth. This will add moisture and flavor to your bars. 2. Folding in optional ingredients If you want extra texture, add chopped nuts or dried fruit. Use: - 1/3 cup chopped walnuts (optional) - 1/4 cup raisins or dried cranberries (optional) Gently fold these into the wet mixture. 1. Heating time and checking for doneness Pour the wet mixture into the dry ingredients. Stir until just combined. Spread the batter evenly in your prepared pan. Bake for 25-30 minutes. To check if they are done, insert a toothpick in the center. If it comes out clean, they are ready! 2. Cooling and cutting Once baked, let the bars cool in the pan for about 10 minutes. Then, transfer them to a wire rack to cool completely. After they cool, cut them into squares or rectangles. Enjoy your healthy breakfast bars! Serve the healthy carrot cake breakfast bars on a rustic wooden board. This adds a cozy touch. You can sprinkle a bit of cinnamon on top. Add a few extra walnuts for crunch and style. These bars pair well with a side of fresh fruit. Consider serving them with yogurt or a glass of milk. This makes a great breakfast or snack. To keep your bars fresh, store them in an airtight container. They stay good at room temperature for up to three days. For longer storage, freeze them. Wrap each bar in plastic wrap and place them in a freezer bag. When you want to eat one, just thaw it overnight in the fridge. You can also microwave them for about 20 seconds for a warm treat. One common mistake is overmixing the batter. This can make the bars tough. Mix just until combined for a soft texture. Another mistake is not adjusting baking time. Every oven is different. Check your bars a few minutes early to avoid overbaking. A toothpick should come out clean when they are done. {{image_2}} You can easily change the taste of these bars. Try using different spices, like ginger or allspice, to give a new twist. If you want it sweeter, use maple syrup or agave nectar instead of honey. These options can make your breakfast bars unique and fun. If you need gluten-free options, use gluten-free oats. They work just as well and keep the bars tasty. For nut-free choices, skip the walnuts and use seeds like sunflower or pumpkin. This way, everyone can enjoy these healthy treats. Adding mix-ins can enhance the flavor and nutrition. You can include seeds like chia or hemp for extra crunch. Dried fruits such as apricots or figs can also add sweetness. Experiment with different combinations to find your favorite mix! Yes, you can easily make these breakfast bars vegan. To replace honey, use maple syrup. It adds sweetness and keeps the bars moist. For Greek yogurt, substitute with a plant-based yogurt like almond or coconut yogurt. This way, you keep the creamy texture without dairy. These breakfast bars last about five days when stored properly. Keep them in an airtight container at room temperature. If you want them fresh for longer, you can freeze them. Just wrap each bar in plastic wrap and place them in a zip-top bag. They stay good for up to three months in the freezer. Yes, you can add other vegetables for extra nutrition. Zucchini works great and keeps the bars moist. You can also try sweet potatoes or even beets for a unique twist. Just make sure to grate them well. This keeps the texture right and adds flavor without altering the recipe too much. Many readers have enjoyed making these bars. One user said, "These bars are a great breakfast! My kids love them." Another shared, "I added some chocolate chips, and they were a hit!" Feedback shows that people love the taste and the ease of making these bars. They are perfect for busy mornings or a snack. I want to hear from you! After you try the recipe, please leave a comment. Tell me what you did differently or how your family liked them. Your thoughts can help others too. Did you use other fruits or nuts? Share your story! The community has great tips for making these bars even better. Some suggest using coconut flour for a different taste. Others say to add a bit of vanilla extract for extra flavor. A few readers recommend letting the bars cool overnight for the best texture. These tips can make your bars even tastier! Healthy carrot cake breakfast bars bring joy and nutrition to your days. With grated carrots, oats, and natural sweeteners, they combine taste and health. Follow the steps to mix, bake, and serve these bars perfectly. Watch for common mistakes to get it right. You can tweak flavors and swap ingredients to fit your diet. Remember, these bars are flexible and fun. Enjoy feedback from other users to inspire your own creations. Try making these compelling bars, and see how they brighten your mornings!

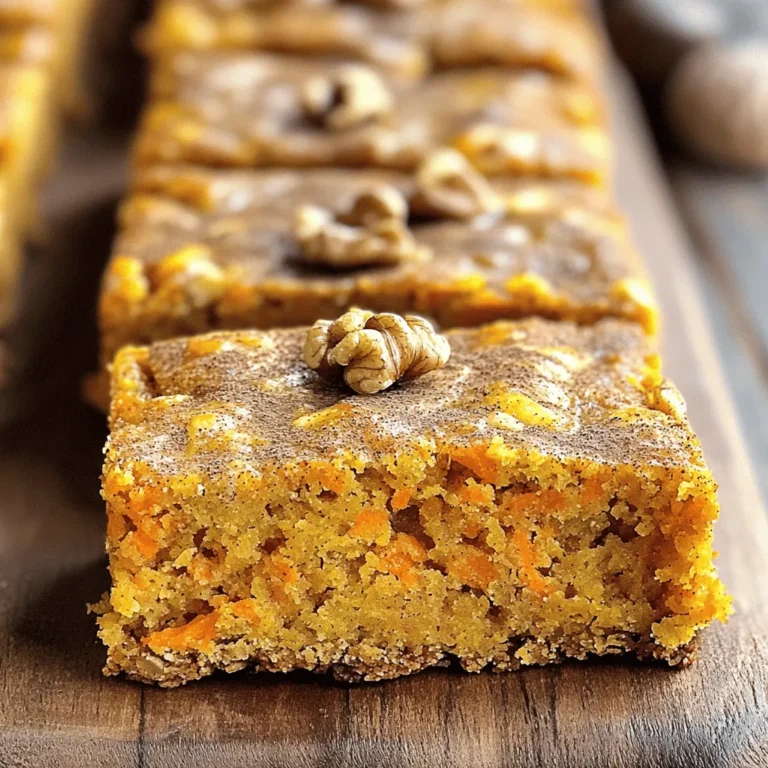
Healthy Carrot Cake Breakfast Bars Nutritious Treat

- 8 chicken drumsticks - 4 cloves garlic, minced - 1/4 cup brown sugar - 1/4 cup soy sauce (low sodium recommended) - 2 tablespoons olive oil - 1 tablespoon apple cider vinegar - 1 teaspoon ground ginger - 1/2 teaspoon black pepper - Salt to taste - Fresh parsley for garnish (optional) This recipe starts with fresh chicken drumsticks. I love using drumsticks because they stay juicy and tender. Minced garlic adds a strong, fragrant flavor. The marinade is the star of this dish. It combines sweet brown sugar and salty soy sauce. The olive oil adds richness. Apple cider vinegar gives a slight tang, which balances the sweetness. For seasonings, we use ground ginger for warmth. Black pepper adds a touch of heat. Salt is key to enhancing all the flavors. You can add fresh parsley at the end. It adds a pop of color and freshness to the dish. Gather these simple ingredients to create a tasty meal. The mix of flavors will impress everyone at your table. You can also customize this recipe. Try adding herbs or spices that you enjoy. Cooking should be fun and personal! Start by preheating your oven to 400°F (200°C). This temperature is key for getting a perfect bake. It allows the chicken to cook evenly, ensuring a tender inside and a crispy outside. In a mixing bowl, combine four minced garlic cloves, 1/4 cup of brown sugar, and 1/4 cup of low-sodium soy sauce. Add two tablespoons of olive oil, one tablespoon of apple cider vinegar, one teaspoon of ground ginger, and 1/2 teaspoon of black pepper. Whisk this mix until the brown sugar dissolves. This marinade adds great flavor to your chicken. Take eight chicken drumsticks and place them in a large zip-lock bag or a shallow dish. Pour the marinade over the chicken. Make sure each drumstick gets a good coat. Seal the bag or cover the dish. Let it marinate in the fridge for at least 30 minutes. For even better flavor, let it sit for up to four hours. Line a baking sheet with aluminum foil. This helps with easy cleanup later. Place a wire rack on top of the baking sheet. Arrange the marinated drumsticks on the rack. Leave space between each piece. This allows the hot air to circulate, cooking the chicken evenly. Bake your drumsticks in the preheated oven for 35-40 minutes. Check that the chicken is cooked through and has a nice caramelized glaze. For an extra crispy finish, broil the drumsticks for 2-3 minutes at the end. Keep a close eye on them to avoid burning. Once cooked, take the chicken out of the oven and let it rest for a few minutes. This helps keep the juices inside. Optionally, garnish with freshly chopped parsley before serving for a pop of color and flavor. Enjoy your delicious garlic brown sugar chicken drumsticks! For the best flavor, marinate your chicken well. I suggest marinating for at least 30 minutes. If you have more time, let it sit for up to 4 hours. This gives the flavors time to soak in. Use a plastic bag or a bowl to keep the chicken covered in the marinade. Make sure each drumstick is coated completely. This ensures every bite is tasty. To get that desired crispiness, you can adjust your cooking methods. Baking at a high temperature helps the skin crisp up. If you want extra crunch, broil the drumsticks for 2-3 minutes at the end. Keep an eye on them, so they don’t burn. You can also grill or air fry these drumsticks. Grilling adds a smoky flavor that many love. For air frying, set the temperature to 380°F (193°C) and cook for about 25-30 minutes, flipping halfway through. These garlic brown sugar chicken drumsticks taste great with many sides. I suggest serving them with rice or mashed potatoes. Roasted veggies also make a perfect pair. For a fresh touch, add a salad or some coleslaw. A light dipping sauce can add extra flavor too. Enjoy your meal! {{image_2}} You can make garlic brown sugar chicken drumsticks even better. Try adding spicy elements like sriracha. This gives the dish a nice kick. Mix in a tablespoon of sriracha to your marinade. It balances the sweet and savory flavors perfectly. Citrus flavors also work well. Squeeze some lemon or orange juice into the marinade. This adds freshness and brightens up the dish. You can use the zest as well for extra flavor. Citrus enhances the sweetness of the brown sugar. If you want to switch things up, use different sweeteners. Honey or maple syrup can replace brown sugar. These options add unique flavors that pair well with chicken. Use the same amount as the brown sugar in the recipe. For gluten-free options, try soy sauce substitutes. Coconut aminos or tamari are great choices. They give a similar taste without gluten. This way, everyone can enjoy the dish. You can make low-carb variations of this recipe. Substitute the brown sugar with stevia or erythritol. This keeps the sweetness while cutting carbs. If you're looking for dairy-free tips, you're in luck. This recipe is already dairy-free. Just ensure your soy sauce is dairy-free too. Enjoying tasty meals while sticking to your diet is easy! To keep your garlic brown sugar chicken drumsticks fresh, store them in the fridge. Place the cooled drumsticks in an airtight container. They will stay good for up to four days. If you want to keep them longer, consider freezing. Freezing is a great option for cooked chicken drumsticks. First, let them cool completely. Then, wrap each drumstick tightly in plastic wrap. Place the wrapped drumsticks in a freezer-safe bag. They can last for up to three months. When you are ready to eat, thaw them in the fridge overnight. Reheat your drumsticks to keep them juicy and tasty. The best way is to use the oven. Preheat the oven to 350°F (175°C). Place the drumsticks on a baking sheet. Cover them with foil to keep moisture in. Heat for about 20 minutes or until warm. You can also microwave them, but this may make them a bit dry. Enjoy your delicious chicken! You can marinate chicken drumsticks for at least 30 minutes. For deeper flavor, I suggest marinating for up to 4 hours. The longer you marinate, the more the flavors soak in. Just remember to keep them in the fridge while marinating. Yes, you can use other cuts like chicken breasts, thighs, or wings. Each cut will have a different cooking time. Breasts may cook faster, while thighs and wings will be juicier. Adjust your timing based on the cut you choose. I love pairing these drumsticks with simple sides. Here are some great options: - Steamed broccoli - Garlic mashed potatoes - Creamy coleslaw - Fresh garden salad These sides balance the sweet and savory of the chicken. Absolutely! For air frying, preheat your air fryer to 380°F (193°C). Place the marinated drumsticks in a single layer. Cook for about 25-30 minutes, flipping halfway through. Check for a crispy skin and juicy inside. To check if the chicken is done, use a meat thermometer. Insert it into the thickest part of the drumstick. It should read at least 165°F (74°C). If you don’t have a thermometer, make sure the juices run clear when pierced. In this blog post, we explored a tasty recipe for garlic brown sugar chicken drumsticks. We covered the key ingredients, step-by-step instructions, and tips for cooking the best chicken. Remember, marinating adds flavor and options like grilling can change the dish. You can also try fun variations, like adding spicy flavors or using honey instead of sugar. Follow the storage tips to keep your leftovers fresh. Enjoy trying out this recipe and make it your own! Your meal will be both delicious and memorable.

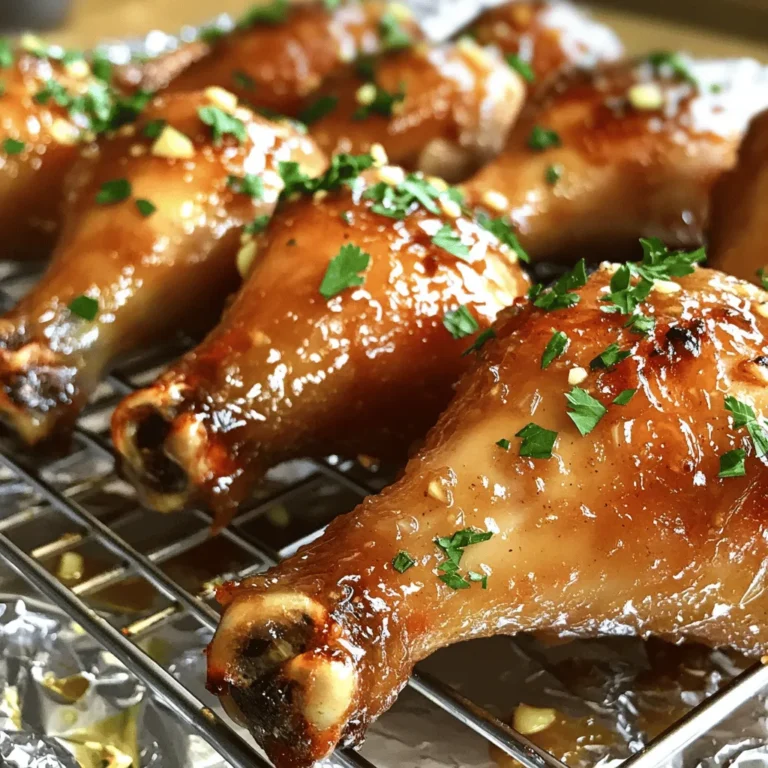
Garlic Brown Sugar Chicken Drumsticks Flavorful Recipe

- 1 medium head of cauliflower, chopped into florets - 1 cup shredded mozzarella cheese - ¼ cup grated Parmesan cheese - 2 large eggs - 1 teaspoon garlic powder - 1 teaspoon onion powder - Salt and pepper to taste - Optional: ¼ teaspoon red pepper flakes for heat - Fresh parsley, chopped (for garnish) Cauliflower is the star here. It gives the breadsticks their shape and low-carb goodness. I love using fresh cauliflower florets. They create a great texture when processed. Cheese adds flavor and cheesy goodness. I use mozzarella for its meltiness. Parmesan gives a rich, nutty kick. Eggs act as a binder. They help hold everything together. Garlic and onion powders add depth and warmth. Salt and pepper bring out all the flavors. If you like heat, try adding red pepper flakes. Fresh parsley makes a lovely garnish. It adds color and freshness. These ingredients combine for a tasty, cheesy treat. You can feel good about enjoying this snack. It’s both comforting and healthy! 1. Pulsing in the food processor: Start by chopping the cauliflower into small florets. Place these florets in your food processor. Pulse them until they look like small rice grains. This step is key to a good texture. 2. Cooking in the microwave: Transfer the pulsed cauliflower into a microwave-safe bowl. Microwave it on high for about 5 minutes. This softens the cauliflower, making it easier to mix later. 3. Squeezing out moisture: Once microwaved, let the cauliflower cool for a bit. Then, place it in a clean kitchen towel or cheesecloth. Squeeze out as much moisture as you can. This step is very important. Getting rid of excess moisture helps the breadsticks become crispy. 1. Combining ingredients in a bowl: In a large mixing bowl, combine the drained cauliflower, 1 cup of shredded mozzarella, ¼ cup of grated Parmesan, 2 large eggs, 1 teaspoon of garlic powder, 1 teaspoon of onion powder, and salt and pepper to taste. If you want some heat, add ¼ teaspoon of red pepper flakes. Mix everything well until it is fully incorporated. 2. Spreading the mixture on the baking sheet: Use your hands or a spatula to spread the mixture evenly onto your prepared baking sheet. Aim for a rectangle or square shape about ½ inch thick. Make sure it is even to cook well. 1. Preheating the oven: Preheat your oven to 425°F (220°C). This high temperature helps the breadsticks become golden and crispy. 2. Bake time and temperature: Place the baking sheet in the oven and bake for about 20-25 minutes. Keep an eye on them. You want them to turn golden brown and feel firm to the touch. 3. Tips for checking doneness: To check if they are done, gently press the center. If it feels firm and not soft, they are ready. If they need more time, return them to the oven for a few more minutes. Remove them when they look perfect. To get the best texture in your cheesy cauliflower breadsticks, moisture removal is key. After cooking the cauliflower, you must squeeze out all the water. This step helps the breadsticks become crispy, not soggy. Use a clean kitchen towel or cheesecloth for this. When you mix the ingredients, handle the mixture gently. Use your hands or a spatula to combine everything. Make sure all the cheese and seasonings blend well with the cauliflower. This will help create a uniform texture. To kick up the flavor, add herbs or spices. You can use dried oregano, basil, or Italian seasoning. These add great taste without extra calories. If you like some heat, sprinkle in red pepper flakes. Just a quarter teaspoon can add a nice kick to your breadsticks. Feel free to experiment! Different herbs can change the flavor profile. Don't be shy to mix and match. For serving, present your cheesy cauliflower breadsticks hot. A side of marinara sauce works great for dipping. You can also serve them with ranch or garlic sauce for extra flavor. Garnishing is easy! Simply sprinkle some chopped fresh parsley over the top. It adds color and freshness. You can also add extra cheese on top right before serving for a cheesy finish. This makes the dish look even more appetizing! {{image_2}} You can change the cheese for different tastes. Cheddar adds a sharp kick. Gouda brings a smoky flavor. You can even mix cheeses for fun. This way, you make the breadsticks your own. Experiment with soft cheeses like ricotta for a creamier texture. Just remember, the cheese should melt well to hold everything together. Adding more veggies can boost nutrition. Try mixing in finely chopped spinach or bell peppers. You can also add herbs like basil or oregano for flavor. For a twist, add sun-dried tomatoes or olives. These options keep your breadsticks fresh and tasty. If you want a low-carb option, consider using almond flour in place of breadcrumbs. This adds texture without the carbs. You can easily make these breadsticks gluten-free. Just ensure all your cheese and other ingredients are certified gluten-free. For a vegetarian option, these breadsticks fit perfectly. They use no meat, making them good for all diets. Just check your cheese choices to ensure they meet your needs. You can enjoy these tasty bites without worry. To store your cheesy cauliflower breadsticks, let them cool first. Place them in an airtight container. This keeps them fresh and prevents them from drying out. You can also use parchment paper between layers if you stack them. This avoids sticking. Store them in the fridge for up to 3 days. To freeze the breadsticks, let them cool completely. Wrap each stick in plastic wrap. Then, place them in a freezer bag. This helps prevent freezer burn. You can freeze them for up to 3 months. To use them, thaw them overnight in the fridge. After that, reheat in the oven at 350°F (175°C) for about 10-15 minutes. This makes them hot and crispy again. In the fridge, these breadsticks last for about 3 days. If you freeze them, they can stay good for 3 months. Always check for any signs of spoilage before eating. Enjoy your tasty low-carb snack anytime! To make your breadsticks crispier, focus on removing moisture. After microwaving the cauliflower, use a clean kitchen towel to squeeze out as much water as you can. Less moisture means a better crunch. Also, consider baking them longer. Keep an eye on them until they turn golden brown. For extra crispiness, spread the mixture thinner on the baking sheet. Yes, you can use frozen cauliflower. Just make sure to thaw it fully before cooking. After thawing, drain any excess water. You'll still want to pulse it in the food processor and squeeze out moisture as you would with fresh cauliflower. This helps keep your breadsticks firm. These breadsticks pair well with many dips. A classic choice is marinara sauce. You can also try ranch dressing or a garlic aioli for added flavor. For something fresh, serve them with a side of chopped veggies. They make a great snack during game night or as a side for your family dinner. Creating Cheesy Cauliflower Breadsticks is simple and rewarding. We explored the main ingredients, including cauliflower, cheese, and seasonings, and discussed step-by-step preparation methods. I shared tips for texture, flavor enhancements, and presentation ideas that elevate your dish. Plus, we looked at variations to suit various diets. You can easily store leftovers and enjoy them later. With these insights, you can make delicious, healthy breadsticks that impress friends and family. Enjoy making them your own!

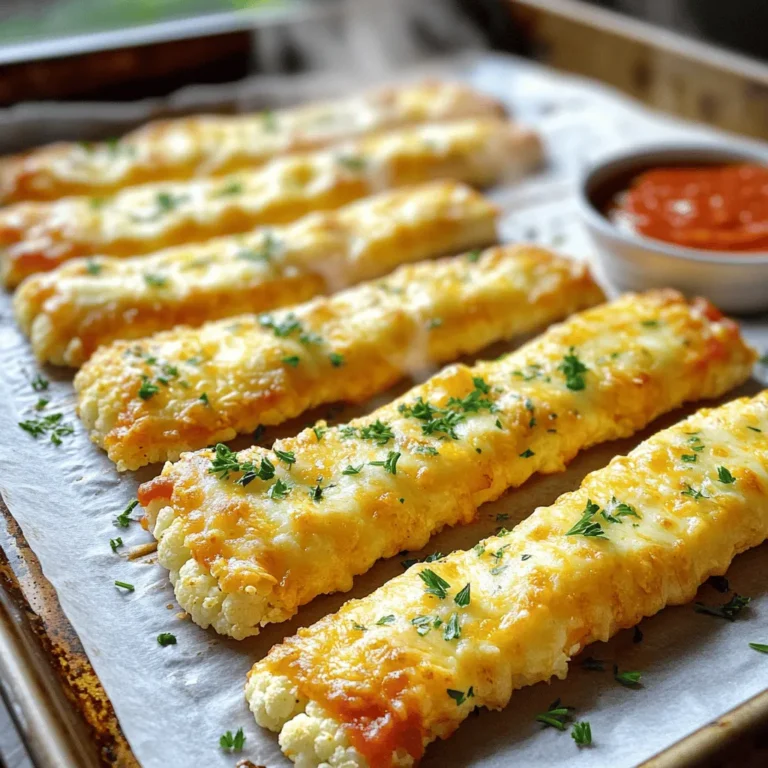
Cheesy Cauliflower Breadsticks Tasty Low-Carb Snack

- 2 boneless, skinless chicken breasts - 2 cups fresh spinach leaves, washed and dried - 1 cup heavy cream - 1 cup chicken broth The main ingredients come together to create a rich and filling dish. The chicken breasts are the star of the show. They provide protein and a nice texture. Fresh spinach adds a lovely color and a boost of nutrients. Heavy cream and chicken broth create a smooth and creamy sauce that ties everything together. - 3 cloves garlic, minced - 1 small onion, finely chopped - 1/2 cup grated Parmesan cheese - 2 tablespoons olive oil - 1 tablespoon lemon juice - 1 teaspoon Italian seasoning - Salt and pepper to taste The seasonings elevate the dish's flavor. Garlic and onion add depth and aroma. Parmesan cheese gives a salty, nutty taste that blends beautifully with the cream. Olive oil helps cook the chicken and add richness. Lemon juice brightens the sauce and cuts through the creaminess. Italian seasoning provides a warm, herbal note that makes this dish feel comforting. Each ingredient plays a vital role in creating a balanced and delicious meal. {{ingredient_image_1}} Seasoning Techniques Start by seasoning the chicken breasts. Use salt, pepper, and Italian seasoning. Make sure to coat both sides well. This step adds flavor and depth to your dish. Cooking Chicken to Perfection Heat olive oil in a large skillet over medium heat. Once it's hot, add the chicken breasts. Cook them for 6-7 minutes on each side. Look for a golden brown color and ensure they are cooked through. After cooking, remove the chicken and set it aside. Sautéing Aromatics In the same skillet, add the chopped onion and minced garlic. Sauté them for about 3-4 minutes. You want the onion to become soft and see-through. This will build a great base for your sauce. Combining Ingredients for the Sauce Pour in the chicken broth. Use a spatula to scrape up any brown bits. This adds flavor! Let the broth simmer for about 3 minutes. Next, stir in the heavy cream and bring it to a gentle simmer. Add the grated Parmesan cheese and lemon juice. Mix until the cheese melts and everything combines well. Wilting the Spinach Now it’s time to add the fresh spinach leaves to your creamy sauce. Stir them in and let them wilt for about 2 minutes. They should become tender but still bright green. Final Steps Before Serving Return the cooked chicken to the skillet. Spoon the creamy spinach sauce over the chicken. Heat everything through for an additional 2-3 minutes. Your dish is now ready to serve! Enjoy this warm, rich meal. - Ensuring the Chicken Stays Moist To keep the chicken juicy, do not overcook it. Cook it for 6-7 minutes per side. Use a meat thermometer to check for doneness. The chicken should reach 165°F. Resting the chicken for a few minutes before slicing helps keep moisture inside. - Perfecting Cream Consistency To make the cream sauce thick and smooth, stir the heavy cream gently. Avoid boiling the sauce too hard; this can cause it to split. If the sauce is too thick, add a bit of chicken broth. For a richer flavor, use more Parmesan cheese. - Garnishing Ideas For a beautiful touch, sprinkle extra Parmesan cheese on top before serving. Add a slice of lemon or a sprig of fresh parsley for color. You can also drizzle a bit of olive oil for shine. - Serving Suggestions Plate the chicken on a bed of creamy spinach sauce. Serve it with crusty bread or over pasta for a filling meal. You can also pair it with a side salad to balance the richness. Pro Tips Perfectly Cooked Chicken: Use a meat thermometer to ensure your chicken reaches an internal temperature of 165°F (75°C) for optimal juiciness. Customize the Greens: Experiment with different leafy greens such as kale or Swiss chard for a unique twist on flavor and nutrition. Make it Lighter: Substitute half-and-half or a plant-based cream alternative if you want a lighter version of the dish without sacrificing creaminess. Add Extra Flavor: Incorporate sun-dried tomatoes or olives into the creamy sauce for an added layer of flavor that complements the spinach beautifully. {{image_2}} Using Different Proteins You can use other proteins for this dish. Try using turkey or shrimp. Both options work well and add a twist. You can even use tofu for a vegetarian choice. It absorbs flavors nicely and complements the creamy sauce. Alternative Cream Options Heavy cream gives the dish a rich flavor, but you have options. You can swap it with half-and-half for a lighter taste. Coconut milk is another option for a unique flavor. It adds a hint of sweetness and works great with the spices. Pairing with Sides Creamy Chicken Florentine is best with sides that balance its richness. Serve it with rice or mashed potatoes. A fresh salad also pairs well, adding crunch and brightness. Garlic bread is a great choice too, perfect for soaking up the sauce. Serving as a Pasta Dish You can turn this dish into a pasta delight. Simply serve the creamy chicken and spinach over cooked pasta. Fettuccine or penne works best, as they hold the sauce well. This creates a filling meal that everyone will love. Best Methods for Reheating You can reheat Creamy Chicken Florentine in a skillet or microwave. If using a skillet, heat it on low. Add a splash of chicken broth or cream to keep it moist. Stir gently until it’s hot. In a microwave, place the dish in a safe bowl. Cover it and heat in 30-second bursts. Stir in between until warm. Maintaining Flavor and Texture To keep the flavor and texture, avoid high heat. High heat can dry out the chicken and make the sauce grainy. Adding a little liquid when reheating helps keep the cream smooth. How to Freeze Creamy Chicken Florentine To freeze, let the dish cool completely. Place it in an airtight container or freezer bag. Make sure to remove as much air as possible. Label the bag with the date. It can last for up to three months in the freezer. Thawing and Reheating Tips Thaw Creamy Chicken Florentine in the fridge overnight. This keeps the chicken safe and helps it thaw evenly. When ready to heat, follow the same reheating tips. Adding a little broth or cream will help bring back its creamy texture. Enjoy your meal just like fresh! Creamy Chicken Florentine is a rich dish made with chicken and spinach. The tender chicken cooks in a creamy sauce made from heavy cream, chicken broth, and Parmesan cheese. Fresh spinach adds bright color and nutrients. This dish is not only hearty but also full of flavor. It's perfect for a cozy dinner at home. You can add more flavor in several ways. Here are some ideas: - Add more spices: Try using red pepper flakes for heat or smoked paprika for depth. - Use fresh herbs: Basil, thyme, or parsley can brighten the dish. - Incorporate sun-dried tomatoes: They add a tangy taste and extra color. - Mix in different cheeses: Goat cheese or feta can add creaminess and zest. These tweaks can make your dish unique and exciting. Yes, you can make this dish ahead. Here are some tips: - Cook the chicken and sauce: Prepare everything as per the recipe, but don’t add the spinach yet. - Store in the fridge: Keep the chicken and sauce in an airtight container for up to 2 days. - Reheat before serving: When ready, heat the dish on low and stir in fresh spinach until it wilts. This way, you can enjoy a delicious meal without stress on busy days. Creamy Chicken Florentine combines tender chicken, fresh spinach, and a rich sauce. We discussed key ingredients, cooking steps, and tasty variations. You can switch proteins and cream types for a new twist. Remember to follow the reheating tips to keep flavors intact. This dish not only delights your taste buds but also impresses at dinner. Enjoy making it your own, and don’t hesitate to experiment. Your culinary journey with Creamy Chicken Florentine can be both fun and rewarding.

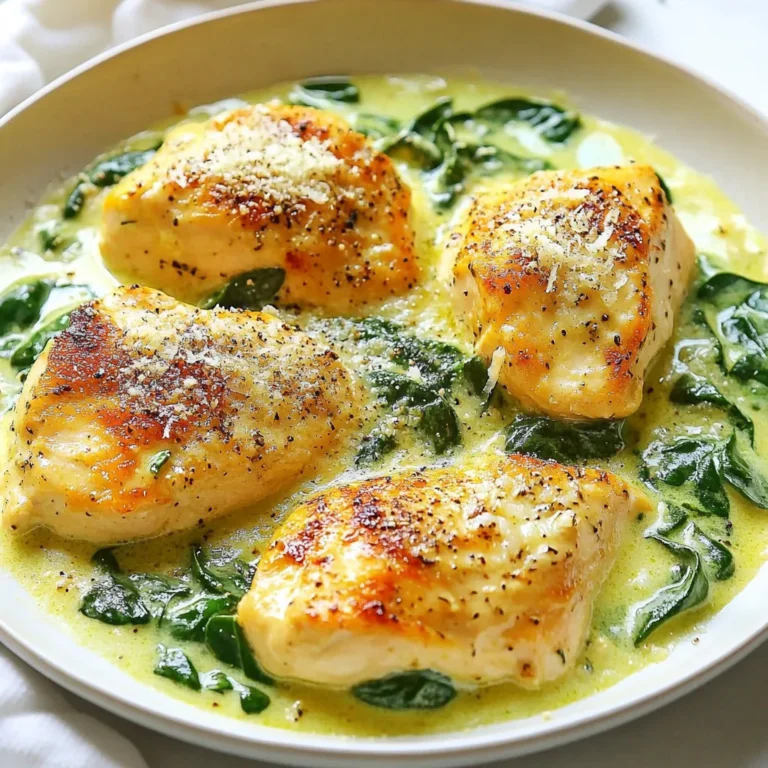
Creamy Chicken Florentine Hearty and Flavorful Dish

- 4 boneless, skinless chicken breasts - 1 cup balsamic vinegar - 1/4 cup honey - 2 tablespoons Dijon mustard - 2 tablespoons olive oil - 2 cloves garlic, minced - Salt and pepper to taste - 1 teaspoon fresh rosemary, chopped (or 1/2 teaspoon dried) - Fresh basil leaves for garnish To make balsamic glazed chicken, start with the chicken breasts. Choose fresh, boneless, and skinless options for the best taste and texture. They cook evenly and stay juicy. Next, balsamic vinegar is key. It adds a deep, sweet tang that brings life to the dish. Honey balances the vinegar's sharpness, giving a rich flavor. Dijon mustard brings a hint of spice and depth. Don’t forget your garlic! Minced garlic adds a warm, savory note. Fresh rosemary rounds out the flavor with its earthy scent. Use fresh if you can, but dried works too. Lastly, olive oil adds richness and helps with cooking. Season with salt and pepper to boost all the flavors. For garnish, fresh basil leaves add color and a burst of freshness. This simple list of ingredients brings together bold flavors to create an unforgettable meal. {{ingredient_image_1}} To start, grab a small saucepan. In it, mix one cup of balsamic vinegar, a quarter cup of honey, two tablespoons of Dijon mustard, and two minced cloves of garlic. Stir this well, then heat it on medium. You want to bring it to a gentle simmer. Simmering is key because it helps the glaze thicken. After about 10 to 15 minutes, you will notice it reducing into a rich sauce. When it looks shiny and coats a spoon, it is ready. Remove it from the heat and let it cool slightly. While the glaze cools, take four boneless, skinless chicken breasts. Season both sides with salt and pepper. This step adds a lot of flavor. Next, heat two tablespoons of olive oil in a large skillet over medium-high heat. Make sure the oil is hot before adding the chicken. This helps create a beautiful golden brown crust. Place the chicken breasts in the skillet, leaving some space between them. Cook the chicken for about 6 to 7 minutes on one side. When it is golden brown, flip the chicken over. Now, pour half of the balsamic glaze over the top. Cook for another 6 to 7 minutes. To know if the chicken is done, use a meat thermometer. The inside must reach 165°F (75°C) for safety. Once cooked, remove the chicken from the skillet. Let it rest for a few minutes. Drizzle the remaining glaze over the chicken before serving. This adds extra flavor and shine. To know if your balsamic glaze is ready, look for a thick, syrupy texture. It should coat the back of a spoon. When you taste it, the flavor should be sweet and tangy. You can enhance the glaze by adding fresh herbs. Rosemary or thyme works great. A pinch of salt can also balance the sweetness. Use a heavy skillet, like cast iron, for even heat. This helps the chicken cook perfectly. Start at medium-high heat to get a nice sear. Once you flip the chicken, lower the heat to medium. This keeps it juicy and tender. For sides, serve with roasted vegetables or a fresh salad. Quinoa or rice also pairs well. For plating, place the chicken in the center of the plate. Drizzle with extra glaze and add fresh basil on top. This makes your dish look stunning and appetizing. Pro Tips Marinate for More Flavor: For an even richer taste, marinate the chicken in the balsamic mixture for at least 1 hour or overnight in the refrigerator. Use Fresh Herbs: Fresh rosemary and basil provide a vibrant flavor profile. If using dried herbs, remember that their flavor is more concentrated, so use less. Check Temperature: Ensure the chicken is fully cooked by checking that it reaches an internal temperature of 165°F (75°C) using a meat thermometer. Serve with Sides: This dish pairs wonderfully with roasted vegetables, a fresh salad, or creamy mashed potatoes for a complete meal. {{image_2}} You can swap honey for maple syrup or agave nectar. Both options add sweetness. If you want a tangy kick, use apple cider vinegar instead of balsamic. For Dijon mustard, try yellow mustard or stone-ground mustard. Each brings a unique taste. Herbs can change the dish too. Instead of rosemary, use thyme or oregano. Fresh herbs often add bright flavors. Dried herbs work well too, but use less. They are stronger than fresh herbs. Grilling the chicken gives it a smoky flavor. It’s fun and great for summer. Just brush the glaze on while grilling. This keeps the chicken juicy and tasty. Pan-searing is easy and quick. You get a nice brown crust. Use a heavy skillet for best results. If you prefer slow cooking, it works too. Just add the chicken and glaze to the slow cooker. Cook on low for 6-8 hours. The chicken becomes tender and full of flavor. You can also bake the chicken in the oven. Place it in a dish and pour the glaze over. Bake at 375°F for 25-30 minutes. This method keeps the chicken moist. For gluten-free options, check labels on the balsamic vinegar. Most are safe, but some may contain gluten. To make it low-carb, skip the honey. Use a sugar substitute like erythritol. This keeps the sweetness without the carbs. If you follow a paleo diet, you may use coconut aminos instead of balsamic vinegar. This keeps the essence while fitting your needs. Always adjust recipes to fit your diet. Cooking should be fun and flexible! Store your balsamic glazed chicken in an airtight container. This keeps it fresh. It will last in the fridge for about 3 to 4 days. Make sure to let it cool before sealing. This avoids steam buildup, which can make it soggy. To freeze your balsamic glazed chicken, wrap it tightly in plastic wrap. Then, place it in a freezer-safe bag. This helps prevent freezer burn. It can stay in the freezer for up to 3 months. When you’re ready to eat, thaw it in the fridge overnight. For reheating, place it in a skillet over low heat. This keeps it juicy and full of flavor. You can easily add balsamic glazed chicken to your weekly meal plan. Cook a batch on Sunday. Portion it out for lunches or dinners. It works great in salads, wraps, or with rice. You can also make the glaze ahead of time. Store it in the fridge for up to a week. This makes cooking easy on busy nights. Balsamic glazed chicken is a savory dish that blends chicken with a sweet-tangy sauce. The dish comes from Italy, where balsamic vinegar has deep roots. The glaze combines balsamic vinegar, honey, and Dijon mustard for a rich flavor. This mix gives the chicken a shiny, sticky coating that is hard to resist. People love this dish for its balance of sweet and savory notes. To check if chicken is fully cooked, use a meat thermometer. The safe internal temperature is 165°F (75°C). You can also look for clear juices when you cut into the chicken. If the juices run clear, it’s ready to eat. The chicken should feel firm to the touch, not soft. These cues help ensure your chicken is safe and tasty. Yes, you can use other meats with balsamic glaze. Pork tenderloin is a great option. It absorbs flavors well and cooks nicely. You can also try chicken thighs or turkey breasts. Each meat will give a unique taste but still pair well with the glaze. Just remember to adjust cooking times for each type of meat. To make balsamic glazed chicken healthier, try these tips. Use less honey to cut down on sugar. You can also swap boneless chicken breasts for skinless chicken thighs. Another option is to use low-sodium soy sauce instead of salt. Adding more herbs like parsley or thyme can boost flavor without extra calories. These changes keep the dish tasty and light. Balsamic glazed chicken is a delicious dish that’s easy to make. We covered key ingredients, step-by-step cooking methods, and helpful tips. You can customize it with different flavors or diets. Proper storage ensures your leftovers stay fresh. Cooking this dish lets you impress family and friends. Enjoy tasty meals with simple planning and preparation. Make it your own, and don’t hesitate to experiment. Your kitchen adventures can thrive with this flavorful recipe!

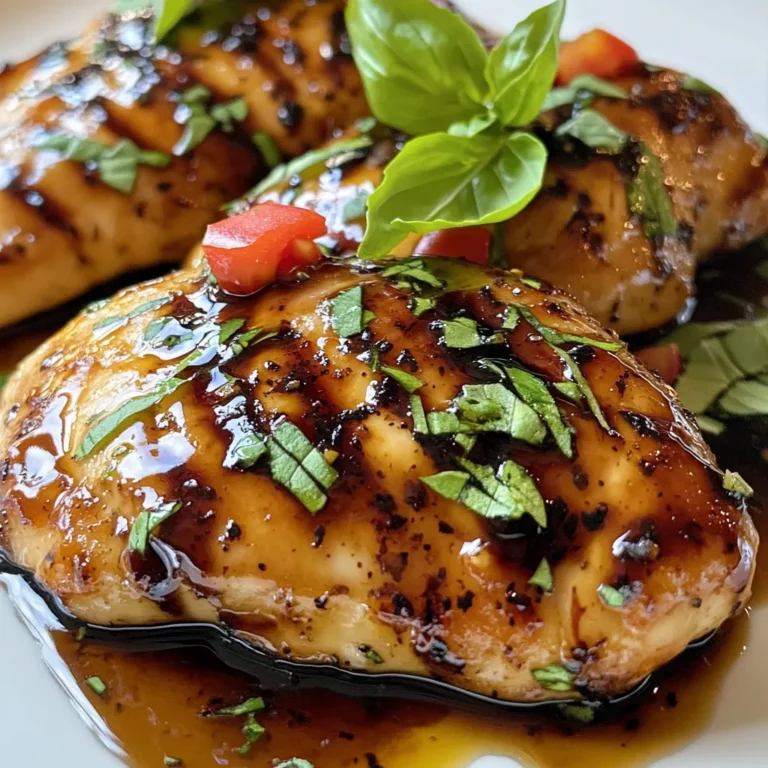
Balsamic Glazed Chicken Irresistible Flavor Journey

To make these tasty bars, gather these simple ingredients: - 1 cup all-purpose flour - 1 cup rolled oats - 1/2 cup brown sugar, packed - 1/2 teaspoon baking powder - 1/4 teaspoon salt - 1/2 cup unsalted butter, melted - 1 cup mixed berries (strawberries, blueberries, raspberries) - 2 tablespoons honey or maple syrup - 1 tablespoon lemon juice - 1 teaspoon vanilla extract - 1 tablespoon cornstarch These ingredients create a great balance of sweet and tart. The oats add texture, while the berries give a burst of flavor. You may not have every ingredient. Here are some swaps: - Use whole wheat flour instead of all-purpose flour for added fiber. - Quick oats can replace rolled oats if that’s what you have. - If you lack brown sugar, white sugar works too, but the flavor changes slightly. - Coconut oil can replace butter for a dairy-free option. These substitutions keep the bars tasty and friendly for different diets. Want to make your bars healthier? Try these options: - Use almond flour or oat flour for a gluten-free choice. - Swap honey or maple syrup with agave nectar for lower sugar. - Add chia seeds for extra fiber and omega-3s. These healthier swaps keep the flavor while adding nutritional value. You can enjoy these bars without guilt. Start by preheating your oven to 350°F (175°C). Grab an 8x8 inch baking dish. Grease it lightly with butter or cooking spray. Then, line it with parchment paper. Leave some paper hanging over the edges. This helps you pull the bars out easily later. In a large bowl, combine the following: - 1 cup all-purpose flour - 1 cup rolled oats - 1/2 cup brown sugar, packed - 1/2 teaspoon baking powder - 1/4 teaspoon salt Mix these ingredients well. Pour in 1/2 cup melted butter. Stir with a spoon until it looks crumbly. Set aside about 1 cup of this mixture for later. In another bowl, add: - 1 cup mixed berries (strawberries, blueberries, raspberries) - 2 tablespoons honey or maple syrup - 1 tablespoon lemon juice - 1 teaspoon vanilla extract - 1 tablespoon cornstarch Gently fold the berries with the other ingredients. Make sure the berries are well coated. Press the remaining crumb mixture firmly into the bottom of the baking dish. Spread the berry mixture evenly on top. Sprinkle the reserved crumb mixture over the berries. Bake the dish for 25-30 minutes. Look for a golden brown top and bubbling berries. Once baked, remove the dish from the oven. Let the bars cool completely on a wire rack. Use the parchment paper to lift the bars out of the dish. Cut them into squares. For a nice touch, serve on a colorful plate. Dust with powdered sugar and add fresh berries for garnish. To get that ideal crumb texture, use cold butter. It helps keep the mixture crumbly. Cut the butter into small pieces. Mix it quickly to avoid melting. Aim for pea-sized clumps in your crumble. This gives a nice crunch when baked. If it feels too wet, add more oats or flour. You can mix and match berries to suit your taste. Try blackberries or cherries for a twist. For a fun summer treat, use peaches with berries. Each berry brings its own flavor. Adjust the honey or maple syrup based on sweetness. This keeps the balance just right. Store leftover bars in an airtight container. Keep them in the fridge for up to five days. To freeze, wrap each bar in plastic wrap. Place them in a freezer bag. They can last up to three months. Just thaw in the fridge before serving. This way, you’ll always have a tasty treat ready! {{image_2}} You can change the berries based on the season. In spring, use fresh strawberries. Summer is great for blueberries and blackberries. In fall, try apples or cranberries. Each berry adds a unique taste. Mixing berries gives a fun twist. You can even use your favorite jam if fresh berries are not available. To make the recipe vegan, swap butter for coconut oil or vegan butter. Use maple syrup instead of honey. For gluten-free bars, replace all-purpose flour with almond flour or gluten-free flour blend. Always check labels to ensure all ingredients are gluten-free. These changes keep the bars tasty and friendly for all diets. These bars shine as a snack or dessert. You can serve them warm or cold. Dust with powdered sugar for a pretty touch. Pair with a scoop of vanilla ice cream for a special treat. Fresh whipped cream also works well. Enjoy with a cup of tea or coffee for a cozy experience. To keep your Triple Berry Crumble Bars fresh, first let them cool completely. Once cool, cut them into squares. Place the bars in an airtight container. Store them in the fridge for up to a week. You can also leave them at room temperature for a day or two, but they will stay fresher in the fridge. If you want to save some for later, freezing is a great option. Wrap each square in plastic wrap. Then place the wrapped bars in a freezer-safe bag. They can last up to three months in the freezer. When you're ready to enjoy them, simply thaw them in the fridge overnight. To enjoy your bars warm, preheat your oven to 350°F (175°C). Place the bars on a baking sheet. Heat them for about 10 minutes. This method keeps the crumbly topping nice and crisp. If you want a quick fix, you can also use a microwave. Heat them for about 15-20 seconds. Just be careful not to overheat, or the bars might get tough. Yes, you can use frozen berries. Just make sure to thaw them first. Drain any extra juice to keep the bars from getting soggy. Frozen berries work well and save time. Triple Berry Crumble Bars last about five days at room temperature. Store them in an airtight container. You can also keep them in the fridge for up to a week. For longer storage, freeze them. Absolutely! You can add nuts or seeds to the crumble mixture. Try walnuts, almonds, or sunflower seeds. This will give your bars a nice crunch and additional flavor. Serve these bars with a dollop of whipped cream or a scoop of ice cream. Fresh berries on the side add color and taste. You can also enjoy them with a cup of tea or coffee. You've learned about the ingredients and steps for making Triple Berry Crumble Bars. You can swap common items for healthier options. Try different berry mixes for variety. Remember the best storage tips to keep them fresh. Whether baking for yourself or guests, these bars are a win. Enjoy each bite and feel proud of your work. With practice, you’ll make the perfect treat every time. Now, gather your ingredients and start baking!

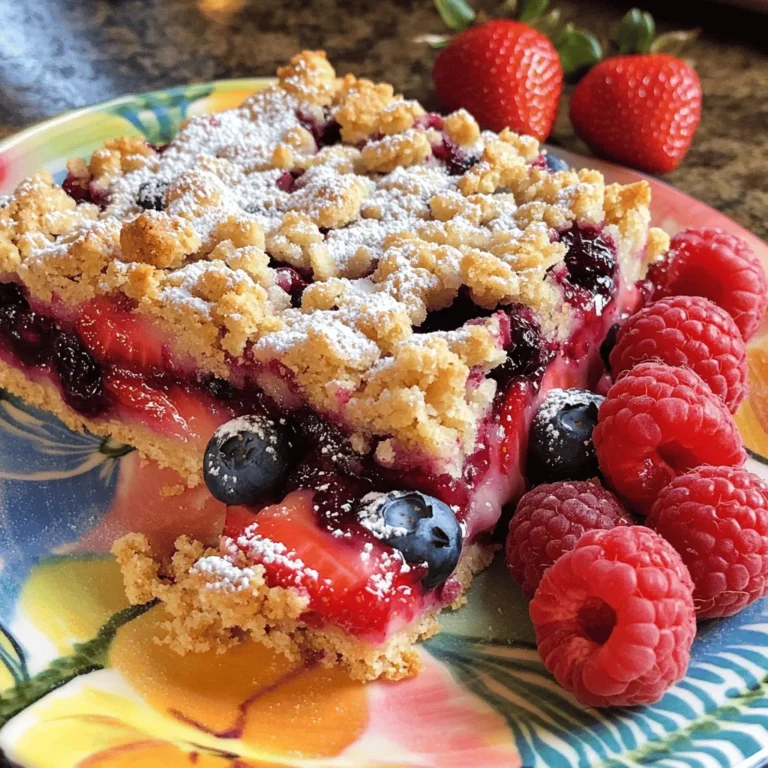
Triple Berry Crumble Bars Simple and Tasty Delight

PREV 1 … 37 38 39 … 57 NEXT
flavor nest kitchen

explore

DessertsDinnerAppetizersDrinks

Our Policies

  • Cookie Policy
  • Copyright Policy
  • Disclaimer
  • GDPR Policy
  • Terms Of Use
Back to Top
  • About
  • Contact Us
  • Privacy Policy
© 2025 flavor nest kitchen