FREE DINNER EBOOK! Get your copy!
  • Cookie Policy
  • GDPR Policy
  • Disclaimer
  • Terms Of Use
  • Visit my other site: Fun Cookie Recipes
flavor nest kitchen
  • Home
  • Dinner
  • Desserts
  • Drinks
  • Appetizers
  • Contact
  • About
  • Privacy Policy
  • Home
  • Dinner
  • Desserts
  • Drinks
  • Appetizers
  • Contact
  • About
  • Privacy Policy
  • Cookie Policy
  • GDPR Policy
  • Disclaimer
  • Terms Of Use
Visit my other site: Fun Cookie Recipes

HOME / CATEGORIES /

Latest

- 1 cup rolled oats - 1 cup coconut milk (or almond milk) - 1 ripe mango, diced - 1 tablespoon chia seeds - 1 tablespoon honey or maple syrup (optional) - 1/2 teaspoon vanilla extract - A pinch of salt - Toasted coconut flakes for garnish - Fresh mint leaves for garnish Coconut Mango Overnight Oats are simple to make and packed with flavor. They use rolled oats as a base, offering a chewy texture. You can choose coconut milk or almond milk based on your taste. Ripe mango adds natural sweetness and a lovely color. Chia seeds bring in healthy fats and help the oats thicken. You can sweeten the oats with honey or maple syrup, if you like. A dash of vanilla extract adds depth to the flavor. Just a pinch of salt balances all the tastes. For garnishes, toasted coconut flakes give a crunchy bite. Fresh mint leaves add a pop of color and freshness. Each ingredient plays a role in making this breakfast treat not only delicious but also visually appealing. Make sure you have all these items ready before you start. Having everything prepped makes the process smoother and faster. 1. Combining oats and chia seeds Start by taking a medium bowl. Add 1 cup of rolled oats and 1 tablespoon of chia seeds. Mix them well. This blend gives your oats a great texture and boosts nutrition. 2. Mixing wet ingredients Next, pour in 1 cup of coconut milk. Stir this mixture until it is smooth. If you want a touch of sweetness, add 1 tablespoon of honey or maple syrup. Then add 1/2 teaspoon of vanilla extract and a pinch of salt. Mix everything until combined. 3. Incorporating mango and assembling Now, fold in half of the diced mango. This adds a burst of flavor. Transfer the mixture into jars or containers. Seal them tightly to keep the flavors fresh. - Importance of chilling Chilling is key for perfect overnight oats. It helps the oats absorb the coconut milk. This makes them soft and creamy. - Recommended time for soaking Let your jars sit in the fridge overnight. If you’re in a hurry, four hours will work too. But overnight gives the best results. - Serving suggestions The next morning, stir the oats well. Top with the remaining diced mango. Add toasted coconut flakes for crunch. If you like, sprinkle fresh mint leaves on top for a fresh taste. - Final touches for presentation Serve your oats in clear jars. This shows off the beautiful layers. A few slices of mango on top make it look extra special. Enjoy this energizing breakfast treat! You can change the sweetness of your oats. A ripe mango is sweet enough for many. If you want more sweetness, add honey or maple syrup. Start with one tablespoon. Taste it and add more if needed. You can also use stevia or agave syrup for a healthier option. Getting the right texture is key. Use equal parts of rolled oats and liquid. For this recipe, one cup of oats needs one cup of coconut milk. Stir well before serving to mix the ingredients. This helps make your oats creamy and smooth. You can boost flavor with extracts or spices. A drop of vanilla extract adds warmth. Try a dash of cinnamon or nutmeg for a new twist. For garnishing, add toasted coconut flakes and fresh mint leaves. They give a nice crunch and a pop of color. {{image_2}} You can change the fruit for a fun twist. Other tropical fruits work great. Try pineapple or passion fruit for a new flavor. Seasonal fruits also shine in this dish. Berries in summer add a fresh taste. In fall, use apples or pears for a cozy feel. Adding different nuts can boost flavor and texture. Almonds and walnuts complement coconut well. They give a nice crunch. You can also mix in seeds like pumpkin or sunflower. These seeds are rich in vitamins and good fats. They help keep you full longer. You can choose from many milk options. Coconut milk makes the oats creamy and rich. Almond milk gives a lighter taste. If you prefer dairy, cow’s milk works well too. Each milk changes the flavor slightly. Experiment to find your favorite! To keep your coconut mango overnight oats fresh, use glass jars or airtight containers. These options seal in flavor and moisture. Store your oats in the fridge for up to three days. After that, they may lose texture or taste. Reheating is not necessary for overnight oats. They taste great cold! If you prefer them warm, heat them gently in the microwave. Add a splash of coconut milk to keep them creamy. Stir well and enjoy! Yes, you can freeze overnight oats! Portion them into freezer-safe containers. They can last up to three months in the freezer. When you’re ready to eat, thaw them in the fridge overnight. This keeps them fresh and tasty for your next breakfast. To make Coconut Mango Overnight Oats, start with rolled oats and chia seeds. Mix them in a bowl. Then, add coconut milk and stir until smooth. You can sweeten it with honey or maple syrup if you like. Add vanilla extract and a pinch of salt for flavor. Gently fold in half of the diced mango. Pour the mixture into jars and seal them. Let them sit in the fridge overnight or for at least four hours. This lets the oats soak up the milk and flavors. Overnight oats can last up to five days in the fridge. Keep them in tightly sealed jars. If you see any mold or notice a sour smell, it is best to toss them. Always check for signs of spoilage before eating. Yes, you can make Coconut Mango Overnight Oats ahead of time. They are great for meal prep. Prepare them on Sunday for a quick breakfast all week. Just remember to store them in the fridge. This makes mornings easy and delicious. Overnight oats are very healthy. They are high in fiber, which helps with digestion. The oats provide long-lasting energy. Chia seeds add omega-3 fatty acids, which are good for your heart. Coconut milk offers a creamy texture and healthy fats. Diced mango gives vitamins and natural sweetness. This breakfast is not only tasty but also full of nutrition. Coconut Mango Overnight Oats are simple to make and full of flavor. You combine basic ingredients like oats, chia seeds, and mango. We discussed how to prepare, chill, and serve these oats. You learned tips for sweetness and texture, alongside various mix-ins. Remember, these oats keep well, so meal prep is easy. Finally, feel free to experiment with your favorite fruits and nuts. Enjoy a healthy, tasty breakfast that fuels your day!

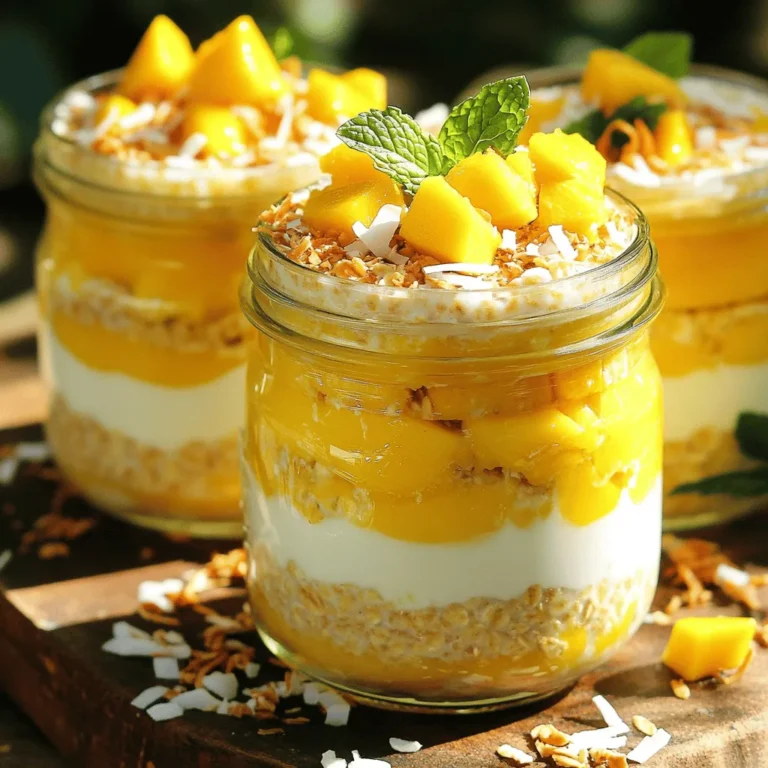
Coconut Mango Overnight Oats Energizing Breakfast Treat

- 4 medium zucchinis: Choose firm zucchinis for the best texture. They should be green and shiny. Each zucchini will be cut in half to make boats. - 1 pound shrimp, peeled and deveined: Use fresh or frozen shrimp. If using frozen, thaw them first. The shrimp should be pink and plump after cooking. - 2 cups cauliflower florets: These will add creaminess to the sauce. Fresh or frozen works well. They need to be cooked before blending. - 1 cup heavy cream: This makes the sauce rich and smooth. You can use light cream if you want a lighter dish. - 1 cup grated Parmesan cheese: Use freshly grated cheese for the best flavor. It adds a salty and nutty taste to the sauce. - 2 cloves garlic, minced: Fresh garlic gives a great aroma and depth to the sauce. You can adjust the amount based on your taste. - 1 tablespoon olive oil: This is for cooking the shrimp. It adds flavor and helps prevent sticking. - Salt and pepper to taste: Season the shrimp and sauce according to your preference. Start with a little and add more if needed. - 1 teaspoon Italian seasoning: This mix of herbs adds warmth and a classic Italian flavor to the dish. - Fresh parsley, chopped (for garnish): This adds a pop of color and freshness when you serve the dish. {{ingredient_image_1}} 1. Preheat the oven. Set it to 400°F (200°C). This gets it hot and ready for baking. 2. Prepare the zucchinis. Slice the zucchinis in half lengthwise. Use a spoon to scoop out the center. This will create your boats. Place them in a baking dish and set aside. 3. Blanch the cauliflower. In a pot of boiling water, add the cauliflower florets. Cook them for about 5 minutes. They should be tender but not mushy. Drain the cauliflower and move it to a food processor. 4. Make the Alfredo sauce. In the food processor, add the heavy cream, grated Parmesan cheese, minced garlic, Italian seasoning, salt, and pepper. Blend everything until it is smooth and creamy. This will be your rich Alfredo sauce. 1. Heat the olive oil. In a skillet, pour in the olive oil and heat it over medium heat. 2. Cook the shrimp. Add the peeled and deveined shrimp to the skillet. Sprinkle some salt and pepper on top. Cook for about 2-3 minutes on each side. The shrimp should turn pink and opaque. Once done, remove them from the heat. 1. Mix the shrimp and sauce. In a large bowl, combine the cooked shrimp with the Alfredo sauce. Stir well so every shrimp is coated in the sauce. 2. Fill the zucchini boats. Take the shrimp Alfredo mixture and spoon it into each zucchini boat. Fill them generously. 3. Bake the zucchinis. Place the filled zucchini boats in the preheated oven. Bake for 20-25 minutes. They should be tender yet still hold their shape. 4. Garnish. Once done, remove them from the oven. Let them cool slightly. Sprinkle some chopped parsley on top before serving. How to choose the right zucchinis: Pick firm zucchinis that are medium-sized. Look for smooth skin without blemishes. Smaller zucchinis are less watery and hold their shape better when baked. Tips for avoiding soggy boats: Scoop out just enough of the center to create a boat, but leave some flesh. This helps keep the zucchini sturdy. Also, bake them at a high temperature. This cooks them quickly and prevents sogginess. Suggestions for achieving the perfect consistency: For a thick sauce, blend the cauliflower well. If it’s too thick, add a bit more cream. Aim for a creamy texture that holds on to the shrimp well. Recommendations for seasoning adjustments: Taste your sauce before adding the shrimp. You may want to increase the garlic or Italian seasoning. This will enhance the flavors and make your dish pop. Pro Tips Use Fresh Shrimp: For the best flavor and texture, opt for fresh shrimp rather than frozen. If using frozen, make sure to thaw them properly before cooking. Don't Overcook the Zucchini: Bake the zucchini just until tender to maintain their shape and prevent them from becoming mushy. Customize Your Sauce: Feel free to add other herbs or spices to the Alfredo sauce, such as red pepper flakes for a bit of heat or nutmeg for warmth. Garnish for Presentation: A sprinkle of fresh parsley not only adds color but also enhances the dish’s flavor profile. Consider using grated lemon zest for an extra brightness. {{image_2}} You can swap heavy cream for Greek yogurt or coconut milk. Both options cut carbs and add creaminess. If you want a lighter sauce, use low-fat milk mixed with cornstarch for thickness. For cheese, try using mozzarella or goat cheese. You can even mix in some cheddar for a fun twist. Each cheese brings its own flavor. Experiment to find what you like best! To make this dish vegetarian, leave out the shrimp. Instead, add diced mushrooms or chopped spinach. Both options add great texture and taste. You can also use chickpeas for a protein boost. This way, you keep the creamy Alfredo sauce and still enjoy a filling meal. If you like heat, add chili flakes to your Alfredo sauce. Start with a pinch and taste as you go. You can also use spicy shrimp. Just season the shrimp with cayenne before cooking. This gives your dish a nice kick without overwhelming it! To keep your Shrimp Alfredo Zucchini Boats fresh, follow these steps. First, let the boats cool down to room temperature. This helps prevent moisture build-up. Next, place them in an airtight container. If you want to freeze them, wrap each boat tightly in plastic wrap before putting them in a freezer-safe bag. You can store them in the fridge for up to three days. For long-term storage, freeze them for up to three months. When you’re ready to enjoy your leftovers, reheating is key. To keep the zucchini firm, use the oven. Preheat it to 350°F (175°C). Place the zucchini boats on a baking sheet and cover them with foil. Bake for about 15 minutes. This warms them up without making them mushy. If you prefer the microwave, heat them in short bursts. Start with 30 seconds, then check if they’re hot. Adding a splash of cream can help keep the sauce creamy. Can I use frozen shrimp instead of fresh? Yes, you can use frozen shrimp. Just make sure to thaw them first. Thaw shrimp in cold water for about 15-20 minutes. Once thawed, pat them dry before cooking. This helps avoid excess water in your dish. How can I make this dish dairy-free? To make Shrimp Alfredo Zucchini Boats dairy-free, swap heavy cream with coconut cream or cashew cream. Use a dairy-free cheese like nutritional yeast for flavor. This keeps the creaminess without the dairy. What sides pair well with Shrimp Alfredo Zucchini Boats? Great sides for this dish include garlic bread, a fresh salad, or steamed veggies. These sides balance the rich flavors and add a light touch to your meal. They also make for a well-rounded dinner. In this post, we explored how to create flavorful Shrimp Alfredo Zucchini Boats. We covered the key ingredients, from zucchinis to shrimp. The step-by-step instructions helped you prepare, cook, and assemble the dish. You learned tips for the best zucchini boats and sauce. We also shared fun variations to mix things up and valuable storage tips for leftovers. I hope these ideas inspire you to cook and enjoy this tasty dish. Happy cooking!

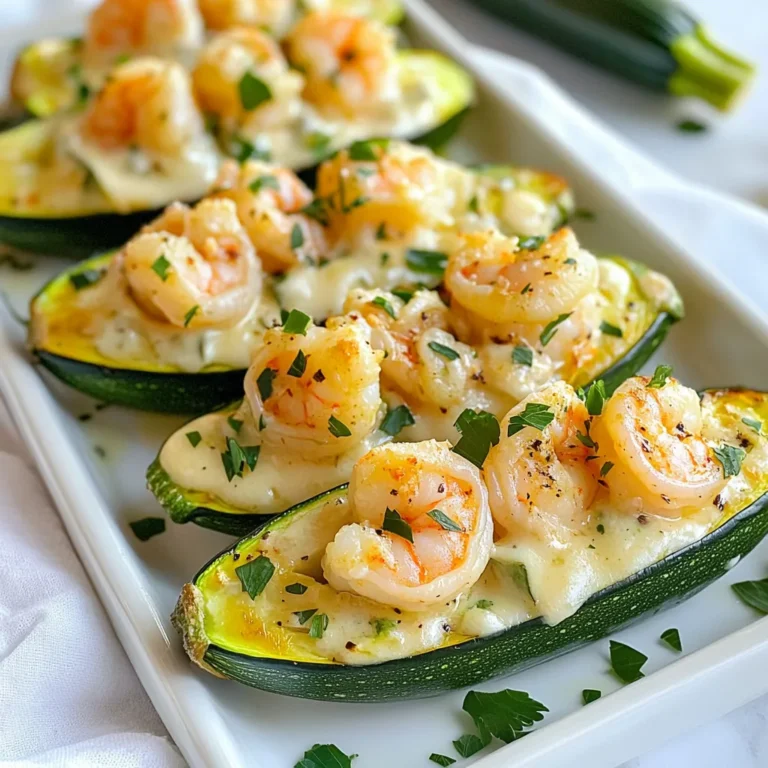
Savory Shrimp Alfredo Zucchini Boats Simple Recipe

- 8 oz linguine pasta - 1 lb large shrimp, peeled and deveined - 4 tablespoons unsalted butter - 4 cloves garlic, minced - 1/2 teaspoon red pepper flakes (adjust to taste) - 1 tablespoon lemon juice - Salt and pepper to taste - 1/4 cup fresh parsley, chopped - Zest of 1 lemon - Grated Parmesan cheese for serving When you measure the ingredients, accuracy helps. Use a kitchen scale for shrimp. For pasta, a standard measuring cup works well. Measure butter with a tablespoon. Garlic should be minced finely for the best flavor. For lemon juice, a tablespoon gives a nice zing without overpowering. Always try to use fresh ingredients when you can. Fresh shrimp taste better than frozen. Fresh parsley adds a bright note that dried cannot match. You can use dried garlic in a pinch, but fresh gives more flavor. The zest from fresh lemons brings a unique aroma that dried lemon cannot replicate. To start, grab a large pot and fill it with water. Add a good amount of salt. Bring it to a boil over high heat. Once the water is boiling, add the linguine. Cook it according to the package directions until it is al dente. This usually takes about 8 to 10 minutes. When it’s done, drain the pasta. Be sure to save 1/2 cup of the pasta water for later. Next, take a large skillet and set it over medium heat. Add 4 tablespoons of unsalted butter to the skillet. Let it melt fully. Once the butter is melted, add 4 minced garlic cloves and 1/2 teaspoon of red pepper flakes. Sauté this mix for about 1 to 2 minutes. You want to smell that rich garlic scent without burning it. Be careful here; burnt garlic can ruin the dish! Now, it’s time for the shrimp. Add 1 pound of peeled and deveined shrimp to the skillet. Season with salt and pepper. Cook the shrimp for about 3 to 4 minutes. They should turn pink and opaque. Make sure to turn them occasionally so they cook evenly. After the shrimp are ready, stir in 1 tablespoon of lemon juice and the reserved pasta water. Then, add the cooked linguine to the skillet. Toss everything well to coat the pasta in that delightful garlic butter sauce. Finally, sprinkle in 1/4 cup of chopped parsley and the zest of 1 lemon. Toss again to mix everything nicely. Taste and adjust the seasoning if needed. Serve your garlic butter shrimp linguine hot. Don’t forget to add some grated Parmesan cheese on top for an extra touch! Enjoy your meal! To get the best garlic taste, use fresh garlic. Fresh garlic gives a strong flavor. I recommend mincing it finely. This helps release its oils. Sauté the garlic in butter for one to two minutes. Watch it closely so it does not burn. Overcooked garlic turns bitter. If you like heat, add red pepper flakes. Adjust the amount to fit your taste. For tender shrimp, do not overcook them. Cook shrimp for three to four minutes. They should turn pink and opaque. If they curl tightly, you have cooked them too long. Remove them from heat as soon as they are done. To help keep shrimp tender, let them rest after cooking. This allows them to absorb flavors. One common mistake is not salting the pasta water. Salt helps flavor the pasta early on. Another mistake is adding shrimp to cold butter. Start with medium heat to warm the butter first. This helps cook the shrimp evenly. Finally, avoid skipping the lemon juice. It brightens the dish and balances the flavors. {{image_2}} For a gluten-free option, use gluten-free linguine. Many brands offer good substitutes. Look for pasta made from rice or corn. If you want a dairy-free dish, skip the butter. Use olive oil instead. This change gives you a light, healthy dish. You can also skip the Parmesan cheese or use a dairy-free version. Feel free to add vegetables to your dish. Spinach or cherry tomatoes work great. You can also use bell peppers for a crunch. Adjust the spice level with red pepper flakes. Add more for heat, or leave it out for a milder taste. If you like herbs, try fresh basil or oregano for a new flavor twist. While linguine is classic, other pastas work too. Spaghetti or fettuccine are good choices. You could even try penne or rigatoni for a fun shape. Each type brings a different texture. Just remember to adjust cooking times based on the pasta you choose. Enjoy experimenting with what you have at home! After enjoying your Garlic Butter Shrimp Linguine, let it cool. Place the leftovers in an airtight container. This keeps the dish fresh. Store it in the fridge for up to three days. Make sure to keep the shrimp and sauce together with the pasta for best flavor. To reheat, use the stovetop for the best results. Add a splash of water or broth to a pan. Heat it over medium heat. Stir often until warm. You can also use the microwave. Place it in a microwave-safe bowl. Cover it and heat for one to two minutes, stirring halfway through. If you want to freeze it, keep in mind that shrimp can change texture. For the best taste, freeze the pasta and sauce together. Use a freezer-safe bag or container. It will last up to three months in the freezer. When ready to eat, thaw it in the fridge overnight, then reheat as mentioned above. You can tell shrimp is cooked when it turns pink and opaque. It usually takes about 3 to 4 minutes in the pan. If you see the shrimp curl into a C shape, it is done. Overcooking can make shrimp tough, so keep an eye on it. Yes, you can use frozen shrimp! Just make sure to thaw it first. The best way is to leave it in the fridge overnight. If you are short on time, you can run it under cold water for about 10 minutes. Pat the shrimp dry before cooking. This helps the shrimp sear better. This dish pairs well with a crisp salad or garlic bread. A light green salad with lemon vinaigrette complements the rich flavors. You can also serve it with steamed vegetables for extra color and nutrition. For a special touch, add a glass of white wine alongside. This blog post covered everything you need for Garlic Butter Shrimp Linguine. We looked at ingredients, step-by-step cooking, tips, and storage. I shared tricks to perfect the flavors and avoid common mistakes. You can even make variations to fit your diet. In conclusion, use fresh ingredients for the best taste. Follow the steps carefully for great results. Enjoy your cooking!

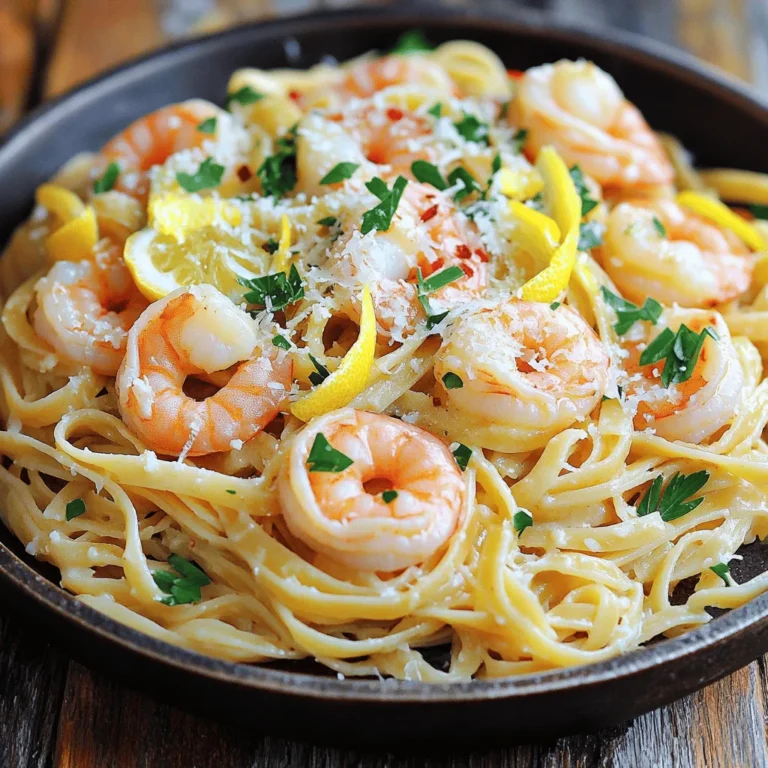
Garlic Butter Shrimp Linguine Flavorful and Easy Recipe

To make a tasty Hawaiian BBQ chicken pizza, gather these main ingredients: - 1 pre-made pizza crust - 1 cup cooked chicken breast, shredded - 1/2 cup barbecue sauce (preferably a sweet one) - 1 cup mozzarella cheese, shredded - 1/2 cup red onion, thinly sliced - 1/2 cup pineapple chunks, fresh or canned - 1/4 cup cilantro, chopped (for garnish) - 1 teaspoon olive oil - Salt and pepper to taste Each ingredient plays a key role. The chicken adds protein, and the barbecue sauce gives it that sweet and smoky flavor. Mozzarella cheese melts beautifully, while pineapple adds a sweet burst. The red onion adds crunch and bite, and cilantro brightens the dish. You can switch things up with these optional ingredients: - Jalapeños for heat - Bell peppers for crunch - Bacon for a smoky touch - Feta cheese for extra tang Feel free to mix in your favorites. This makes the pizza your own. For the best base, consider these crust options: - Thin crust for a crispy bite - Thick crust for a chewy texture - Cauliflower crust for a low-carb choice - Whole wheat crust for added fiber Choose the crust that fits your taste. All options work well with the toppings. Start by preheating your oven to 450°F (230°C). In a medium bowl, mix one cup of cooked, shredded chicken with half a cup of barbecue sauce. Stir until the chicken is well-coated. If you want a bolder taste, feel free to add more sauce. This mix gives your pizza the sweet and tangy flavor it needs. On a floured counter, take your pre-made pizza crust. Roll it out until it fits your baking sheet or pizza stone. Make sure it is even all around. Once it is rolled out, place it onto your baking sheet. Brush the edges lightly with olive oil. This helps achieve a nice golden brown color when baked. Spread the BBQ chicken mixture evenly across the crust. Leave a small border around the edges. Next, sprinkle one cup of shredded mozzarella cheese over the chicken. Add half a cup of thinly sliced red onion and half a cup of pineapple chunks on top of the cheese. Distribute them well for balanced flavors. Lightly season with salt and pepper to enhance the taste. Now, bake the pizza in your preheated oven for about 12-15 minutes. You want the crust to be golden and the cheese to bubble. Once done, take it out and let it cool for a minute. Finally, garnish with chopped cilantro before slicing and serving. Enjoy your Hawaiian BBQ Chicken Pizza! To get a great crust, choose a pre-made one that fits your taste. I like thin crusts for a crispy bite. If you want a softer crust, look for thicker options. Roll it out evenly on a floured surface. Brush the edges with olive oil. This helps the edges turn golden brown while baking. The sauce is key for flavor. I suggest using a sweet barbecue sauce. It pairs well with chicken and pineapple. Mix the shredded chicken with the sauce until it's well-coated. If you want more flavor, add more sauce. Don't forget the red onion for a nice crunch. It adds a bit of sharpness that balances the sweetness of the pineapple. For a fun presentation, serve the pizza on a wooden cutting board. This gives it a rustic look. Before cutting, sprinkle fresh cilantro on top. It adds color and a fresh taste. You can also add a small bowl of barbecue sauce on the side. This lets everyone dip their slices for extra flavor. {{image_2}} You can enjoy this pizza without meat. Use a mix of veggies instead of chicken. Try bell peppers, mushrooms, or zucchini. Toss them in barbecue sauce for flavor. This keeps all the taste but adds a fresh twist. You can also add some beans for protein. Black beans or chickpeas work great. They add a nice texture and flavor. If you like heat, jalapeños are a perfect fit. Slice fresh jalapeños and scatter them on top. You can also use pickled jalapeños for a tangy kick. Adjust the amount based on your heat level. Just remember, a little goes a long way! The spicy flavor pairs well with the sweet barbecue sauce. While mozzarella is classic, you can mix it up. Try using smoked gouda or pepper jack for a unique taste. Cheddar cheese also adds a sharp flavor. Mix and match different cheeses for fun. Just ensure they melt well and blend with the toppings. This way, each bite is a tasty surprise! To keep your Hawaiian BBQ chicken pizza fresh, let it cool first. Then, wrap it tightly in plastic wrap or foil. You can also use an airtight container. Store it in the fridge. This method keeps the pizza from drying out or getting soggy. For the best taste, reheat your pizza in the oven. Set the oven to 350°F (175°C). Place the pizza on a baking sheet. Bake it for about 10-12 minutes. This makes the crust crispy again. You can also use a microwave, but it may make the crust soft. If you use the microwave, heat it for 30 seconds at a time until warm. You can store leftover Hawaiian BBQ chicken pizza in the fridge for about 3-4 days. If you want to keep it longer, place it in the freezer. It can last up to 2 months in the freezer. Just remember to wrap it well. When you're ready to eat it, thaw it in the fridge overnight before reheating. I love using a sweet barbecue sauce for this pizza. A sauce like honey BBQ adds a great flavor. You can also try teriyaki sauce for a fun twist. The sweet taste works well with chicken and pineapple. If you want a bit of spice, choose a sauce with a kick. This adds depth to the flavors. Yes, you can make your pizza crust from scratch! It is easy and fun. Mix flour, yeast, water, and salt to create the dough. Knead it until smooth, then let it rise. I often use pre-made crust for quick meals, but making your own is a great way to enjoy the process. Homemade crust can taste fresher and more special. Hawaiian BBQ Chicken Pizza goes well with several side dishes. A fresh green salad is a good choice. You can also serve coleslaw for a crunchy texture. Fruit salad adds a sweet touch that complements the pizza. If you want something warm, try garlic bread. These sides balance the meal and make it even more enjoyable. Hawaiian BBQ chicken pizza is fun and tasty. We covered the main and optional ingredients, helping you tailor the dish. Step-by-step instructions made it easy to prepare and assemble your pizza. I shared tips for perfect crust and flavors, plus ways to present it nicely. Don't forget the variations to suit your taste, like vegetarian options or spicy jalapeños. With proper storage and reheating, your leftovers will stay scrumptious. Enjoy this pizza with friends and family for a great meal!

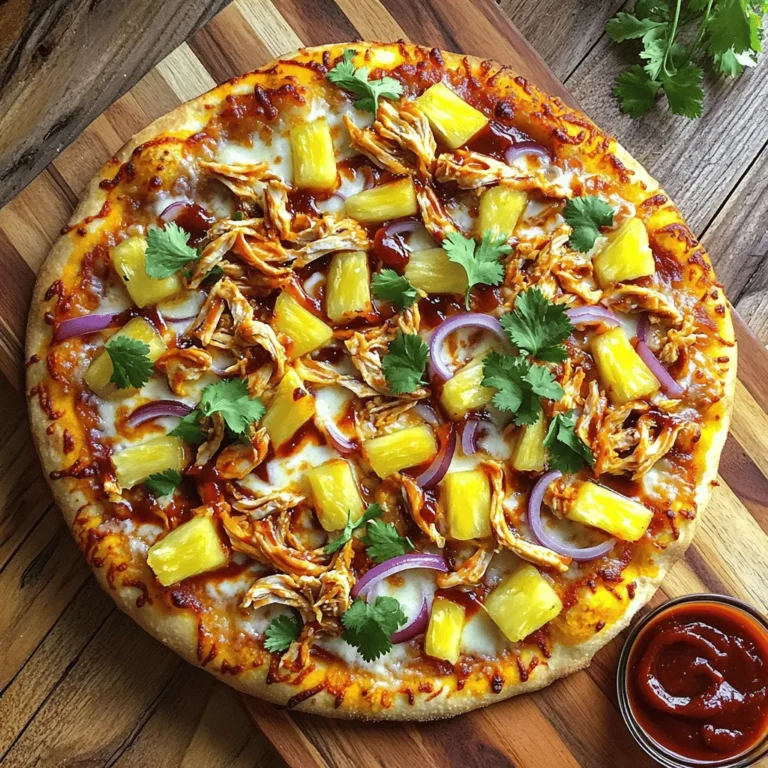
Hawaiian BBQ Chicken Pizza Tasty Family Favorite Recipe

To make Creamy Tomato Basil Tortellini Soup, gather these ingredients: - 2 cups tortellini (fresh or frozen) - 1 tablespoon olive oil - 1 medium onion, diced - 3 cloves garlic, minced - 1 can (28 oz) crushed tomatoes - 4 cups vegetable broth - 1 teaspoon dried basil - 1 teaspoon dried oregano - 1 cup heavy cream (or coconut cream for a lighter option) - Salt and pepper to taste - Fresh basil leaves for garnish - Grated Parmesan cheese for serving (optional) Garnishes can elevate your soup. Consider these options: - Fresh basil leaves for a burst of flavor. - Grated Parmesan cheese adds a rich, salty taste. - A drizzle of olive oil for a finishing touch. If you lack some ingredients, try these swaps: - Use any small pasta if you can’t find tortellini. - Swap olive oil for butter for a different flavor. - Chicken broth can replace vegetable broth for deeper taste. - Coconut cream can stand in for heavy cream to make it lighter. - Fresh herbs can replace dried ones if you have them on hand. These ingredients and options make this soup easy to prepare and customize! Start by heating 1 tablespoon of olive oil in a large pot over medium heat. Once hot, add 1 medium diced onion. Sauté it for about 5 to 7 minutes, until it turns translucent. This step builds a rich base for our soup. Next, add 3 minced garlic cloves. Sauté for another 1 to 2 minutes, just until the garlic smells yummy. Now, pour in 1 can (28 oz) of crushed tomatoes. Add 4 cups of vegetable broth to the pot. Stir them together well. This mix is the heart of your soup. Bring it to a gentle simmer. Add 1 teaspoon of dried basil and 1 teaspoon of dried oregano. Season with salt and pepper to taste. Let this simmer for about 15 minutes to help the flavors blend. It’s time to add the star of the dish—2 cups of tortellini. If you use fresh tortellini, cook them for about 3 to 5 minutes. If they are frozen, let them cook for 7 to 10 minutes. Stir gently to avoid breaking them. Once they are tender, lower the heat and slowly stir in 1 cup of heavy cream. Mix until everything is combined. Heat it through for about 2 to 3 minutes, but be careful not to let it boil. Taste, and adjust the seasoning if needed. Your creamy tomato basil tortellini soup is now ready to serve! To boost the flavor, try adding fresh herbs. Fresh basil or thyme can make a big difference. You can also use garlic powder for extra depth. For a spicy kick, add red pepper flakes. This soup is great with a squeeze of lemon juice. It brightens the taste and adds freshness. If your soup is too thick, add more broth. If it's too thin, let it simmer longer. Taste often to adjust the salt and pepper. If you find it bland, fresh herbs or a splash of vinegar can help. For a creamier texture, blend a portion of the soup and mix it back in. Serve the soup with crusty bread for dipping. A side salad pairs well, too. For added richness, top it with grated Parmesan cheese. You can also sprinkle fresh basil leaves for color. This soup tastes even better the next day, so enjoy the leftovers! {{image_2}} To make a vegan version of creamy tomato basil tortellini soup, I swap heavy cream for coconut cream. It brings richness without dairy. I also use vegetable broth instead of chicken broth for a fully plant-based dish. Just be sure to check the tortellini package for dairy ingredients. Some brands offer vegan tortellini made from plant-based ingredients. This change keeps the soup creamy and satisfying. While tortellini shines here, you can use other pasta types. Shells or small penne work great. They soak up the soup's flavors well. Cook them according to the package instructions. Keep an eye on cooking times, as they may differ from tortellini. A fun twist is to use whole wheat or gluten-free pasta. These options add extra nutrition and cater to dietary needs. Adding seasonal veggies can enhance this soup’s flavor and nutrition. In spring, try fresh peas and asparagus for a pop of green. In fall, add diced butternut squash or kale. These veggies blend well with the creamy base. Chop them small so they cook evenly. Simply stir them in when you add the tortellini. This way, you enjoy a colorful and nutrient-rich bowl of soup. You can store your creamy tomato basil tortellini soup in the fridge. First, let it cool. Then, place it in an airtight container. It stays fresh for up to three days. Make sure to label the container with the date you made it. This way, you won’t forget when you made it. If you want to save some for later, freezing is a good option. Pour the cooled soup into freezer-safe bags or containers. Leave some space at the top for expansion. It can last in the freezer for up to three months. When you’re ready to eat, just take it out and thaw it overnight in the fridge. Reheating this soup is easy! Pour the soup into a pot over low heat. Stir it often to keep it from sticking. If the soup is too thick, add a bit of vegetable broth or water. You can also reheat it in the microwave. Just heat it in 30-second bursts, stirring in between. Enjoy it warm, just like the first day! Yes, you can use dried tortellini in this soup. Just remember, cooking time will change. Dried tortellini usually needs more time to cook. Check the package for exact times. Typically, it takes about 10 to 12 minutes. Add it to the soup after simmering the tomatoes and broth. This way, the flavors blend well. If you want a lighter option, use coconut cream. It gives a nice flavor and keeps it creamy. You can also use half-and-half or whole milk. Both will work but will be less rich. For a dairy-free version, try almond milk or cashew cream. These options help keep the soup smooth. This soup can last for about three to four days in the fridge. Make sure to store it in an airtight container. When you reheat, do so gently on low heat. Avoid boiling, as it may affect the creaminess. If you add fresh tortellini, it may not keep as long. Check for freshness before eating. This blog post covered key elements of making a tasty tortellini soup. We explored ingredients, step-by-step instructions, and helpful tips. I shared ways to enhance flavors and fix common problems. You also learned about storage and possible variations, including vegan options. In my view, this soup is easy to make and fun to customize. With simple steps, anyone can enjoy a warm bowl. Dive in and try your own version!

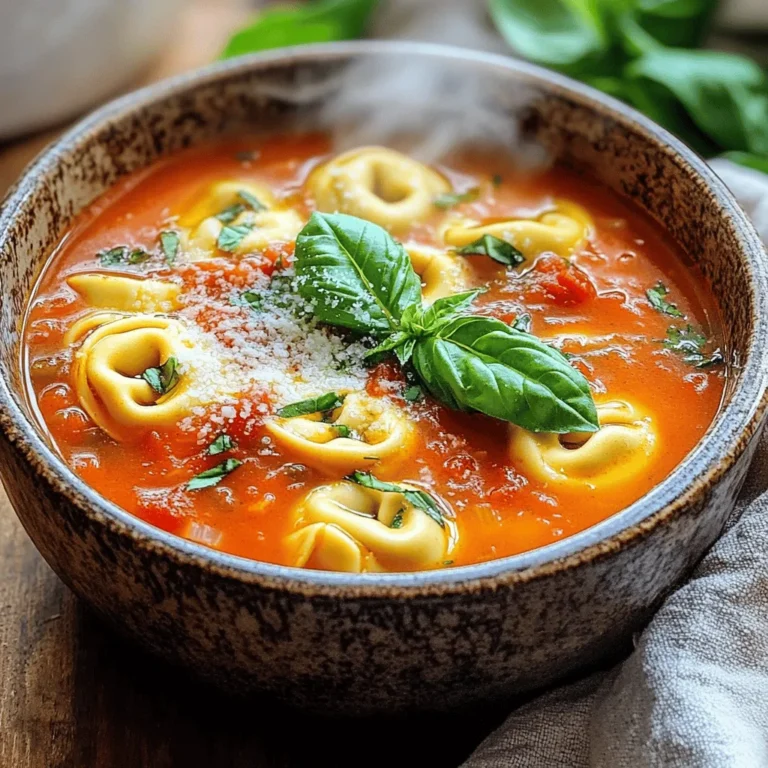
Creamy Tomato Basil Tortellini Soup Comfort Dish

For this recipe, I use 1 pound of ground turkey. Ground turkey is lean, healthy, and easy to work with. It absorbs flavors well, making it a great choice for tasty meatballs. You can find it at any grocery store. Look for fresh ground turkey to get the best taste and texture. The binding ingredients help hold the meatballs together. I use 1/2 cup of breadcrumbs, preferably whole wheat. These give the meatballs structure and a bit of crunch. I also add 1/4 cup of grated Parmesan cheese. This cheese adds a nice salty flavor. A large egg helps bind everything. It keeps the meatballs moist and fluffy. Seasonings and sauces bring the flavor to these meatballs. I include 1/4 cup of buffalo sauce for that signature spicy kick. You can adjust the amount to your liking. I add 1 teaspoon of onion powder and 1 teaspoon of garlic powder for depth. Salt and pepper enhance all the flavors. Lastly, I mix in 1/4 cup of finely chopped green onions. They add freshness and a pop of color. Together, these ingredients create a delicious balance in each bite. {{ingredient_image_1}} First, set your oven to 400°F (200°C). This heat helps the meatballs cook fast and brown nicely. Next, grab a baking sheet and line it with parchment paper. This step keeps the meatballs from sticking and makes cleanup easy. You want enough space on the sheet for each meatball so they can bake evenly. Now, let’s mix the ingredients. In a large bowl, combine 1 pound of ground turkey with 1/2 cup of breadcrumbs, 1/4 cup of grated Parmesan cheese, and 1/4 cup of finely chopped green onions. Then, add 2 minced garlic cloves, 1 large egg, and 1/4 cup of buffalo sauce. Sprinkle in 1 teaspoon of onion powder, 1 teaspoon of garlic powder, 1/2 teaspoon of salt, and 1/2 teaspoon of pepper. Use your hands to mix everything well, but don’t overdo it. If you mix too much, the meatballs can become tough. Just blend until everything is combined. Now for the fun part—shaping the meatballs! Take a scoop of the mixture and form it into a ball about 1.5 inches wide. Place the meatballs on the baking sheet, leaving some space between each one. This lets the heat reach all sides. To help them brown, drizzle a bit of olive oil over the meatballs or spray them lightly with cooking spray. Bake them in the oven for 20 to 25 minutes. You’ll know they are done when they are cooked through and have a nice brown color. For an extra kick, toss the meatballs in more buffalo sauce just before serving. Enjoy these tasty bites warm with celery sticks and your favorite dipping sauce! To make tender meatballs, mix the ingredients gently. Overmixing can make them tough. Use your hands to combine the ground turkey, breadcrumbs, and other ingredients. This keeps them soft and juicy. Bake them at the right temperature of 400°F for 20-25 minutes. You want them cooked through but not dry. You can change the flavor to suit your taste. Add more buffalo sauce for extra heat. Try different cheeses like feta or cheddar for a twist. You can also mix in herbs like parsley or cilantro for added freshness. Don’t forget spices! A pinch of smoked paprika can add a nice kick. Serve your meatballs warm with celery sticks. They pair well with ranch or blue cheese dressing. You can also place them in a sub for a tasty sandwich. For a fun twist, serve them on toothpicks for easy snacking at parties. Enjoy these meatballs with friends or family for a crowd-pleaser! Pro Tips Avoid Overmixing: Mix the meatball ingredients just until combined to ensure a tender texture. Use Lean Turkey: Opt for lean ground turkey to keep the meatballs healthy without sacrificing flavor. Customize the Heat: Adjust the amount of buffalo sauce based on your spice tolerance for a personalized kick. Perfectly Bake: Ensure even cooking by spacing the meatballs apart on the baking sheet. {{image_2}} If you love heat, try adding more buffalo sauce to your meatball mix. A simple way is to use 1/2 cup instead of 1/4 cup. You can also mix in some chopped jalapeños for an extra kick. These spicy turkey meatballs will bring a bold flavor to your meal. Serve them with a cooling dip like ranch or blue cheese to balance the heat. Want to make these meatballs even healthier? Use lean ground turkey or swap in ground chicken. You can replace breadcrumbs with oats or crushed whole grain cereal. This change adds fiber while keeping the meatballs tasty. For a lower calorie option, you can use Greek yogurt in place of the egg. This keeps the meatballs moist and adds protein. If you have dietary needs, you can still enjoy these meatballs. Try ground turkey substitutes like lean beef or ground lamb. If you prefer a plant-based option, use lentils or black beans. Just mash them up and mix with the other ingredients. You’ll create a delicious meatball that fits your diet. Don’t forget to adjust the baking time for different meats. You can store leftover Buffalo turkey meatballs in the fridge. Place them in an airtight container. They will stay fresh for about three to four days. Make sure they cool down before sealing them. This helps keep the meatballs juicy and tasty. If you want to keep them longer, freeze the meatballs. First, let them cool completely. Then, place them in a freezer-safe bag. Try to remove as much air as possible. Label the bag with the date. They can last for up to three months in the freezer. This way, you can enjoy them later! To reheat, you have a few options. For the oven, set it to 350°F (175°C). Place the meatballs on a baking sheet and heat for about 15 minutes. You can also use a microwave. Heat them on a plate for 1-2 minutes. If you want to keep them crispy, use the oven. Enjoy your flavorful meatballs! Yes, you can use ground chicken. It works well as a substitute for turkey. The flavor is similar, and the meatballs will still be tasty. Just ensure the cooking time stays the same. You want them to be fully cooked and juicy. To make these meatballs gluten-free, use gluten-free breadcrumbs. Many brands offer great options made from rice or oats. You can also use crushed gluten-free crackers. This swap keeps the meatballs soft and tasty without gluten. Buffalo turkey meatballs pair well with many sides. Here are some great options: - Celery sticks - Carrot sticks - Ranch dressing - Blue cheese dressing - A fresh salad These sides help balance the heat and enhance the meal. You can also enjoy them as a snack or appetizer! This blog post covered how to make tasty ground turkey meatballs. We discussed key ingredients, step-by-step methods, and tips for perfect meatballs. You can try spicy buffalo variations or explore healthier options. Remember to store your meatballs right for future meals. Feel confident in your cooking skills. Enjoy delicious meals by customizing flavors and serving with your favorite sides. Now, get cooking and savor the results!

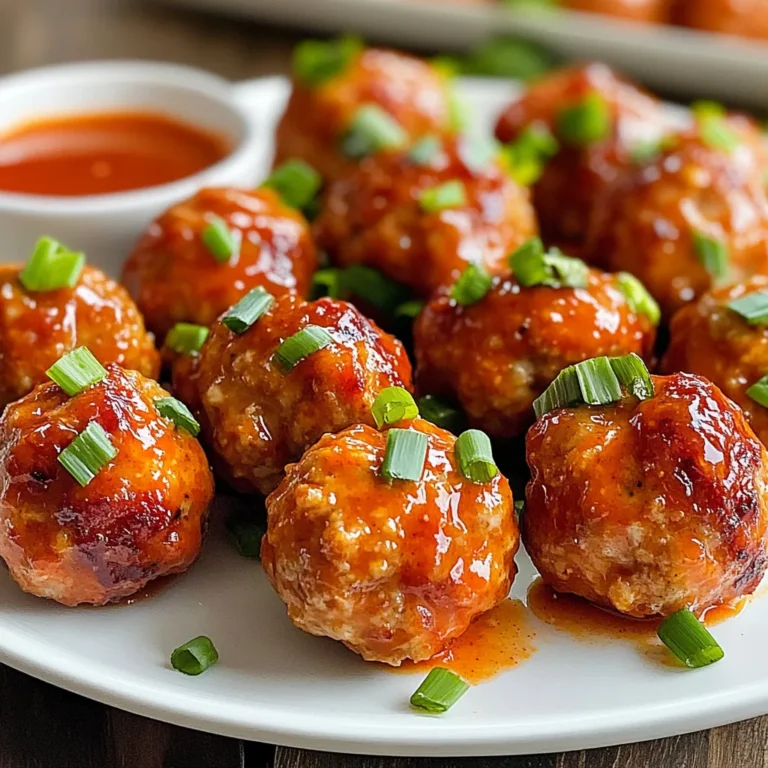
Buffalo Turkey Meatballs Flavorful and Easy Recipe

To make Creamy Garlic Spinach Orzo, you need just a few simple ingredients. Here’s what you will need: - 1 cup orzo pasta - 2 tablespoons olive oil - 3 cloves garlic, minced - 4 cups fresh spinach, roughly chopped - 1 cup heavy cream - 1/2 cup vegetable broth - 1/2 cup grated Parmesan cheese - Salt and pepper to taste - Zest of 1 lemon - 1/4 teaspoon red pepper flakes (optional) - Fresh parsley, chopped for garnish Each ingredient plays a key role in this dish. The orzo pasta gives a delightful texture. Olive oil adds richness, while garlic brings a bold, aromatic flavor. Fresh spinach not only adds color but also boosts nutrition. Heavy cream creates that creamy base, and vegetable broth enhances the taste. Parmesan cheese melts beautifully, adding depth and umami. Lemon zest brightens the dish, making every bite refreshing. Red pepper flakes can add a hint of spice for those who like it hot. Lastly, fresh parsley provides a pop of color and a fresh taste. Gather these ingredients, and you are ready to create a delicious meal. To boil orzo pasta effectively, start with a large pot of salted water. Bring the water to a rolling boil. Add 1 cup of orzo pasta and stir gently. Cook it according to the package instructions, usually around 8-10 minutes. You want the orzo to be al dente, which means it should still have a slight bite. Once cooked, drain and set the orzo aside. For perfect sautéing, heat 2 tablespoons of olive oil in the same pot over medium heat. Add 3 cloves of minced garlic and sauté for about 1 minute. Watch closely to avoid burning the garlic. Once fragrant, add 4 cups of roughly chopped spinach. Sauté, stirring often, until the spinach wilts, which takes about 2-3 minutes. The heat brings out the flavor in the garlic and spinach. Pour in 1 cup of heavy cream and 1/2 cup of vegetable broth. Stir well to combine the ingredients. Bring the mixture to a gentle simmer. Next, add the cooked orzo and 1/2 cup of grated Parmesan cheese. Season with salt, pepper, and 1/4 teaspoon of red pepper flakes if you like some heat. Mix everything well until it becomes creamy. Finally, remove from heat and add zest from 1 lemon to brighten the dish. Adjust seasonings if needed, and serve immediately with fresh parsley on top. To avoid overcooked orzo, follow the package's cooking time closely. Stir the pasta while it cooks. This helps it cook evenly and prevents sticking. When you drain the orzo, do not rinse it. Rinsing removes the starch that helps sauces cling. Lemon zest adds a bright kick to the dish. It enhances the creamy flavor and balances richness. Just a little zest goes a long way in lifting the taste. For pairing, serve Creamy Garlic Spinach Orzo with grilled chicken or shrimp. This adds protein and makes the meal more filling. You can also add a side salad for freshness. Garnish with fresh parsley on top. The green color makes the dish pop. You can also add a sprinkle of red pepper flakes for a spicy touch. Timing is key when cooking. Add the spinach after the garlic is fragrant. This ensures the spinach wilts without losing nutrients. Adjust seasoning after mixing in cheese and cream. Taste before serving. This way, you can add more salt or pepper if needed. {{image_2}} You can add fun ingredients to make Creamy Garlic Spinach Orzo even better. Try sun-dried tomatoes for a sweet twist. They add a rich flavor that pairs well with garlic. Artichokes are another great choice. They bring a lovely texture and taste to the dish. Changing the cheese can also change the flavor. Instead of Parmesan, try feta for a tangy bite. Or use goat cheese for a creamy texture. Each cheese brings its own taste, so feel free to mix and match! Making this dish fit your diet is easy. You can use gluten-free orzo if you need it. There are many brands that offer tasty gluten-free pasta. Just check the package for cooking times. If you want a vegan version, swap the heavy cream with coconut milk or cashew cream. Both give a creamy texture without dairy. Use nutritional yeast instead of cheese for a cheesy flavor without animal products. You can change the recipe based on what’s in season. In spring, add asparagus or peas. These veggies bring bright colors and flavors. In the fall, try adding butternut squash or kale for warmth. Using fresh herbs can also elevate your dish. In summer, add basil or mint. In winter, thyme or rosemary can add depth. Adjusting the recipe with seasonal veggies and herbs gives you new tastes all year round! To store Creamy Garlic Spinach Orzo, follow these steps. First, let it cool to room temperature. This helps to prevent condensation in the container, which can make the dish soggy. Use an airtight container to keep the orzo fresh. Glass or BPA-free plastic containers work well. They help keep flavors intact and prevent spills. Store your leftovers in the fridge for up to three days. Reheating this dish needs some care. Use a medium heat on the stove or the microwave. Add a splash of vegetable broth or cream to keep the orzo creamy. Stir often to ensure even heating. If you microwave it, cover the dish to trap steam and avoid drying out the pasta. Watch it closely to prevent overcooking. Freezing Creamy Garlic Spinach Orzo is easy. Place it in a freezer-safe container. Leave some space at the top for expansion. It can last up to three months in the freezer. When ready to eat, thaw it in the fridge overnight. You can also use the microwave for quick thawing. Reheat on the stove and add cream or broth to restore creaminess. This keeps the dish tasty and enjoyable. Creamy Garlic Spinach Orzo lasts about 3 to 5 days in the fridge. To store it, place it in an airtight container. This helps keep it fresh and tasty. Make sure the dish cools down before sealing it. Avoid letting it sit out for too long. When you want to enjoy it again, check for any off smells or changes in texture. Yes, you can make Creamy Garlic Spinach Orzo ahead of time. It’s a great dish for meal prep! Cook it fully, then let it cool. Store it in the fridge for easy meals later. When you are ready to eat, just reheat it on the stove or in the microwave. Add a splash of broth or cream to keep it creamy. This keeps the flavor rich and the texture smooth. You can substitute heavy cream with several options. For a lighter choice, use half-and-half or whole milk. If you want a dairy-free option, try coconut milk or almond milk. These alternatives still give a creamy texture. Just keep in mind that they may change the flavor slightly. Enjoy experimenting to find your favorite creamy option! This blog post covered how to make Creamy Garlic Spinach Orzo step by step. You learned about the key ingredients, cooking methods, and tips for great flavors. I shared ideas for variations, storage, and reheating. Remember, making this dish is simple and fun. You can adjust it to fit your tastes. Enjoy creating tasty meals that impress your friends and family!

Creamy Garlic Spinach Orzo Delightful and Easy Dish

- 2 cups raw almonds - 1/2 cup pure maple syrup - 1 teaspoon ground cinnamon - 1/4 teaspoon salt - 1 teaspoon vanilla extract - 1 tablespoon coconut oil (or any neutral oil) These ingredients work together to create a sweet and spicy snack. The almonds give a nice crunch. The maple syrup adds sweetness, while cinnamon brings warmth. The salt balances the flavors. Coconut oil helps the almonds roast perfectly and keeps them from sticking. - 1/4 teaspoon nutmeg Nutmeg adds a unique twist. It pairs well with cinnamon. If you love rich flavors, give it a try. You can also experiment with other spices like cardamom or allspice for fun variations. - Use a dry measuring cup for solids like almonds. - Pour sticky liquids like maple syrup into a liquid measuring cup. - Level off dry ingredients, using a straight edge for accuracy. Measuring correctly gives you the best outcome. Too much or too little can change the taste. Always ensure your ingredients are fresh. Fresh spices and nuts make a big difference in flavor! Start by gathering your ingredients. You will need: - 2 cups raw almonds - 1/2 cup pure maple syrup - 1 teaspoon ground cinnamon - 1/4 teaspoon salt - 1 teaspoon vanilla extract - 1/4 teaspoon nutmeg (optional) - 1 tablespoon coconut oil Make sure your oven is ready. Preheat it to 350°F (175°C). Line a baking sheet with parchment paper. This will help with cleaning later. In a medium bowl, add the raw almonds. Pour in the coconut oil. Stir well to coat the almonds. In another bowl, mix the maple syrup, cinnamon, salt, and vanilla extract. If you like, add nutmeg for extra flavor. Whisk until combined. Now, pour this syrup mixture over the almonds. Mix until all the almonds are well coated. Spread the almonds in a single layer on your baking sheet. Make sure they do not overlap. Place the baking sheet in the oven. Roast the almonds for 15-20 minutes. Stir them halfway through to help them roast evenly. They should turn golden brown and smell amazing. Once they are done, take the baking sheet out of the oven. Let the almonds cool on the sheet. They will get crunchy as they cool. Once cool, you can serve them right away or store them for later. To make great maple cinnamon roasted almonds, follow these tips: - Use fresh almonds: Fresh nuts taste better. Check the date on the package. - Coat evenly: Mix the nuts and oil well. This helps the flavor spread. - Don’t overcrowd the pan: Spread the nuts out. They roast better without touching each other. - Stir halfway through: This keeps them from burning and helps them roast evenly. Here are mistakes to steer clear of: - Using too much oil: You only need a little coconut oil. Too much makes them greasy. - Skipping the parchment paper: This helps with cleanup and keeps the nuts from sticking. - Not watching the oven: Nuts can go from golden to burnt quickly. Stay alert! - Ignoring cooling time: Let them cool completely. They will get crunchy as they cool. These tools will help you make the best almonds: - Baking sheet: A flat baking sheet is key for even roasting. - Parchment paper: Line your baking sheet with parchment for easy cleanup. - Mixing bowls: Use medium bowls for mixing the almonds and syrup. - Whisk: A whisk is great for mixing the syrup and spices. - Oven mitts: Protect your hands when taking the hot sheet out of the oven. With these tips, you can create a tasty snack that is sure to please! {{image_2}} You can change the flavor of your maple cinnamon roasted almonds easily. Try adding a pinch of cayenne pepper for a spicy kick. A little chili powder can also add warmth. If you like more sweetness, sprinkle in some cocoa powder. You can even mix in dried fruits, like cranberries or cherries, for a chewy twist. Each spice or add-in gives a new flavor. If you want to use a different sweetener, try honey or agave syrup. These will work well but may change the taste a bit. For nuts, walnuts or pecans can be a good swap. They will give your snack a new texture and taste. Mix and match to find your favorite combo. You can make your almonds fit any holiday. For fall, add pumpkin spice to evoke cozy vibes. In winter, consider adding peppermint extract for a holiday feel. For spring, try a hint of lemon zest for a fresh taste. Each season can inspire a new version of this tasty snack. After you make your maple cinnamon roasted almonds, let them cool completely. Once they are cool, transfer them to an airtight container. This keeps them fresh and tasty. You can store them at room temperature for up to two weeks. If you want them to last longer, you can put them in the fridge. They will stay good for about a month that way. To keep your almonds fresh, avoid exposing them to air and moisture. Always use a tight-fitting lid on your container. If you notice any signs of moisture, dry them out before storing. You can also add a small packet of silica gel in the container. This helps absorb any excess moisture. If your almonds lose their crispness, don’t worry! You can re-crisp them easily. Preheat your oven to 350°F (175°C) again. Spread the almonds on a baking sheet in a single layer. Roast them for about 5-10 minutes. Keep an eye on them to avoid burning. Let them cool before enjoying them again! You can store maple cinnamon roasted almonds for up to two weeks. Place them in an airtight container to keep them fresh. They stay crunchy at room temperature. If you want to enjoy them longer, you can freeze them. Just remember to let them cool completely first. Yes, this recipe is already vegan-friendly! The ingredients are all plant-based. Use pure maple syrup for sweetness and coconut oil for richness. This makes a great snack for everyone, even those who avoid animal products. You can use many nuts for this recipe. Walnuts, pecans, or cashews work well. Each nut adds a unique taste and texture. Just keep an eye on roasting times, as different nuts may cook faster or slower than almonds. This post covered how to make tasty maple cinnamon roasted almonds. You learned about key and optional ingredients, plus measurement tips. I shared precise cooking steps and best practices to avoid common mistakes. In the end, with the right tips, you can enjoy this snack any time. So, get creative with flavors and enjoy your delicious almonds fresh or stored!

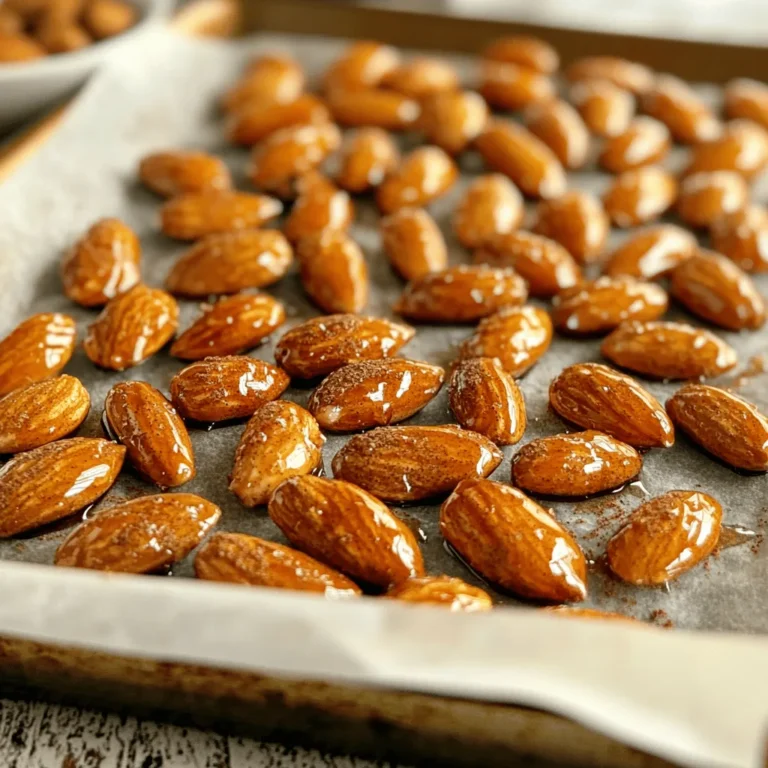
Maple Cinnamon Roasted Almonds Flavorful Snack Recipe

- 4 boneless, skinless chicken breasts - 1 ripe mango, diced - 1 small red onion, finely chopped - 1 red bell pepper, diced - 1 jalapeño, deseeded and minced (optional for heat) - 1/4 cup fresh cilantro, chopped - 2 tablespoons lime juice - 2 tablespoons olive oil - 1 teaspoon ground cumin - Salt and pepper to taste When I make Mango Salsa Chicken, I focus on fresh and vibrant ingredients. The chicken is the star here, and I always choose boneless, skinless breasts for ease. They cook quickly and soak up the flavors well. The ripe mango is key. It adds sweetness and a beautiful color. I choose a mango that feels soft to the touch. This means it is ripe and ready to use. I also like to include red onion and red bell pepper. They give a good crunch and a pop of color to the dish. If you want some heat, add a jalapeño. I remove the seeds to keep it mild. But if you love spice, feel free to keep some seeds in. For the marinade, I mix fresh cilantro, lime juice, olive oil, ground cumin, salt, and pepper. This mix brings the dish to life. The lime juice adds brightness, and cumin gives warmth. It is simple but so effective. These fresh, simple ingredients create a meal that feels special yet easy to make. Start by gathering your ingredients. In a small bowl, whisk together: - 2 tablespoons olive oil - 2 tablespoons lime juice - 1 teaspoon ground cumin - Salt and pepper to taste Mix these well until they blend into a smooth marinade. The lime juice adds a bright flavor, while cumin gives warmth to the dish. Take your chicken breasts and place them on a clean surface. Brush the marinade over both sides of each piece. Make sure to coat them evenly. This step is key for flavor. Let the chicken marinate for about 15 minutes. You can cover it with plastic wrap if you like. While the chicken marinates, it’s time to prepare the mango salsa. In a medium bowl, combine: - 1 ripe mango, diced - 1 small red onion, finely chopped - 1 red bell pepper, diced - 1 jalapeño, deseeded and minced (optional) - 1/4 cup fresh cilantro, chopped Mix these ingredients together gently. Season with a pinch of salt and a squeeze of lime juice. This salsa gives the dish a fresh and vibrant taste. Preheat your grill or grill pan over medium-high heat. Once hot, place the marinated chicken on the grill. Cook for 6-7 minutes on each side. Check the chicken’s doneness; it should reach 165°F (75°C). This ensures it’s safe to eat and still juicy. After cooking, remove the chicken from the grill. Let it rest for about 5 minutes. This helps keep it juicy. To serve, place the grilled chicken on a plate and top it generously with the fresh mango salsa. Enjoy the burst of flavors! To make your marinade shine, start by adjusting the lime juice and seasoning. Taste it as you go. A good balance of lime and spices makes the chicken pop with flavor. If it’s too tart, add a bit more olive oil. If it’s bland, sprinkle in some salt and pepper. To ensure your chicken is juicy, use a meat thermometer. Cook the chicken until it reaches 165°F or 75°C. This step helps avoid dry chicken. Insert the thermometer into the thickest part of the breast. It’s a quick way to check for doneness. If you don’t have a thermometer, cut into the chicken. If the juices run clear, it’s ready. When you serve your mango salsa chicken, take a moment to make it pretty. Garnish your dish with fresh cilantro. Add lime wedges on the side. This makes your meal look vibrant and inviting. A colorful platter always catches the eye and makes the meal feel special. {{image_2}} You can swap chicken for shrimp or tofu. Shrimp cooks quickly and adds a nice taste. Tofu soaks up flavors well and is a great option for vegans. Both choices make this dish fun and tasty. Want to spice up your salsa? Try adding diced avocado or pineapple. The creamy avocado gives a smooth texture, while pineapple adds a sweet twist. Both options make the salsa even more vibrant and delicious. You can bake the chicken instead of grilling it. Preheat your oven to 375°F (190°C). Place the marinated chicken in a baking dish. Bake for 25-30 minutes until cooked through. This method keeps the chicken juicy and flavorful, too. After enjoying your Mango Salsa Chicken, store any leftovers in an airtight container. This keeps the chicken fresh. You can safely refrigerate it for up to 3 days. Make sure it cools to room temperature before sealing it. This step helps avoid extra moisture inside the container. If you want to prepare ahead, freeze the marinated chicken. You can freeze it for up to 2 months before grilling. Just place it in a freezer-safe bag or container. This makes meal prep easy and quick. When ready to cook, simply thaw it in the fridge overnight. When reheating your grilled chicken, do it gently. Use a skillet over low heat to warm it up. This method keeps the chicken tender and juicy. Avoid using high heat, as it can dry out the meat. If you have leftover salsa, add it on top for extra flavor! Yes, you can save time by prepping in advance. Marinate the chicken and make the salsa ahead. Store them in the fridge. This way, you can grill the chicken quickly when you’re ready to eat. You can serve this dish with rice, quinoa, or a fresh salad. Each option adds a nice touch. The rice or quinoa gives a hearty base. A salad adds freshness and crunch. Choose what you enjoy most! Want more heat? Add extra jalapeños to the salsa. You can also add a dash of hot sauce to the marinade. Adjust the spice to your taste. Make it as spicy as you like! This recipe combines juicy chicken with fresh mango salsa for a tasty meal. You learned how to make a quick marinade, marinate chicken, and prepare a vibrant salsa. Remember to adjust flavors for your taste, and feel free to swap chicken for shrimp or tofu. Store any leftovers properly, and you can enjoy this dish later. So, grab your ingredients and start cooking this delicious meal today. Enjoy!

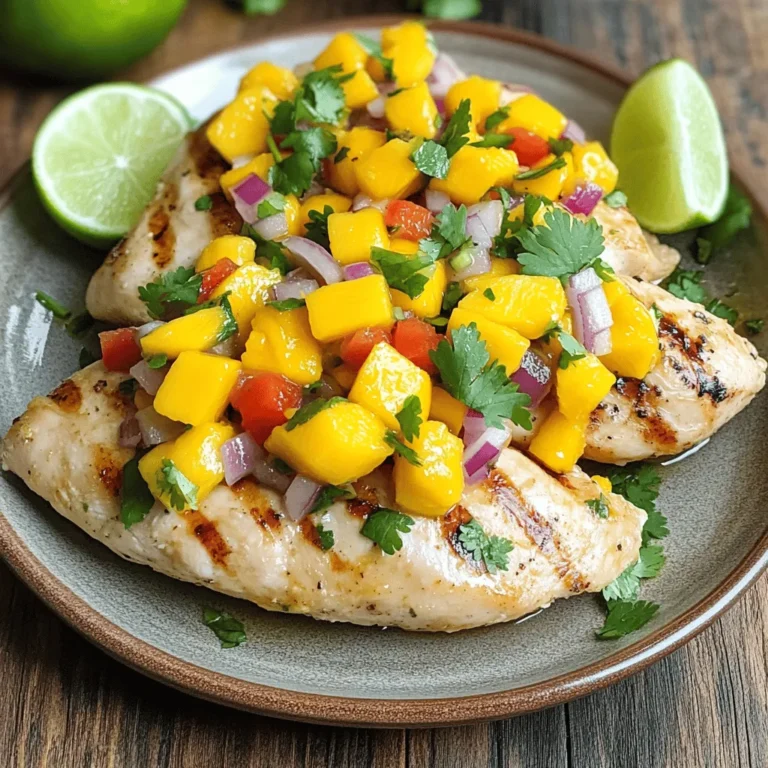
Mango Salsa Chicken Flavorful and Simple Meal Recipe

- 12 oz cheese tortellini (fresh or frozen) - 1 cup cherry tomatoes, halved - 1 cup fresh mozzarella balls, halved - 1 cup baby spinach, roughly chopped - 1/2 cup homemade or store-bought pesto - 1/4 cup pine nuts, lightly toasted - 1 tablespoon olive oil - Salt and pepper to taste - Parmesan cheese, for garnish I love how each ingredient brings its own flavor to the dish. The cheese tortellini acts as a soft base. It absorbs the pesto well, making each bite tasty. Cherry tomatoes add a sweet burst that brightens the salad. Fresh mozzarella balls give a creamy touch, balancing the flavors. Baby spinach brings a nice crunch and fresh green color. Pesto is the star of this recipe. You can use homemade pesto for a personal touch, or store-bought for convenience. Either way, it offers a rich, herby taste. The pine nuts add a nutty crunch. Toasting them enhances their flavor and makes them even better. For seasoning, a splash of olive oil helps all ingredients blend smoothly. A pinch of salt and pepper brings everything together. Finally, a sprinkle of Parmesan cheese on top adds a savory finish. This dish is not just colorful; it's also filled with flavor and nutrition. First, fill a large pot with water and add salt. Bring the water to a boil. Once boiling, add the cheese tortellini. Cook according to the package instructions, which is usually about 3-5 minutes for fresh tortellini. You know they are done when they float to the top. Drain the tortellini and rinse them under cold water. This stops the cooking and keeps them nice. In a big mixing bowl, combine the halved cherry tomatoes, mozzarella balls, and roughly chopped baby spinach. Use fresh ingredients for the best flavor. Mixing them in a bowl makes it easy to combine later. Next, add the cooked tortellini to your bowl of vegetables. Drizzle the pesto and olive oil over the mixture. Gently fold everything together. Make sure all the ingredients get a nice coat of pesto. This brings all the flavors together. Now, it’s time to season. Add salt and pepper to taste. Then, fold in the lightly toasted pine nuts. The nuts add a nice crunch and flavor. Chilling the pasta salad is important. Cover the bowl and refrigerate it for at least 30 minutes. This lets all the flavors mix well. Before serving, give the salad a gentle stir. Finally, garnish with freshly grated Parmesan cheese for that perfect finishing touch. Enjoy! Choosing the right pesto Pick a pesto that tastes fresh and vibrant. You can use store-bought pesto, but I often prefer homemade. Making your own lets you control the ingredients. Use fresh basil, good olive oil, and quality nuts to create a rich flavor. If you want a twist, try sun-dried tomato or arugula pesto for a new twist. Cooking tortellini tips When boiling the tortellini, use plenty of water. This helps them cook evenly. Bring the water to a rolling boil before adding the pasta. Fresh tortellini cooks quickly, usually in just 3-5 minutes. Keep an eye on them; they’re done when they float. After cooking, rinse them under cold water to stop further cooking. This keeps the tortellini firm and prevents them from getting sticky. Best side dishes Pair this pasta salad with crusty bread or a light green salad. A simple arugula salad with lemon dressing works well. If you want a heartier meal, serve it alongside grilled chicken or shrimp. Ideal occasions for serving This dish shines at summer gatherings, picnics, or potlucks. It’s great for barbecues, too. The colors and flavors make it a crowd-pleaser for any festive occasion. You can even serve it as a light lunch or dinner option. Best ways to plate To plate your salad, use a large, shallow bowl. This shows off all the vibrant colors. Gently toss the salad before serving to ensure even distribution of the ingredients. Enhancing visual appeal with fresh herbs Garnish with fresh basil or parsley to add a pop of color. You can also sprinkle extra pine nuts on top for added texture. A few shavings of Parmesan cheese can elevate the dish’s look. These small touches make a big difference in presentation. {{image_2}} You can make this dish work for different diets. For those needing gluten-free options, try using gluten-free tortellini. Many brands offer good substitutes that taste great. If you want a vegan twist, replace cheese tortellini with a plant-based version. You can also use nutritional yeast for a cheesy flavor without dairy. Want to boost the taste of your pesto tortellini pasta salad? Adding proteins like grilled chicken or shrimp can make it heartier. Just cook the protein separately and mix it in. You can also switch up the veggies. Consider adding bell peppers, cucumbers, or even roasted zucchini for extra crunch and color. While pesto works wonders, you can try different dressings too. A creamy dressing adds richness, while a light vinaigrette can brighten the dish. Don't hesitate to mix it up! Experiment with fresh herbs like basil or parsley. These can elevate the flavors and bring freshness to your salad. To keep your Pesto Tortellini Pasta Salad fresh, store it in an airtight container. Make sure to cool the salad completely before sealing it. I recommend using glass or plastic containers with tight lids. This helps prevent any odors from your fridge from mixing in. Place the container in the refrigerator right after serving. This pasta salad is best enjoyed fresh, but it can last in the fridge for up to three days. After that, the flavors may fade, and the texture can change. Always check for any signs of spoilage, like an off smell or discoloration, before eating leftovers. If you want to reheat the salad, do it gently. Start by warming it in a pan on low heat. Stir it often to ensure even warming. You can also add a splash of olive oil to help keep it moist. Avoid the microwave if possible, as it can make the tortellini mushy. Enjoy your meal! You can store Pesto Tortellini Pasta Salad in the fridge for about 3 days. Make sure to keep it in an airtight container. This helps keep the flavors fresh and the ingredients safe to eat. Yes, you can freeze Pesto Tortellini Pasta Salad. To do this, place it in a freezer-safe container. When you're ready to eat it, thaw it in the fridge overnight. Then, enjoy it chilled or at room temperature. Keep in mind that some ingredients, like tomatoes, may change texture after freezing. Absolutely! This recipe is very flexible. You can swap cheese tortellini for another pasta shape. Add veggies like bell peppers or cucumbers if you like. You can also include proteins like chicken or shrimp. Feel free to adjust the amount of pesto, too, for more or less flavor. You can use either store-bought or homemade pesto. Store-bought pesto is quick and easy. Just make sure it tastes good to you. If you have time, homemade pesto can add a special touch. You can blend fresh basil, garlic, nuts, and oil for a rich flavor. This blog post showed how to make a tasty Pesto Tortellini Pasta Salad. You learned about key ingredients like tortellini, spinach, and fresh mozzarella. I shared helpful tips for cooking and serving. You can customize the dish to fit your taste. Remember, the right storage keeps leftovers fresh. Enjoy your salad as a side or main dish for any occasion. A perfect blend of flavors and textures will impress anyone who tries it. Keep experimenting until it’s just right for you!

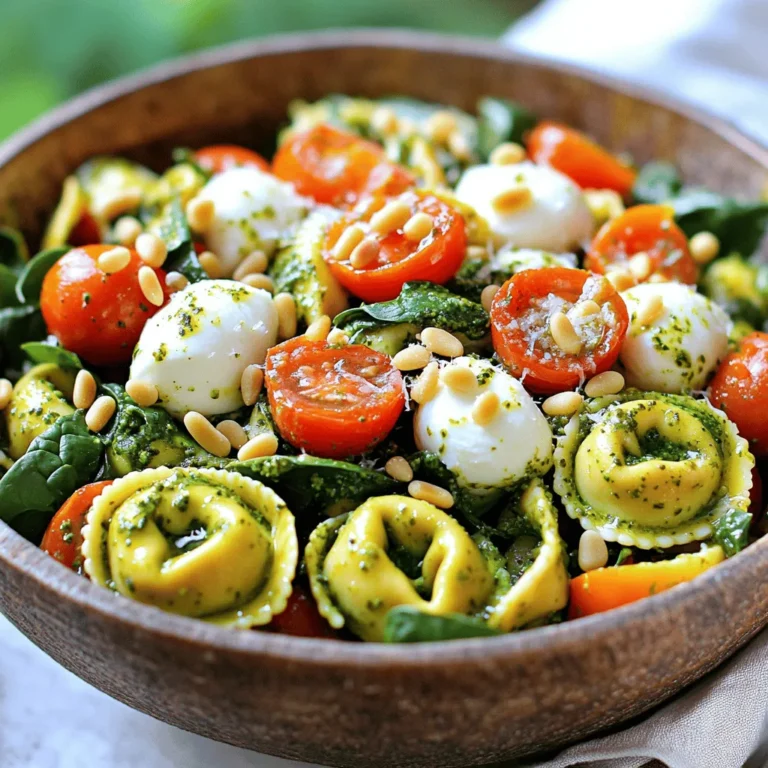
Pesto Tortellini Pasta Salad Flavorful and Fresh Dish

PREV 1 … 40 41 42 … 57 NEXT
flavor nest kitchen

explore

DessertsDinnerAppetizersDrinks

Our Policies

  • Cookie Policy
  • Copyright Policy
  • Disclaimer
  • GDPR Policy
  • Terms Of Use
Back to Top
  • About
  • Contact Us
  • Privacy Policy
© 2025 flavor nest kitchen