FREE DINNER EBOOK! Get your copy!
  • Cookie Policy
  • GDPR Policy
  • Disclaimer
  • Terms Of Use
  • Visit my other site: Fun Cookie Recipes
flavor nest kitchen
  • Home
  • Dinner
  • Desserts
  • Drinks
  • Appetizers
  • Contact
  • About
  • Privacy Policy
  • Home
  • Dinner
  • Desserts
  • Drinks
  • Appetizers
  • Contact
  • About
  • Privacy Policy
  • Cookie Policy
  • GDPR Policy
  • Disclaimer
  • Terms Of Use
Visit my other site: Fun Cookie Recipes

HOME / CATEGORIES /

Latest

- 1 cup acini di pepe pasta - 2 cups fresh spinach, chopped - 1 cup cooked meatballs (beef or chicken) Italian Wedding Soup is rich in flavor and texture. The acini di pepe pasta adds a nice bite. This tiny pasta cooks quickly and absorbs the broth's taste well. Fresh spinach gives the soup a vibrant color and a healthy touch. It wilts beautifully in the warm broth. Meatballs, whether beef or chicken, are the heart of this soup. They provide protein and add a savory depth. - Grated Parmesan cheese - Fresh parsley For a finishing touch, you can add grated Parmesan cheese. This cheese melts slightly into the soup, adding creaminess. Fresh parsley also brightens the dish with color and flavor. It gives the soup a fresh aroma and taste. Both ingredients elevate the soup and make it feel special. - 1 tablespoon olive oil - 4 cups chicken broth - 1 teaspoon dried oregano - 1 teaspoon dried basil Olive oil is key for sautéing aromatics. It brings out the flavors of onions and garlic. Chicken broth forms the base of this soup. It makes the soup hearty and comforting. Dried oregano and basil add an Italian flair. These herbs fill the soup with warmth and depth. Salt and pepper enhance all the flavors, making each bite delicious. 1. First, grab a large pot. Pour in 1 tablespoon of olive oil and heat it over medium heat. 2. Add 1 small finely chopped onion. Sauté it for about 3-4 minutes. You want it to turn translucent. 3. Next, stir in 2 minced garlic cloves. Cook for 1 more minute until it smells amazing. 4. Now add 1 diced carrot and 1 diced zucchini. Cook these for another 5 minutes until they soften a bit. 1. Pour in 4 cups of chicken broth. Bring this mixture to a boil. 2. Once boiling, add 1 cup of acini di pepe pasta. Cook it according to the package instructions. This usually takes about 8-10 minutes. 3. After the pasta is al dente, toss in 2 cups of chopped fresh spinach and 1 cup of cooked meatballs. 4. Add 1 teaspoon of dried oregano and 1 teaspoon of dried basil. Season with salt and pepper to taste. Stir everything to mix well. 5. Let the soup simmer for another 2-3 minutes. This will wilt the spinach and heat the meatballs. 1. Taste the soup. Adjust seasoning if you think it needs more salt or pepper. 2. Now, it’s time to serve! Ladle the soup into bowls. 3. Sprinkle some grated Parmesan cheese on top for extra flavor. 4. Garnish with fresh parsley. A drizzle of olive oil adds richness too. Enjoy your warm, hearty soup! - Choosing the right meatballs: Use small meatballs that are full of flavor. You can make them from beef or chicken. If you choose store-bought, look for ones that are juicy and well-seasoned. They should fit nicely in a spoonful of soup. - Cooking the pasta to perfection: You want your acini di pepe pasta to be just right. Cook it until it is al dente, meaning it should be firm to the bite. This usually takes about 8-10 minutes, so be sure to check the package for the exact time. - Best ways to serve and garnish: Serve the soup hot in bowls. Top it with grated Parmesan cheese and a sprinkle of fresh parsley. A drizzle of olive oil adds a nice touch too, giving it extra flavor. - Pairing with bread or salad: This soup goes well with crusty bread or a fresh salad. A simple green salad with a light vinaigrette works great. The bread is perfect for dipping into the broth. - Overcooking pasta: Be careful not to overcook your pasta. If it gets too soft, it can break apart and lose its texture. Always taste it before you drain it! - Using too much salt: Watch the salt! Since the chicken broth can be salty, add salt slowly. Taste as you go to make sure it’s just right. Too much salt can ruin the soup. {{image_2}} You can make Italian Wedding Soup in many ways. If you want a vegetarian option, skip the meatballs. Instead, use firm tofu or mushrooms for protein. You can also add chickpeas for extra texture and flavor. If you prefer meatballs, try different types. Use beef, chicken, or even turkey. Make sure they are small and round for the best bite. To boost the flavor, add spices like red pepper flakes for heat. You might also try thyme or rosemary for a fresh taste. Want to add more veggies? Try bell peppers, peas, or kale. Each vegetable brings its own flavor and color to the soup. Italy has many styles of this soup. Northern Italian versions often include rice instead of pasta. In Southern Italy, you might find a richer broth with more herbs. Family recipes can be unique, too. Some families add special ingredients like lemon zest or even saffron. This makes each bowl special and full of love. Store leftover soup in an airtight container. This keeps it fresh and tasty. Italian wedding soup lasts for about 3 to 4 days in the fridge. Label the container with the date. This helps you know when to eat it. To freeze the soup, let it cool first. Then, pour it into freezer-safe containers. Leave some space at the top for expansion. The soup can last up to 3 months in the freezer. When ready to eat, move it to the fridge overnight to thaw. Reheat the soup on the stove for the best flavor. Use low to medium heat and stir often. This keeps it from sticking to the pot. You can also microwave the soup. Use a microwave-safe bowl and heat in short bursts. Stir in between to warm it evenly. Enjoy your soup hot for the best taste! Italian Wedding Soup is a warm, rich dish. It mixes meatballs, greens, and broth. This soup is loved for its comforting feel. It often brings families together. The name comes from the Italian word "matrimonio." It means "marriage." This refers to the tasty blend of flavors. The soup has roots in Southern Italy, where it is a staple. Each family has its own twist on the recipe, making it special. Yes, you can make this soup ahead of time. It saves time on busy days. Store it in the fridge for up to three days. To keep it fresh, use an airtight container. If you want to freeze it, cool the soup first. Transfer it to a freezer-safe container. It can last for about three months in the freezer. When ready to eat, thaw it overnight in the fridge. Reheat it on the stove until hot. You do not have to make homemade meatballs. Store-bought meatballs work just as well. They save time and still taste great. If you prefer homemade, mix ground meat with herbs and spices. Roll them into small balls before cooking. Both options give you a tasty soup. Choose what fits your schedule and taste. If you can't find acini di pepe, don't worry. You can use small pasta shapes instead. Options include orzo, ditalini, or even mini shells. These shapes work well in the soup. They soak up the broth and add a nice bite. Choose what you have on hand, and enjoy your Italian Wedding Soup! Italian wedding soup combines fresh veggies, tasty meatballs, and acini di pepe pasta. You learned how to prepare it step-by-step, from sautéing aromatics to adjusting seasonings. I shared tips on perfecting your soup and avoiding common mistakes. Variations let you customize flavors and ingredients to your liking. In the end, enjoy this warm soup with family and friends. It’s a comforting dish that brings everyone together. Whether you stick to the classic or try new variations, this soup will surely delight you.

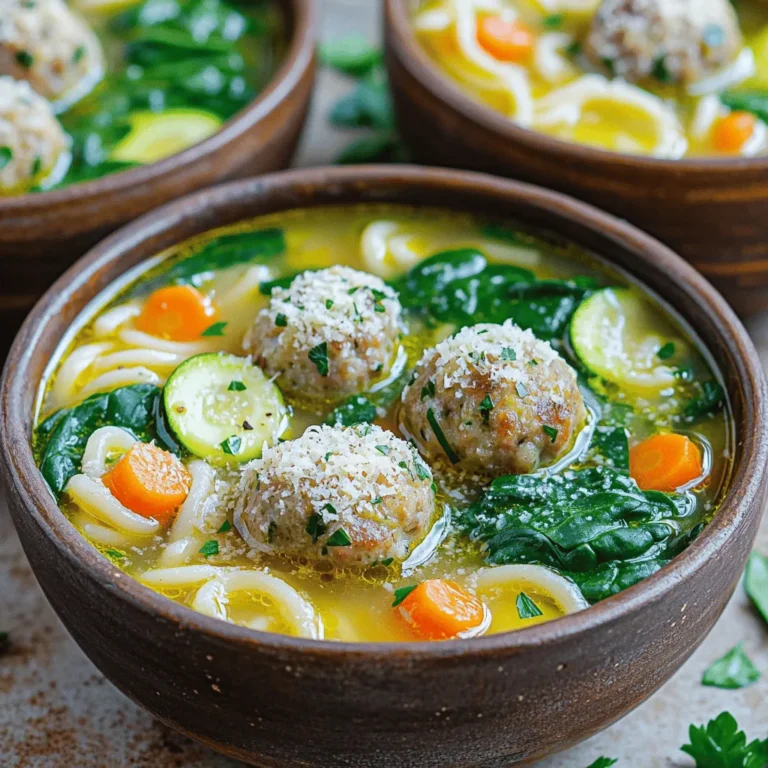
Italian Wedding Soup Hearty and Flavorful Delight

To make Chocolate Hazelnut Banana Sushi, you need these key ingredients: - 2 large ripe bananas - 1/4 cup chocolate hazelnut spread (like Nutella) - 4 whole wheat tortillas or crepes - 1/4 cup shredded coconut (unsweetened) - 1/4 cup chopped nuts (such as almonds or walnuts) - 1 tablespoon honey (optional) - Fresh berries for garnish (strawberries, blueberries, or raspberries) You can switch ingredients based on your taste or needs. Try almond butter instead of hazelnut spread. If you want a gluten-free option, use gluten-free tortillas or crepes. Instead of shredded coconut, consider using crushed graham crackers for a different crunch. If you don’t have fresh berries, use dried fruits like raisins or apricots. Adding garnishes makes your sushi look great! You can drizzle honey on top for extra sweetness. Fresh mint leaves add a pop of color. Chopped nuts sprinkled on top can give it more texture. You can even dust with cocoa powder for a chocolatey touch. These small details make your treat even more special! To make this fun treat, first gather your ingredients. You will need ripe bananas, chocolate hazelnut spread, and whole wheat tortillas. Now, lay out each tortilla flat. Spread 1-2 tablespoons of chocolate hazelnut spread evenly on each tortilla. Leave a small edge free of spread. Next, peel the bananas and place them on one edge of the tortilla. Roll the tortilla tightly around the banana. Press down gently to flatten the roll a bit. This helps hold it together. Use a sharp knife to cut the rolls into bite-sized pieces, about 1-inch thick. Mix shredded coconut and chopped nuts on a plate. Roll each sushi piece in this mix until fully coated. If you want, drizzle honey on top. Add fresh berries for a pretty touch. To make sure your rolls come out great, keep a few tips in mind. Use ripe bananas; they are easier to roll and taste sweeter. Spread the chocolate hazelnut spread evenly but not too thick. Too much spread can make the roll slippery. When rolling, start tight but do not squish the banana. If the ends come loose, use a bit more spread to seal them. Cut the rolls gently to avoid smashing them. While I can't provide images directly, visual guides can help you see each step. Look for videos of making chocolate hazelnut banana sushi online. Watching someone else roll the sushi can give you confidence. Seeing how the ingredients blend can inspire your creativity! To make your sushi rolls tight, start with a flat tortilla. Spread the chocolate hazelnut spread evenly, but leave a small edge. Place the banana on one side of the tortilla. Roll it tightly, pressing gently as you go. This helps keep the filling inside. If the roll feels loose, add a bit more spread to seal it. Cut the roll into bite-sized pieces. You will get neat sushi bites ready to eat! You can change up the flavor in fun ways. Try adding sliced strawberries or blueberries inside the roll. They add a fresh taste. You can also sprinkle cinnamon with the chocolate spread for warmth. Swap the chopped nuts for sunflower seeds if you want a nut-free treat. Drizzling honey on top adds a sweet touch. Choose any of these ideas to make your sushi special! A good-looking plate makes your sushi more fun to eat. Arrange the sushi pieces on a colorful plate. Garnish with fresh berries beside the rolls. You can also add a drizzle of honey over the top. If you have extra coconut or nuts, sprinkle them around the sushi. This adds a nice touch and makes your dish pop! {{image_2}} You can get creative with this recipe! Instead of chocolate hazelnut spread, try peanut butter or almond butter. Spread a layer of cream cheese for a rich taste. You can also add sliced strawberries or apples for a fruity twist. The fun is in mixing flavors you love! To make it vegan, use a plant-based hazelnut spread. Many brands offer this option. For gluten-free sushi, swap whole wheat tortillas with gluten-free wraps. Always check labels to ensure they fit your diet. These small changes make the treat suitable for everyone. In the summer, use fresh peaches or nectarines. They add a sweet and juicy touch! In the fall, try thinly sliced apples or pears. These fruits work well with the chocolate flavor. Seasonal fruits not only taste great but also add color to your dish! To keep your chocolate hazelnut banana sushi fresh, wrap each piece in plastic wrap. Place the wrapped sushi in an airtight container. Store it in the fridge for up to two days. This helps maintain that yummy taste and texture. You can freeze chocolate hazelnut banana sushi for later. First, wrap each piece in plastic wrap. Place them in a freezer-safe bag. They can stay frozen for up to a month. To enjoy, let them thaw in the fridge overnight before serving. Reheating is simple if you want a warm treat. Use a non-stick pan on low heat. Place the sushi pieces in the pan for a few minutes. This warms them up without making them soggy. Enjoy your tasty treat again! Yes, you can prepare this treat ahead of time. Just make sure to wrap each sushi roll tightly in plastic wrap. Store them in the fridge for up to 2 hours. The bananas can brown, so it's best to serve them fresh. If you need to make them earlier, you can keep the tortillas and bananas separate until you're ready to roll. If you want to swap the hazelnut spread, try using almond butter or peanut butter. These nut butters give great flavor and texture. You can also use sunflower seed butter for a nut-free option. Just spread it like you would the hazelnut spread. The taste will change, but it will still be yummy! You can get creative with fruits! Try using apples, strawberries, or peaches. Just slice them thinly so they fit well inside the roll. You can also mix different fruits for added flavor. Each fruit gives a new twist to the sushi and adds color too! Absolutely! Kids love fun shapes and flavors. This recipe is easy to make, and they can help too. Let them spread the chocolate hazelnut spread and roll the tortillas. It’s a great way to get them involved in the kitchen. Plus, who doesn’t love chocolate and bananas? This blog post covered how to make Chocolate Hazelnut Banana Sushi. We discussed essential ingredients, tasty substitutions, and optional garnishes. I provided step-by-step instructions, tips for rolling, and ways to enhance flavors. You also learned about variations, storage methods, and answers to common questions. This fun recipe is easy for everyone, from kids to adults. Enjoy experimenting with flavors and sharing this treat with friends and family. Happy rolling!

Chocolate Hazelnut Banana Sushi Tasty and Simple Treat

For this tasty dish, gather these fresh ingredients: - 4 bone-in, skin-on chicken thighs - 1 pound baby potatoes, halved - 4 cloves garlic, minced - 1 tablespoon fresh rosemary, chopped - 1 tablespoon fresh thyme, chopped - 2 tablespoons olive oil - 1 teaspoon paprika - Salt and pepper to taste - Juice of 1 lemon - Fresh parsley, chopped (for garnish) To make this meal, accurate measurements help. Here’s how you can adjust: - Chicken thighs: You can swap bone-in thighs for boneless. This cuts cooking time. - Potatoes: If you prefer, use larger potatoes. Just cut them into smaller pieces. - Herbs: Fresh herbs give great flavor. If you have dried herbs, use 1 teaspoon for each tablespoon. - Olive oil: Any cooking oil can work, but olive oil adds a lovely taste. - Paprika: For a smoky flavor, use smoked paprika instead. Fresh herbs taste bright and lively. They bring a special touch to your dish. I love using fresh rosemary and thyme in this recipe. Dried herbs, on the other hand, are handy and last longer. They can still give nice flavor but may lack some freshness. If you choose dried herbs, remember: - Use less, as they are stronger. - Add them early in cooking to let their flavors bloom. Using fresh herbs elevates this meal. But if you only have dried ones, don’t worry! You can still make a delicious dish. Start by preheating your oven to 425°F (220°C). This high heat will help crisp the chicken skin and brown the potatoes. While the oven heats, grab a large mixing bowl. Add halved baby potatoes, minced garlic, chopped rosemary, chopped thyme, olive oil, paprika, salt, and pepper. Toss everything well. Ensure the potatoes are fully coated in flavors. Next, place the chicken thighs skin-side up in a roasting pan or cast-iron skillet. Squeeze the juice from one lemon over the chicken. Then, season the chicken with salt and pepper. This step is key for great flavor. Arrange the seasoned potatoes around the chicken in the pan. Drizzle any remaining oil and herbs from your mixing bowl over the chicken and potatoes. Roast everything in the preheated oven for about 35 to 40 minutes. The chicken is done when it reaches an internal temperature of 165°F (74°C). The skin should be crispy and the potatoes tender and golden brown. Use a meat thermometer to check the chicken's doneness. This tool is simple and helps avoid any guesswork. To check if the chicken is fully cooked, insert a meat thermometer into the thickest part of the thigh, avoiding the bone. If it reads 165°F (74°C), it's ready. For the potatoes, pierce them with a fork. They should be soft and easy to cut. If the chicken isn't done, return it to the oven for a few more minutes. Always let the dish rest for 5 minutes after cooking. This step allows juices to settle and enhances the flavor. To get the best crispy chicken skin, start with bone-in, skin-on thighs. Pat the skin dry with a paper towel. This step removes moisture for better crisping. Next, use olive oil to coat the skin. This helps it brown nicely. Season with salt and pepper. The salt draws out moisture, enhancing crispiness. Roast in a hot oven at 425°F. This high heat cooks the skin quickly. After 35-40 minutes, check if the skin is golden and crispy! Flavor balance is key for this dish. Use fresh herbs like rosemary and thyme for a bright taste. Minced garlic adds depth, while lemon juice gives a fresh zing. Don’t forget the salt and pepper. These simple seasonings enhance all the flavors. Taste the potatoes as you mix them. Adjust the seasoning if needed. This small step makes a big difference. When everything cooks together, the tastes blend. You’ll enjoy a savory and satisfying meal. To make this dish, a few tools are very helpful. A large mixing bowl is great for tossing the potatoes and herbs. Use a roasting pan or cast-iron skillet for even cooking. A meat thermometer is a must. It helps you check if the chicken is done. Aim for an internal temperature of 165°F. A paper towel is handy for drying the chicken skin. Lastly, have a sharp knife ready for cutting the chicken and potatoes. These tools make your cooking easier and more fun! {{image_2}} You can boost your meal by adding seasonal veggies. Carrots, bell peppers, and zucchini work well. Chop them into bite-sized pieces. Mix them with the potatoes and herbs. This adds color and nutrients to your dish. It also gives new flavors. Try using vegetables that are fresh and in season for the best taste. If you want to switch up the protein, you have options. Chicken breasts or drumsticks are great choices. For a plant-based option, try chickpeas or tofu. Just adjust the cooking time. Make sure the chicken reaches 165°F (74°C), or the tofu is golden brown. This keeps your meal exciting and allows for variety. Herbs can change the taste of your dish. If you want to try something new, swap rosemary and thyme. Basil, oregano, or dill can add unique flavors. Mix and match them based on your taste. Fresh herbs give a bright flavor, while dried ones offer convenience. Experiment to find your favorite blend, and enjoy the fresh taste in every bite! After enjoying your garlic herb chicken and potatoes, let the leftovers cool. Place the chicken and potatoes in an airtight container. This helps keep them fresh. Store them in the fridge for up to three days. If you want to keep them longer, freezing is a great option. To reheat your garlic herb chicken and potatoes, first, take them out of the fridge. Preheat your oven to 350°F (175°C). Place the chicken and potatoes in a baking dish. Cover with foil to keep moisture in. Heat for about 20-25 minutes. Check to make sure everything is hot throughout. You can also use a microwave, but the oven keeps the skin crispy. If you have extra garlic herb chicken and potatoes, freezing is easy. Let the dish cool completely. Then, wrap the food tightly in plastic wrap. Place it in a freezer-safe bag or container. Label it with the date. This dish can stay in the freezer for up to three months. To enjoy later, let it thaw in the fridge overnight before reheating. Yes, you can use boneless chicken for this dish. Boneless chicken cooks faster than bone-in chicken. To keep it juicy, reduce the cooking time. Aim for 25-30 minutes in the oven. Check that it reaches 165°F for safety. You have many great options to pair with Garlic Herb Chicken and Potatoes. Here are some ideas: - A simple green salad adds freshness. - Steamed broccoli or green beans bring color and nutrients. - Garlic bread gives a nice crunch. - Rice or quinoa can soak up the chicken’s juices. Absolutely! A slow cooker works well for this recipe. Start by searing the chicken in a pan for flavor. Then, add all the ingredients to the slow cooker. Cook on low for 6-7 hours or high for 3-4 hours. The chicken will be tender, and the potatoes will absorb all the tasty herbs. This blog post covered the essentials of making Garlic Herb Chicken and Potatoes. We explored the key ingredients and their measurements. You learned tips for cooking perfectly, like checking doneness and achieving crispy skin. We also discussed how you can vary the recipe with different veggies and proteins. In closing, remember to experiment with flavors and adjust as you like. Enjoy your cooking journey!

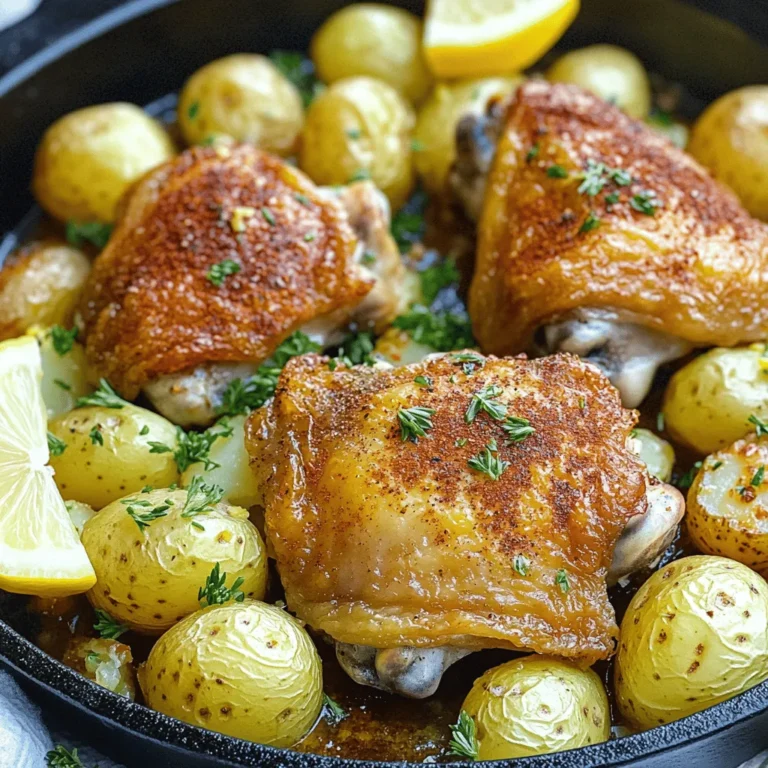
Garlic Herb Chicken and Potatoes Savory Dinner Idea

To create these tasty spicy black bean quesadillas, gather these key items: - 1 can (15 oz) black beans, drained and rinsed - 1 cup corn (fresh, frozen, or canned) - 1 small red onion, finely chopped - 2 cloves garlic, minced - 1 jalapeño, finely diced (remove seeds for less heat) - 1 teaspoon cumin - 1 teaspoon chili powder - 1 cup shredded cheese (cheddar or Monterey Jack) - 4 large flour tortillas - 2 tablespoons olive oil - Salt and pepper to taste These ingredients work together to create a filling that is both hearty and flavorful. The black beans provide protein and fiber, while the corn adds sweetness. Feel free to add your own twist! Here are some optional ingredients: - Bell peppers for extra crunch - Spinach or kale for added greens - Avocado slices for creaminess - A splash of lime juice for zest These extras let you make the recipe your own! Garnishes and sides enhance the meal. Here are some ideas: - Fresh cilantro, chopped - Sour cream for creaminess - Salsa for extra flavor - Guacamole for a rich dip These toppings make your quesadillas even more enjoyable. Each bite becomes a burst of flavor! {{ingredient_image_1}} To start, gather your ingredients. You will need black beans, corn, red onion, garlic, jalapeño, cumin, chili powder, and some salt and pepper. 1. Heat 1 tablespoon of olive oil in a large skillet over medium heat. 2. Add the chopped red onion and minced garlic. Cook for about 2-3 minutes. The onion should look soft and clear. 3. Next, add the diced jalapeño, cumin, and chili powder. Stir this mix for one minute. This helps the spices release their flavors. 4. Now, stir in the black beans and corn. Season with salt and pepper. Cook for another 3-4 minutes. You want everything warm and well mixed. Now it's time to make the quesadillas. 1. Take another non-stick skillet and heat 1 tablespoon of olive oil over medium-low heat. 2. Place one large tortilla in the skillet. 3. On one half of the tortilla, spread a good amount of the black bean filling. Top this with shredded cheese. 4. Fold the tortilla over the filling carefully. 5. Cook for about 3-4 minutes until the bottom is golden brown. 6. Flip the quesadilla and cook for another 3-4 minutes. The cheese should melt and the other side should brown too. 7. Remove it from the skillet. Repeat this process with the rest of the tortillas and filling. Getting the right texture is key. - Use medium-low heat. This helps the cheese melt without burning the tortilla. - Don’t overstuff the quesadilla. Too much filling makes it hard to flip. - Let the cooked quesadillas sit for a minute before slicing. This helps the cheese set a bit, making it easier to cut. - Garnish with fresh cilantro and serve warm with sour cream and salsa. Enjoy! To adjust the heat in your spicy black bean quesadillas, focus on the jalapeño. If you like heat, add the seeds. For a milder taste, remove them. You can also add more chili powder or use a hotter pepper like serrano. If you want no heat, skip the jalapeño. Instead, use bell peppers for a sweet taste. Heating tortillas well makes all the difference. Use a dry skillet over medium heat. Warm each tortilla for about 30 seconds on each side. This step makes them soft and easy to fold. You can also wrap them in a damp paper towel and microwave them for 20 seconds. This method keeps them warm and pliable. Cooking multiple quesadillas is simple. Use two skillets at once, if you have them. This way, you can cook more quesadillas in less time. Just keep the heat low to avoid burning. Cook the quesadillas until both sides are golden. You can also keep them warm in an oven set to low heat. This keeps them nice while you finish cooking the rest. Pro Tips Use Fresh Ingredients: Fresh vegetables and herbs will enhance the flavor of your quesadillas. Opt for fresh corn and cilantro for a vibrant taste. Customize the Heat: Adjust the amount of jalapeño based on your heat preference. You can also add crushed red pepper flakes for extra spice. Perfectly Melted Cheese: For the best cheese melt, use a combination of cheeses or grate your own. Pre-packaged shredded cheese often has anti-caking agents that can affect melting. Make Ahead: Prepare the black bean filling in advance and store it in the fridge. This makes assembling the quesadillas quick and easy when you're ready to eat. {{image_2}} You can easily make these quesadillas vegetarian. Skip the cheese and use vegan cheese instead. You can also add more veggies like spinach or bell peppers. They taste great and add color too. Mix up the flavors! Try adding diced tomatoes for freshness. Fresh lime juice can bring a zesty kick. You might also like to add avocado slices for creaminess. Experiment with herbs like oregano or basil for a twist. Want to boost protein? Add cooked chicken or ground turkey to the filling. You can also use tofu for a healthy option. Just make sure to season it well to match the spicy beans. This way, you keep the quesadillas hearty and satisfying. Store leftover quesadillas in an airtight container. Let them cool to room temperature first. This helps keep them fresh and tasty. You can also wrap them tightly in plastic wrap. Keep them in the fridge. They last up to three days. To reheat quesadillas, use a skillet for best results. Heat a non-stick skillet over medium heat. Place the quesadilla in the skillet. Heat for about 2-3 minutes on each side. This keeps the crust crispy and warm. You can also use the microwave. Heat for 30 seconds to 1 minute. But the crust may not stay crisp. Freezing is a great way to save extra quesadillas. First, let them cool completely. Wrap each quesadilla in foil or plastic wrap. Place them in a freezer-safe bag. Label the bag with the date. They stay good for up to three months. To eat, thaw in the fridge overnight. Then reheat in the skillet for the best texture. Yes, you can use different types of cheese. Cheddar and Monterey Jack are great choices. You can also try pepper jack for a spicy kick. If you want a creamier texture, use mozzarella. Mixing cheeses can add depth to the flavor. You can make quesadillas without tortillas by using thin slices of vegetables. Zucchini, eggplant, or bell peppers work well. Just slice them thinly and grill or sauté. Then fill with your black bean mixture and cheese. Cook until the cheese melts. You can serve quesadillas with sour cream and salsa for dipping. Guacamole is also a great choice. A fresh salad or some chips can add crunch. Pair with a side of Mexican rice for a full meal. In this post, I shared the key ingredients for making quesadillas, the preparation steps, and useful tips. Customization options can change the flavor and fit any taste. You can even store leftovers for later meals, ensuring none goes to waste. Enjoy experimenting with different fillings and spices to find what you love most. With this guide, you are well-equipped to make delicious quesadillas. Enjoy cooking and savoring every bite of your creations!

Spicy Black Bean Quesadillas Flavorful and Simple Meal

- 2 medium sweet potatoes, peeled and diced - 1 can (15 oz) black beans, drained and rinsed - 1 can (14 oz) diced tomatoes with green chilies - 1 medium onion, finely chopped - 3 cloves garlic, minced - 1 bell pepper (any color), chopped - 2 cups vegetable broth - 2 teaspoons ground cumin - 1 teaspoon smoked paprika - 1 teaspoon chili powder - 1/2 teaspoon cayenne pepper (adjust to taste) - Salt and pepper to taste - 1 tablespoon olive oil - 1 lime, juiced - Fresh cilantro for garnish I love using fresh sweet potatoes. They add a nice sweetness and texture. You can swap them with regular potatoes if you want. Canned black beans save time. If you prefer dried beans, soak them overnight and cook them first. Use any bell pepper color; each adds its own twist. For the tomatoes, choose ones with added green chilies for heat. If you want less spice, skip the cayenne pepper. Fresh cilantro brightens the dish, so don’t skip it! Each serving has about: - Calories: 240 - Protein: 10g - Carbohydrates: 50g - Fiber: 15g - Fat: 4g - Sodium: 400mg This chili is not just tasty; it's also packed with nutrients! Sweet potatoes provide vitamins and fiber. Black beans add protein and more fiber. You get a hearty meal that feels good and tastes great. {{ingredient_image_1}} First, gather all your ingredients. You will need: - 2 medium sweet potatoes, peeled and diced - 1 can (15 oz) black beans, drained and rinsed - 1 can (14 oz) diced tomatoes with green chilies - 1 medium onion, finely chopped - 3 cloves garlic, minced - 1 bell pepper (any color), chopped - 2 cups vegetable broth - 2 teaspoons ground cumin - 1 teaspoon smoked paprika - 1 teaspoon chili powder - 1/2 teaspoon cayenne pepper (adjust to taste) - Salt and pepper to taste - 1 tablespoon olive oil - 1 lime, juiced - Fresh cilantro for garnish Next, peel and dice the sweet potatoes. Chop the onion and bell pepper. Mince the garlic. Rinse the black beans. This prep makes your cooking smooth and fun. Start by heating the olive oil in a large pot or Dutch oven over medium heat. Add the chopped onion and bell pepper. Cook them for about five minutes until they soften. Then, add the minced garlic. Cook it for another minute. This step brings out the aroma. Next, toss in the diced sweet potatoes. Stir them well to mix with the onions and peppers. Pour in the vegetable broth, diced tomatoes (with their juices), and black beans. Stir everything together. Season the chili with cumin, smoked paprika, chili powder, cayenne pepper, salt, and pepper. Stir well again. Bring the chili to a boil. Once it boils, reduce the heat to low, cover the pot, and let it simmer. Cook for 25-30 minutes until the sweet potatoes are tender. Stir occasionally, so nothing sticks to the pot. When ready, taste the chili. You can adjust the seasoning if needed. Squeeze in the lime juice and mix it well. This adds a bright flavor. Always taste your chili before serving. If it needs more spice, add more cayenne pepper. For more depth, add an extra dash of smoked paprika. If it feels too thick, just add a bit more vegetable broth. For garnish, sprinkle fresh cilantro on top before serving. You can also add a lime wedge on the side. This makes your dish look great and adds flavor. Enjoy your hearty and healthy meal! To make the best sweet potato black bean chili, start with fresh ingredients. Fresh sweet potatoes bring a natural sweetness. Use ripe tomatoes for a richer flavor. Always rinse canned beans to reduce sodium. Cook the chili low and slow for deep taste. Stir often to avoid sticking. Add layers of flavor by using spices wisely. Ground cumin and smoked paprika add warmth. Adjust cayenne pepper for your spice level. A squeeze of lime brightens the dish. For extra texture, top with crunchy tortilla chips. Fresh cilantro adds a nice herbaceous note. Try adding corn for a sweet pop. Don’t skip sautéing the onions and peppers; this builds flavor. Avoid overcooking the sweet potatoes, or they may turn mushy. Be cautious with salt; taste before adding more. If it’s too thick, add more broth. Lastly, don’t forget to taste and adjust before serving. Pro Tips Choosing Sweet Potatoes: Opt for firm, smooth sweet potatoes without any blemishes to ensure the best flavor and texture. Enhancing Flavor: For a deeper flavor, consider roasting the sweet potatoes before adding them to the chili. Adjusting Heat: If you prefer your chili spicier, feel free to add more cayenne pepper or include chopped jalapeños. Make-Ahead Option: This chili can be made ahead of time; it tastes even better the next day after the flavors have melded together. {{image_2}} This chili is naturally vegan. It has no meat and uses plant-based ingredients. The sweet potatoes and black beans give it a hearty texture. You can add more beans or even lentils for extra protein. Feel free to skip the lime juice if you prefer. Good news! This chili is gluten-free. All the ingredients are safe for a gluten-free diet. Just make sure to check the labels on canned goods. Some brands may add gluten as a thickener. Use a gluten-free vegetable broth to keep it safe. You can make this chili your own. Try adding corn for a sweet crunch. Chopped zucchini or carrots can add more veggies. For a spicy kick, toss in jalapeños or habaneros. Fresh herbs like parsley or basil can brighten the dish. You might even add quinoa for more texture and protein. Each change can make your chili unique and delicious! To store your leftover sweet potato black bean chili, let it cool first. Once cooled, transfer it into an airtight container. Make sure to seal it well to keep air out. You can keep it in the fridge for up to five days. Label the container with the date, so you know when it was made. If you want to freeze the chili, it’s simple. Place the cooled chili in freezer-safe containers or heavy-duty bags. Leave some space at the top because liquids expand when frozen. Your chili will stay fresh for up to three months. When you are ready to eat it, thaw it in the fridge overnight before reheating. To reheat the chili, you have a few options. You can use the stove, microwave, or oven. If using the stove, pour the chili into a pot over medium heat. Stir it often until it’s hot. For the microwave, place the chili in a microwave-safe bowl and heat in 1-minute intervals, stirring in between. If using the oven, cover it with foil and heat at 350°F until warm. Always check that it’s heated through before serving. Enjoy your delicious chili! Yes, you can make this chili ahead of time. It tastes even better the next day. The flavors blend well when it sits overnight in the fridge. Just keep it in an airtight container. When you're ready to eat, heat it in a pot over medium heat. You can serve this chili with a variety of sides. Crusty bread or tortilla chips work great for dipping. A side salad adds freshness. You might also try some avocado slices or sour cream on top for creaminess. To add more heat, use more cayenne pepper. You can also add chopped fresh jalapeños. If you like smoky flavors, try adding smoked chipotle peppers. Adjust the spice levels to fit your taste. Yes, you can use other beans if you prefer. Kidney beans or pinto beans are great choices. Just make sure to rinse and drain them well. This keeps the chili flavorful and not too salty. If you don’t have sweet potatoes, try using regular potatoes. You can also use squash or carrots. Each will give a different taste but still keep it hearty and filling. This chili lasts about 4-5 days in the fridge. Make sure to store it in an airtight container. If you want to keep it longer, consider freezing it. To freeze, let the chili cool first. Then, transfer it to a freezer-safe container. Leave some space at the top for expansion. It can last up to 3 months in the freezer. Absolutely! You can add corn, zucchini, or spinach. Just chop them into small pieces and add them during cooking. This boosts nutrition and adds color to your dish. You now have all the tools to make a great chili. We explored the key ingredients, how to prepare and cook, and tips to enhance flavor. I shared variations for vegan and gluten-free options. You learned how to store leftovers and answered common questions about this dish. Chili can be simple or complex, but it’s all about what you like. Get creative and enjoy each bite! Cooking is a journey, so make it fun.

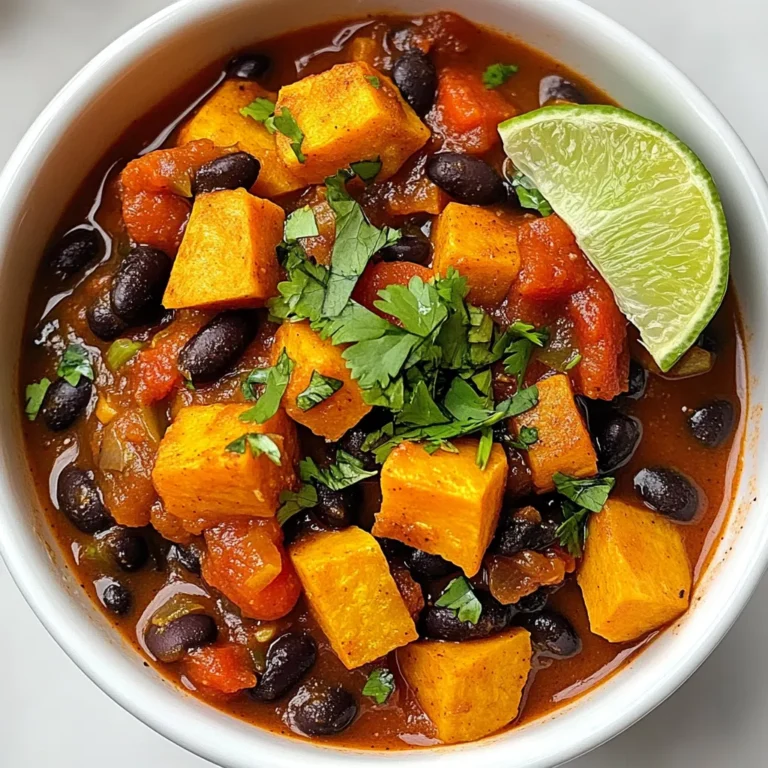
Sweet Potato Black Bean Chili Hearty and Healthy Meal

- 4 cups Rice Krispies cereal - 3 tablespoons unsalted butter - 1 package (10 oz) marshmallows (or 6 cups mini marshmallows) - 1 cup creamy peanut butter - 1/2 teaspoon vanilla extract - 1 cup dark chocolate chips - 1/2 cup milk chocolate chips - Sea salt (optional) Gather all these ingredients before you start. Each one plays a key role. The Rice Krispies give the treats their crunch. The butter and marshmallows bind everything together. Peanut butter adds a rich, creamy layer. Vanilla gives a nice aroma and taste. The dark and milk chocolate will create a sweet, decadent finish. If you like a little salt, sprinkle some sea salt on top. This will balance the sweetness and add depth. Having everything ready makes the process smoother and more fun. {{ingredient_image_1}} First, lightly grease a 9x13 inch baking dish. You can use cooking spray or butter. This step helps the treats come out easily later. Make sure the dish is the right size. A smaller dish may make the treats too thick. In a large saucepan, melt 3 tablespoons of unsalted butter over low heat. Add the marshmallows, stirring often. Keep mixing until everything is smooth and melted. This is the key to a great texture. Once the marshmallows melt, take the pan off the heat. Quickly stir in 1 cup of creamy peanut butter and 1/2 teaspoon of vanilla extract. Mix well to make sure everything is combined. This adds flavor and creaminess to your treats. Now, add 4 cups of Rice Krispies cereal to the pan. Gently fold the cereal into the melted mixture. Make sure every piece is coated well. This ensures every bite is tasty and sweet. Pour the mix into the greased baking dish. Use a spatula or your hands to press it down firmly. Make sure it spreads evenly. This step is important to get a good bite and firmness. In a microwave-safe bowl, combine 1 cup of dark chocolate chips and 1/2 cup of milk chocolate chips. Microwave them in 30-second bursts, stirring in between. Stop when the chocolate is smooth and melted. This will be the delicious topping. Pour the melted chocolate over the Rice Krispie mixture. Use a spatula to spread it evenly. Optionally, sprinkle a bit of sea salt on top for extra taste. Place the dish in the refrigerator for about 30 minutes. After it sets, cut into squares or bars. Enjoy your tasty treats! To get the best texture in your treats, press the mixture firmly into the pan. This step helps everything stick together. Use a spatula or your hands, greased for easy handling. Make sure the mixture is level and compact. When melting chocolate, the key is to go slow. Use a microwave-safe bowl. Microwave the chocolate in 30-second bursts. Stir the chocolate between each burst. This way, it melts evenly and stays smooth. To make your treats even more fun, think about toppings! You can add colorful sprinkles or chopped nuts for a crunchy texture. They also make your treats pop with color. Feel free to customize with different chocolate types. You could try white chocolate or even flavored chocolate. Mixing chocolates can create unique flavors. Get creative when presenting your treats. You can stack them on a nice plate or cut them into fun shapes. Wrapping them in clear bags makes a great gift, too! For pairing ideas, serve these treats with a glass of milk or hot chocolate. They also go well with a scoop of ice cream on the side. Enjoy sharing these delightful snacks! Pro Tips Use Fresh Ingredients: Make sure your marshmallows and chocolate chips are fresh for the best flavor and texture. Don’t Overheat the Chocolate: When melting chocolate, be careful not to overheat it. Stir frequently and use short intervals to avoid burning. Grease Your Hands: When pressing the mixture into the pan, greasing your hands will prevent sticking and make it easier to spread. Customize Your Mix-ins: Feel free to add nuts, dried fruits, or additional chocolate for a personalized touch! {{image_2}} You can switch up the peanut butter in your treats. Try almond butter or sunflower seed butter. Both give a great taste. You can also use flavored chocolate. Try mint or orange chocolate for a fun twist. These flavors add a new layer to your treats. For gluten-free options, use gluten-free Rice Krispies. Many brands offer this now. If you need vegan treats, swap the butter for coconut oil. Use a dairy-free chocolate for the topping. These changes keep the yummy flavors without dairy or gluten. Add candy pieces like M&Ms or Reese's Pieces for a sweet crunch. You can also toss in nuts like almonds or walnuts. Dried fruits like cranberries or raisins add chewiness. These mix-ins make your treats even more fun and tasty! - Store your Chocolate Covered Rice Krispie Treats in an airtight container. - Keep the container in a cool, dry place. - These treats will last up to one week at room temperature. - Watch for signs like a hard texture or off smell, which indicate spoilage. - You can freeze the treats before cutting for easy storage. - If you freeze after cutting, wrap each piece in plastic wrap. - To defrost, leave them at room temperature for about an hour before serving. Yes, you can make these treats without peanut butter. You can try using almond butter or sun butter instead. These options keep the treat creamy and add a nice flavor. Dark chocolate and milk chocolate both work well. Dark chocolate gives a rich taste, while milk chocolate adds sweetness. You can also mix them for a balanced flavor. You can add colorful sprinkles or themed candies on top. For holidays, use colored chocolate melts or shape them into festive forms. Wrapping them in pretty paper makes them great gifts. Yes, you can substitute marshmallow fluff for melted marshmallows. Use about 2 cups of fluff for this recipe. The texture will be slightly different but still delicious. To cut these bars cleanly, use a sharp knife. Lightly grease the knife to avoid sticking. Let the bars chill in the fridge before cutting for clean edges. You learned about the key ingredients for delicious Rice Krispies treats. We covered step-by-step instructions, tips for the perfect texture, and fun variations. Remember, the secret lies in mixing well and pressing firmly. Don't hesitate to experiment with flavors or toppings to make them your own. Store your treats properly to enjoy them longer. I hope you have fun making these tasty snacks!

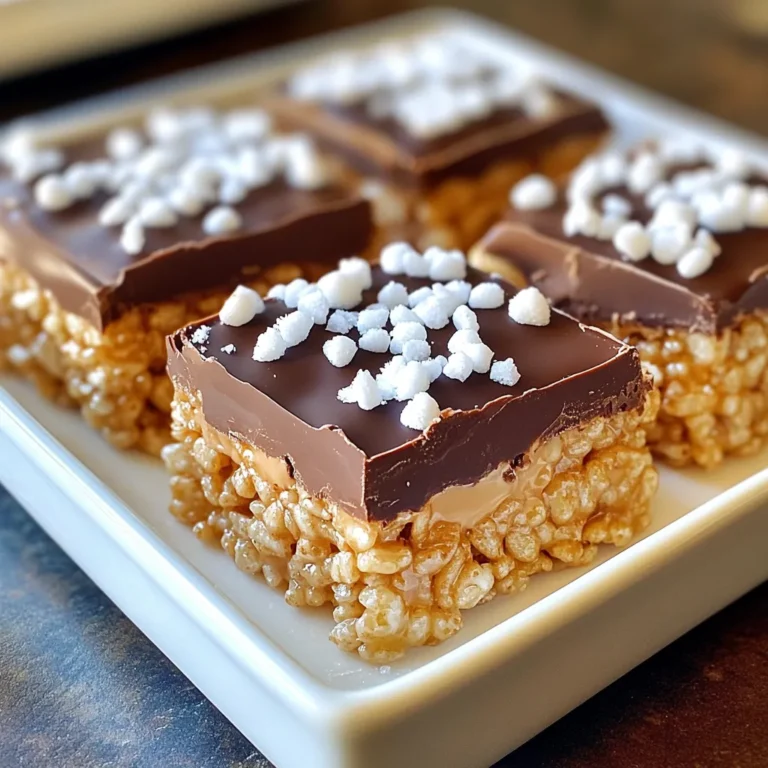
Chocolate Covered Rice Krispie Treats Delightful Snack

- 1 lb boneless, skinless chicken breasts - 1 cup BBQ sauce (your favorite or homemade) - 1 tablespoon olive oil - 1 teaspoon garlic powder - 1 teaspoon onion powder - 1/2 teaspoon smoked paprika - 1/4 teaspoon cayenne pepper (optional for a little heat) - Salt and pepper to taste - 8 slider buns - 1/2 cup coleslaw (store-bought or homemade) - Fresh cilantro for garnish When I make BBQ pulled chicken sliders, I always start with fresh ingredients. The boneless, skinless chicken breasts are key. They cook up tender and juicy, perfect for shredding. I love using BBQ sauce. You can choose store-bought for speed, or make your own for a special touch. The sauce is the heart of this dish. Don't skip the seasoning! Garlic powder, onion powder, and smoked paprika add depth. The cayenne pepper gives a hint of heat if you like spice. Adjust salt and pepper to your taste. For the sliders, I choose soft buns. They hold the chicken well without falling apart. If you're feeling creative, coleslaw adds crunch. You can use store-bought or whip up a quick batch at home. Lastly, fresh cilantro makes a great garnish. It brightens the dish and adds a pop of color. Enjoy these sliders at your next party or gathering! {{ingredient_image_1}} Start by setting up your slow cooker. Place 1 lb of boneless, skinless chicken breasts inside. Drizzle 1 tablespoon of olive oil over the chicken. Next, season it with 1 teaspoon of garlic powder, 1 teaspoon of onion powder, 1/2 teaspoon of smoked paprika, and a pinch of salt and pepper. If you like heat, add 1/4 teaspoon of cayenne pepper. Pour 1 cup of your favorite BBQ sauce over the chicken. Make sure it coats the chicken well. Cover the slow cooker and set it to low for 6-8 hours or high for 3-4 hours. Cooking on low gives the chicken time to soak in the flavors and become very tender. This tenderness is key for shredding later. After cooking, take the chicken out of the slow cooker. Use two forks to shred the chicken into bite-sized pieces. This is easy and fun! Return the shredded chicken to the slow cooker and mix it with the remaining BBQ sauce. This step ensures every bite is packed with flavor. While the chicken absorbs the sauce, it’s time to toast the buns. Preheat a skillet over medium heat. Lightly butter the outside of each slider bun. Toast them in the skillet until they are golden brown. This adds a nice crunch to your sliders. To assemble, start with the bottom half of each toasted slider bun. Spoon a generous amount of BBQ pulled chicken on top. Then, add a spoonful of coleslaw for some crunch and creaminess. Finally, place the top half of the bun over the coleslaw. Your sliders are now ready to serve! Arrange them on a platter and garnish with fresh cilantro for a bright touch. - Pair your sliders with pickles for a crunchy bite. - Add jalapeños for a spicy kick. - Serve extra BBQ sauce on the side for dipping. - Offer a variety of drinks, like iced tea or lemonade, to balance the flavors. - Keep your sliders warm in a slow cooker or covered dish while guests arrive. - Experiment with spices like cumin or chili powder for a twist. - Mix honey or mustard into your BBQ sauce for added sweetness or tang. - Customize your coleslaw by adding apples or raisins for a fruity touch. - Use different types of cabbage for a unique crunch. - Do not overcook the chicken; it should be tender, not dry. - Always toast your buns; this adds a nice texture. - Avoid skipping the sauce mixing step; it ensures each bite is flavorful. - Do not forget to let the chicken absorb the sauce before serving. Pro Tips Use Thighs for Juiciness: For a richer flavor and juicier texture, consider using boneless, skinless chicken thighs instead of breasts. Homemade BBQ Sauce: If you have time, try making your own BBQ sauce for a personal touch. You can adjust the sweetness and spiciness to your liking! Let it Rest: After cooking, let the shredded chicken sit in the sauce for a few minutes before serving. This allows the flavors to meld beautifully. Experiment with Toppings: Don’t hesitate to get creative with toppings! Try adding pickled red onions, jalapeños, or even avocado for a unique twist. {{image_2}} You can switch up the meat for pulled sliders. Try using pork or beef if you want a different taste. Both meats work well with BBQ sauce. They add a nice richness that many people love. If you want a plant-based option, consider using jackfruit or tofu. Jackfruit has a texture similar to pulled meat, and it soaks up flavors well. Tofu can also be marinated and grilled for a tasty twist. Changing the BBQ sauce can really change your sliders. You can use sweet, tangy, or spicy BBQ sauces. Each type brings a unique taste. For an extra kick, try adding fruit like pineapple or apple to your sauce. These fruits add a natural sweetness that balances the savory flavors. You can also mix in some spices to make it even more interesting. If you're looking for gluten-free options, there are many choices. You can find gluten-free slider buns at most stores. Another fun option is using pretzel buns. They add a nice chew and flavor. For a lighter choice, use lettuce wraps instead of buns. This keeps the meal fresh and low-carb. Each of these options offers a different twist on your BBQ pulled chicken sliders. To keep your BBQ pulled chicken sliders fresh, store them in an airtight container. Place any leftover chicken in a separate container. Make sure to cool it down before sealing. This helps keep flavors intact. You can store the sliders and chicken for up to three days in the fridge. If you want to save some pulled chicken for later, freezing is a great option. Portion the shredded chicken into freezer bags. Try to remove as much air as possible before sealing. This helps prevent freezer burn. You can freeze it for up to three months. When you are ready to eat, thaw the chicken overnight in the fridge. To reheat, place it in a pan on low heat. Add a splash of BBQ sauce to keep it moist. Stir occasionally until warm. You can also microwave it if you're in a hurry. BBQ pulled chicken sliders last about 3 to 4 days in the fridge. Store them in an airtight container. The chicken stays tasty and safe to eat during this time. Yes, you can make BBQ pulled chicken sliders ahead of time! Cook the chicken and shred it as usual. Store the pulled chicken in the fridge. Assemble the sliders just before serving for the best flavor. Many side dishes work well with BBQ pulled chicken sliders. Here are a few options: - Baked beans - Potato salad - Corn on the cob - Chips and salsa These sides add flavor and fun to your meal. Yes, you can make BBQ pulled chicken in an Instant Pot. Place the chicken, olive oil, and spices in the pot. Add the BBQ sauce and cook on high pressure for 10 to 15 minutes. Let the steam release naturally before shredding the chicken. The best BBQ sauce for pulled chicken varies by taste. You can use sweet, tangy, or smoky flavors. A homemade sauce lets you control the taste. However, your favorite store-bought sauce also works great! In this blog post, we covered how to make delicious BBQ pulled chicken sliders from scratch. We discussed ingredients, cooking methods, and tips for the best flavor. Remember to toast your buns for great texture and avoid overcooking the chicken. You can customize ingredients to suit your taste or try different meats. With these steps, your sliders will impress anyone at your gathering. Get ready to enjoy some tasty bites!

BBQ Pulled Chicken Sliders Flavorful Party Delight

To make Tuscan Tomato White Bean Soup, gather these ingredients: - 2 tablespoons olive oil - 1 medium onion, finely chopped - 2 cloves garlic, minced - 1 carrot, diced - 1 celery stalk, diced - 1 can (28 oz) crushed tomatoes - 1 can (15 oz) white beans, drained and rinsed - 4 cups vegetable broth - 1 teaspoon dried basil - 1 teaspoon dried oregano - 1 teaspoon red pepper flakes (optional) - Salt and pepper to taste - 2 cups fresh spinach or kale, roughly chopped - Fresh parsley, chopped (for garnish) - Optional: Parmesan cheese, grated (for serving) You can swap some ingredients based on what you have. Use any oil instead of olive oil. If you lack white beans, chickpeas work too. Use fresh tomatoes if you can’t find crushed ones. You can also replace vegetable broth with chicken broth. Fresh herbs like thyme or rosemary can replace dried herbs. For greens, any leafy vegetable works, like Swiss chard or arugula. When choosing your vegetables, look for bright colors and firmness. The onion should feel heavy for its size. Look for garlic with tight skin, not sprouted. Choose carrots that are smooth and feel solid. Pick celery that is crisp and green. When selecting greens, go for vibrant leaves without wilting or brown spots. These tips ensure you get the best flavors in your soup! {{ingredient_image_1}} To make this Tuscan Tomato White Bean Soup, gather all the ingredients first. You need olive oil, onion, garlic, carrot, celery, crushed tomatoes, white beans, vegetable broth, dried herbs, spinach, and seasoning. Chopping the veggies ahead saves time and keeps you organized. This soup is simple and quick to prepare, so let’s dive in! 1. Heat the olive oil: In a large pot, place the olive oil over medium heat. 2. Sauté the veggies: Add the chopped onion, diced carrot, and diced celery. Cook for 5-7 minutes. The onion should turn soft and clear. 3. Add garlic: Stir in the minced garlic. Cook for 1-2 minutes. The smell will be great! 4. Combine tomatoes and broth: Pour in the crushed tomatoes and vegetable broth. Bring to a gentle simmer. 5. Mix in beans and herbs: Add the drained white beans, dried basil, oregano, red pepper flakes, salt, and pepper. Stir it all together. 6. Simmer the soup: Let the soup simmer for 20-25 minutes. This helps the flavors blend well. 7. Add greens: Before serving, stir in the chopped spinach or kale. Cook for another 5 minutes until they wilt. 8. Taste and serve: Taste the soup and adjust seasoning if needed. Serve hot, garnished with fresh parsley and grated Parmesan cheese if you like. To save time while cooking, prep your vegetables ahead. You can chop them the night before and store them in the fridge. Using canned beans helps cut down on cooking time too. Simmer the soup while you prepare your side dishes or set the table. This way, you can enjoy your meal sooner! To enhance the flavors of your Tuscan Tomato White Bean Soup, use fresh herbs. Fresh basil or parsley gives a bright taste. You can also add a splash of lemon juice at the end. This adds a nice zing. For a deeper flavor, roast your garlic before adding it to the pot. Roasting makes it sweet and rich. One common mistake is not sautéing the veggies long enough. Sauté them until they are soft and fragrant. This step builds a good base for the soup. Another mistake is adding too much salt too soon. Taste as you go. It’s easier to add salt later than to fix over-salting. Serve your soup with crusty bread or a side salad. A sprinkle of grated Parmesan adds a lovely touch. If you want a little heat, serve it with red pepper flakes on the side. You can also pair it with a light white wine. Enjoy the flavors together for a complete meal! Pro Tips Use Fresh Herbs: Fresh basil or oregano can enhance the flavor profile of the soup significantly. Add them right at the end for a vibrant taste. Adjust the Consistency: If you prefer a creamier soup, use an immersion blender to puree a portion of the soup, then stir it back in for a delightful texture. Beans Variation: Experiment with different varieties of beans such as navy or chickpeas for a unique flavor and texture while keeping the dish nutritious. Make It Ahead: This soup tastes even better the next day! Make a larger batch and store it in the fridge for quick lunches or dinners throughout the week. {{image_2}} You can switch up the ingredients in this soup. Try using diced zucchini or bell peppers for a new twist. You can also add corn for sweetness. If you love herbs, fresh basil or thyme can brighten the flavors. You may even want to use different beans, like kidney or black beans, for a fun change. For extra protein, add cooked chicken or turkey. If you prefer plant-based options, try adding tofu or tempeh. You can also mix in cooked grains like quinoa or rice. These additions will make the soup heartier and more filling. Just remember to adjust the broth if you add more solids. This soup is easy to make vegan. Simply skip the Parmesan cheese or use a plant-based version. To keep it gluten-free, always check your broth for gluten. Most vegetable broths are safe, but it’s good to verify. You can enjoy this meal without worry while still savoring every bite. To keep your Tuscan tomato white bean soup fresh, cool it down first. Place the soup in an airtight container. Always store it in the fridge within two hours. Use glass or BPA-free plastic containers for best results. Label the container with the date so you know when you made it. You can freeze this soup for up to three months. Pour the cooled soup into freezer-safe bags or containers. Remove as much air as you can before sealing. To reheat, thaw in the fridge overnight. Then, warm it on the stove over low heat. Stir well to ensure even heating. You may need to add a splash of broth or water. In the fridge, this soup lasts for about 3 to 4 days. If you freeze it, it will keep well for about 3 months. Always check for changes in smell, color, or texture before eating. If it looks or smells off, it's best to toss it. Keeping track of storage times helps you enjoy this soup at its best! You can use any type of bean you like. Chickpeas work well. Pinto beans are also a good choice. They add a nice texture and flavor. Kidney beans can be used too. Just remember to drain and rinse them first! Yes, a slow cooker is great for this soup! Start by sautéing the onion, carrot, and celery in a pan. Then, add all the other ingredients to the slow cooker. Let it cook on low for 6-8 hours. This will make the flavors even richer! To adjust spice levels, simply add or reduce red pepper flakes. If you like it hot, add more. If you prefer it mild, use less or leave it out. You can also add a sprinkle of black pepper for a gentle kick. Absolutely! This soup is perfect for meal prep. It stores well in the fridge for up to five days. You can also freeze it for up to three months. Just make sure to cool it completely before storing. While this soup is best served hot, you can try it cold. It will taste different but can be refreshing. If you want to serve it cold, chill it in the fridge first. Try adding a splash of lemon juice for extra zest! This blog covered everything for making Tuscan Tomato White Bean Soup. We explored the key ingredients, helpful substitutions, and how to choose fresh produce. Then, I shared step-by-step prep and cooking instructions. You learned tips for enhancing flavors and avoiding common mistakes. We also discussed variations like protein options and storage best practices. In the end, cooking can be fun and tasty. With these easy tips, you can create a great soup that suits your needs. Enjoy your cooking journey!

Tuscan Tomato White Bean Soup Flavorful Comfort Meal

To make these tasty Garlic Parmesan Zucchini Chips, you need a few simple ingredients. Here’s what you will need: - 2 medium zucchinis - 1 cup grated Parmesan cheese - 1 teaspoon garlic powder - 1 teaspoon onion powder - ½ teaspoon paprika - Salt and pepper to taste - 1 tablespoon olive oil - Cooking spray These ingredients come together to create a crunchy and flavorful snack. The zucchinis provide a light base. The Parmesan adds a savory kick. Garlic and onion powder give it a nice depth, while paprika adds a hint of warmth. The olive oil helps the chips crisp up perfectly in the oven. When you gather these items, you set yourself up for a delicious treat. I love the mix of textures and flavors. The chips are not just healthy; they are also fun to make! {{ingredient_image_1}} 1. First, preheat your oven to 225°F (110°C). While it heats, line a baking sheet with parchment paper. This helps prevent sticking and makes cleanup easy. 2. Next, wash and dry the zucchinis. Use a mandoline slicer or a sharp knife to cut them into thin slices, about 1/8 inch thick. Thin slices will yield the best crunch. 3. Now, prepare the seasoning mixture in a bowl. Combine 1 cup of grated Parmesan cheese, 1 teaspoon of garlic powder, 1 teaspoon of onion powder, ½ teaspoon of paprika, and salt and pepper to taste. Mix well until all ingredients blend. 1. Place the zucchini slices in a large bowl. Drizzle 1 tablespoon of olive oil over them. This step adds flavor and helps the coating stick. 2. Toss gently to coat each slice with olive oil. Ensure every slice is covered for maximum taste. 3. Sprinkle the Parmesan mixture over the zucchini slices. Toss again to ensure all slices are evenly coated with the seasoning. 1. Arrange the zucchini slices in a single layer on the prepared baking sheet. Make sure they don’t overlap. Overlapping may cause uneven cooking and soggy chips. 2. Lightly spray the tops of the zucchini slices with cooking spray. This helps promote crisping during baking. 3. Bake in the preheated oven for about 2 hours. Flip the chips halfway through to ensure they cook evenly. Look for a golden brown color and a crispy texture. Once done, let them cool for a few minutes to enhance crispiness. To make your zucchini chips crispy, slice them thin. Aim for about 1/8 inch thick. Thin slices allow for even cooking and a better crunch. If they are too thick, they may end up soggy. Set your oven to 225°F (110°C). This low temperature helps dry the zucchini slowly, avoiding burnt edges. Baking at a lower heat for a longer time creates the perfect crispy texture. For a great presentation, serve the chips in a basket. Line it with parchment paper for a rustic look. This adds charm and keeps the chips from getting soggy. Pair your zucchini chips with a tasty dip. A zesty ranch or garlic aioli works wonders. These flavors complement the garlic and cheese perfectly. One common mistake is overlapping the slices. Make sure each slice lays flat on the baking sheet. Overlapping leads to uneven cooking and soggy chips. Also, prepare your baking sheet well. Line it with parchment paper to prevent sticking. This easy step keeps your chips intact and makes cleanup a breeze. Pro Tips Slice Uniformly: Ensure all zucchini slices are cut to the same thickness for even baking and consistent crispiness. Use Fresh Ingredients: For the best flavor, opt for freshly grated Parmesan cheese rather than pre-packaged varieties. Season to Taste: Adjust the seasoning according to your preference; add more garlic powder or spices for a bolder flavor. Monitor Baking Time: Keep an eye on the chips towards the end of baking, as ovens may vary and they can burn quickly. {{image_2}} You can easily change the taste of your Garlic Parmesan Zucchini Chips. Adding different seasonings can make a big difference. Italian herbs like oregano or basil add a fresh taste. You could also try a pinch of red pepper flakes for some heat. Switching up the cheese can also enhance the flavor. Instead of Parmesan, consider using cheddar or even a spicy pepper jack. Each cheese brings its unique taste to the chips. Experiment with what you like best! If you want to make these chips faster, use an air fryer. Set it to 375°F (190°C) and fry for about 15 minutes. Shake the basket halfway through for even cooking. You’ll get crispy chips in less time! You can also adjust oven temperatures. If you want quicker chips, try 300°F (150°C) for about one hour. Just keep an eye on them to make sure they don’t burn. Zucchini chips are not just a snack! You can use them as salad toppings. They add a nice crunch and flavor to your greens. Incorporating them into other dishes is also fun. Try using them in wraps or as a side with your favorite dip. They make any meal more interesting! To store leftover garlic Parmesan zucchini chips, let them cool completely. Place the chips in an airtight container. This helps keep them fresh. Store them in the fridge. They can last up to three days. The chips may lose some crispness, but they will still taste good. To reheat the chips, use the oven for the best results. Preheat your oven to 350°F (175°C). Spread the chips on a baking sheet. Heat them for about 5 to 10 minutes. This method helps maintain their crunchiness. You can also use an air fryer if you have one. Set it to 350°F for about 3 to 5 minutes. Yes, you can freeze zucchini chips! To freeze, let them cool fully. Arrange them in a single layer on a baking sheet. Place the sheet in the freezer for one hour. This will help them freeze separately. Once frozen, transfer the chips to a freezer bag. Remove as much air as you can before sealing. When you’re ready to eat them, thaw in the fridge overnight. Reheat in the oven or air fryer to restore crispiness. Garlic Parmesan Zucchini Chips are a tasty snack made from thinly sliced zucchini. They have a crunchy texture and a savory flavor. The garlic powder and Parmesan cheese give them a strong, rich taste. When baked, they turn golden brown and crispy. You can enjoy them on their own or with a dip, like ranch or garlic aioli. They make a great alternative to regular chips. Yes, you can easily make Garlic Parmesan Zucchini Chips gluten-free. Just ensure that the Parmesan cheese you use is labeled gluten-free. Most brands are safe, but it's good to check. You can also try using gluten-free breadcrumbs if you want extra crunch. This way, you keep all the flavor without any gluten. You’ll know the chips are done when they turn golden brown and feel crispy to the touch. It takes about 2 hours at 225°F (110°C). Make sure to flip the chips halfway through baking for even crispiness. Let them cool for a few minutes after baking. This helps them become even crunchier. Yes, you can use other vegetables to make chips. Try using sweet potatoes, carrots, or beets. Just slice them thinly, like the zucchini, and adjust the baking time as needed. Each vegetable will bring a unique flavor and texture, so feel free to experiment! You’ve learned how to make delicious garlic Parmesan zucchini chips, using simple steps and common ingredients. Remember to slice your zucchinis evenly for the best crispiness. Try different seasonings and cheeses to find your favorite flavor. Don’t forget the tips for storing and reheating to keep them tasty. With the right techniques, you can make a great snack or side dish any time. Enjoy your cooking and share these crispy treats with friends and family!

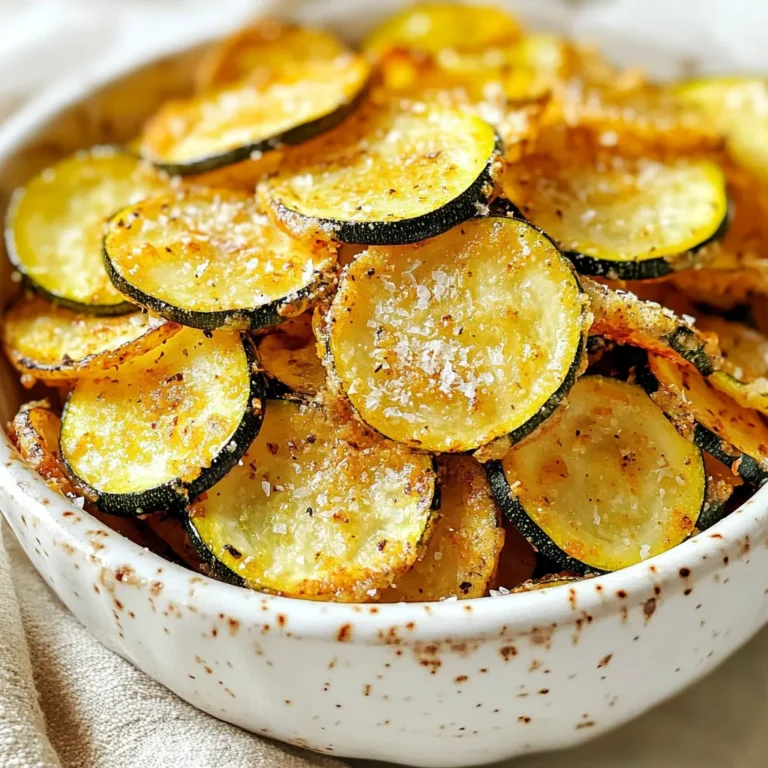
Garlic Parmesan Zucchini Chips Crunchy and Flavorful Snack

- 8 oz cheese tortellini - 3 cups mixed mushrooms (cremini, shiitake, and button), sliced - 1 cup heavy cream The heart of this dish is the cheese tortellini. It brings a soft, cheesy bite that pairs well with the sauce. Mixed mushrooms add depth. Cremini, shiitake, and button mushrooms each bring unique flavors and textures. Heavy cream gives the sauce its rich and smooth finish. - 2 tablespoons olive oil - 2 cloves garlic, minced - 1 medium onion, finely chopped These pantry staples are key to building flavor. Olive oil serves as the cooking base. It adds richness and helps to sauté the vegetables. Garlic brings a warm, aromatic note, while onion adds sweet and savory flavors. When you cook them together, they create a flavorful backdrop for the mushrooms. - 1/2 cup grated Parmesan cheese - 1 tablespoon fresh thyme leaves (or 1 teaspoon dried thyme) - Salt and pepper to taste - Fresh parsley, chopped (for garnish) Parmesan cheese adds a salty, nutty flavor that enhances the cream sauce. Fresh thyme brings a hint of earthiness. Salt and pepper are essential for balancing the dish. Finally, a sprinkle of fresh parsley adds a pop of color and freshness. This combination makes every bite delicious. {{ingredient_image_1}} First, fill a large pot with water and add a good amount of salt. Bring it to a boil. Once boiling, add the cheese tortellini. Cook them according to the package instructions. You want them to be al dente, which means they should be firm but not hard. This usually takes about 3-5 minutes. After that, drain the tortellini and set them aside. In a large skillet, pour in the olive oil and heat it over medium heat. Add the chopped onion and cook until it turns translucent, about 3-4 minutes. This step builds a sweet base for the dish. Next, stir in the sliced mushrooms and minced garlic. Cook these for another 5-7 minutes until the mushrooms are tender and browned. This mix adds depth to your creamy sauce. Reduce the heat to low. Pour in the heavy cream and stir well. Then, add the grated Parmesan cheese and fresh thyme leaves. Allow the sauce to simmer for about 3-4 minutes. Stir occasionally, and watch as it thickens. The cream and cheese create a rich, velvety sauce that clings to the tortellini. Now, add the cooked tortellini to the skillet with the sauce. Toss gently to coat the pasta evenly. This is where all the flavors come together. Season with salt and pepper to taste. Make sure each piece of tortellini gets a good amount of sauce. To serve, plate the creamy mushroom tortellini in bowls or on plates. For a pop of color, sprinkle fresh parsley on top. This dish looks beautiful and tastes even better, making it perfect for any occasion. - Cooking al dente: To get the best tortellini, cook it until it is al dente. This means it should be firm but not hard. It should have a slight bite to it. Follow the package instructions closely for timing. - Avoiding overcooking: Be careful not to overcook your tortellini. If you do, it will become mushy and lose its shape. Start checking a minute or two before the package's suggested time. - Additional herbs and spices: You can boost the flavor by adding herbs like basil or oregano. A pinch of red pepper flakes gives a nice kick. Experiment with what you love! - Alternative cheese options: If you want a twist, try using different cheeses. Goat cheese or ricotta can add a unique taste. They will still blend well with your creamy sauce. - Best serving dishes: Use wide, shallow bowls for serving. They allow the creamy sauce to shine. You can also use plates for a more elegant look. - Creative plating ideas: To make your dish pop, garnish it with fresh parsley. You can also sprinkle extra Parmesan on top. Try a drizzle of olive oil for extra flair. A few whole mushrooms can add a rustic touch too. Pro Tips Choose Fresh Mushrooms: Always use fresh mushrooms for the best flavor and texture. Look for firm, unblemished mushrooms with a pleasant aroma. Customize Your Cheese: Feel free to experiment with different types of cheese. A mix of Parmesan and Pecorino Romano can add a delightful depth of flavor. Thicken the Sauce: If you prefer a thicker sauce, let it simmer a bit longer or add a touch of cornstarch mixed with water to achieve your desired consistency. Add Protein: For a heartier dish, consider adding cooked chicken, shrimp, or sausage to the tortellini and sauce mixture. {{image_2}} You can easily modify the recipe with different tortellini. If you need gluten-free options, try using gluten-free tortellini. Many brands offer this choice. They taste great and match the sauce well. For a vegan dish, swap the cheese tortellini for a plant-based version. Also, use coconut cream or almond milk instead of heavy cream. Nutritional yeast can replace Parmesan cheese. These swaps keep the dish rich and creamy without dairy. Want to boost the flavor? Add more veggies! Spinach, kale, or bell peppers work well. Just sauté them with the onions and mushrooms. You can also add proteins. Grilled chicken or sautéed shrimp complement the dish nicely. For a veggie boost, toss in some white beans or lentils. These additions make the meal heartier and more filling. Feel like changing the sauce? You can try a tomato-based sauce. Just swap the cream for crushed tomatoes and add herbs like basil and oregano. This gives the dish a fresh twist. Another option is to use pesto as a sauce. It adds a rich and vibrant flavor to the tortellini. Toss the cooked tortellini in the pesto before serving. Each of these sauces brings a new life to your creamy mushroom tortellini! To keep your creamy mushroom tortellini fresh, store it in an airtight container. Make sure the dish is cool before sealing it. This helps prevent moisture build-up, which can make the pasta soggy. Best practices for leftovers include eating them within 3 days. While it may last longer, the taste and texture will decline. Storage containers should be glass or BPA-free plastic. Avoid metal containers, as they can react with the food. Label your container with the date so you know when you made it. You can freeze creamy mushroom tortellini if you want to save some for later. How to freeze creamy mushroom tortellini involves letting it cool completely. Then, portion it into freezer-safe bags. Squeeze out all the air before sealing to prevent freezer burn. When you're ready to enjoy it, thawing and reheating instructions are simple. Place the frozen tortellini in the fridge overnight or use a microwave. Heat it gently on low power to avoid overcooking the pasta. Stir occasionally, and add a splash of cream if needed to freshen up the sauce. Enjoy your meal! To cook tortellini well, start with a large pot. Fill it with water and add salt. Bring the water to a boil. Add the cheese tortellini and cook until al dente. This usually takes about 3-4 minutes. Stir gently to avoid sticking. Once done, drain it and set aside. This method gives you the best texture. Yes, you can use dried mushrooms. They add a deep flavor. To use them, first, you need to rehydrate them. Soak the dried mushrooms in hot water for about 20-30 minutes. Once they are soft, drain and chop them. Use them just like fresh mushrooms in your dish. This swap works well when fresh mushrooms aren't available. To make a lighter tortellini, focus on the cream. You can use half-and-half instead of heavy cream. This cuts fat while still keeping it creamy. Try reducing the amount of Parmesan cheese too. You can also add more vegetables to fill the plate. This way, you enjoy a tasty meal with fewer calories. Creamy mushroom tortellini pairs well with many sides. A fresh green salad adds a crisp touch. Garlic bread is also great for dipping. You can serve roasted vegetables for more flavor. If you want a warm option, try a light soup. Each of these sides complements the dish well. This blog post covered everything you need for a creamy mushroom tortellini dish. I shared key ingredients like cheese tortellini, mixed mushrooms, and heavy cream. You learned how to cook tortellini and create a tasty cream sauce. I also discussed tips for flavor, variations, and storage. Now, you have the tools to impress at your next meal. Feel free to experiment with different ingredients and flavors. Enjoy making this dish your own!

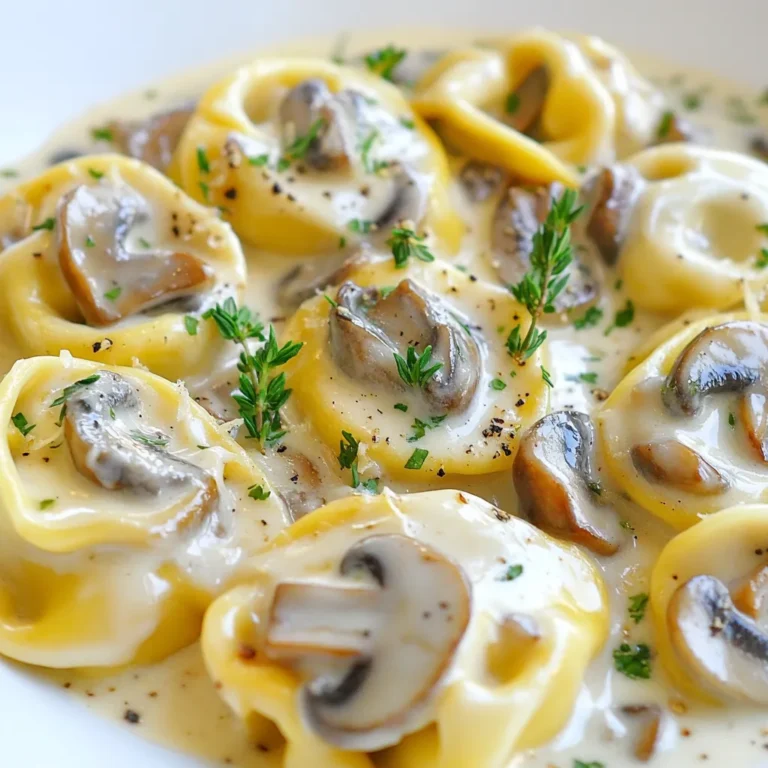
Creamy Mushroom Tortellini Flavorful and Quick Meal

PREV 1 … 41 42 43 … 57 NEXT
flavor nest kitchen

explore

DessertsDinnerAppetizersDrinks

Our Policies

  • Cookie Policy
  • Copyright Policy
  • Disclaimer
  • GDPR Policy
  • Terms Of Use
Back to Top
  • About
  • Contact Us
  • Privacy Policy
© 2025 flavor nest kitchen