FREE DINNER EBOOK! Get your copy!
  • Cookie Policy
  • GDPR Policy
  • Disclaimer
  • Terms Of Use
  • Visit my other site: Fun Cookie Recipes
flavor nest kitchen
  • Home
  • Dinner
  • Desserts
  • Drinks
  • Appetizers
  • Contact
  • About
  • Privacy Policy
  • Home
  • Dinner
  • Desserts
  • Drinks
  • Appetizers
  • Contact
  • About
  • Privacy Policy
  • Cookie Policy
  • GDPR Policy
  • Disclaimer
  • Terms Of Use
Visit my other site: Fun Cookie Recipes

HOME / CATEGORIES /

Latest

- 1 cup pumpkin puree - 1/2 cup brown sugar, packed - 1/2 cup granulated sugar - 1/2 cup vegetable oil - 2 large eggs The main ingredients create a rich and moist muffin. Pumpkin puree provides flavor and moisture. Brown sugar adds depth, while granulated sugar enhances sweetness. Vegetable oil keeps the muffins soft, and eggs bind everything together. - 1 teaspoon ground cinnamon - 1/2 teaspoon ground nutmeg - 1/4 teaspoon ground ginger - 1 cup semi-sweet chocolate chips The spices bring warmth and depth to each bite. Cinnamon gives a classic flavor of fall. Nutmeg and ginger add a unique touch. Semi-sweet chocolate chips create a sweet, gooey surprise in every muffin. - 1/4 cup chopped walnuts or pecans - Non-stick spray or paper liners for muffin preparation Add walnuts or pecans for a crunchy texture. They will complement the soft muffins well. Use non-stick spray or paper liners to make muffin removal easier. This way, you can enjoy your treat without any mess. First, I preheat the oven to 350°F (175°C). I line a muffin pan with paper liners or spray it with non-stick spray. This helps the muffins come out easily. Next, I grab a large mixing bowl. I add the pumpkin puree, brown sugar, granulated sugar, vegetable oil, eggs, and vanilla extract. I whisk everything together until it looks smooth and well mixed. In another bowl, I whisk together the flour, baking soda, baking powder, cinnamon, nutmeg, ginger, and salt. This mix brings out the warm, cozy flavors. Then, I slowly add the dry ingredients to the wet mixture. I mix gently until just combined. I make sure not to overmix; this keeps the muffins light and fluffy. Finally, I fold in the chocolate chips and the nuts if I’m using them. Now, I evenly distribute the batter into the muffin pan, filling each cup about two-thirds full. I place the pan in the oven and bake for 18-20 minutes. I check the muffins by inserting a toothpick into the center. If it comes out clean, they are done! After baking, I let the muffins cool in the pan for about five minutes. Then, I transfer them to a wire rack to cool completely. To bake fluffy muffins, avoid overmixing the batter. Overmixing can make muffins dense. Mix just until the dry ingredients are combined. You want some lumps in the batter; that’s okay! Ensure your oven is at the right temperature. Preheat it to 350°F (175°C). An oven thermometer can help check the heat. If the oven is too hot or too cold, your muffins may not rise properly. Serve your muffins warm for the best taste. Add toppings like a sprinkle of powdered sugar. You can also pair them with whipped cream or cream cheese frosting. These extras make your muffins feel special. If your muffins turn out dry, try adding a bit more pumpkin puree. This helps add moisture. Also, check baking time; muffins can dry out if baked too long. To avoid a gummy texture, make sure to measure ingredients correctly. Too much liquid can cause this problem. Also, ensure the muffins bake until a toothpick comes out clean. This ensures they are fully cooked. {{image_2}} For a gluten-free version of these muffins, you can use almond flour or oat flour. These flours provide a nice texture and flavor. If you use almond flour, add a bit more baking powder. Oat flour works well, too. It might need a slight increase in liquid, so watch the batter closely. When baking gluten-free muffins, you may need to adjust the baking time. Start checking for doneness a few minutes earlier. Gluten-free batters can bake faster, so keep an eye on them! You can change the chocolate in these muffins to suit your taste. Dark chocolate adds a rich flavor while milk chocolate gives a sweeter touch. Both work well! You can also add spices like allspice or cloves for a unique twist. Just a pinch will do! These spices can enhance the warm flavor of the pumpkin. Experimenting with flavors makes this recipe fun! If you want a healthier muffin, try using applesauce instead of oil. This swap reduces fat and adds moisture. You won’t lose any flavor! You can also cut down on sugar. Try using half the amount of brown sugar or granulated sugar. The pumpkin adds natural sweetness. Your muffins will still taste yummy without all the sugar. To keep your pumpkin chocolate chip muffins fresh, use airtight containers. A good option is a plastic or glass container with a tight seal. This helps prevent air from making the muffins dry. You can also wrap them in plastic wrap, then place them in a bag. This method keeps them moist and tasty. If you want to save some muffins for later, freezing is easy. First, let the muffins cool completely. Next, wrap each muffin in plastic wrap. Then, place them in a freezer bag. Squeeze out as much air as you can before sealing. To thaw, leave them in the fridge overnight. For a quick warm-up, microwave them for about 15-20 seconds. At room temperature, your muffins will last about 2-3 days. Store them in a cool, dry place away from sunlight. Look for signs of spoilage, like a dry texture or mold. If they smell off or look strange, it's best to discard them. Enjoy these sweet treats while they're fresh! Yes, you can use fresh pumpkin. Fresh pumpkin gives a bright flavor. It also has a nice texture. To use fresh pumpkin, roast it until soft. Then, scoop out the flesh and blend it until smooth. Canned pumpkin is easy and quick. It saves time and works well in this recipe. Both options are tasty, so choose what you prefer. To measure flour, use a spoon. Scoop flour into a measuring cup. Then, level it off with a knife. Do not pack the flour down. Packing can add too much flour, making muffins dry. For accuracy, you can also use a kitchen scale. One cup of flour weighs about 120 grams. This method ensures you get the right amount for your muffins. You can make these muffins dairy-free easily. Replace the vegetable oil with coconut oil. Use a dairy-free chocolate chip brand. You can also substitute the eggs. Use flaxseed meal mixed with water as a binder. Mix one tablespoon of flaxseed meal with three tablespoons of water for one egg. These swaps keep the muffins moist and delicious. Yes, you can add mix-ins to the batter. Chopped walnuts or pecans add a nice crunch. You can also try dried fruits like cranberries or raisins. If you like spice, consider adding shredded coconut or even pumpkin seeds. These extras make the muffins even more fun and tasty. Just be careful not to add too much, as it can change the texture. These pumpkin chocolate chip muffins are tasty and fun to make. We covered key ingredients like pumpkin puree, spices, and chocolate chips. I shared step-by-step directions for preparing the batter, baking, and cooling. Remember to avoid overmixing for fluffy muffins. You can try different flavors or make them gluten-free. Store them correctly to keep them fresh. With a few tips and tricks, anyone can bake a delicious treat. Try these muffins; they will surely impress your family and friends. Happy baking!

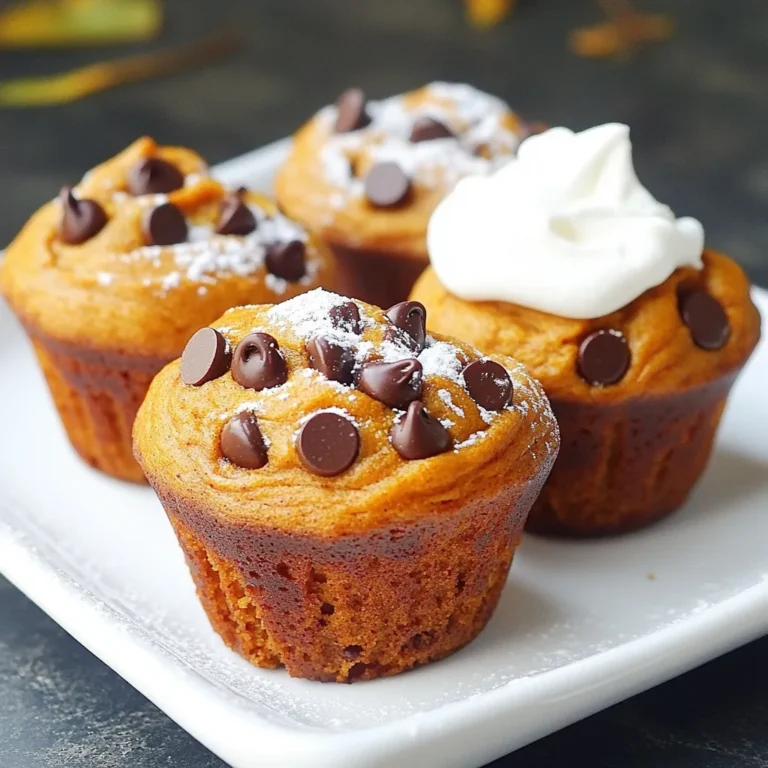
Pumpkin Chocolate Chip Muffins Deliciously Simple Treat

- 1 cup all-purpose flour - 1/2 cup brown sugar - 1/4 cup granulated sugar - 1 teaspoon baking powder - 1/2 teaspoon baking soda - 1 teaspoon ground cinnamon - 1/4 teaspoon nutmeg - 1/4 teaspoon salt I love starting with the dry ingredients. All-purpose flour is the base for our donuts. It gives them structure and a soft bite. Brown sugar adds moisture and a deep sweetness. Granulated sugar brings a touch of brightness. Baking powder and baking soda help the donuts rise. Spices like cinnamon and nutmeg add warmth and flavor. Salt is key; it balances the sweetness. - 1 cup apple cider - 1 large egg - 1/4 cup unsweetened applesauce - 2 tablespoons vegetable oil - 1 teaspoon vanilla extract Next, we move to the wet ingredients. Apple cider and applesauce bring natural sweetness and moisture. The egg binds everything together. Vegetable oil helps keep the donuts tender. Don’t forget the vanilla extract; it adds a lovely aroma. - 1 cup powdered sugar - 2 tablespoons pure maple syrup - 1-2 tablespoons milk (adjust for desired consistency) The maple glaze is where the magic happens. Powdered sugar gives it that sweet, smooth texture. Pure maple syrup adds a rich, sweet flavor. Use milk to make the glaze the right thickness. You want it thick enough to coat but thin enough to drizzle. 1. Preheat the oven to 350°F (175°C). Grease your donut pan with cooking spray or oil. This helps the donuts come out easily. 2. Reduce the apple cider. Pour 1 cup of apple cider into a saucepan. Heat it over medium heat. Stir occasionally until it reduces to about 1/2 cup. This takes around 10-15 minutes. Let it cool slightly before using. 1. Combine the dry ingredients. In a large bowl, mix 1 cup of all-purpose flour, 1/2 cup of brown sugar, 1/4 cup of granulated sugar, 1 teaspoon of baking powder, 1/2 teaspoon of baking soda, 1 teaspoon of ground cinnamon, 1/4 teaspoon of nutmeg, and 1/4 teaspoon of salt. Whisk them together until well mixed. 2. Whisk the wet ingredients separately. In another bowl, beat 1 large egg. Add 1/4 cup of unsweetened applesauce, 2 tablespoons of vegetable oil, 1 teaspoon of vanilla extract, and the slightly cooled reduced apple cider. Mix well. 1. Incorporate the mixtures. Pour the wet mixture into the bowl with the dry ingredients. Stir gently just until combined. Avoid overmixing to keep the donuts fluffy. 2. Fill the donut pan and bake. Transfer the batter into a piping bag or a zip-top bag and snip the corner. Fill each donut cavity about halfway. Bake for 10-12 minutes. Check with a toothpick; it should come out clean. Let the donuts cool in the pan for about 5 minutes before moving them to a wire rack. To make soft and fluffy donuts, avoid overmixing the batter. When you combine the wet and dry ingredients, mix just until you see no dry flour. If you mix too much, the donuts can become tough. Use a gentle folding motion when mixing to keep the batter light. For measuring ingredients, use dry measuring cups for flour and sugars. Spoon flour into the cup, then level it off with a knife. This method prevents packing too much flour, which can make the donuts dense. Use a liquid measuring cup for the apple cider and oils to ensure accuracy. Set your oven to 350°F (175°C) before you start. An oven thermometer can help check the exact temperature. If your oven runs hot, your donuts may brown too quickly. You can tell the donuts are done when a toothpick inserted in the center comes out clean. They should spring back when lightly touched. If they look wet or sticky, they need more time. To make these donuts even tastier, try adding extra spices. A pinch of ground ginger or cloves can add depth. You can also add lemon or orange zest for a fresh twist. If you want to switch up the glaze, use melted chocolate or a simple icing with lemon juice. These options can give a fun flavor twist and change the look of your donuts. {{image_2}} You can change the flavor of your donuts easily. Try adding ginger or cloves to the spice mix. These spices add warmth and depth. You can also switch the glaze. Instead of maple, try chocolate or vanilla. Each glaze brings a unique taste to the donuts. If you need gluten-free donuts, use a gluten-free flour blend. Many blends work well for this recipe. For an egg substitute, consider using ground flaxseed or mashed banana. This keeps the donuts moist and tasty. You can give these donuts a seasonal spin. Adding pumpkin puree is perfect for fall. It gives a rich flavor and pairs well with spices. You can also try different fruits in the glaze. Use berries or citrus for a fresh twist. This makes the donuts fun and unique for any season. To keep your apple cider baked donuts fresh, follow these tips: - Cool completely: Let the donuts cool on a wire rack before storing. - Use airtight containers: Store them in a sealed container or a zip-top bag. - Add a paper towel: Place a paper towel inside to absorb any moisture. These steps help keep your donuts soft and tasty. When you want to enjoy your donuts again, here’s how to reheat them: - Microwave: Heat each donut for about 10-15 seconds. This keeps them moist. - Oven: Preheat the oven to 350°F (175°C). Warm the donuts for 5-7 minutes. These methods help maintain the texture and flavor of the donuts. How long can you keep these donuts? - Room temperature: They last for about 1-2 days. - Refrigerator: Store them for up to a week. - Freezer: They can be frozen for up to 3 months. Just remember to wrap them well to prevent freezer burn. Yes, you can prepare these donuts ahead of time. Bake them and let them cool completely. Once cool, place them in a freezer-safe bag. Store them in the freezer for up to three months. When you want to enjoy them, just thaw and glaze. This way, you have a sweet treat ready to go! If you don't have apple cider, use apple juice instead. Apple juice gives a sweet flavor that works well. You can also mix apple juice with a bit of vinegar to mimic cider’s tangy taste. This swap keeps your donuts tasty and delightful! Yes, you can bake these donuts in a muffin tin. Just fill each muffin cup halfway with the batter. Bake at the same temperature for 15-18 minutes. Check with a toothpick to see if they are done. Muffins will have a different shape, but they will still be delicious! You now have all the steps to make delicious apple cider donuts. Start with fresh ingredients and follow the easy instructions. Remember to avoid overmixing and keep an eye on the baking time. With a few fun variations, you can make these donuts suit any season or preference. Proper storage keeps them fresh, and reheating revives their soft texture. Enjoy making and sharing your tasty donuts with friends and family! Your kitchen will smell amazing, and you'll impress everyone with your baking skills. Happy baking!

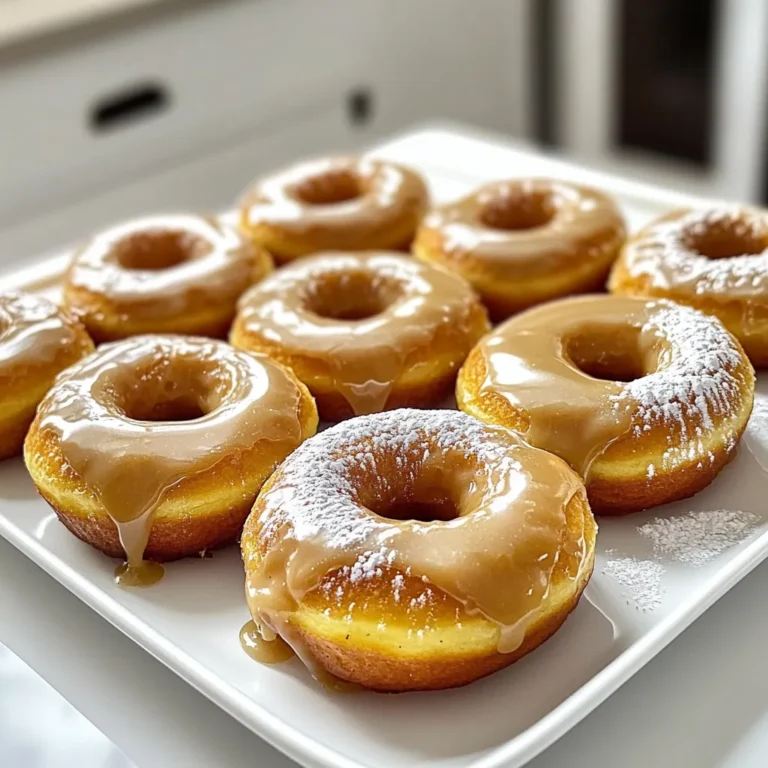
Apple Cider Baked Donuts with Maple Glaze Delight

- 1 cup all-purpose flour - 1/2 cup pumpkin puree - 1/4 cup granulated sugar - 1/4 cup brown sugar, packed - 1 teaspoon baking powder - 1/2 teaspoon baking soda - 1 teaspoon pumpkin pie spice - 1/4 teaspoon salt - 1/4 cup milk (dairy or non-dairy) - 1 large egg - 2 tablespoons melted butter or coconut oil - 1 teaspoon vanilla extract - 1/4 cup cinnamon sugar (for coating) These ingredients come together to create a simple yet delightful treat. The pumpkin puree adds moisture and a rich flavor. The sugars provide sweetness and a nice crust. The spices, especially pumpkin pie spice, give that warm, cozy taste we all love in fall. - Air fryer - Mixing bowls - Whisk - Cookie scoop or spoon - Parchment paper (optional) Using the right tools makes a big difference. The air fryer cooks these donut holes evenly and quickly. Mixing bowls and a whisk help blend the ingredients smoothly. A cookie scoop ensures uniform sizes, which leads to even cooking. - Calories per serving: Approximately 120 - Key nutrients: Fiber, Vitamin A, and Iron These donut holes are not only tasty but also provide some nutrition. The pumpkin adds fiber and vitamin A, which is great for your eyes. Enjoying them in moderation can fit well into a balanced diet. - Mixing dry ingredients: In a large bowl, whisk together 1 cup of all-purpose flour, 1/4 cup of granulated sugar, 1/4 cup of brown sugar, 1 teaspoon of baking powder, 1/2 teaspoon of baking soda, 1 teaspoon of pumpkin pie spice, and 1/4 teaspoon of salt. This creates a sweet and spiced base for your donut holes. - Combining wet ingredients: In a separate bowl, mix 1/2 cup of pumpkin puree, 1/4 cup of milk, 1 large egg, 2 tablespoons of melted butter or coconut oil, and 1 teaspoon of vanilla extract. Stir until it’s smooth and creamy. - Merging dry and wet mixtures: Pour the wet mixture into the dry ingredients. Stir gently until a smooth batter forms. Avoid overmixing. You want it silky and thick but not tough. - Preheating the air fryer: Preheat your air fryer to 350°F (175°C) for about 5 minutes. This helps to cook the donut holes evenly. - Portioning the batter: Use a small cookie scoop or spoon to drop 1 tablespoon of batter into the air fryer basket. Leave space between each ball. This gives them room to puff up. - Cooking times and temperature: Air fry the donut holes for 8-10 minutes. They should be golden brown. Check with a toothpick; it should come out clean. - Coating in cinnamon sugar: Once cooked, take the donut holes out and roll them in 1/4 cup of cinnamon sugar while warm. This coating adds sweetness and flavor. - Presentation tips for serving: Serve the donut holes in a decorative bowl or on a tiered stand. You can drizzle them with icing or maple syrup for extra charm. Enjoy the warm, spiced goodness! - How to avoid sticking: Lightly grease your air fryer basket. You can also use parchment paper. This helps the donut holes lift out easily. - Ensuring even cooking: Don’t overcrowd the basket. Leave space between each donut hole. This allows hot air to flow around them, cooking evenly. - Adjustments for different air fryer models: Each model cooks differently. If your air fryer runs hot, check the donut holes a minute or two early. Adjust cooking time as needed. - Substitutions for allergens: Use gluten-free flour for a gluten-free version. Substitute dairy milk with almond, oat, or soy milk to make it dairy-free. - Adding chocolate chips or nuts: For extra flavor, mix in chocolate chips or chopped nuts. This adds texture and a fun twist. - Using different spices or flavorings: Try adding nutmeg or ginger for a unique flavor. You can also use chai spice for a different taste. - Pairing with beverages: These donut holes go great with coffee or warm apple cider. They are perfect for cozy fall mornings. - Creative serving ideas: Serve in a decorative bowl or on a tiered stand. Drizzle with icing or maple syrup for an extra touch. Sprinkle with extra cinnamon sugar for more sweetness. {{image_2}} You can change the flavor of your donut holes easily. A maple glaze is a great option. Just mix powdered sugar and maple syrup for a sweet topping. You can also add different spices. Nutmeg and allspice give a warm flavor twist. For pumpkin spice variations, try adding pumpkin pie mix or chai spices. Each option gives your donut holes a unique taste. You can switch up the size of your donut holes. For larger treats, simply form them into bigger balls. These become pumpkin spice donuts. If you want bite-sized snacks, make mini donut holes. They are fun for parties or kids. Each size offers a different eating experience. Make your donut holes festive with seasonal decorations. Use icing to create fun designs for holidays. You can also add seasonal fruits. Chopped apples or cranberries bring extra flavor and color. This not only enhances taste but makes the dish look beautiful too. Happy baking! To store your leftover pumpkin spice donut holes, let them cool completely. Place them in an airtight container. This keeps them fresh and moist. If you have some cinnamon sugar left, keep it in a separate container. This way, you can coat the donut holes again before serving. You can freeze these donut holes for later. First, let them cool completely. Then, place them in a single layer on a baking sheet. Freeze for about one hour. Once frozen, transfer them to a freezer-safe bag. They can stay fresh for up to three months. To reheat, bake them in the air fryer at 350°F (175°C) for 5-7 minutes. At room temperature, these donut holes last for about two days. Keep them in an airtight container to prevent them from drying out. If you notice any mold or an off smell, it’s best to throw them away. Enjoy them fresh for the best taste! Yes, you can swap the all-purpose flour. Whole wheat flour works well. It adds a nutty taste. Gluten-free flour is also an option. Just make sure it has a good binding agent. These donut holes take about 8-10 minutes to cook. Keep an eye on them after 8 minutes. They should be golden brown and fluffy. If your donut holes are uneven, check your air fryer. Make sure it is preheated well. You can also rotate the basket halfway through cooking. This helps them cook evenly. Yes, you can make these donut holes in advance. You can prepare the dough and chill it. Just air fry them when you are ready. This keeps them fresh and tasty. This blog post outlined a simple and tasty recipe for pumpkin spice donut holes. You learned about the ingredients, tools, and easy steps for making them. I shared tips for better air frying and fun ways to serve your treats. Remember, you can adjust this recipe for allergies or add fun flavors. Enjoy experimenting with your donut holes! They make a great snack or dessert, perfect for any time. Now, gather your ingredients and make these delicious bites at home!

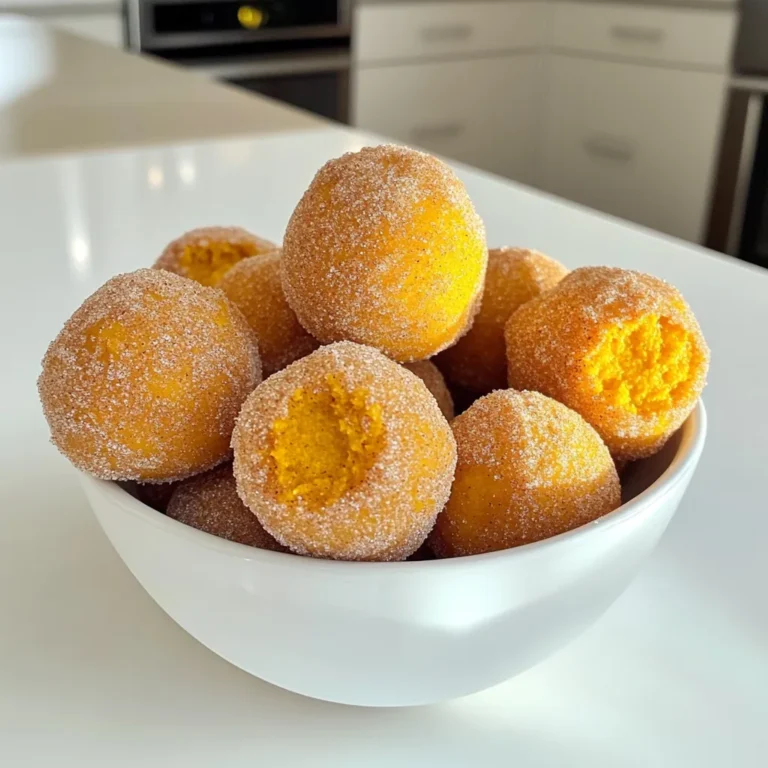
Pumpkin Spice Donut Holes Air Fryer Blissful Recipe

For this recipe, you need a tasty mix of nuts. I suggest using: - 2 cups mixed nuts (almonds, pecans, walnuts, cashews) Choosing a variety gives you great flavors and textures. Each nut adds its own taste, making every bite fun. To create that sweet candy coating, you will need: - 1 cup granulated sugar - 1 tablespoon ground cinnamon - 1/2 teaspoon salt The sugar provides sweetness, while cinnamon brings warmth. A touch of salt balances these flavors, making the nuts even tastier. We need just a few more items to make the nuts shine: - 1/2 cup unsalted butter, melted - 1 teaspoon vanilla extract (optional) - 1 egg white, lightly beaten The butter coats the nuts, helping the sugar stick. Vanilla adds a lovely aroma. The egg white helps the coating to stick and creates a crunchy texture. With these ingredients, you set the stage for a delightful treat. Each one plays a part in making your cinnamon sugar candied nuts a hit! First, gather your ingredients. You need 2 cups of mixed nuts, 1 cup of sugar, and 1/2 cup of melted unsalted butter. You will also want 1 tablespoon of ground cinnamon, 1/2 teaspoon of salt, and an optional teaspoon of vanilla extract. Lastly, grab 1 egg white. Next, mix the sugar, cinnamon, and salt in a bowl. Stir well and set this aside. Then, take a large mixing bowl and add your mixed nuts. Pour the melted butter and vanilla extract over the nuts. Toss them gently until they are well coated. Now, add the lightly beaten egg white to the nuts. Stir until it is fully combined. This step helps the candy coating stick to the nuts. Finally, sprinkle the cinnamon-sugar mixture over the nuts. Toss again until all the nuts are coated evenly. Transfer the mixture to your slow cooker. Spread the nuts out evenly. Cover the slow cooker and set it on low heat. Cook for about 2 to 3 hours. Remember to stir the nuts every 20 minutes. This ensures they cook evenly and do not stick together. When the nuts turn golden and smell great, it is time to stop cooking. Turn off the slow cooker and uncover it. Spread the cooked nuts out on a baking sheet lined with parchment paper. This step helps them cool completely. Cooling allows the nuts to harden and get crunchy. Once they are cool, break apart any clumps. Then, store the nuts in an airtight container. Keeping them sealed will help them stay fresh. Enjoy your cinnamon sugar candied nuts as a tasty snack! To get your nuts crunchy, ensure you coat them well. The egg white helps the sugar stick. Stir the nuts every 20 minutes while they cook. This keeps them from sticking together and gives a nice crunch. After cooking, spread them out on parchment paper to cool. This step is key for that perfect bite. You can boost the flavor with a few simple tweaks. Try adding a dash of nutmeg or allspice to the cinnamon mix. A little zest from an orange or lemon can also brighten the taste. If you love vanilla, use that teaspoon of extract. This will add depth and a warm layer to your nuts. One common mistake is not stirring enough. If you let the nuts sit too long, they may burn or clump. Another issue is using too much butter. Stick to the half cup for the best texture. Lastly, don’t skip the cooling step. It’s crucial for that satisfying crunch. By avoiding these pitfalls, your candied nuts will shine! {{image_2}} You can mix and match nuts for your cinnamon sugar candied nuts. Each nut brings its own taste and crunch. I love using: - Almonds - Pecans - Walnuts - Cashews Try a blend of two or three for a unique flavor. You can even add pistachios or hazelnuts for extra fun. Just remember to adjust cooking time if you use larger nuts. Spice things up with extra flavors. You can add other spices to the sugar mix. Some great choices include: - Nutmeg for warmth - Allspice for a hint of sweetness - Ginger for a zesty kick You can also add citrus zest. Lemon or orange zest brightens the nuts. Just add it to the sugar mix before coating the nuts. If you want a different sweetness, try these options: - Honey or maple syrup for a natural touch - Coconut sugar for a richer flavor - Stevia for a low-calorie choice Remember to adjust the amount based on the sweetness level you like. Each sweetener changes the texture, so be ready for a new twist on your candied nuts! To keep your cinnamon sugar candied nuts fresh, store them in an airtight container. A glass jar works well, as it keeps moisture out. Make sure the nuts are completely cool before sealing. This prevents any steam that can make them soggy. For added protection, you can use parchment paper at the bottom of the container. These tasty treats can last up to two weeks when stored properly. If you want them to stay even longer, you can freeze them. Just place them in a freezer-safe bag or container. They can last for up to three months in the freezer. When ready to eat, let them thaw at room temperature. You don’t need to reheat these nuts, as they taste best at room temp. However, if you want to warm them up, spread them on a baking sheet and put them in a 350°F oven for about 5 to 10 minutes. This will revive their crunch. Serve them in a pretty bowl or jar to impress your guests. They make great snacks or gifts for friends and family. Enjoy the sweet crunch! Yes, you can use different nuts! Almonds, pecans, walnuts, and cashews work great. You can mix and match based on your taste. If you have a favorite nut, feel free to add it. Just keep in mind that some nuts cook faster than others. Make sure to check them often for doneness. To make the nuts less sweet, you can reduce the sugar. Try cutting the sugar by half. You can also add more nuts to balance the sweetness. Another option is to add a pinch of salt. Salt helps to enhance the nutty flavor and balance the sweet taste. Cleaning your slow cooker is easy. First, unplug it and let it cool down. Next, remove the insert and wash it with warm soapy water. A sponge works well for stuck bits. If there are tough stains, soak the insert for a while. Finally, rinse and dry it before storing. Making your own mixed nuts is fun and easy. We covered ingredients, prep steps, and cooking tips. You learned how to choose nuts, add sweeteners, and boost flavors. We also shared common mistakes to help you succeed. Now, with some creative twists and proper storage, your nuts can be a hit! Enjoy sharing your tasty treats. Happy snacking!

Cinnamon Sugar Candied Nuts Slow Cooker Delight

- 2 cups rolled oats - 1 cup whole wheat flour - ½ cup brown sugar, packed - 1 teaspoon baking powder - ½ teaspoon baking soda - ½ teaspoon cinnamon - ½ teaspoon salt - ½ cup unsalted butter, melted - 1 large egg - 1 teaspoon vanilla extract - 2 medium apples, peeled and diced (about 2 cups) - ½ cup caramel sauce (store-bought or homemade) - ½ cup chopped nuts (walnuts or pecans) You need simple and fresh ingredients for these caramel apple breakfast bars. The oats give a hearty base. Whole wheat flour adds good fiber. Brown sugar adds a rich sweetness. Baking powder and baking soda help the bars rise. Cinnamon and salt balance the flavors. Next, we have melted butter, which makes the bars rich. A large egg binds everything together. Vanilla extract adds a sweet, warm flavor. The apples bring moisture and a fresh taste. Caramel sauce swirls through the bars, giving them a sweet, sticky touch. Chopped nuts, like walnuts or pecans, add crunch. You can mix and match based on what you like. Enjoy the process! - Preheat your oven to 350°F (175°C). - Prepare a 9x13 inch baking pan. Grease it or line it with parchment paper. - In a large bowl, combine: - 2 cups rolled oats - 1 cup whole wheat flour - ½ cup brown sugar, packed - 1 teaspoon baking powder - ½ teaspoon baking soda - ½ teaspoon cinnamon - ½ teaspoon salt - Mix these dry ingredients well until they are combined. - In another bowl, whisk together: - ½ cup unsalted butter, melted - 1 large egg - 1 teaspoon vanilla extract - Make sure this mixture is smooth and well blended. - Pour the wet mixture into the dry ingredients. Stir until just combined. - Gently fold in: - 2 medium apples, peeled and diced (about 2 cups) - ½ cup chopped nuts (like walnuts or pecans) - Drizzle in ½ cup caramel sauce and fold it through. This creates nice swirls. - Pour the mixture into your prepared pan. Spread it evenly. - Drizzle the remaining caramel sauce on top. Use a knife to create swirls. - Bake in the oven for 25-30 minutes. Check if a toothpick comes out clean. - Once baked, let the bars cool for about 10 minutes in the pan. - Lift them out using the parchment paper and let them cool completely on a wire rack. - After cooling, cut them into squares or rectangles. You can switch whole wheat flour with all-purpose flour. This helps make the bars lighter. You can also use oat flour for a gluten-free option. For butter, vegan butter works well. If you need an egg substitute, try 1/4 cup of applesauce. This keeps the bars moist and tasty. To ensure even baking, spread the mixture flat in the pan. Use a spatula to press it down gently. This helps the bars cook evenly. To tell if the bars are done, look for golden edges. Insert a toothpick in the center. If it comes out clean, the bars are ready. For serving, place the bars on a nice plate. Drizzle extra caramel sauce over the top for a sweet touch. A sprinkle of cinnamon adds flavor and makes the bars look pretty. It’s a small step that makes a big difference. {{image_2}} You can change the apples in this recipe. Try using pears, which are sweet and juicy. Berries also work well, like blueberries or raspberries. These fruits add a burst of flavor. You can mix and match your favorites. The key is to keep the fruit diced small, so it mixes well. If you want a different crunch, switch up the nuts. Almonds add a nice touch. You can chop them or use slivered almonds for a different look. Pistachios are a fun choice too; they bring a unique flavor. Just make sure to chop them to mix in easily. Nuts not only add taste but also give extra nutrition. Want to make your bars more fun? Add chocolate chips for a sweet twist. Dark chocolate pairs well with the caramel. You can also sprinkle in spices like nutmeg or ginger. These spices give warmth and depth. Just a little can change the whole taste. Get creative and find the mix you love best! You can store the caramel apple breakfast bars in the fridge. They will stay fresh for up to one week. Make sure to keep them in an airtight container. This helps keep their taste and texture nice. If you want to save some for later, freezing works great. Cut the bars into squares before freezing. Wrap each bar in plastic wrap and place them in a freezer bag. They can last up to three months in the freezer. When you are ready to eat them, just take out what you need. To reheat the bars, use the microwave. Heat them for about 15 to 20 seconds. If you want a crispier texture, warm them in the oven. Set the oven to 350°F (175°C) and heat for about 10 minutes. This way, the caramel gets all gooey again, and the bars taste fresh. Yes, you can make these bars gluten-free. Use gluten-free rolled oats and a gluten-free flour blend. Almond flour or coconut flour can also work well. Just ensure all your ingredients are gluten-free. This way, those with gluten sensitivities can enjoy this tasty treat too. These bars stay fresh for about five days at room temperature. Store them in an airtight container. If you want them to last longer, keep them in the fridge for up to a week. You can also freeze them for up to three months. Just wrap them tightly in plastic wrap and then place them in a freezer bag. Yes, you can use store-bought caramel sauce. It saves time and effort. However, homemade caramel sauce has a richer flavor. Store-bought sauce may contain preservatives, which can change the taste. If you have time, making your own caramel adds a special touch to these bars. This blog post covered a fun recipe for caramel apple breakfast bars. We reviewed the key ingredients, step-by-step instructions, and helpful tips. You can even switch up the fruits and nuts to make it your own. Don't forget storage tips to keep your bars fresh. Give this recipe a try for a tasty breakfast or snack! Enjoy the blend of oats, apples, and caramel. It’s a dish sure to please everyone. Happy baking!

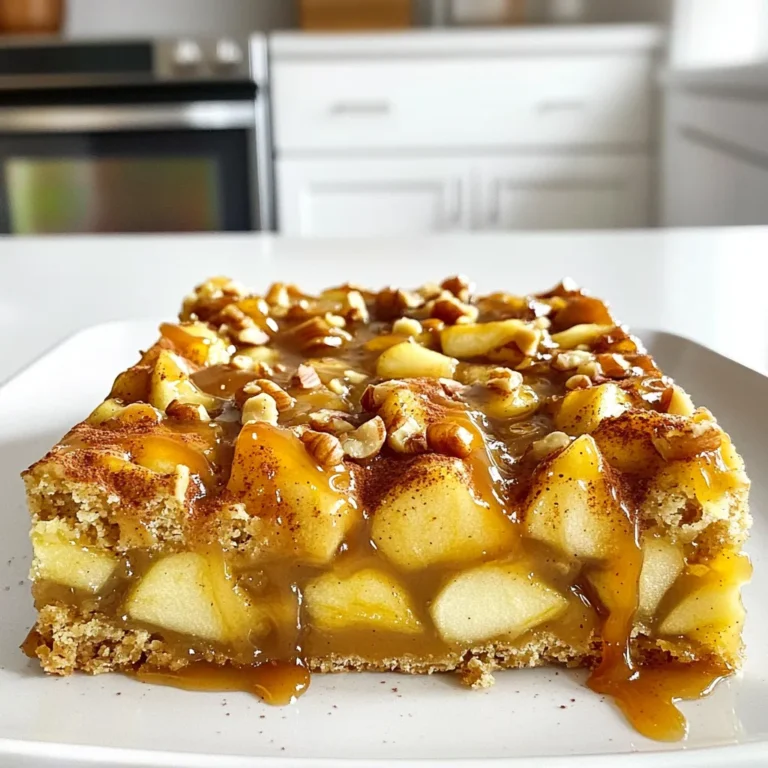
Caramel Apple Breakfast Bars Tasty and Easy Treat

- 10 oz fresh or frozen cheese tortellini - 2 tablespoons olive oil - 1 small onion, finely chopped - 3 garlic cloves, minced - 8 oz button mushrooms, sliced - 4 cups fresh spinach - 1 cup vegetable broth - 1 cup heavy cream - ½ cup grated Parmesan cheese - 1 teaspoon dried Italian herbs - Salt and pepper to taste - Fresh basil leaves for garnish These ingredients create a rich and creamy dish. The tortellini is the star here, soaking up all the flavors. I love using fresh spinach for its vibrant color and taste. The mushrooms add a nice earthiness, while the cream and cheese create a luscious sauce. - 1 cup cooked chicken or shrimp - 1 cup cherry tomatoes, halved - 1 teaspoon red pepper flakes - Fresh lemon juice You can add cooked chicken or shrimp for extra protein. Cherry tomatoes bring a burst of freshness. Red pepper flakes add heat for those who enjoy a spicy kick. A squeeze of lemon juice brightens the dish, balancing the creaminess. - Use coconut cream instead of heavy cream - Replace Parmesan cheese with nutritional yeast - Choose gluten-free tortellini if needed These swaps make the dish friendly for dairy-free and vegan diets. Coconut cream gives a rich texture, while nutritional yeast adds a cheesy flavor without dairy. Gluten-free tortellini ensures everyone can enjoy this meal. Start by heating 2 tablespoons of olive oil in a large pot over medium heat. Add 1 small onion, finely chopped, and sauté it for about 3-4 minutes. You want the onion to become soft and translucent. Next, stir in 3 minced garlic cloves and 8 ounces of sliced button mushrooms. Cook them together for another 5 minutes. This step brings out the great flavors. Now it's time to add 1 cup of vegetable broth to the pot. Bring it to a light simmer. Once it bubbles, gently add 10 ounces of fresh or frozen cheese tortellini. Cook according to the package instructions, usually about 5-7 minutes. As the tortellini cooks, stir in 4 cups of fresh spinach. Let the spinach wilt for about 2 minutes. This adds color and nutrients to your dish. Once the tortellini is cooked, lower the heat. Pour in 1 cup of heavy cream and add ½ cup of grated Parmesan cheese. Stir everything well until the cheese melts, making the sauce creamy. Season with 1 teaspoon of dried Italian herbs, salt, and pepper to your taste. If the sauce seems too thick, add a splash of vegetable broth to reach your desired thickness. Finally, let the pot sit for a couple of minutes before serving. Enjoy a delicious meal! To boost flavor in your creamy mushroom spinach tortellini, use fresh herbs. Fresh basil adds a bright taste. You can also sprinkle some chopped parsley on top. Dried herbs like oregano, thyme, and basil work too. They bring warmth and depth to your dish. Just remember to add them during cooking for the best flavor. When cooking tortellini, follow package instructions for the best results. Use a large pot with plenty of water. This helps prevent sticking. Salt the water to enhance the pasta flavor. Stir gently as it cooks. This keeps the tortellini from clumping together. Taste a piece before draining to ensure it's tender. Garnishing makes your dish look pretty and inviting. Try adding fresh basil leaves on top. They add color and a lovely aroma. You can also sprinkle extra Parmesan cheese for a rich touch. A drizzle of olive oil gives it shine. Serve in deep bowls to show off the creamy sauce. {{image_2}} You can add proteins to your creamy mushroom spinach tortellini for a heartier meal. Chicken works well. Cook diced chicken in the pot before adding onions. Shrimp is another great choice. Add shrimp when you stir in the tortellini to keep them tender. This adds flavor and makes the dish more filling. Feel free to mix in other vegetables. Bell peppers add sweetness and color. Just slice them thin and sauté with the onions. Zucchini adds a nice texture. You can cube it and add it with the mushrooms. This way, you boost nutrition while keeping the dish exciting. If you need gluten-free options, choose gluten-free tortellini. Many brands offer tasty alternatives made from rice or chickpeas. You can also make your own tortellini if you’re feeling adventurous. Just use gluten-free flours to create a dough. This way, everyone can enjoy this creamy delight! To store leftovers, let the tortellini cool down. Use an airtight container to keep it fresh. Place the container in the fridge. It will stay good for 3 to 4 days. If you want to keep it longer, consider freezing it. When you are ready to eat, take the tortellini out of the fridge. Put it in a pot over low heat. Add a splash of vegetable broth or cream to help it heat evenly. Stir often until warm. You can also use the microwave. Heat in short bursts, stirring in between. Ensure it is hot all the way through before serving. To freeze this dish, make sure it is completely cool. Portion it into freezer-safe bags or containers. Remove as much air as you can before sealing. Label the bags with the date. It can stay good in the freezer for up to 3 months. When you're ready to eat, thaw it in the fridge overnight. Reheat it as mentioned above. Yes, you can use frozen tortellini. Just add it directly to the pot. There’s no need to thaw first. It cooks well right from frozen. This saves you time and makes meal prep easier. Just follow the cooking time on the package, usually around 5 to 7 minutes. To add some heat, try adding red pepper flakes. Start with a pinch and taste as you go. You can also add diced jalapeños for a fresh kick. If you like, use spicy sausage instead of the regular one. This adds flavor and warmth to the dish. For a lighter option, use coconut cream. It works well and gives a nice flavor. You can also try using cashew cream for a rich taste. If you want a non-dairy option, almond milk or oat milk can work in a pinch. Just note that they may change the texture slightly. This blog post covered the key ingredients and steps for making creamy mushroom spinach tortellini. I shared tips for flavor and variations to fit your needs. Don’t forget about storage and reheating for leftovers. Cooking should be fun, and this dish is easy to customize. Enjoy making it your own, and savor every bite. Remember, you can always adjust it to your taste or dietary needs. Happy cooking!

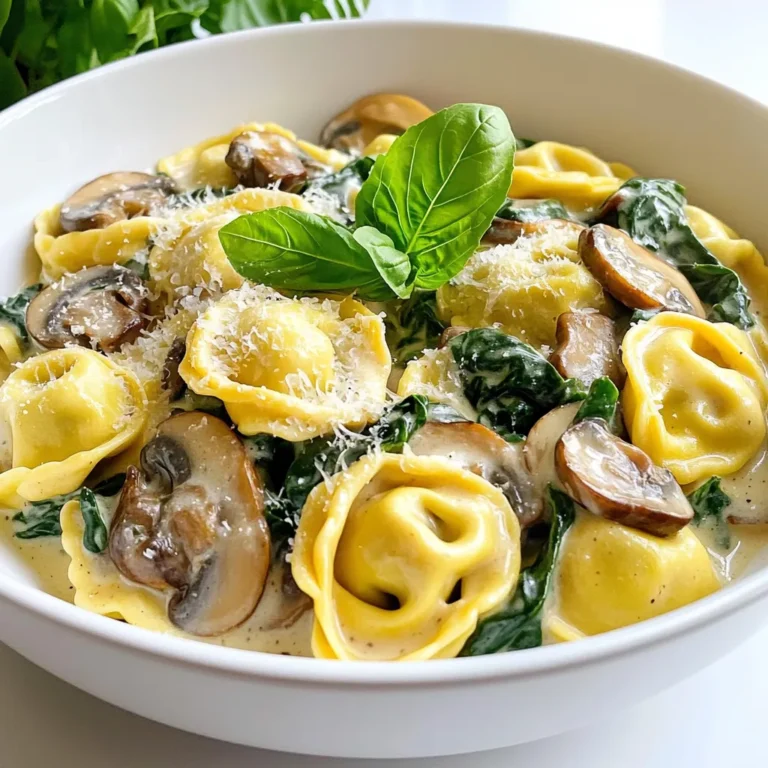
Creamy Mushroom Spinach Tortellini One Pot Delight

To make these Pumpkin Cheesecake Mousse Parfaits, gather the following items: - 1 cup pumpkin puree - 8 oz cream cheese, softened - 1/2 cup Greek yogurt - 1/2 cup powdered sugar - 1 teaspoon vanilla extract - 1 teaspoon pumpkin pie spice - 1 cup heavy whipping cream - 1 cup crushed graham crackers - 2 tablespoons melted butter These ingredients create a rich and creamy mousse that pairs well with a crunchy base. Enhance the parfaits with these fun toppings: - Whipped cream, for topping - Ground cinnamon, for garnish These garnishes add flavor and make your dessert look extra special. You will need a few essential tools for this recipe: - Large mixing bowl - Electric mixer or whisk - Separate mixing bowl for whipped cream - Small bowl for graham cracker mixture - Serving glasses or jars Having the right tools helps you prepare and layer your parfaits easily. Start by getting a large mixing bowl. Add the softened cream cheese, pumpkin puree, Greek yogurt, powdered sugar, vanilla extract, and pumpkin pie spice. Use a hand mixer to beat all the ingredients together. Mix until everything becomes smooth and creamy. Check for lumps; you want it all even. Next, take a separate bowl and pour in the heavy cream. Use a whisk or a mixer to whip the cream. Whip it until you see stiff peaks form. This step is key for a light texture. Gently fold the whipped cream into the pumpkin mixture. Use a spatula and be careful. You want to keep it fluffy, not flat. Now it's time to build your parfaits! In a small bowl, mix your crushed graham crackers with melted butter. Stir until all the crumbs are coated. Start layering in your serving glasses. Begin with a layer of graham cracker mixture at the bottom. Next, add a generous layer of the pumpkin cheesecake mousse. Repeat these layers until the glasses are full. End with a smooth layer of mousse on top. Once you finish, chill the parfaits in the fridge for at least one hour. This helps them set. Before serving, add a dollop of whipped cream on top and sprinkle ground cinnamon for a festive look. Enjoy your delicious dessert! To make the best whipped cream, chill your bowl and beaters first. Cold tools help the cream whip better. Use heavy cream for a thick texture. Start on low speed, then increase to high. Stop when you see stiff peaks. This means the cream holds its shape well. Fold it gently into your pumpkin mix. Be careful not to over-mix, or it could turn grainy. For a stunning look, use clear glasses. You can see the layers of graham crackers and mousse. Mason jars give a cozy feel, while cocktail glasses feel fancy. Top each parfait with a swirl of whipped cream. Add a sprinkle of ground cinnamon for a warm touch. You can also place a cinnamon stick or a small pumpkin on the side for more flair. One mistake is not chilling the parfaits long enough. They need time to set and become firm. Another error is over-mixing the whipped cream. This can make it lose its light and airy texture. Always layer carefully; if you rush, you may mix the layers. Lastly, avoid using low-fat cream cheese. It won't give the rich taste you want. {{image_2}} You can change the flavor of your parfaits to keep things fresh. Try adding a layer of chocolate mousse for a rich twist. You can also mix in some caramel sauce for a sweet surprise. If you love spices, add a touch of nutmeg or ginger for extra warmth. Each change brings something new and exciting to your dessert. Toppings can elevate your parfaits. Instead of whipped cream, consider using coconut cream for a tropical vibe. Crushed nuts, like pecans or walnuts, add a nice crunch. A drizzle of maple syrup or honey can make your parfaits even sweeter. You can also use fresh fruit, like slices of pear or apple, for a bright touch. To make this dessert gluten-free, swap graham crackers with gluten-free cookies or oats. You can crush gluten-free ginger snaps for a spicy kick. Just check the labels to ensure all ingredients are safe. This way, everyone can enjoy the creamy, deliciousness of your parfaits without worry. To store any leftover parfaits, cover the glasses tightly with plastic wrap. This helps keep the mousse fresh and prevents it from absorbing odors from the fridge. If you used jars, simply screw on the lids. Store them in the fridge for up to three days. You can freeze the parfaits, but be careful. The texture may change once thawed. To freeze, place the parfaits in airtight containers. Leave some space at the top, as the mousse expands when frozen. They can last for about two months in the freezer. When ready to enjoy, move them to the fridge overnight to thaw. These parfaits stay tasty for up to three days in the fridge. If you freeze them, remember they last longer but may not taste the same. For best quality, enjoy them fresh. Always check for signs of spoilage, like off smells or changes in texture, before serving. Yes, you can make these parfaits a day in advance. Just follow the recipe and chill them. This allows the flavors to blend nicely. The longer they sit, the better they taste. Just remember to add the whipped cream right before serving. This keeps it fresh and fluffy. I recommend using small glasses or jars. They should hold about 6 to 8 ounces. This size is perfect for a single serving. You can use mason jars for a fun, rustic look. Clear glasses also work well to show the layers. Yes, you can make a dairy-free version! Use dairy-free cream cheese and coconut cream in place of regular cream. For yogurt, try almond or coconut yogurt. The flavor will still be delicious, and it can be just as creamy. Enjoy your pumpkin cheesecake mousse parfaits without the dairy! This blog post covered everything you need for perfect pumpkin parfaits. We talked about ingredients, steps, and tips for success. You learned how to whip cream and avoid common mistakes. I also shared fun variations and storage advice. Remember, the key is to enjoy the process. These parfaits can impress your friends and family. Experiment with flavors and have fun. You will make a delicious dessert to share.

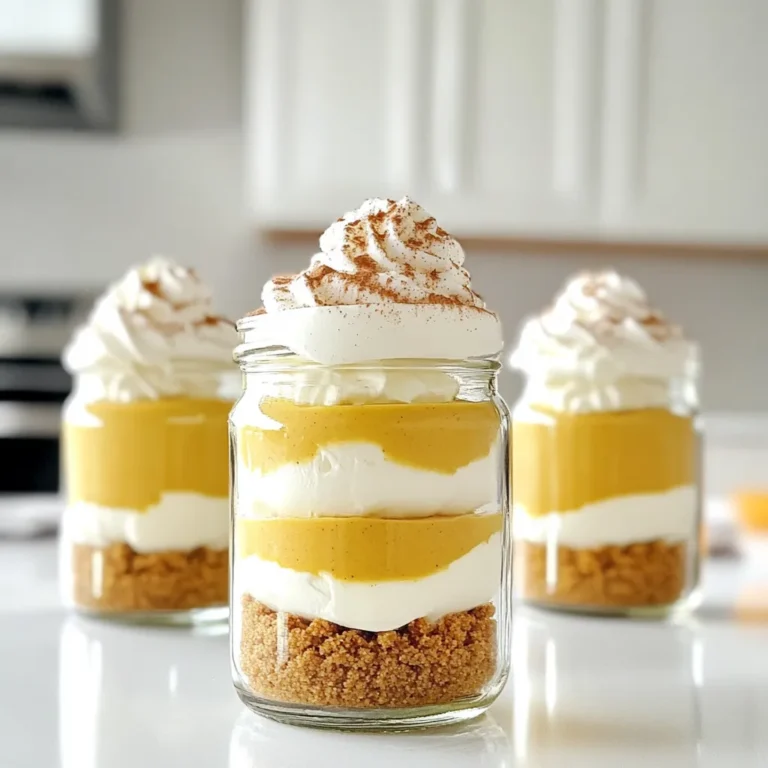
Pumpkin Cheesecake Mousse Parfaits Decadent Treat

- 2 cups graham cracker crumbs - 1/2 cup unsalted butter, melted - 1/4 cup sugar - 1 (8 oz) package cream cheese, softened - 1/2 cup granulated sugar - 1/4 cup brown sugar - 2 large eggs - 1 teaspoon vanilla extract - 2 cups apples, peeled, cored, and thinly sliced - 1 teaspoon cinnamon - 1/2 teaspoon nutmeg - 1 cup quick oats - 1/2 cup all-purpose flour - 1/4 cup brown sugar (for crumble topping) - 1/4 teaspoon salt Each ingredient plays a big role in the flavor and texture of the bars. The graham cracker crumbs make a sweet, crunchy crust. Butter holds it all together, while sugar adds sweetness. Cream cheese gives the filling its rich and creamy texture. The eggs help set the filling. Vanilla brings warmth to the dish. The apples add a fresh, fruity taste, while spices like cinnamon and nutmeg give a warm, cozy flavor. Oats and flour create the crumble topping, adding a crunchy finish. - 9x9 inch baking dish - Mixing bowls - Whisk or hand mixer - Measuring cups and spoons - Spatula Using the right tools helps make your baking easier. A 9x9 inch baking dish is perfect for these bars. Mixing bowls allow you to combine ingredients well. A whisk or hand mixer helps you get a smooth filling. Measuring cups and spoons ensure you use the right amounts for each ingredient. A spatula is great for spreading the cream cheese mixture and topping the apples evenly. 1. First, preheat your oven to 350°F (175°C). This step warms the oven for even baking. 2. Next, grease a 9x9 inch baking dish. This will help the bars come out easily. 3. In a bowl, combine 2 cups of graham cracker crumbs, 1/2 cup of melted unsalted butter, and 1/4 cup of sugar. Mix them well until they blend together. 4. Press this mixture into the bottom of the baking dish. Use your hands or the back of a spoon to create an even layer. 5. Bake the crust in the oven for 8-10 minutes. You're looking for a light golden color. 6. Once baked, remove the crust and let it cool for a bit. 1. In a large mixing bowl, beat 1 (8 oz) package of softened cream cheese with 1/2 cup of granulated sugar and 1/4 cup of brown sugar. Mix until it becomes smooth and creamy. 2. Add in the 2 large eggs one at a time. Mix well after each egg to ensure it's fully blended. 3. Finally, stir in 1 teaspoon of vanilla extract. This adds a lovely flavor to the filling. Set the mixture aside. 1. Take 2 cups of peeled and thinly sliced apples. Toss them in a bowl with 1 teaspoon of cinnamon and 1/2 teaspoon of nutmeg. This gives the apples a warm spice. 2. Pour the cream cheese mixture over your cooled crust. Spread it evenly with a spatula. 3. Next, arrange the spiced apple slices over the cream cheese layer. Make sure they’re spread out nicely. 4. In a small bowl, mix 1 cup of quick oats, 1/2 cup of all-purpose flour, 1/4 cup of brown sugar, and 1/4 teaspoon of salt. 5. Sprinkle this crumble topping evenly over the apple slices. This will create a nice texture when baked. 6. Bake everything for an additional 30-35 minutes. The cheesecake should set, and the crumble should turn golden. 7. Let the bars cool at room temperature before placing them in the fridge. Chill for at least 2 hours before cutting into squares. Enjoy these delightful treats with friends and family! To make the best Apple Crumble Cheesecake Bars, avoid common mistakes. One pitfall is overmixing the cheesecake batter. Mix until smooth but don’t whip too much air into it. This helps keep the bars from cracking. Another tip is to bake the crust just until it is lightly golden. This keeps it from becoming too hard. Let it cool slightly before adding the filling. For the perfect cheesecake consistency, use room-temperature cream cheese. Cold cream cheese can lead to lumps in your batter. Beat it well with the sugars and eggs until creamy. Serving is key to making your bars look amazing. Cut them into neat squares for a tidy look. Place them on a pretty platter for a nice display. For garnishing, top each bar with a dollop of whipped cream. A light sprinkle of cinnamon adds a lovely touch. You can also add some thin apple slices on top for color and appeal. {{image_2}} You can tweak the flavor of Apple Crumble Cheesecake Bars with fun twists. For a caramel touch, drizzle caramel sauce over the apple layer before adding the crumble. This adds sweetness and richness. You can also mix in chopped nuts like pecans or walnuts. They give a nice crunch and nutty flavor. If you want to make these bars gluten-free, swap graham crackers for gluten-free crumbs. Use almond flour instead of regular flour in the crumble. To go dairy-free, try cashew cream for the cheesecake layer. It gives a creamy texture without dairy. Fruits change with the seasons. In summer, use fresh berries like blueberries or strawberries for a fruity twist. In fall, you can add pears along with apples for a cozy flavor. In winter, citrus zest from oranges can brighten the dish. Adding spices can also enhance the taste. Try ginger or allspice for a warm flavor profile. Even a pinch of pumpkin spice can give a unique twist to your bars. These variations keep your dessert fresh and exciting throughout the year. To keep your Apple Crumble Cheesecake Bars fresh, store them in the fridge. Place the bars in an airtight container. This helps keep moisture in and prevents them from drying out. If you want to store them longer, freeze the bars. Wrap them tightly in plastic wrap, then place them in a freezer bag. This method helps avoid freezer burn. - Refrigerator: 5-7 days - Freezer: Up to 3 months Always label your containers with dates. This way, you know when you made them. If the bars smell off or look different, it’s best to throw them out. Safety first! Reheating your bars can bring back their great taste. You want to keep the texture nice as well. Here’s how to do it: - Microwave: Place a bar on a microwave-safe plate. Heat for about 10-15 seconds. Check if it’s warm, then add more time if needed. - Oven: Preheat your oven to 300°F (150°C). Place the bars in a baking dish. Cover with foil to keep them from drying out. Heat for about 10-15 minutes. For serving, consider adding a dollop of whipped cream on top. It adds a lovely touch and enhances the flavor. Enjoy your delicious dessert! Apple Crumble Cheesecake Bars last about 4 to 5 days in the fridge. Store them in an airtight container. This keeps them fresh and tasty. If you want them to last longer, you can freeze them. Just wrap them well in plastic wrap and aluminum foil. They can stay in the freezer for up to 3 months. Thaw them in the fridge before serving. Yes, you can make these bars ahead of time. You can bake them a day before serving. Let them cool completely, then refrigerate. This helps the flavors blend well. If you want to make them even earlier, freeze them. Just remember to let them cool first, then wrap them tightly. Thaw them in the fridge overnight before serving. If you need a substitute for graham crackers, you have options. Use crushed digestive biscuits or vanilla wafers for a similar taste. For a gluten-free option, try almond flour or gluten-free cookies. You can also use oats mixed with some melted butter. This gives a unique flavor and texture. Yes, you can add nuts to the crumble topping. Chopped walnuts or pecans work great. They add crunch and flavor. Just be careful with allergies if you serve these bars to others. Adding nuts may change the texture slightly but will enhance the taste. Mix them in with the oats and flour before sprinkling on top. In this post, we covered how to make Apple Crumble Cheesecake Bars. We explored the key ingredients, baking tools, and easy steps. I shared tips for a smooth filling and ways to present your bars. You learned about fun flavor twists and how to store leftovers well. Enjoy experimenting with this recipe, and have fun sharing your bars with others. They will impress your friends and family!

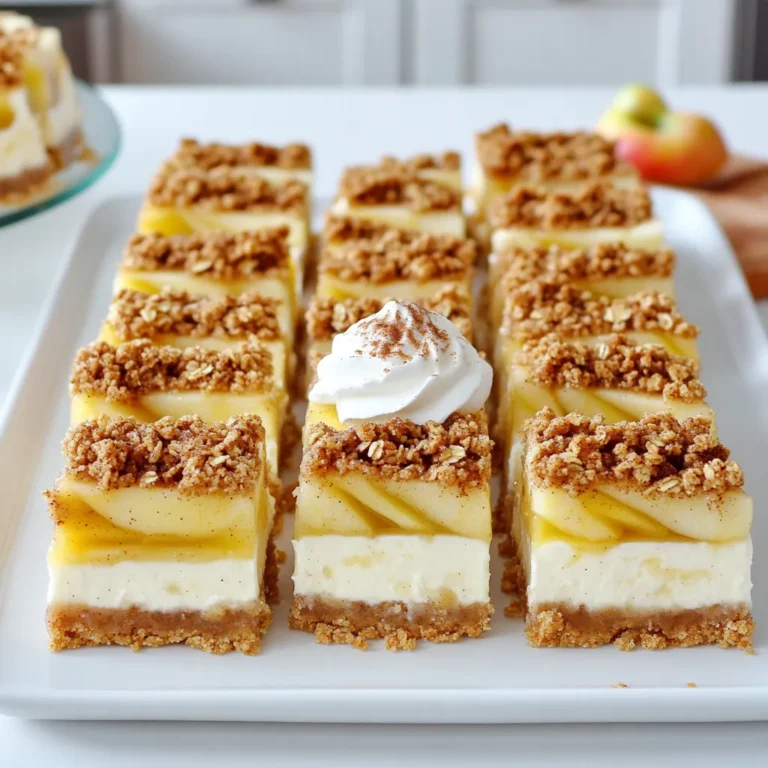
Apple Crumble Cheesecake Bars Delightful Dessert Treat

- 1 cup heavy whipping cream - 1/4 cup powdered sugar - 1 teaspoon vanilla extract - 1 teaspoon pumpkin spice blend - A pinch of sea salt You can swap powdered sugar with alternative sweeteners like agave or honey. These options can give a different flavor and sweetness level. If you need a dairy-free option, use coconut cream or almond cream instead of heavy whipping cream. Both choices whip well and add unique flavors to your whipped cream. First, chill your mixing bowl. Place it in the fridge for about 10 minutes. This step is key for great whipped cream. A cold bowl helps the cream whip faster. Next, take the bowl out of the fridge. Pour in 1 cup of heavy whipping cream. Then, add 1/4 cup of powdered sugar. Follow that with 1 teaspoon of vanilla extract and 1 teaspoon of pumpkin spice blend. Finally, add a pinch of sea salt. Mixing these ingredients gives your cream a rich flavor. Now, grab your electric mixer. Start whipping the mixture on medium speed. This helps combine all the ingredients smoothly. As the cream thickens, increase the speed to high. Watch closely as it whips. After about 3 to 5 minutes, you will see soft peaks form. This means your whipped cream is ready. Be careful not to over-whip it. If you do, it can turn into butter, and that’s not what we want! Taste your whipped cream after whipping. You may want to adjust the sweetness or spice. If it needs more sweetness, add a little more powdered sugar. For more spice, add a sprinkle of pumpkin spice. A perfect texture is light and fluffy. If your cream seems too thick, you can gently fold in a little more heavy cream. This keeps your whipped cream airy and delightful. To make great whipped cream, pay attention to temperature. Start with a chilled bowl. Put your mixing bowl in the fridge for about 10 minutes. Cold utensils help the cream whip faster. Next, avoid over-whipping. Whip the cream until you see soft peaks. This takes about 3 to 5 minutes. If you whip too long, it can turn to butter. Serve your whipped cream in a pretty bowl. A decorative bowl shows off your creation. Top it with a sprinkle of pumpkin spice. You can also add a cinnamon stick for flair. Pair this whipped cream with your favorite desserts. It goes well with pies, cakes, or even coffee. After making whipped cream, clean your tools right away. Use warm, soapy water for easy cleaning. Don’t let cream sit on your utensils for too long. Store leftover ingredients properly. Keep extra whipped cream in an airtight container. It lasts for about 2 days in the fridge. Enjoy your pumpkin spice whipped cream while it’s fresh! {{image_2}} You can mix things up with flavor variations. Try different spice blends to change the taste. For instance, use cinnamon or nutmeg for a unique twist. You can also add chocolate or caramel. A drizzle of chocolate syrup can make a rich treat. Caramel adds a sweet touch, perfect for fall desserts. If you're looking for alternatives, consider making vegan pumpkin spice whipped cream. Use coconut cream instead of heavy whipping cream. This keeps it creamy and rich without any dairy. For those who want a sugar-free option, use a sugar substitute. Sweeteners like stevia or erythritol work well, and they keep the flavor intact. You can create special holiday-themed variations. For Halloween, add orange food coloring for a fun look. Around Thanksgiving, pair this whipped cream with pumpkin pie. It makes a great topping! For Christmas, mix in peppermint extract. It adds a fresh twist and pairs well with hot cocoa. Enjoy these different themes all season long! To store your homemade pumpkin spice whipped cream, use an airtight container. Glass jars or plastic containers work well. Make sure the lid seals tightly. This keeps air out and keeps the cream fresh. In the fridge, your whipped cream stays good for about 3 to 5 days. It’s best to use it within this time for the best taste and texture. You can freeze whipped cream for later use. To freeze, spoon it into an ice cube tray or a freezer-safe bag. Spread it out flat if using a bag. This makes it easy to grab just what you need later. When you want to use it, move it to the fridge to thaw overnight. If you need it fast, you can defrost it in the microwave for a few seconds. Just be careful not to melt it. If you buy pumpkin spice whipped cream, check the label for the expiration date. Store-bought whipped cream can last longer than homemade. It usually stays good for a few weeks if unopened. Once you open it, use it within a week for best flavor. If you notice any strange smells or changes in texture, it’s best to toss it out. To make pumpkin spice whipped cream from scratch, follow these simple steps: - Chill a medium bowl in the fridge for 10 minutes. - Pour in 1 cup of heavy whipping cream. - Add 1/4 cup of powdered sugar. - Mix in 1 teaspoon of vanilla extract and 1 teaspoon of pumpkin spice blend. - Sprinkle in a pinch of sea salt. - Whip the mixture using an electric mixer on medium speed. - Increase the speed to high until soft peaks form, about 3-5 minutes. It's crucial not to over-whip, or it may turn to butter. Taste and adjust sweetness or spice as needed. Serve in a decorative bowl for a festive touch. Yes, many brands sell pumpkin spice whipped cream. Some recommended brands are: - Reddi-wip: They offer a pumpkin spice flavor in a convenient can. - Land O'Lakes: Their version pairs well with many desserts. - Cool Whip: They also have a pumpkin spice option during fall. Check your local grocery store or online. Pumpkin spice whipped cream enhances many desserts. Here are some tasty ideas: - Pumpkin pie: A classic fall favorite. - Chocolate cake: The spice adds warmth to rich chocolate. - Apple crisp: It complements the sweetness of baked apples. - Coffee or lattes: A dollop of this cream makes your drink cozy. Feel free to experiment with your favorite sweets! Yes, you can use non-dairy options instead of real cream. Here are some great alternatives: - Coconut cream: Whips well and adds a light coconut flavor. - Almond milk cream: Use a thicker version for the best results. - Soy cream: This option whips nicely and has a neutral taste. Whichever option you choose, follow the same steps for whipping. Enjoy your pumpkin spice whipped cream! In this post, we explored how to make delicious pumpkin spice whipped cream. We covered the key ingredients, step-by-step instructions, and helpful tips to achieve the best results. I shared various flavor and dietary variations, plus storage methods to keep your cream fresh. For all the sweet treats you create, this whipped cream will elevate them. Experiment and enjoy making it your own. With the right techniques, you can impress family and friends this season.

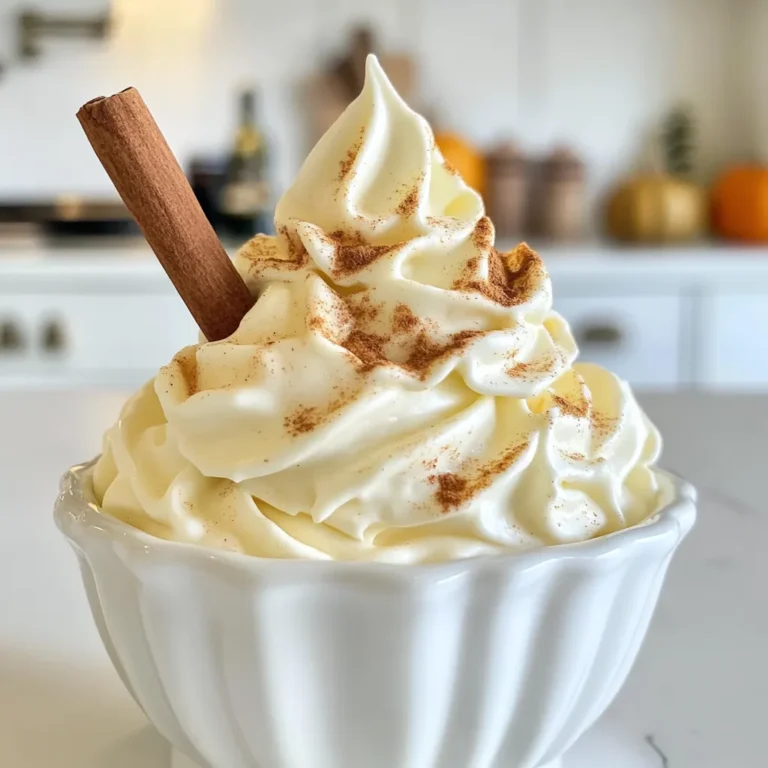
Pumpkin Spice Whipped Cream Delightful Fall Treat

- 2 boneless, skinless chicken breasts, diced - 8 oz (225 g) pasta (fettuccine or penne) - 2 tablespoons olive oil The main ingredients form the base of this dish. The diced chicken gives protein and flavor. You can choose fettuccine or penne, both are great. Olive oil adds richness and helps cook the chicken. - 1 cup heavy cream - 1/2 cup grated Parmesan cheese - Juice and zest of 1 large lemon Heavy cream creates a rich, creamy sauce. Grated Parmesan adds a salty and nutty taste. The lemon juice and zest brighten the dish with fresh flavor. - 1 cup chicken broth - 3 cloves garlic, minced - 1 teaspoon dried thyme - 1/2 teaspoon red pepper flakes (optional) Chicken broth adds depth to the sauce. Garlic gives a sweet, savory note. Dried thyme adds an earthy touch. Red pepper flakes can spice things up, if you like. To start, heat 2 tablespoons of olive oil in a large pot over medium heat. Add 2 diced chicken breasts. Sprinkle with salt and pepper. Cook until the chicken is brown, about 5 to 7 minutes. Once done, remove the chicken and set it aside. This step keeps the chicken juicy and flavorful. In the same pot, add 3 minced garlic cloves. Sauté them for about 1 minute. Be careful not to burn the garlic. Next, pour in 1 cup of chicken broth and scrape any tasty bits from the pot. This adds great flavor. Now, mix in 8 ounces of pasta, 1 cup of heavy cream, the juice, and zest of 1 large lemon. Stir well to combine everything. Bring the mixture to a gentle boil. Then, reduce the heat to low and cover the pot. Cook for about 10 to 12 minutes. Stir occasionally to prevent sticking. You want the pasta to be al dente, which means firm but cooked. The sauce will thicken as it cooks. Once the pasta is ready, stir in the cooked chicken. Add 1/2 cup of grated Parmesan cheese, 1 teaspoon of dried thyme, and 1/2 teaspoon of red pepper flakes if you want some heat. Mix everything well. Taste it and adjust the salt and pepper if needed. Let the pot sit for a couple of minutes. This helps the pasta soak up more sauce. Finally, garnish with fresh chopped parsley before serving. Enjoy your creamy lemon chicken pasta! To make great pasta, cook it until it is al dente. This means it should be firm but not hard. You can test it by biting into a piece. If it feels slightly soft in the center, it is ready. Always taste a piece before draining it. Seasoning your water is key. Add salt to the boiling water before you cook your pasta. This helps the pasta soak up flavor as it cooks. A good rule is to use about one tablespoon of salt per gallon of water. To boost the flavor, consider adding lemon zest. The zest adds a bright, fresh taste. You can also mix in extra herbs. Fresh parsley or basil can work wonders. Just chop them finely and stir them in right before serving. If you want a creamier sauce, add more heavy cream. This will make your dish richer. You can also mix in a splash of pasta water to help blend the sauce better. For serving, use individual bowls. This makes each portion look nice. You can sprinkle extra Parmesan cheese on top for a tasty touch. Garnish with chopped parsley and a bit of lemon zest. This adds color and freshness to the dish. It makes your creamy lemon chicken pasta not only delicious but also beautiful! {{image_2}} You can switch up the pasta types in this dish. Fettuccine and penne work great, but you can try others too. Whole wheat pasta adds a nice texture and flavor. If you're looking for gluten-free options, consider brown rice pasta or chickpea pasta. These alternatives keep the dish tasty while meeting dietary needs. If you want to change the protein, shrimp is a fantastic option. Just cook shrimp until pink and add it to the dish. Tofu is another great choice for a vegetarian meal. It soaks up flavors well and adds protein. You can also skip the protein altogether for a lighter, veggie-focused dish. Adding vegetables can really boost the dish. Spinach or broccoli not only adds color but also nutrients. Just toss them in when you mix the sauce. For cheese lovers, try different cheese varieties like goat cheese or feta. They can add unique flavors that make this pasta even more delightful. To keep your creamy lemon chicken pasta fresh, store it in the fridge. Use an airtight container for the best results. Make sure to cool the pasta before sealing the container. This helps avoid extra moisture. You can keep leftovers for up to three days. When it’s time to enjoy your leftovers, you have two options: the microwave or the stovetop. - Microwave: Place a serving in a microwave-safe dish. Cover it loosely. Heat in short bursts, stirring in between, until warm. - Stovetop: Warm on low heat in a pan. Add a splash of chicken broth or cream to keep it creamy. Stir often to avoid sticking. To maintain that rich creaminess, always add a bit of liquid when reheating. Enjoy your delicious pasta again! This recipe takes about 30 minutes to make. You’ll need 10 minutes to prep the ingredients. The cooking time is around 20 minutes. This quick meal is perfect for busy nights! Yes, you can use whole wheat pasta. It adds a nutty flavor and makes the dish a bit healthier. Just keep an eye on the cooking time, as whole wheat pasta may take longer to cook. You can make this recipe dairy-free. Use coconut milk or a dairy-free cream substitute. You can also skip the cheese or use a dairy-free cheese option to maintain flavor. Serve this pasta with a fresh salad or garlic bread. A light green salad pairs well, adding crunch and color. You can also enjoy it with steamed vegetables for added nutrition. This blog post covered how to make creamy lemon chicken pasta. We detailed the main ingredients, like chicken and pasta, and how to create a rich sauce. I shared cooking tips and suggested variations to fit your taste. You can even store leftovers for a tasty meal later. With these steps, you can enjoy this dish any day. Embrace your kitchen skills and have fun!

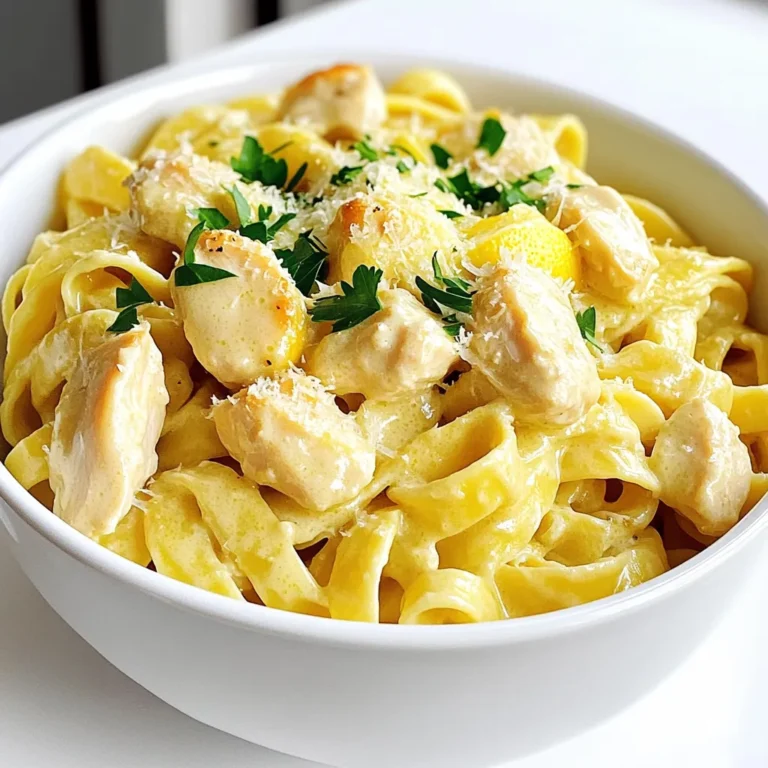
Creamy Lemon Chicken Pasta One Pot Delightful Dish

PREV 1 … 4 5 6 … 57 NEXT
flavor nest kitchen

explore

DessertsDinnerAppetizersDrinks

Our Policies

  • Cookie Policy
  • Copyright Policy
  • Disclaimer
  • GDPR Policy
  • Terms Of Use
Back to Top
  • About
  • Contact Us
  • Privacy Policy
© 2025 flavor nest kitchen