FREE DINNER EBOOK! Get your copy!
  • Cookie Policy
  • GDPR Policy
  • Disclaimer
  • Terms Of Use
  • Visit my other site: Fun Cookie Recipes
flavor nest kitchen
  • Home
  • Dinner
  • Desserts
  • Drinks
  • Appetizers
  • Contact
  • About
  • Privacy Policy
  • Home
  • Dinner
  • Desserts
  • Drinks
  • Appetizers
  • Contact
  • About
  • Privacy Policy
  • Cookie Policy
  • GDPR Policy
  • Disclaimer
  • Terms Of Use
Visit my other site: Fun Cookie Recipes

HOME / CATEGORIES /

Latest

- 2 ripe avocados - 12 oz (340g) spaghetti or linguine - 2 cloves garlic, minced - 1 tablespoon fresh lemon juice - 1/4 cup extra virgin olive oil - 1/4 cup grated Parmesan cheese (or nutritional yeast for a vegan option) - 1/4 teaspoon red pepper flakes (adjust to taste) - Salt and pepper to taste - Fresh basil leaves for garnish - Cherry tomatoes, halved (optional, for garnish) You can easily swap some ingredients. If you're vegan, use nutritional yeast instead of Parmesan. For gluten-free diets, try gluten-free pasta. If you're avoiding garlic, skip it or use garlic powder. For a nut-free option, make sure your Parmesan cheese is nut-free. You can also add cooked chicken or shrimp for extra protein. When choosing avocados, look for ones that feel soft but not mushy. Gently press the skin with your fingers. If it gives a little, it’s ripe. Avoid avocados with dark spots or cracks. If they are hard, leave them at room temperature for a couple of days. You can speed up ripening by placing them in a brown paper bag with a banana. Bananas give off ethylene gas, which helps the avocados ripen faster. {{ingredient_image_1}} First, you need to cook the pasta. Use a large pot and fill it with water. Add a good amount of salt to the water. Bring it to a boil. Once boiling, add 12 ounces of spaghetti or linguine. Cook it for about 8 to 10 minutes, or until it is al dente. This means it should be firm but not hard. While the pasta cooks, save 1 cup of pasta water before draining. This water helps to thin the sauce later. While the pasta cooks, grab two ripe avocados. Cut them in half, remove the pit, and scoop the flesh into a blender. Add two cloves of minced garlic and 1 tablespoon of fresh lemon juice. Pour in 1/4 cup of extra virgin olive oil. Sprinkle in 1/4 cup of grated Parmesan cheese or nutritional yeast if you want a vegan option. Add 1/4 teaspoon of red pepper flakes for some heat and season with salt and pepper. Blend everything until it becomes a smooth and creamy sauce. If it’s too thick, add some reserved pasta water a little at a time to reach your desired consistency. Once your pasta is drained, put it back in the pot. Pour the creamy avocado sauce over the pasta. Toss it all together well. Make sure every piece of pasta is coated in that rich, green sauce. For a nice touch, serve the pasta in bowls and add halved cherry tomatoes on top for color. Don’t forget to garnish with fresh basil leaves! If you like, drizzle a bit more olive oil on top for extra flavor. Enjoy your creamy avocado pasta! To make the sauce creamy, use ripe avocados. They should feel soft but not mushy. Blend the avocados with garlic, lemon juice, olive oil, and cheese. If the sauce is too thick, add pasta water. Start with a little and blend until smooth. This helps you control the sauce’s thickness. To make the flavor pop, add fresh herbs. Basil works well, but you can try parsley too. Red pepper flakes add heat. Adjust the amount based on your taste. For a fresh touch, toss in halved cherry tomatoes. They add color and sweetness to the dish. For a beautiful plate, use large bowls. Serve the pasta warm. Top it with fresh basil leaves. A drizzle of olive oil adds shine. Finish with cracked black pepper and more cheese for extra flavor. These little details make your dish look and taste amazing. Pro Tips Use Ripe Avocados: Ensure your avocados are perfectly ripe for a creamy texture. They should yield slightly when pressed gently. Customize Your Spice Level: Adjust the amount of red pepper flakes according to your heat preference. Start with a little, and add more if you like it spicy! Reserve Pasta Water: Always save some pasta water before draining. It helps to adjust the sauce consistency and makes it cling better to the pasta. Add Fresh Ingredients: For extra freshness, toss in some fresh spinach or arugula just before serving, or consider adding grilled chicken for protein. {{image_2}} You can easily make this creamy avocado pasta vegan. Just swap out the cheese. Use nutritional yeast instead of Parmesan. This gives a nice cheesy flavor without dairy. You can also add a splash of plant-based milk. This helps blend the sauce smoother if needed. Want to boost the protein? Try adding chickpeas or white beans. They mix well with the avocado sauce. You can also add grilled chicken or shrimp. These options add taste and make the meal more filling. Simply toss them in with the pasta and sauce. Add herbs and spices to make the dish unique. Fresh basil is a great start. You can also use parsley, cilantro, or even mint. These herbs brighten the taste. For extra heat, add more red pepper flakes. Lemon zest can also add a nice zing. Mix and match to find your favorite flavors! To keep your creamy avocado pasta fresh, store it in an airtight container. Make sure to seal it tightly. It can last in the fridge for about two days. The avocado may darken, but this does not mean it has gone bad. You can add a little extra lemon juice on top to slow this down. I do not recommend freezing creamy avocado pasta. The texture of the avocado may change when frozen, making it less appealing. If you have leftover sauce, you can freeze that. Just place it in a freezer-safe container. It will keep well for up to three months. Thaw it in the fridge overnight before using. When reheating, do it gently. You can use a pan over low heat. Add a splash of water or olive oil to help restore creaminess. Stir it often to heat evenly. If you microwave, use a low setting. Heat in short bursts to avoid cooking it too much. Enjoy your creamy avocado pasta warm and tasty! Yes, you can switch up the pasta. You can use any shape you like. Whole wheat pasta adds more fiber. Gluten-free options work well too. Just follow the cooking time on the package. Adjust the sauce if you use a different type. The creamy avocado sauce will taste great with all pasta shapes. Creamy avocado pasta lasts about three days in the fridge. Store it in an airtight container. The avocado may brown a bit, but it will still taste good. To keep it fresh, you can add a splash of lemon juice. This helps slow down browning. Yes, you can make this dish ahead of time. Cook and cool the pasta first. Make the sauce and store it separately. When you’re ready to eat, mix them together. You may need to add a splash of pasta water to keep it creamy. This way, you get the best taste and texture. This blog post shared how to make creamy avocado pasta. We covered the ingredients, cooking steps, and tips for the best taste. You learned about substitutions and how to pick ripe avocados. I also shared variations for vegan and protein-rich options. Remember, proper storage keeps your dish fresh longer. Enjoy your tasty and healthy pasta! With these steps, you can impress yourself and others. You now have all you need to make this dish a favorite. Happy cooking!

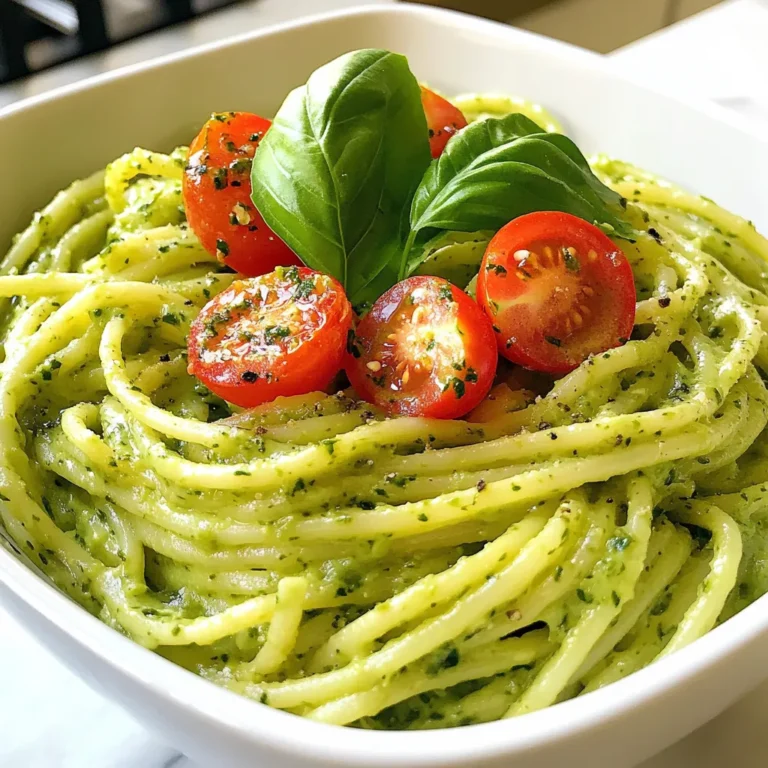
Creamy Avocado Pasta Irresistible Quick Meal Option

- 3 ripe bananas, sliced - 1 box (3.4 oz) instant vanilla pudding mix - 2 cups milk - 1 cup heavy whipped cream - 1 teaspoon vanilla extract - 1 box (7 oz) vanilla wafers The main ingredients make this dessert rich and creamy. Ripe bananas are sweet and soft. They blend well with the pudding. Instant vanilla pudding mix thickens quickly and adds sweetness. Milk helps the pudding mix hydrate. Heavy whipped cream gives a light, fluffy texture. Vanilla extract enhances the flavor. - 1/2 cup toasted coconut flakes (optional) - Fresh mint leaves for garnish (optional) Toasted coconut flakes add a crunchy texture and a tropical taste. Mint leaves bring a fresh color and aroma. You can skip these if you prefer a simpler trifle. But they do add a nice twist! {{ingredient_image_1}} Whisking the Pudding and Milk Start by grabbing a large bowl. Add the instant vanilla pudding mix and the milk. Whisk them together until the mix is smooth. This should take about two minutes. You want it to be thick and creamy. Set this mixture aside to let it firm up. Folding in the Whipped Cream Next, take another bowl. Pour in the heavy whipped cream and add the vanilla extract. Beat this until soft peaks form. This means the cream should hold its shape but still be fluffy. Now, gently fold this whipped cream into your pudding mixture. Mix until both are fully combined. This step gives your trifle a light, airy texture. Layering Vanilla Wafers Now it’s time to build your trifle! Grab a trifle dish or individual glass cups. Start with a layer of vanilla wafers at the bottom. Make sure they cover the base well. This layer adds crunch and sweetness. Adding Banana Slices and Pudding On top of the wafers, add a layer of sliced bananas. Aim for even coverage. Then, spoon a generous layer of your creamy pudding mixture over the bananas. Repeat the layers. Wafers, bananas, pudding—until you reach the top of the dish. Finish with a final layer of pudding. Applying Coconut Flakes If you like coconut, sprinkle some toasted coconut flakes on top. This adds a nice crunch and flavor. It’s an optional step, but I highly recommend it for extra texture. Chilling the Trifle Cover your trifle and chill it in the refrigerator. Let it sit for at least two hours. This chilling time helps the flavors blend and the wafers soften slightly. It makes each bite melt in your mouth. Enjoy your Classic Banana Pudding Trifle! It’s a delightful dessert that pleases everyone. Importance of Chilling Time Chilling your banana pudding trifle is key. It helps the flavors mix well. I recommend at least two hours in the fridge. This time lets the wafers soften just right. The dessert will taste better once chilled. Using Fresh Ingredients Always use ripe bananas. They add sweetness and a creamy texture. Fresh whipped cream makes a big difference too. It keeps the trifle light and airy. Choose quality vanilla pudding mix for the best taste. Fresh ingredients help you create a rich dessert. Serving in Individual Glass Cups Serving in small glass cups is fun and fancy. Each guest gets their own portion. This makes it easy to enjoy your trifle. Plus, it looks great on any table. You can see the lovely layers through the glass. Adding Caramel Sauce Drizzle caramel sauce on top for extra flavor. It adds a sweet touch and makes it special. Just a little goes a long way. The sauce pairs well with the bananas and vanilla pudding. It’s a simple trick to impress your guests. Pro Tips Use Ripe Bananas: For the best flavor and sweetness, make sure your bananas are fully ripe with brown spots. This will enhance the overall taste of the trifle. Chill the Pudding: Allow the pudding to chill for at least 30 minutes before layering. This helps it to thicken further and improves the texture of your trifle. Layer Strategically: To avoid soggy wafers, layer them in between the bananas and pudding. This creates a barrier and keeps them crunchy longer. Garnish Creatively: Elevate your presentation by adding fresh berries, chocolate shavings, or a drizzle of chocolate sauce on top along with the mint leaves for a colorful touch. {{image_2}} You can make your banana pudding trifle even more exciting with new flavors. Here are two tasty ideas: - Chocolate Banana Trifle: Just add chocolate pudding mix instead of vanilla. Layer the chocolate pudding with banana slices and vanilla wafers. This gives a rich twist to the classic dessert. The chocolate pairs well with the bananas. - Peanut Butter Banana Trifle: For this treat, mix peanut butter into the vanilla pudding. Use creamy or chunky peanut butter based on your taste. Layer it similarly to the classic version. The nutty flavor adds a fun crunch and taste. Garnishes can make your trifle look fancy and taste great. Here are some ideas: - Nuts or Chocolate Shavings: Sprinkle chopped nuts like walnuts or pecans on top. They add a nice crunch. You can also use chocolate shavings for a sweet touch. They melt in your mouth as you enjoy the trifle. - Whipped Cream Alternatives: If you want to switch it up, try adding flavored whipped cream. You can use chocolate or even coconut whipped cream. This adds a unique twist to your dessert and can match your flavor choice. With these variations, your classic banana pudding trifle can become a dessert for any mood or occasion! - Best Container Options: Use an airtight container. A glass dish works well too. - Recommended Storage Time: Store in the fridge for up to 3 days. The wafers may get soft over time. - Guidelines for Freezing: Yes, but it’s best to freeze only the pudding. Do not freeze the wafers. They won’t hold up. - Thawing Tips: Thaw in the fridge overnight. After thawing, add fresh banana slices and wafers for the best taste. Yes, you can use different puddings! Each type will change the flavor. - Chocolate pudding gives a rich twist. - Butterscotch pudding adds a sweet, caramel flavor. - Strawberry pudding offers a fruity note. If you want a lighter touch, go for lemon pudding. It brightens the dessert nicely. Just make sure to match the milk amount as stated in the recipe. The trifle can sit for up to 24 hours. - Maximum Recommended Time: 24 hours is best for flavor. - Effects on Texture and Taste: If left too long, the wafers may get too soggy. They should be soft but not mushy. Layers meld well when chilled, enhancing the taste. You have several yummy options if you can't find vanilla wafers. - Graham crackers work well and add a nice crunch. - Shortbread cookies bring a buttery flavor. - Ladyfingers can add a fun twist too. If you need gluten-free choices, use gluten-free cookies or almond flour cookies. These can replace wafers without losing great taste. In this post, we covered how to make a delicious banana pudding trifle. You learned about key ingredients like ripe bananas and vanilla pudding mix. I shared step-by-step instructions and tips for a great texture and presentation. You also discovered fun variations, storage tips, and answers to common questions. Now, you can confidently create your own trifle. Enjoy experimenting with flavors and impressing your friends and family!

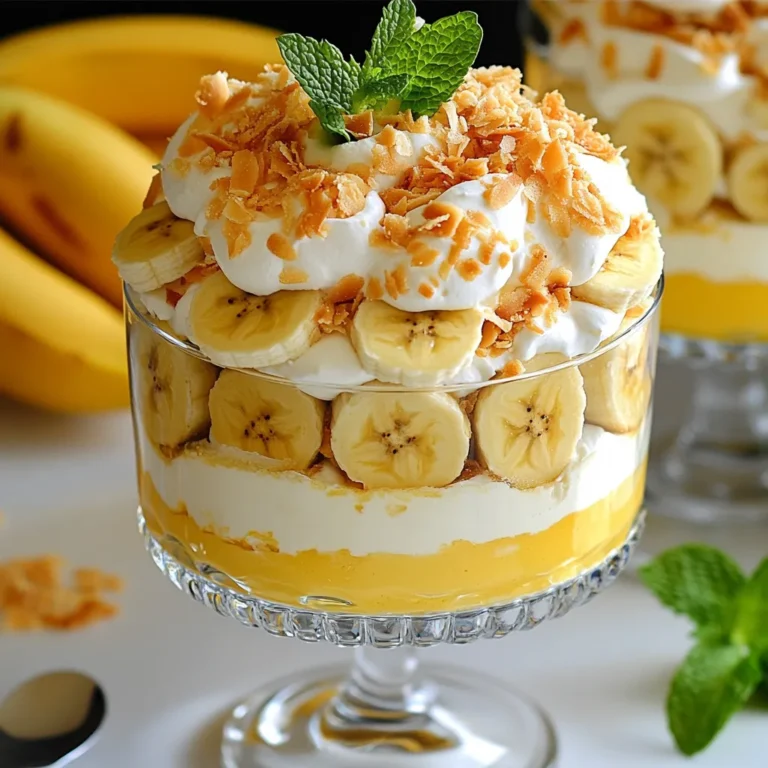
Classic Banana Pudding Trifle Decadent Dessert Delight

- 1 cup rolled oats - 1/2 cup creamy peanut butter - 1/3 cup honey or maple syrup - 1/4 cup dark chocolate chips - 1/4 cup ground flaxseed (optional) - 1/2 tsp vanilla extract - A pinch of sea salt To make these tasty bites, you need simple, healthy ingredients. First, rolled oats give a good base. They add fiber and make you feel full. Next, creamy peanut butter brings rich flavor and healthy fats. Honey or maple syrup adds sweetness. You can choose which one you like best. Dark chocolate chips give a nice crunch and a sweet touch. You can use regular or dark chocolate based on your taste. Ground flaxseed is optional, but it adds extra fiber and omega-3s. A splash of vanilla extract boosts the flavor, while a pinch of sea salt balances the sweetness. When you gather these ingredients, you have everything you need for a fun, healthy snack. These energy bites are great for on-the-go munching or a quick pick-me-up. They are easy to make and fun to eat! {{ingredient_image_1}} This recipe is simple and quick. You will need about 10 minutes to prep. Gather your ingredients first. This helps keep things organized. You will mix dry and wet items in separate bowls. Then, you will combine everything and form bites. In a large mixing bowl, add these items: - 1 cup rolled oats - 1/4 cup ground flaxseed (optional) - A pinch of sea salt Stir these together well. This mix gives your bites texture and flavor. The oats are the main base. Flaxseed adds extra nutrients. The salt balances the sweetness. Next, grab another bowl. In this bowl, mix: - 1/2 cup creamy peanut butter - 1/3 cup honey or maple syrup - 1/2 tsp vanilla extract Stir until everything is smooth. This mix adds creaminess and sweetness. The vanilla gives a nice aroma too. It’s like a hug for your taste buds! Now, pour the wet mix into the dry ingredients. Stir until everything is well combined. Then, add: - 1/4 cup dark chocolate chips Fold these in carefully. The chocolate chips add a sweet crunch. Now, take about a tablespoon of the mix. Roll it into a ball using your hands. Repeat until you use all the mix. Once formed, place the energy bites on a baking sheet lined with parchment paper. Make sure they are spaced out. Chill them in the fridge for at least 30 minutes. This step helps them firm up and hold their shape. Enjoy your tasty and healthy snacks! For the best texture, use rolled oats. They give a chewy bite. If you want a smoother mix, add ground flaxseed. This helps bind the ingredients better. Make sure your peanut butter is creamy. It needs to blend easily with other ingredients. If the mixture feels too dry, add a bit more honey or peanut butter. Your hands should be able to roll the mixture into balls easily. You can make these energy bites to fit many diets. If you need a nut-free snack, use sun butter or soy nut butter instead of peanut butter. Maple syrup is a great choice if you want a vegan option. For gluten-free diets, ensure your oats are certified gluten-free. You can also swap out dark chocolate chips for carob chips for a different flavor. One common mistake is not chilling the bites long enough. They need at least 30 minutes in the fridge to firm up. Don’t skip the sea salt; it enhances the flavor. Mixing the dry and wet ingredients well is key. If they are not mixed well, the bites may fall apart. Lastly, be careful not to overpack the bites. They should be ball-shaped but not too tight. Pro Tips Chill for Firmness: Allow the energy bites to chill in the refrigerator for at least 30 minutes. This helps them firm up and hold their shape better when serving. Customize Flavors: Feel free to experiment with different add-ins such as shredded coconut, chopped nuts, or dried fruits to create your own unique flavor combinations! Storage Is Key: Store your energy bites in an airtight container in the fridge for up to a week or freeze them for longer-lasting snacks. Just remember to separate layers with parchment paper to prevent sticking. Make it Vegan: To keep this recipe vegan, use maple syrup instead of honey and ensure your chocolate chips are dairy-free! {{image_2}} If you want to make these bites nut-free, you can swap the peanut butter. You can use sun butter or soy nut butter instead. Both options work well and keep the texture smooth. They also add a nice flavor. You can enjoy the same energy boost without nuts. Adding different flavors can make these bites unique. You can stir in shredded coconut for a tropical touch. Dried fruits like raisins or cranberries add sweetness and chewiness. Try mixing in some cinnamon for a warm spice. Each variation brings a new taste that's fun to explore. To boost protein, you can mix in protein powder. Choose your favorite flavor to enhance the taste. Chia seeds are another great option. They add crunch and extra nutrients. You can also use hemp seeds for more protein and a nutty flavor. These additions make your energy bites even more satisfying. Store your chocolate peanut butter energy bites in an airtight container. This keeps them fresh longer. You can use glass jars or plastic containers. Make sure they are sealed well. This helps prevent moisture and keeps the bites tasty. At room temperature, your energy bites last about 2-3 days. If you refrigerate them, they stay fresh for up to a week. The cold keeps them firm and flavorful. I prefer to store them in the fridge for the best taste. You can freeze these energy bites for even longer storage. Place them in a single layer on a baking sheet. Freeze them for about an hour, then transfer to a freezer bag. They can last up to three months in the freezer. When you're ready to enjoy, just let them thaw in the fridge or at room temperature. Yes, you can use natural peanut butter. It has a different texture but works well. Natural peanut butter may be less sweet, so adjust the honey if needed. These energy bites can last up to one week in the fridge. If you freeze them, they can last for three months. Just make sure to store them in an airtight container. Yes, these energy bites are gluten-free. Oats are the main ingredient, and they can be gluten-free. Just check the label to be sure. Yes, you can substitute honey with maple syrup or agave syrup. Both options bring sweetness and moisture to the bites. Absolutely! You can add nuts, seeds, or dried fruit. Just keep the ratios similar, so the bites hold together well. These Chocolate Peanut Butter Energy Bites are easy to make and fun to enjoy. We covered the simple ingredients, step-by-step prep, and tips for perfect bites. Remember, you can vary the flavors and make them fit your diet. Store them right to keep the bites fresh. Don’t forget to get creative with your mix-ins! These bites are a quick treat for any time of day. Enjoy the process, and happy snacking!

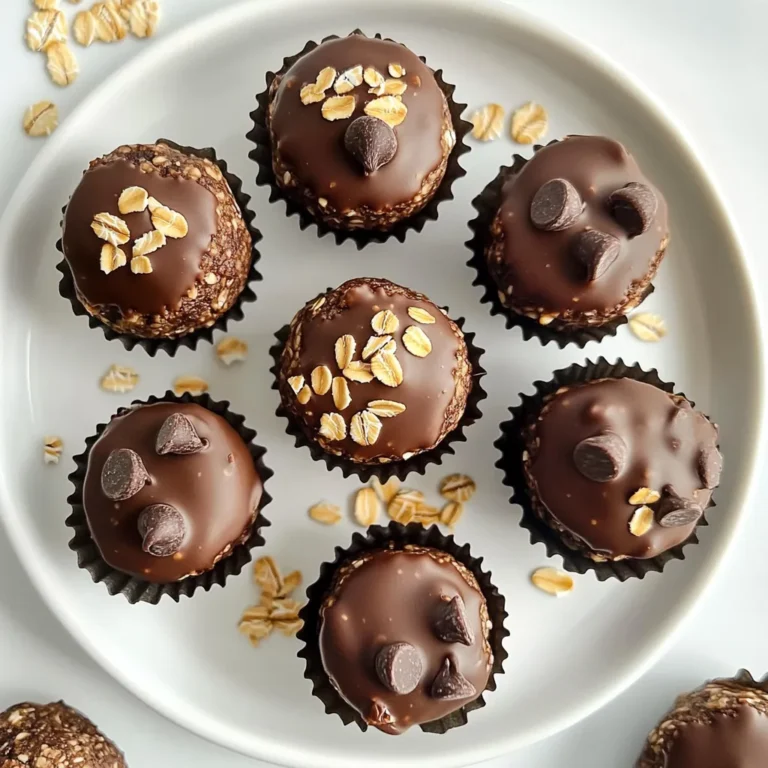
Chocolate Peanut Butter Energy Bites Easy Snack Recipe

To make Pesto Mozzarella Pull-Apart Bread, you need: - 1 large round loaf of crusty bread (like ciabatta or sourdough) - 1 cup fresh basil pesto - 2 cups fresh mozzarella cheese, shredded or cubed - 1/4 cup grated Parmesan cheese - 3 tablespoons olive oil - 1 teaspoon garlic powder - 1 teaspoon red pepper flakes (optional) - Fresh basil leaves for garnish These ingredients work together to create a hearty and flavorful dish. The fresh basil pesto gives the bread a vibrant taste. The mozzarella cheese melts beautifully, making every bite gooey and delicious. I recommend using a round loaf of crusty bread. Ciabatta and sourdough are both great choices. They have a thick crust that holds up well. This structure keeps the bread from falling apart. You want a bread that can hold the pesto and cheese without getting soggy. Avoid soft breads like sandwich bread for this recipe. While fresh mozzarella is the star, you can explore other cheeses too. Try using provolone or gouda for a twist. If you want a stronger flavor, add some sharp cheddar. Mixing cheeses can create a richer taste and melt texture. Remember to keep the balance of flavors in mind. You want the cheese to complement the pesto, not overpower it. {{ingredient_image_1}} Start with a large round loaf of crusty bread. Ciabatta or sourdough works best. Place your loaf on a cutting board. Carefully slice it into a grid pattern. Make cuts about one inch apart. Be sure not to cut all the way through the bottom crust. This helps hold the loaf together. Grab a small bowl and add three tablespoons of olive oil. Then, mix in one teaspoon of garlic powder. If you like a bit of heat, add one teaspoon of red pepper flakes. Stir the mixture well until it is smooth. This oil mixture will add great flavor to the bread. Using a pastry brush, spread the oil mixture between the slices of bread. Make sure to coat every crevice. Next, take one cup of fresh basil pesto and spoon it into each slice. Now, grab two cups of fresh mozzarella cheese. Stuff the cheese into the cuts of the bread evenly. Finally, sprinkle a quarter cup of grated Parmesan cheese over the top. This adds a nice, cheesy finish. Start by preheating your oven to 350°F (175°C). This step is key. It helps the bread bake evenly and ensures the cheese melts just right. Don’t skip this. Once the oven is ready, wrap your prepared bread in aluminum foil. Place it on a baking sheet. This keeps the bread moist while baking. Bake it for about 15-20 minutes. You want the cheese melted and the bread warmed through. For a crispy top, open the foil for the last 5 minutes of baking. This allows the top to brown nicely. You want that golden color for the best flavor. Watch it closely to avoid burning. Enjoy the warm, crispy goodness as soon as it’s done! Pro Tips Use Day-Old Bread: Day-old bread works best for this recipe as it is sturdier and holds up better to the fillings. Experiment with Cheese: Feel free to mix different types of cheese like fontina or gouda for a unique flavor profile. Customize the Pesto: Try using sun-dried tomato pesto or arugula pesto for a twist on the classic basil flavor. Perfectly Crispy Top: For an extra crispy crust, broil the bread for the last 1-2 minutes of baking, keeping a close eye to prevent burning. {{image_2}} Store leftover pull-apart bread in an airtight container. This keeps it fresh for up to two days. If you want to save it longer, wrap it well in plastic wrap and freeze it. To reheat, place it in the oven at 350°F (175°C) for about 10 minutes. This gives it a warm and fresh taste again. For the best cheese melt, use fresh mozzarella. Shred or cube the cheese, so it fits nicely between the bread slices. When you bake, the cheese should melt evenly. Cover the bread with foil for the first part of baking to trap heat. Remove the foil in the last five minutes to get a nice, golden top. Garnishing is key to adding flair to your dish. Fresh basil leaves on top give a pop of color. You can also drizzle a little olive oil for extra richness. For a fun twist, sprinkle crushed red pepper flakes for heat. Serve with a small bowl of pesto on the side for dipping. This adds more flavor and makes it fun to eat! You can easily change the taste of your Pesto Mozzarella Pull-Apart Bread. Try adding sun-dried tomatoes for a tangy kick. You could also mix in some sliced olives for a briny touch. If you like a bit of spice, add jalapeños or hot sauce. For a sweeter note, toss in roasted red peppers. Each flavor adds a new twist to the classic recipe. Garnishes can make your dish pop. Fresh herbs like parsley or oregano add color and aroma. A sprinkle of chili flakes can enhance the spice level. You might also drizzle some balsamic glaze on top for a sweet contrast. These small touches can elevate your bread's look and taste. If you need gluten-free bread, many stores offer options. Look for gluten-free ciabatta or sourdough. You can also make your own gluten-free bread at home. Just ensure it has a good crust to hold the fillings. This way, everyone can enjoy this delicious treat! Yes, you can use store-bought pesto. It saves time and adds flavor. Look for a brand with fresh ingredients. If you want more taste, add a little extra garlic or cheese. This can give it a boost. Homemade pesto is great too, but store-bought works well for quick meals. To enhance the flavor, use quality ingredients. Start with fresh bread. Brush on a mix of olive oil, garlic powder, and red pepper flakes. This adds depth. You can also mix herbs into your pesto for extra zest. Experiment with different cheeses to find your favorite combo. Serve this bread as an appetizer or side. It pairs well with a fresh salad or soup. You can also offer extra pesto on the side for dipping. A light tomato salad complements the rich flavors. This makes for a balanced meal that everyone will enjoy. In this article, we explored how to make Pesto Mozzarella Pull-Apart Bread. We covered the key ingredients and the best types of bread to use. You learned to prepare, assemble, and bake it for a crispy top. Our tips shared how to store leftovers and enhance flavors. Plus, we looked at tasty variations to try. Now you can enjoy this fun dish any time. Get creative and make it your own!

Pesto Mozzarella Pull-Apart Bread Hearty and Flavorful

- 2 cups cooked jasmine rice - 1 pound boneless, skinless chicken thighs - 1 cup BBQ sauce (preferably Hawaiian-style) - 1 tablespoon olive oil - 1 teaspoon garlic powder - 1 teaspoon ginger powder - 1/2 teaspoon black pepper - 1 cup pineapple chunks (fresh or canned) - 1 red bell pepper, sliced - 1 green onion, chopped - Sesame seeds for garnish - Fresh cilantro for garnish You will need a few tools to make this meal easy. A large skillet or grill pan works best for cooking. You also need a mixing bowl to combine the sauce and spices. A sharp knife will help slice the chicken and veggies. Don’t forget measuring cups and spoons for accuracy. For the best flavor, choose a good BBQ sauce. Look for brands like Aloha BBQ Sauce or Hawaiian Style BBQ Sauce. These sauces have the right blend of sweet and tangy, perfect for this dish. If you want an extra kick, try a spicy Hawaiian sauce. {{ingredient_image_1}} To start, I mix my BBQ sauce, garlic powder, ginger powder, and black pepper in a bowl. This blend creates a sweet and spicy flavor. I reserve about 1/4 cup of this sauce for later. I then coat the chicken thighs with the sauce, making sure every piece is covered. This step helps the chicken soak up all those tasty flavors. After coating, I let the chicken marinate for at least 30 minutes. If I have more time, I let it sit in the fridge for up to 2 hours. This way, the chicken gets even better. Next, I preheat my skillet over medium heat. I add a tablespoon of olive oil, which helps prevent sticking. Once the oil is hot, I place the marinated chicken thighs in the skillet. I cook them for about 5-7 minutes on each side. The goal is for the chicken to reach an internal temperature of 165°F (75°C). When done, the chicken should be caramelized and golden. I then add sliced red bell pepper and pineapple chunks to the skillet. I cook them for about 3-4 minutes until they are soft and slightly caramelized. This adds a great texture and flavor to the dish. Now comes the fun part: assembling the rice bowls! I start with a base of 2 cups of cooked jasmine rice in each bowl. On top of the rice, I add sliced BBQ chicken. Next, I pile on the caramelized bell pepper and pineapple. To finish, I drizzle the reserved BBQ sauce over the top. I sprinkle sesame seeds and chopped green onions for added crunch and color. A garnish of fresh cilantro adds a burst of flavor. These bowls are not only delicious but look great too! Marinating your chicken is key to a great taste. Use a mix of BBQ sauce, garlic powder, ginger powder, and black pepper. Coat the chicken thighs well. Let them sit for at least 30 minutes. If you have time, marinate them for up to 2 hours. This extra time lets the flavors soak in deep. To cook the chicken, preheat your skillet or grill pan over medium heat. Add olive oil before the chicken. This oil helps to get a nice golden crust. Cook each side for 5-7 minutes. Always check the internal temperature. It should reach 165°F (75°C) for safe eating. Let the chicken rest for a few minutes after cooking. This step keeps it juicy. For a beautiful bowl, add color and texture. Start with a base of jasmine rice. Top with sliced BBQ chicken, caramelized red bell pepper, and bright pineapple chunks. Drizzle with the reserved BBQ sauce for extra flavor. Sprinkle sesame seeds and chopped green onions on top. Finish with fresh cilantro for a pop of green. This makes your dish look and taste amazing. Pro Tips Marinate for Maximum Flavor: Allow the chicken to marinate for at least 1 hour, or even overnight, to enhance the flavor and tenderness. Use Fresh Ingredients: Opt for fresh pineapple and bell peppers for a vibrant taste and added nutrition in your rice bowls. Check Chicken Temperature: Use a meat thermometer to ensure the chicken is cooked to an internal temperature of 165°F (75°C) for food safety. Customize Your Toppings: Feel free to add other toppings like avocado, shredded carrots, or jalapeños to personalize your rice bowls. {{image_2}} You can easily swap chicken for tofu. Use firm or extra-firm tofu. Press it to remove extra water. Cut it into cubes and marinate it in the BBQ sauce mixture just like the chicken. Cook the tofu until it gets a nice golden crust. You’ll love the way it absorbs the flavors! If you want a different taste, try shrimp or pork. For shrimp, use large, raw shrimp. Marinate them in the same BBQ sauce for about 15 minutes. Cook them for just 3-4 minutes until they turn pink. For pork, you can use chops or tenderloin. Marinate and cook them just like the chicken. Each option gives a new twist to the dish. Add more flavor to your rice bowls with extra toppings. Sliced avocado gives a creamy texture. Jalapeños add a spicy kick. You can also try adding fresh mango or sliced radishes for crunch. These toppings not only taste great but also make the dish look colorful and fun! You can keep your Hawaiian BBQ chicken rice bowls in the fridge. Store them in an airtight container. They last for about three to four days. Make sure the chicken and rice are cool before sealing. This helps keep the flavors fresh. If you have any leftover sauce, store it separately. You can also freeze these bowls for later. Place the chicken, rice, and veggies in a freezer-safe container. They can stay in the freezer for up to three months. When you freeze, leave some space in the container. This allows for expansion when the food freezes. Avoid freezing the garnishes like green onions and cilantro, as they don’t freeze well. To reheat, first, let the bowl thaw in the fridge overnight. You can heat it in the microwave or on the stove. If using the microwave, cover the bowl with a lid or a damp paper towel. This keeps the moisture in. Heat for about one to two minutes, stirring halfway through. If using the stove, add a splash of water and heat on low. Stir often until heated through. Always check that the chicken reaches 165°F (75°C) before serving. Yes, you can use boneless chicken breasts. They are leaner than thighs. If you choose breasts, make sure to cook them for a longer time. They need to reach the same safe temperature of 165°F (75°C). You may also want to marinate them longer to add flavor. To make Hawaiian BBQ sauce, you need a few simple ingredients. Start with these: - 1 cup ketchup - 1/2 cup brown sugar - 1/4 cup soy sauce - 1/4 cup apple cider vinegar - 2 teaspoons garlic powder - 1 teaspoon ginger powder - 1 teaspoon pineapple juice Mix all these ingredients in a bowl. Stir until smooth. This sauce will give your chicken a sweet and tangy flavor. You can adjust the sweetness by adding more brown sugar or pineapple juice. You have many great options for sides. Some of my favorites include: - Steamed broccoli - Grilled corn on the cob - Sweet potato fries - Cucumber salad - A fresh fruit salad These sides add color and balance to the meal. They also enhance the tropical flavors of the chicken rice bowls. In this blog post, we covered everything you need for the perfect Hawaiian BBQ chicken rice bowls. We discussed ingredients, marinating methods, and cooking steps. We also shared tips for great flavor and presentation. You can even explore tasty variations with proteins like tofu or shrimp. Storing your meals is easy, too! Remember, with the right ingredients and a few simple steps, you can create delicious meals. Enjoy your cooking!

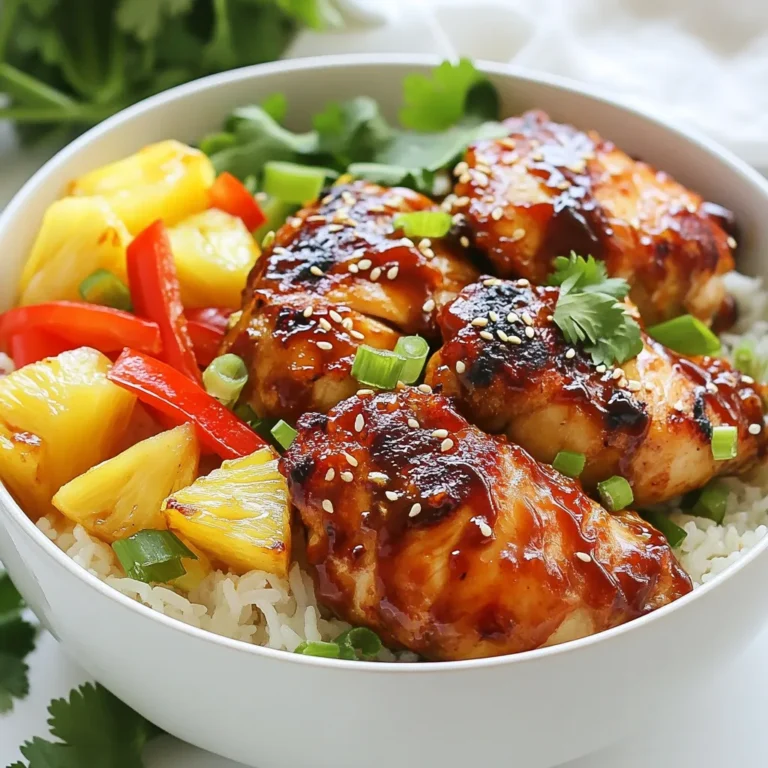
Hawaiian BBQ Chicken Rice Bowls Flavorful and Easy Meal

- 4 boneless, skinless chicken breasts - 1 cup Swiss cheese, shredded - 8 oz mushrooms, sliced - 1 cup heavy cream - 1 teaspoon garlic powder - 1 teaspoon onion powder - 1 tablespoon olive oil - Salt and pepper to taste - Fresh parsley, chopped (for garnish) For those looking to make this dish lighter or dairy-free, you can swap heavy cream for coconut cream or a dairy-free cream. For Swiss cheese, you can use Gruyère or a similar cheese. Brands like Organic Valley or Tillamook offer quality options. Using fresh ingredients is key. Fresh chicken breasts give a better texture and taste. Look for local farms or trusted grocery stores to find good chicken. For mushrooms, opt for firm, plump varieties. They add great flavor. Try to buy them from farmers' markets or organic stores for the best quality. {{ingredient_image_1}} First, preheat your oven to 375°F (190°C). This temperature is perfect for baking chicken. Next, grab a large skillet. Heat one tablespoon of olive oil over medium heat. Once the oil is hot, add your sliced mushrooms. Sauté them for about 5-7 minutes. You want them golden brown and tender. This step brings out their rich flavor. Once they are done, take them off the heat and set them aside. Now it’s time to assemble your dish. Take a lightly greased baking dish and arrange four boneless, skinless chicken breasts inside. Make sure they are spaced out evenly. Next, in a mixing bowl, combine one cup of heavy cream, one teaspoon of garlic powder, one teaspoon of onion powder, and salt and pepper to taste. Whisk them well until mixed. Pour this creamy mix over the chicken. Ensure each piece is coated. Then, sprinkle the sautéed mushrooms evenly on top. Finally, add one cup of shredded Swiss cheese over everything. Cover the baking dish with foil. Place it in the oven and bake for 25 minutes. After that, remove the foil. Bake for another 15 minutes. This step helps the cheese get bubbly and golden. To check if the chicken is done, use a meat thermometer. The chicken should reach an internal temperature of 165°F (74°C). If you don’t have a thermometer, cut into a piece to check if it’s no longer pink inside. Once it’s cooked, take it out and let it sit for a few minutes. To keep chicken moist, use a meat thermometer. Aim for 165°F (74°C) in the center. This ensures the chicken cooks just right. Marinating the chicken for an hour can also help make it juicy. You can use olive oil and your favorite herbs for a simple marinade. For a bubbly, golden cheese top, remove the foil during the last 15 minutes of baking. This step lets the cheese brown nicely. You can also broil it for a minute or two for extra color. Just keep an eye on it to avoid burning. Pair this dish with yummy sides like steamed broccoli or a fresh garden salad. These options add color and crunch. You can also serve it with rice or mashed potatoes for a filling meal. For a nice presentation, use the baking dish to serve right from the oven. Add a sprinkle of fresh parsley on top for a bright touch. The green will contrast beautifully with the creamy dish. One common mistake is overcooking the chicken. This can make it dry and tough. Always check the temperature with a thermometer. Another mistake is not seasoning properly. Salt and pepper enhance the flavors. Make sure to sprinkle enough on the chicken and the cream mixture before baking. Pro Tips Enhance Flavor: Marinate the chicken breasts in a mixture of olive oil, garlic, and herbs for at least 30 minutes before cooking to deepen the flavor. Cheese Choices: Experiment with different cheeses like Gruyère or Fontina for a unique twist on the traditional Swiss flavor. Mushroom Varieties: Use a mix of mushrooms such as cremini, shiitake, and portobello for a more complex flavor profile and texture. Resting Time: Allow the dish to rest for 5-10 minutes after baking to help retain moisture and improve the overall texture of the chicken. {{image_2}} You can easily change this recipe to fit your needs. If you are gluten-free, make sure to check your cream for gluten. You can use gluten-free flour if you want to thicken the sauce. For those who prefer vegetarian meals, try using plant-based chicken. This change keeps the dish tasty and hearty. Adding herbs and spices can make this dish even better. Try using fresh thyme or basil for a burst of flavor. You can also add a pinch of red pepper flakes for some heat. Cheese lovers can switch out Swiss cheese for mozzarella or cheddar. Each cheese gives a unique taste and texture. Using seasonal ingredients can add freshness to your meal. In spring, add asparagus or peas for a pop of color. During fall, try using wild mushrooms or root vegetables. Using fresh produce not only boosts flavor but also makes your dish more vibrant. Seasonal ingredients can keep your meals exciting all year round. To keep your Mushroom Swiss Chicken Bake fresh, store leftovers in the fridge. Use an airtight container to seal in moisture. If you want to freeze it, portion the bake into smaller containers. This helps when you want a quick meal later. To reheat the chicken without drying it out, use the oven. Preheat to 350°F (175°C). Place the chicken in a baking dish and cover it with foil. Heat for about 20 minutes or until warm. You can also use the microwave, but be careful. Heat it in short bursts to avoid drying. Mushroom Swiss Chicken Bake lasts about 3-4 days in the fridge. If you freeze it, it can last up to 2-3 months. Always check for signs of spoilage. If the chicken has a strange smell or looks off, it’s best to throw it away. You can try mozzarella or provolone cheese. Both melt well and taste mild. If you want a stronger flavor, use Gruyère or aged cheddar. Gruyère adds a nutty taste, while cheddar gives a sharp bite. Keep in mind, the flavor changes with each type of cheese. Yes, you can prepare the dish a day before. Cook the chicken and sauce, then store them in the fridge. When ready to bake, just add the cheese and mushrooms. This saves time and makes meal prep easier. The safest way is to check the internal temperature. Chicken should reach 165°F (75°C). You can also look for clear juices when you cut into it. A meat thermometer is the best tool for this. It helps you avoid undercooked chicken and keeps your meal safe. This blog shows you how to make a tasty Mushroom Swiss Chicken Bake. We talked about the right ingredients, cooking steps, and ways to make it your own. Remember to choose fresh ingredients and avoid common mistakes to keep your meal delicious. Store leftovers properly and reheat them gently. With the tips provided, you will cook a meal that exceeds expectations. Enjoy your cooking journey!

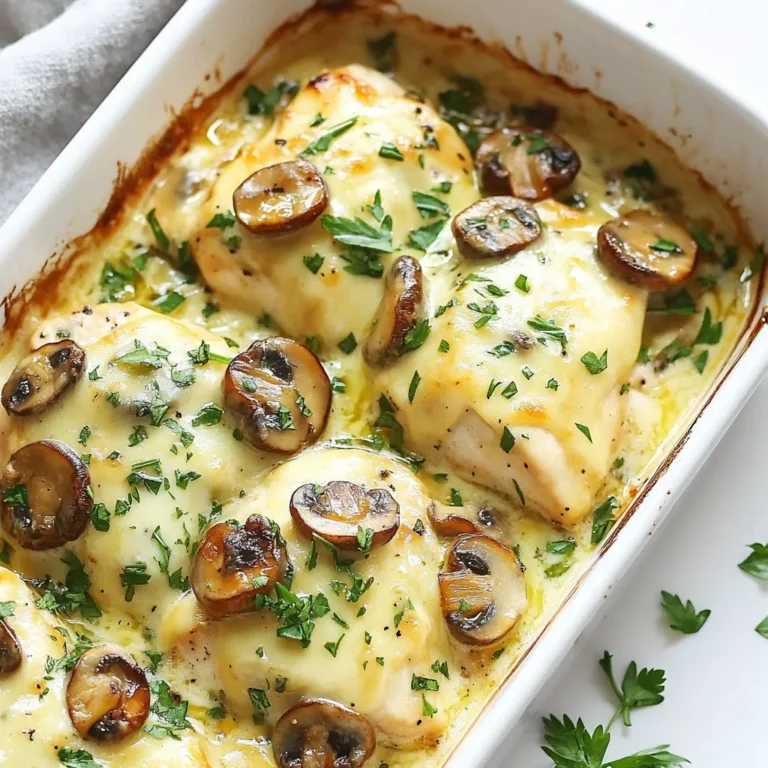
Mushroom Swiss Chicken Bake Irresistible Family Meal

- 2 cups fresh spinach, roughly chopped - 1 can (15 oz) white beans (cannellini or navy beans), drained and rinsed - 2 cups cherry tomatoes, halved - 1 small red onion, finely chopped - 3 cloves garlic, minced - 1 teaspoon dried Italian herbs (oregano, basil, thyme) - 1 tablespoon olive oil - Salt and pepper to taste - 1 tablespoon fresh lemon juice - Optional: Crumbled feta cheese or grated Parmesan for garnish If you can't find fresh spinach, use frozen spinach. Just make sure to thaw and drain it well. If you want a different bean, chickpeas work great too. You can swap cherry tomatoes for diced regular tomatoes. For the onion, shallots can add a nice touch, too. If you're out of olive oil, you can use avocado oil or even butter for richness. Fresh herbs are best, but dried herbs will still give good flavor. Each serving of this dish is healthy and balanced. You'll get about: - Calories: 220 - Protein: 10g - Carbohydrates: 30g - Fiber: 8g - Fat: 8g - Sugars: 3g This meal offers a good source of protein and fiber while being low in fat. It’s a great choice for anyone seeking a simple and healthy meal. {{ingredient_image_1}} Start by heating olive oil in your skillet over medium heat. Once the oil is warm, add the finely chopped red onion. Let it cook for about 3-4 minutes. You want it to soften and turn a bit translucent. Next, add the minced garlic to the skillet. Cook it for another 1-2 minutes. You should smell the garlic's sweet aroma. Be careful not to let it burn, as burnt garlic tastes bitter. Now, it’s time to add the halved cherry tomatoes to the skillet. Stir them gently into the onion and garlic mix. Let these cook for about 5 minutes. You will notice the tomatoes start to burst and release their juices. This step adds a lovely sweetness to the dish. Stir occasionally to ensure even cooking and prevent sticking. After the tomatoes have cooked down, it’s time for the white beans. Drain and rinse the beans, then add them to the skillet. Sprinkle in the dried Italian herbs. Stir everything together well, allowing the flavors to mingle. Let the mixture cook for another 3-4 minutes. Finally, toss in the chopped spinach. Season with salt and pepper to taste. Stir gently until the spinach wilts, which should take about 2-3 minutes. For a bright finish, squeeze fresh lemon juice over the dish. Mix well and prepare to serve. To boost the taste, use fresh herbs. Fresh basil or parsley can add a bright note. You can also add a pinch of red pepper flakes for heat. A dash of balsamic vinegar can deepen the flavor. If you like, try adding smoked paprika for a unique twist. Always taste as you cook to find your perfect blend. Cooking times can vary based on your stove. Watch the onions closely; they should soften but not brown. When cooking tomatoes, keep stirring to prevent sticking. If you want softer beans, extend the cooking time by a few minutes. Just ensure the spinach wilts but stays vibrant green. This will keep the dish fresh and appealing. Serve this dish warm for the best flavor. It's great on its own or with crusty bread. You can also pair it with grilled chicken or fish for extra protein. For a fancy touch, sprinkle crumbled feta or grated Parmesan on top. A side salad of mixed greens complements it nicely. Enjoy this healthy meal with family or friends! Pro Tips Use Fresh Ingredients: Whenever possible, opt for fresh spinach and ripe cherry tomatoes to enhance the flavor and nutrition of the dish. Customize Your Beans: Feel free to mix different types of beans for variety in texture and taste; chickpeas or black beans work well too. Perfectly Sautéed Garlic: Keep an eye on the garlic while sautéing; it can burn quickly and turn bitter, so stir frequently and cook until fragrant. Add a Kick: For a spicy twist, consider adding red pepper flakes or a dash of hot sauce before serving for added heat and flavor. {{image_2}} You can easily make this dish vegan. Simply skip the cheese or use a plant-based option. Nutritional yeast also adds a cheesy flavor without dairy. It keeps the dish light and fresh while being fully plant-based. Feel free to swap the white beans for any beans you like. Black beans or chickpeas work great. You can also change the spinach to kale or Swiss chard. These greens add a different taste and texture. Want to boost the protein? Try adding chicken or sausage. Slice cooked chicken into strips and mix it in with the beans. If you prefer sausage, use your favorite kind. Just cook it first, then add it to the skillet. This helps create a heartier meal. Store your Tomato Spinach White Bean Skillet in an airtight container. Make sure it cools down first. It will stay fresh for up to four days in the fridge. When you're ready to eat, just take it out and check for any signs of spoilage. If it smells off or looks strange, don't eat it! You can freeze this dish for later use. First, let it cool completely. Then, pack it in a freezer-safe container. It can last up to three months in the freezer. When you want to enjoy it again, thaw it in the fridge overnight. This keeps the flavors intact. To reheat, you can use the stove or microwave. If using the stove, heat it on low. Stir occasionally until hot. If using the microwave, cover it with a lid or wrap. Heat in short bursts of one to two minutes. Stir in between to ensure even heating. Enjoy your meal warm! Yes, you can use frozen spinach. Just thaw and drain it first. Frozen spinach has a softer texture. This may change the dish's look a bit. However, it still works well. You can serve this skillet with rice or quinoa. A crusty bread also pairs nicely. It makes a great side for grilled chicken or fish. Try a simple salad for a fresh touch. The skillet lasts about 3 to 4 days in the fridge. Store it in an airtight container. You may see some water form, but it's still good. Just stir it before reheating. This blog post covered all you need to know about making a Tomato Spinach White Bean Skillet. We discussed ingredients, substitutions, and nutrition. You learned step-by-step instructions for preparing your meal. Tips helped enhance flavor and guide serving options. We explored variations, including vegan swaps and protein additions. Finally, we shared storage info for leftovers. Now, you can make this dish with ease. Enjoy your cooking and the tasty results!

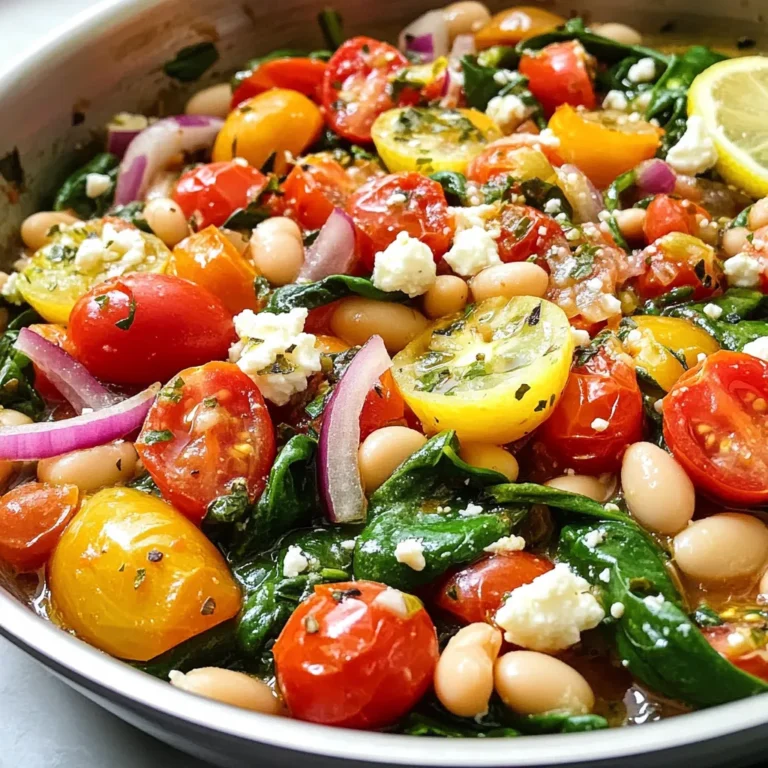
Tomato Spinach White Bean Skillet Simple and Healthy

To make creamy tomato basil tortellini soup, you need these key ingredients: - 1 tablespoon olive oil - 1 medium onion, diced - 3 cloves garlic, minced - 1 can (28 oz) crushed tomatoes - 4 cups vegetable broth - 1 teaspoon dried Italian herbs - Salt and pepper to taste - 1 cup heavy cream - 1 package (9 oz) cheese tortellini - 1/2 cup fresh basil leaves, chopped - Grated Parmesan cheese for serving These ingredients create a warm and comforting soup. The olive oil adds richness, while the onion and garlic build flavor. You can adjust the soup to fit your taste. Here are some optional ingredients: - Red pepper flakes for spice - Spinach or kale for added greens - Fresh oregano or thyme for extra herbs - A squeeze of lemon for brightness Feel free to add what you love. Each choice can give a new twist to the soup. If you have dietary needs, here are some substitutions: - Use coconut cream instead of heavy cream for a dairy-free option. - Swap cheese tortellini for gluten-free pasta to make it gluten-free. - Replace vegetable broth with chicken broth if you prefer. These swaps ensure everyone can enjoy this delicious soup. Always taste as you go to balance flavors! {{ingredient_image_1}} 1. Start by heating one tablespoon of olive oil in a large pot over medium heat. 2. Add one medium diced onion and sauté for about five minutes until it turns clear. 3. Next, mix in three minced garlic cloves and cook for one more minute. 4. Now, pour in one can of crushed tomatoes and four cups of vegetable broth. 5. Add one teaspoon of dried Italian herbs, along with salt and pepper to taste. 6. Bring this mix to a gentle simmer. 7. Lower the heat and stir in one cup of heavy cream for richness. 8. Add one package of cheese tortellini, following the package cooking time, about three to five minutes. 9. Once the tortellini floats, fold in half a cup of chopped fresh basil. 10. Taste the soup and adjust the seasoning if needed. - Use fresh tortellini for a softer texture. - If using frozen, do not thaw before cooking. - Stir gently to avoid breaking the tortellini. - Cook just until they float for best results. - Simmer the soup slowly to develop rich flavors. - Use an immersion blender for a smoother texture, if desired. - Add the cream at low heat to keep it from curdling. - For a thicker soup, let it simmer longer before adding the tortellini. To boost flavors in your creamy tomato basil tortellini soup, try these tips: - Use fresh basil instead of dried. It adds a bright taste. - Add a dash of red pepper flakes for heat. This brings warmth. - Stir in a splash of balsamic vinegar. It gives a nice tang. - Finish with a squeeze of lemon juice. This brightens the flavors. These small changes can make a big difference in taste. Here are some common mistakes to watch out for: - Don’t skip sautéing the onion and garlic. This builds a strong base. - Avoid overcooking the tortellini. They should be tender but firm. - Don’t add the cream too early. It’s best added after simmering. - Taste before serving. Adjust salt and pepper to your liking. By avoiding these errors, your soup will shine. Pair your soup for a delightful meal: - Serve with crusty bread. It’s perfect for dipping. - Add a side salad to balance the meal. A simple green salad works well. - Top with extra Parmesan cheese. It adds a nice richness. - Try a glass of white wine, like Pinot Grigio. It complements the soup nicely. These suggestions will enhance your dining experience. Pro Tips Use Fresh Ingredients: Fresh basil and high-quality tomatoes can elevate the flavor of your soup significantly. Opt for fresh basil whenever possible for a brighter taste. Adjust Creaminess: For a lighter version, substitute half of the heavy cream with milk or a non-dairy alternative while still achieving a creamy texture. Customize Tortellini: Feel free to experiment with different types of tortellini, such as spinach or mushroom, to add unique flavors to your soup. Make it Ahead: This soup tastes even better the next day! Make a batch in advance and store it in the refrigerator to let the flavors meld together. {{image_2}} To make this soup vegetarian, skip the cheese tortellini and use plant-based ones. For a vegan version, replace heavy cream with coconut cream or cashew cream. Use vegetable broth to keep it meat-free. These swaps keep the creamy texture while staying true to plant-based diets. If you need a gluten-free soup, choose gluten-free tortellini. They are easy to find in stores now. Make sure your broth is also gluten-free. This way, you can enjoy the soup without any worries about gluten. Want to boost the nutrition? Add some spinach or kale just before serving. Chopped carrots or zucchini also work well. These veggies add fiber and vitamins without changing the flavor much. Just remember to cook them until tender for the best texture. After you enjoy your creamy tomato basil tortellini soup, store any leftovers right away. Use an airtight container to keep the soup fresh. Let the soup cool down before sealing the container. This helps prevent moisture build-up. You can store the soup in the fridge for up to three days. If you want to keep it longer, freezing is a great option. Reheating the soup is simple and quick. Pour the soup into a pot over medium heat. Stir it often to warm it evenly. If the soup seems too thick, add a splash of vegetable broth or water. You can also use the microwave. Place the soup in a microwave-safe bowl. Heat it in short bursts, stirring in between, until hot. Freezing is a smart way to save your creamy tomato basil tortellini soup. Use freezer-safe containers or bags. Make sure to leave some space at the top for expansion. Label the containers with the date. When you’re ready to eat, thaw the soup in the fridge overnight. Reheat it on the stove or in the microwave for a quick meal. Enjoy this comforting soup anytime! You can use half-and-half or whole milk for a lighter option. Coconut milk works well for a dairy-free choice. If you want more flavor, try using sour cream or Greek yogurt. These options will still give you a creamy texture. Just remember that they might change the taste slightly. Yes, you can make this soup ahead of time. Just prepare it as directed and let it cool. Store it in an airtight container in the fridge. It will stay fresh for about three days. When you’re ready to eat, simply reheat it on the stove. Add a splash of broth to thin it out if needed. To add spice, include red pepper flakes when cooking the onions. You can also mix in diced jalapeños or a splash of hot sauce. If you love heat, add a dash of cayenne pepper. Start small and taste as you go. This way, you can control the spice level just how you like it. This blog post covered everything you need for a great tortellini soup. We went through the key ingredients and how to adjust them based on your needs. The steps for cooking were laid out clearly, making it easy to follow. I shared tips to enhance flavor and avoid common mistakes. We also explored different variations and how to store leftovers well. Now you can enjoy this soup in many ways, making it your own. Use this guide to create a tasty meal that fits your style!

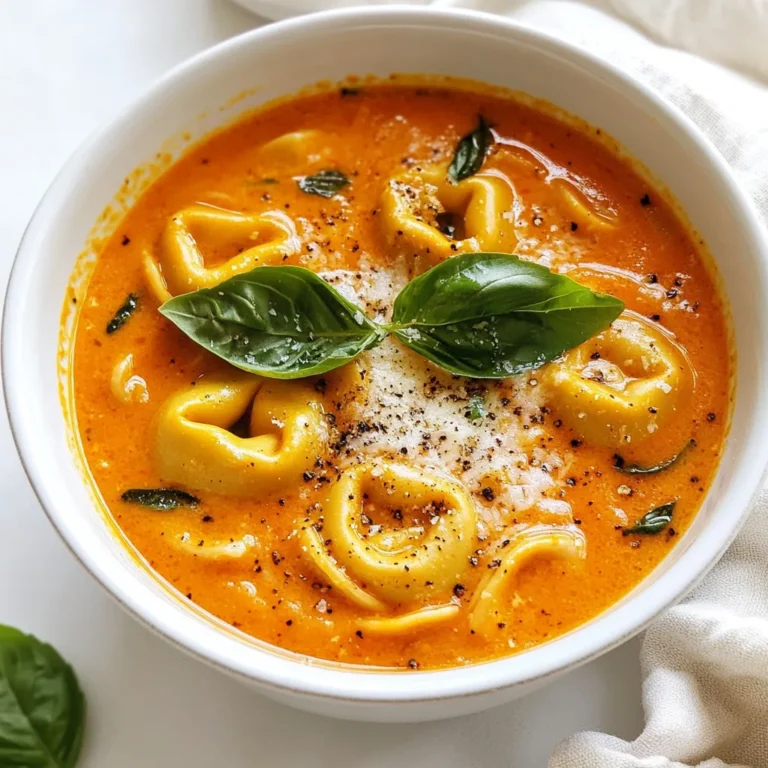
Creamy Tomato Basil Tortellini Soup Simple and Tasty

To make Coconut Curry Lentil Soup, gather these key items: - 1 cup red lentils, rinsed - 1 can (14 oz) coconut milk - 1 medium onion, chopped - 3 cloves garlic, minced - 1 tablespoon fresh ginger, grated - 1 tablespoon red curry paste - 4 cups vegetable broth - 1 medium carrot, diced - 1 bell pepper, diced (any color) - 1 cup spinach leaves, chopped - 2 tablespoons lime juice - 2 tablespoons olive oil - Salt and pepper to taste - Fresh cilantro for garnish These ingredients create a rich and creamy soup. The red lentils cook down nicely, adding a hearty texture. Coconut milk brings a smooth and sweet flavor. The red curry paste adds warmth, making each bite exciting. You can enhance your soup with some fun add-ins: - Sliced green onions for crunch - Chopped tomatoes for freshness - Peas for sweetness - A dash of soy sauce for depth - Chopped chilies for heat These extras can change the soup’s taste and texture. Feel free to mix and match based on your taste. Fresh ingredients make a big difference. Here are some tips: - Choose bright-colored bell peppers. Look for smooth skin. - Pick firm carrots. They should not be soft or limp. - Select spinach leaves that are vibrant green and crisp. - Check the coconut milk can for dents or leaks. - Smell the garlic. It should be strong and fresh. Using fresh ingredients means more flavor and better nutrition. Always trust your senses when shopping for the best quality. {{ingredient_image_1}} First, gather all your ingredients. You need red lentils, coconut milk, onion, garlic, ginger, red curry paste, vegetable broth, carrots, bell pepper, spinach, lime juice, and olive oil. Make sure to rinse the lentils well before using. Chop the onion, garlic, ginger, carrot, and bell pepper into small pieces. This helps them cook evenly. 1. Heat olive oil in a large pot over medium heat. 2. Add the chopped onion and sauté for about 5 minutes until it turns translucent. 3. Next, stir in the minced garlic and grated ginger, cooking for an extra minute. This will make your kitchen smell amazing! 4. Now, add the red curry paste. Stir it well to coat the onions and cook for another 2 minutes. 5. Pour in the vegetable broth and bring the mix to a gentle simmer. 6. Then, add the rinsed lentils, diced carrots, and bell pepper into the pot. Let it cook for about 20 minutes until the lentils become tender. 7. After the lentils are cooked, stir in the coconut milk and chopped spinach. Cook until the spinach wilts down. 8. Finally, add lime juice, salt, and pepper to taste. This will brighten the flavors! Serve your soup hot in bowls. Don't forget to garnish with fresh cilantro. This adds a lovely touch and a bit of color to your dish. Enjoy your warm, comforting bowl of coconut curry lentil soup! To make your soup pop, use fresh herbs. Fresh cilantro adds a bright taste. You can also try adding a dash of soy sauce for saltiness. This boosts the umami flavor. If you like heat, add red pepper flakes. A squeeze of lime juice brightens the dish. It balances the creamy coconut milk nicely. If you want softer lentils, cook them longer. Check them at 20 minutes. If they aren't tender, simmer for five more minutes. Stir often to prevent sticking. You can also cook the soup on low heat for an hour. This melds the flavors well and makes it richer. For this recipe, you need a large pot. A sturdy wooden spoon is best for stirring. An onion chopper helps with prep. A measuring cup makes measuring easy. If you have a hand blender, use it to blend the soup for a creamier texture. You can also use a ladle to serve. Pro Tips Use Fresh Ingredients: Fresh garlic, ginger, and vegetables will enhance the flavors of your soup significantly. Adjust Spice Level: If you prefer a milder soup, start with half the amount of red curry paste and adjust to taste. Storage Tips: This soup keeps well in the refrigerator for up to 5 days. Reheat gently on the stove for best results. Add Protein: For a heartier meal, consider adding cooked chicken, shrimp, or tofu to the soup before serving. {{image_2}} You can switch up the lentils in this soup. Red lentils work great because they cook fast and break down nicely. If you want a different texture, try green or brown lentils. They hold their shape better, giving a hearty feel. Just remember, cooking times will change. Green lentils may need more time to become tender. This recipe is already vegan-friendly, but you can add more fun ingredients. Try adding sweet potatoes for a sweet twist. You can toss in chickpeas for extra protein. If you love spice, add diced jalapeños or a sprinkle of chili flakes. You could also use kale instead of spinach for a different green. Want it spicier? Add more red curry paste or some cayenne pepper. Start with a little, then taste as you go. If you want less heat, use less curry paste. You can balance heat with a squeeze of lime juice. This adds a nice flavor without making it too hot. Adjusting spice lets you make this soup just right for you. To store leftover soup, let it cool first. Use an airtight container for the soup. Make sure to seal it tightly to keep it fresh. You can store it in the fridge for up to three days. If you want to keep it longer, consider freezing it. When you are ready to enjoy the soup again, take it out of the fridge. Pour the soup into a pot. Heat it over medium-low heat, stirring often. You may need to add a splash of broth or water. This helps keep it from getting too thick. Heat until warm, and enjoy! To freeze the soup, first cool it completely. Then, pour it into freezer-safe bags or containers. Leave some space at the top for expansion. You can freeze it for up to three months. When you want to eat it, thaw it in the fridge overnight. Reheat it as described above for a tasty meal. Yes, you can make this soup ahead of time. The flavors deepen when it sits. Store it in an airtight container in the fridge. It stays fresh for about three days. Just reheat it on the stove when you're ready to eat. Absolutely! This soup is perfect for meal prep. It divides well into single servings. You can pack it in containers for quick lunches or dinners. Just heat and enjoy throughout the week. If you don’t have red curry paste, you can use yellow curry paste. It has a milder flavor. Alternatively, mix 1 tablespoon of curry powder with a bit of coconut milk. This will give you a similar taste. To make this soup gluten-free, use gluten-free vegetable broth. Most brands are safe to use. Check the label to ensure no gluten ingredients are present. All the other ingredients in the recipe are naturally gluten-free. This blog post covered every step to make Coconut Curry Lentil Soup. We discussed essential ingredients and how to choose fresh ones. You learned detailed cooking steps and how to enhance flavor. Variations showed you options for different lentil types and spice levels. Finally, I shared storage tips to keep leftovers fresh. Now, go ahead and try this soup. Enjoy its rich taste and warmth!

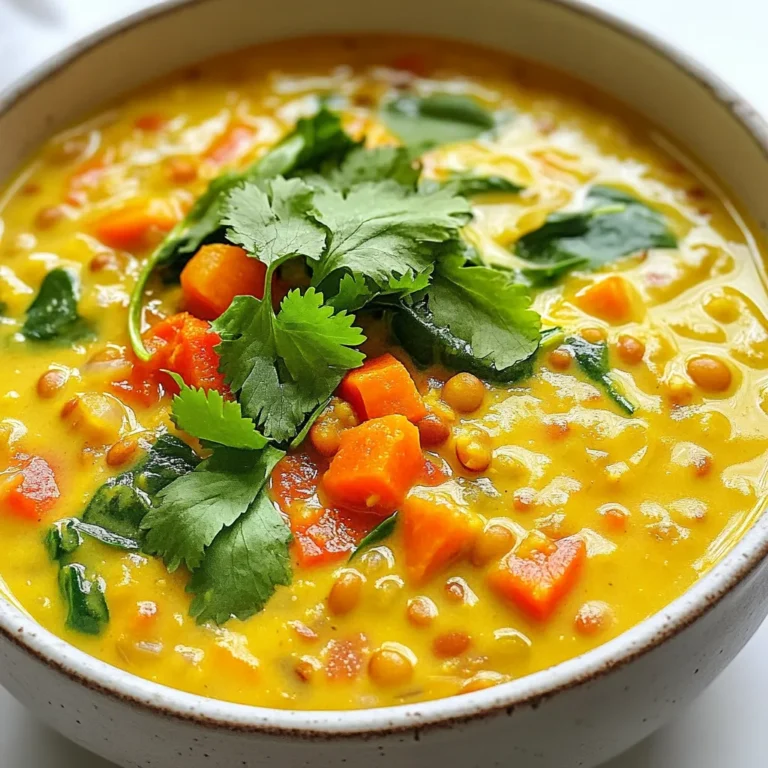
Coconut Curry Lentil Soup Nourishing Comfort Bowl

For this tasty dish, gather these main ingredients: - 4 salmon fillets (about 6 oz each) - 1/4 cup sweet chili sauce - 2 tablespoons soy sauce - 2 tablespoons honey - 1 tablespoon fresh ginger, grated - 2 cloves garlic, minced - 1 tablespoon sesame oil - 1 tablespoon rice vinegar - 1 teaspoon red pepper flakes (optional, for extra heat) These ingredients work together to create a perfect balance of sweet and spicy flavors. The salmon fillets are rich and buttery. The sweet chili sauce gives a lovely glaze, while ginger and garlic add depth. To make your dish even better, you can add these garnishes: - 2 green onions, sliced - Sesame seeds These toppings add crunch and a fresh look. They also enhance the taste. Pair your salmon with these sides for a full meal: - Steamed jasmine rice - Sautéed vegetables Steamed jasmine rice soaks up the glaze well. Adding sautéed veggies gives color and nutrition. This makes for a complete and vibrant dinner. {{ingredient_image_1}} To start, gather your ingredients. In a small bowl, mix the sweet chili sauce, soy sauce, honey, grated ginger, minced garlic, sesame oil, rice vinegar, and red pepper flakes if you want extra heat. Whisk this mixture well. This makes a tasty glaze for the salmon. Next, preheat your oven to 400°F (200°C). Line a baking sheet with parchment paper for easy cleanup. Place the salmon fillets skin-side down on the baking sheet. Use a brush to coat each fillet with the sweet chili glaze. Make sure to save some glaze for later. Then, bake the salmon for 12-15 minutes. The fish is ready when it flakes easily with a fork. While the salmon bakes, take the reserved glaze and simmer it in a small saucepan over low heat for 2-3 minutes. This will make it thicker and even more flavorful. Once the salmon is cooked, drizzle the thickened glaze over the fillets. For a fresh look, garnish with sliced green onions and a sprinkle of sesame seeds. Serve the salmon on a bed of jasmine rice and add a side of sautéed vegetables for a full meal. To get that perfect glaze, mix sweet chili sauce, soy sauce, honey, ginger, and garlic. Whisk them well in a bowl. This blend gives a nice balance of sweet and savory. Brush the glaze on thick for a bold flavor. Reserve some glaze for later. Simmer the reserved glaze to thicken before serving. This makes it shine on your salmon. Baking salmon at 400°F (200°C) works wonders. It cooks evenly and keeps the fish moist. Always place the salmon skin-side down on a lined baking sheet. This helps the skin crisp up nicely. Check for flakiness at 12-15 minutes. Use a fork to see if it falls apart easily. This means it’s done. One mistake is overcooking the salmon. Keep an eye on it in the oven. Another pitfall is not seasoning enough. The glaze adds flavor, but a pinch of salt helps too. Avoid skipping the reserved glaze step. It adds that extra touch when you serve. Lastly, don’t forget to garnish with green onions and sesame seeds. These add color and crunch. Pro Tips Choose Fresh Salmon: Opt for wild-caught salmon if possible, as it tends to have a richer flavor and better texture compared to farmed salmon. Marinate for More Flavor: If time allows, marinate the salmon in the glaze for 30 minutes to an hour before baking to enhance the flavor. Check for Doneness: To ensure perfect doneness, use a fork to gently flake the salmon; it should easily separate and appear opaque. Experiment with Toppings: Feel free to customize your garnishes with additional toppings like crushed peanuts or cilantro for added texture and flavor. {{image_2}} You can change some items in the glaze for different tastes. Use maple syrup instead of honey for a richer flavor. Try using tamari instead of soy sauce for a gluten-free option. If you want more spice, add more red pepper flakes or try sriracha. You can also mix in some lime juice for a zesty twist. Each change gives a unique taste to your glaze. Grilling salmon adds a smoky flavor that is hard to beat. Preheat your grill to medium-high. Place the salmon fillets on the grill skin-side down. Cook them for about 6-8 minutes on each side. Brush with glaze while grilling to build flavor. You can also pan-sear the salmon. Heat oil in a pan over medium heat. Sear the fillets for 4-5 minutes per side. This gives a nice crust and keeps the fish moist. For weeknight dinners, serve the salmon with jasmine rice and steamed veggies. If you have guests, plate the salmon on a large platter. Drizzle with extra glaze and garnish with green onions and sesame seeds. For a casual meal, serve in taco shells with avocado and a fresh salsa. Each option makes the dish shine for any occasion, from simple to special. To keep your leftover salmon fresh, place it in an airtight container. Make sure to cover it well to avoid any air exposure. You can store it in the fridge for up to three days. If you want to keep it longer, freezing is a great option. When you reheat salmon, aim to keep it moist. Preheat your oven to 275°F (135°C). Place the salmon on a baking sheet and cover it with foil. Heat for about 15 minutes or until warm. This method helps keep the fish tender and juicy. If you decide to freeze your salmon, wrap each fillet tightly in plastic wrap. Then, place them in a freezer bag. This method helps prevent freezer burn. Frozen salmon can last up to three months. When ready to eat, thaw it in the fridge overnight before reheating. You can serve sweet chili glazed salmon with many sides. I love jasmine rice. It pairs well with the glaze's sweetness. You can also add steamed broccoli for color and crunch. A fresh salad with lime dressing works great too. For extra flavor, try sautéed green beans or bok choy. These sides balance the rich taste of salmon nicely. Remember to drizzle some extra glaze over everything for a tasty finish. Yes, you can use frozen salmon. Just make sure to thaw it first. Place the salmon in the fridge overnight for best results. If you're short on time, you can thaw it in cold water. Once thawed, follow the recipe as usual. The glaze will still soak in and taste amazing. Just keep an eye on the cooking time, as it may vary slightly. Cooking salmon in the oven usually takes 12 to 15 minutes. The exact time depends on the thickness of your fillets. A good rule is to cook it for about 4 to 6 minutes per half inch of thickness. You know it’s done when the salmon flakes easily with a fork. Always check for doneness to avoid overcooking. Salmon should look opaque and moist. Absolutely! You can make the glaze as spicy or mild as you like. To add heat, include more red pepper flakes. For a milder taste, reduce or skip the flakes altogether. You can also add a bit of fresh chili for a different flavor. Taste the glaze before brushing it on the salmon. Adjust it to match your preference. To wrap up, we covered how to make sweet chili glazed salmon. You learned about key ingredients and the best ways to prepare them. I shared tips for achieving a perfect glaze and avoiding common mistakes. You can also explore various cooking methods and storage options. This dish is versatile and can suit any occasion. Whether you're new to cooking or a pro, this recipe is easy and rewarding. Enjoy your cooking journey, and make this salmon a staple in your meals!

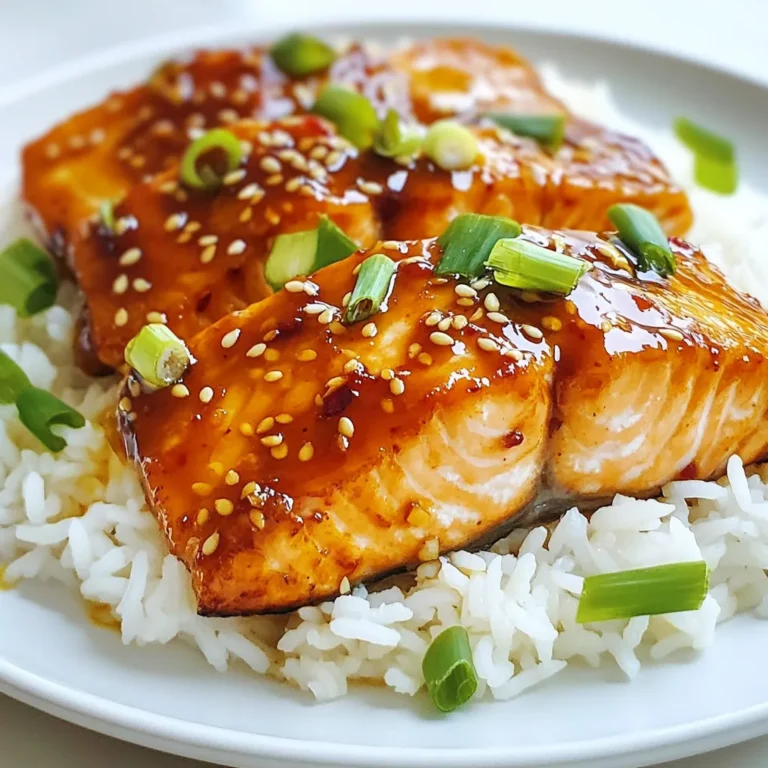
Sweet Chili Glazed Salmon Flavorful Dinner Recipe

PREV 1 … 50 51 52 … 57 NEXT
flavor nest kitchen

explore

DessertsDinnerAppetizersDrinks

Our Policies

  • Cookie Policy
  • Copyright Policy
  • Disclaimer
  • GDPR Policy
  • Terms Of Use
Back to Top
  • About
  • Contact Us
  • Privacy Policy
© 2025 flavor nest kitchen