FREE DINNER EBOOK! Get your copy!
  • Cookie Policy
  • GDPR Policy
  • Disclaimer
  • Terms Of Use
  • Visit my other site: Fun Cookie Recipes
flavor nest kitchen
  • Home
  • Dinner
  • Desserts
  • Drinks
  • Appetizers
  • Contact
  • About
  • Privacy Policy
  • Home
  • Dinner
  • Desserts
  • Drinks
  • Appetizers
  • Contact
  • About
  • Privacy Policy
  • Cookie Policy
  • GDPR Policy
  • Disclaimer
  • Terms Of Use
Visit my other site: Fun Cookie Recipes

HOME / CATEGORIES /

Latest

- 2 tablespoons vegetable oil - 1 pound boneless chicken thighs, thinly sliced - 4 cloves garlic, minced - 2 bird's eye chilies, finely sliced - 1 red bell pepper, sliced - 1 cup green beans, trimmed and cut into 2-inch pieces - 3 tablespoons soy sauce - 1 tablespoon oyster sauce - 1 teaspoon sugar - 2 cups fresh Thai basil leaves - Cooked jasmine rice, for serving These ingredients form the backbone of Thai basil chicken. The chicken gives you a rich protein base. Garlic adds a lovely aroma. The chilies bring heat, and the bell pepper adds color. Green beans add crunch and freshness. - Lime wedges for serving - Additional fresh basil for garnish - Chopped scallions for a pop of flavor Using lime wedges can brighten the dish. Extra basil enhances the herbal notes. Scallions add a fresh touch, making your meal even more appealing. - Use mushroom sauce instead of oyster sauce for a vegetarian option. - Swap chicken thighs for chicken breast or tofu for a lighter dish. - If you dislike heat, remove chilies or use bell peppers instead. These substitutions keep the dish flexible for various diets. You can easily make this meal fit your taste and needs. Adjusting ingredients can still yield delicious results. {{ingredient_image_1}} Start by gathering your ingredients. For this dish, you will need boneless chicken thighs, garlic, chilies, red bell pepper, green beans, soy sauce, oyster sauce, sugar, and fresh Thai basil leaves. Slice the chicken into thin pieces. Mince the garlic and slice the chilies finely. Cut the red bell pepper into strips and trim the green beans. This prep makes cooking much easier and faster. Heat two tablespoons of vegetable oil in a large skillet or wok. Set the heat to medium-high. Once the oil is hot, add the minced garlic and sliced chilies. Stir-fry for about 30 seconds. You want the mix to smell great but not burn. Next, raise the heat to high. Add the sliced chicken thighs. Cook for about four to five minutes. Keep stirring until the chicken turns brown and is cooked through. Now, it’s time to add the veggies. Toss in the sliced red bell pepper and green beans. Stir-fry for another three to four minutes. The goal is to get them tender but still crisp. In a small bowl, mix the soy sauce, oyster sauce, and sugar. Pour this sauce over the chicken and vegetables. Toss everything together until well coated. Remove the skillet from the heat and gently fold in the fresh Thai basil leaves. They should wilt slightly from the heat. Serve the Thai basil chicken over cooked jasmine rice. Enjoy! To get the best stir-fry, start with a hot pan. Heat your oil until it shimmers. This helps to sear the chicken and lock in flavor. Slice the chicken thin for quick cooking. Stir often to keep it from sticking. This gives you that nice, tender bite. Bird's eye chilies pack a punch. If you like heat, keep them in. For less spice, remove the seeds before slicing. You can also use fewer chilies. Taste as you go to find your perfect heat level. Remember, you can always add more later. Fresh Thai basil is key to this dish. Add it at the end of cooking. This keeps the leaves bright and fragrant. Use your hands to tear the leaves for more flavor. If you can, use fresh basil only. Dried basil won't give you the same taste. Enjoy its unique aroma and taste in every bite! Pro Tips Adjust Spice Level: If you're sensitive to spice, start with one chili and gradually add more to suit your taste. Fresh Basil is Key: Use fresh Thai basil for a vibrant flavor; avoid dried basil as it won't provide the same aromatic qualities. Cook Chicken in Batches: If your pan isn't large enough, cook the chicken in batches to ensure even cooking and browning. Perfect Rice: Rinse jasmine rice before cooking to remove excess starch, resulting in fluffy, non-sticky grains. {{image_2}} You can easily make Thai basil chicken vegetarian or vegan. Use mushroom sauce instead of oyster sauce. For protein, try using firm tofu. Press the tofu to remove water, then cut it into bite-sized pieces. Sauté it just like you would with chicken. This method keeps the dish tasty and satisfying. If you want to change up the protein, consider using beef or shrimp. For beef, choose flank steak or sirloin. Slice the meat thinly for quick cooking. For shrimp, use peeled and deveined shrimp. Both options cook fast and absorb the flavors well. Adjust the cooking time to ensure the protein is cooked through. Adding spices can give your Thai basil chicken a new twist. Try adding ginger for warmth. A dash of chili flakes boosts the heat. For a sweet touch, consider adding a bit of pineapple. You can also mix in some lime zest for freshness. These small changes can make your dish unique and exciting. To keep your Thai basil chicken fresh, store leftovers in an airtight container. Make sure to cool it down first. Place it in the fridge within two hours of cooking. It will last about three to four days. If you want to enjoy it later, consider freezing it. When reheating, use a skillet on low heat. Add a splash of water or broth to keep it moist. Stir it often to heat evenly. This will help keep the chicken juicy and the veggies crisp. You can also use a microwave. Just cover the dish and heat in short bursts. Stir in between to avoid hot spots. If you plan to freeze your dish, make sure it’s cooled completely. Use freezer-safe containers or bags. Separate servings for easy access later. Thai basil chicken can be frozen for up to three months. When you’re ready, thaw it in the fridge overnight. Reheat as mentioned for the best taste. Thai Basil Chicken comes from Thailand. It uses Thai basil, a special herb. This dish is popular in Thai street food. Chefs make it with chicken, fresh veggies, and a tasty sauce. The bold flavors reflect Thailand's love for spicy food. You can find it in many Thai restaurants around the world. Yes, you can make this dish ahead of time. Cook the chicken and veggies, then let them cool. Store them in the fridge for up to three days. When you are ready to eat, reheat it in a pan. Add fresh Thai basil at the end for the best flavor. Thai Basil Chicken tastes great with jasmine rice. The rice soaks up the sauce well. You can also serve it with a side salad. A fresh cucumber salad works nicely too. For an extra kick, add lime wedges. This brightens the dish and adds a zesty flavor. Thai Basil Chicken is simple to make and very tasty. You learned about essential ingredients, how to prep, and cook this dish step by step. I shared tips for a perfect stir-fry, variations for different diets, and storage advice. Whether you enjoy it with rice or noodles, this meal is flexible. Feel free to make it your own. With the right techniques, you can create a delicious meal that impresses everyone. Enjoy your cooking journey!

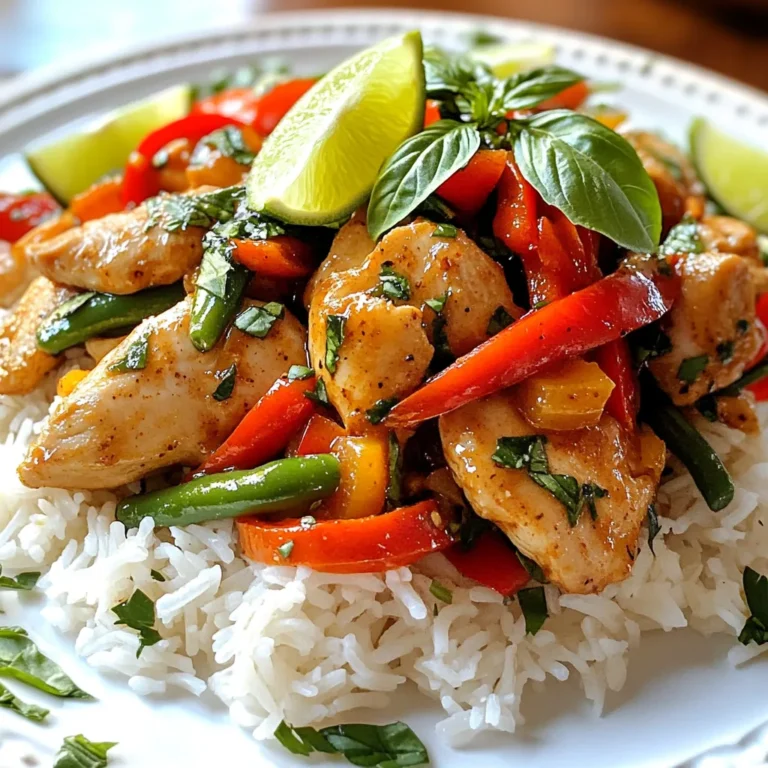
Thai Basil Chicken Flavorful and Simple Recipe Guide

- 1 medium head of cauliflower, cut into small florets - 3 tablespoons olive oil - Zest of 1 lemon - Juice of 1 lemon - ½ cup grated Parmesan cheese - 1 teaspoon garlic powder - 1 teaspoon smoked paprika - Salt and pepper to taste - 8 small corn or flour tortillas - 1 avocado, sliced - Fresh cilantro, for garnish - Optional: Hot sauce for serving Using fresh ingredients makes a big difference in taste. Fresh cauliflower has a crisp texture and a mild flavor that absorbs seasonings well. Fresh lemons add a bright, tangy flavor that lifts the dish. This zest and juice enhance the cauliflower and keep the tacos vibrant. Fresh herbs, like cilantro, add color and aroma. When you use fresh ingredients, your tacos will burst with flavor. If you can’t find cauliflower, try broccoli or Brussels sprouts. They roast well and taste great too. For a dairy-free option, use nutritional yeast instead of Parmesan cheese. You can also swap olive oil for avocado oil if you prefer. If you want a gluten-free option, use corn tortillas instead of flour. Feel free to mix and match based on what you have! {{ingredient_image_1}} First, grab a medium head of cauliflower. Cut it into small florets. This helps them cook evenly. Next, in a large mixing bowl, combine the cauliflower with olive oil, lemon zest, lemon juice, garlic powder, smoked paprika, salt, and pepper. Toss everything well. Make sure every floret gets coated. Preheat your oven to 400°F (200°C). Spread the cauliflower on a baking sheet in a single layer. This ensures even cooking. Now, sprinkle the grated Parmesan cheese over the top. Roast the cauliflower for about 25-30 minutes. Stir halfway through for even browning. You want it golden and tender when done. While the cauliflower roasts, warm the tortillas in a dry skillet over medium heat. This makes them soft and easy to fold. Once the cauliflower is ready, let it cool slightly. To assemble, spoon the roasted lemon Parmesan cauliflower onto each tortilla. Add sliced avocado and fresh cilantro on top. If you like heat, drizzle on some hot sauce. Enjoy your fresh and flavorful tacos! Roasting cauliflower brings out its natural sweetness. Start by cutting the cauliflower into small florets. Smaller pieces roast more evenly and get crisp. Toss the florets in olive oil, lemon zest, and spices. Make sure they are well-coated. This helps the flavors stick. Spread the cauliflower in a single layer on your baking sheet. This way, they roast well without steaming. Lemon and Parmesan work great together, but you can mix it up. Try adding chili powder for heat. Cumin adds warmth and depth. For a fresh twist, toss in some chopped garlic or onion. Don't forget about herbs! Fresh cilantro adds brightness. You can also squeeze more lemon juice before serving. This enhances the citrus flavor and freshness. To serve these tacos, use small corn or flour tortillas. Warm them in a pan for a few seconds. This makes them soft and tasty. Spoon the roasted cauliflower onto each tortilla. Add sliced avocado for creaminess. Fresh cilantro on top makes it look pretty. For an extra kick, drizzle hot sauce over the tacos. For a vibrant look, serve the tacos on a colorful platter. Add lemon wedges and more cilantro as garnish. These small touches make your meal feel special. Pro Tips Perfectly Roasted Cauliflower: For the best texture, ensure that the cauliflower florets are cut into uniform sizes to promote even roasting. Cheese Variation: Try using different types of cheese, like feta or cotija, for a unique flavor twist. Fresh Herb Boost: Add other fresh herbs like parsley or dill for extra freshness and flavor in your tacos. Make-Ahead Option: Roast the cauliflower ahead of time and reheat it in the oven before serving for a quick meal solution. {{image_2}} You can easily make these tacos vegetarian or vegan. To make them vegan, skip the Parmesan cheese. Instead, use nutritional yeast for a cheesy flavor. You can also add more spices, like chili powder, to boost the taste. This way, you still enjoy rich flavors without dairy. If you want gluten-free options, choose corn tortillas. They are tasty and perfect for these tacos. You can also find gluten-free wraps at the store. Just make sure to read the labels before buying. This way, you can enjoy the tacos without worrying about gluten. Toppings can take your tacos to the next level. Try adding sliced jalapeños for heat. Fresh lime juice adds a zesty kick. You can also use a drizzle of creamy avocado sauce or tahini. Fresh herbs, like dill or mint, bring a new flavor twist. Mix and match these toppings to create your perfect taco! After enjoying your Lemon Parmesan Cauliflower Tacos, store any leftovers in an airtight container. Place the cauliflower and toppings separately. This keeps the tortillas from getting soggy. You can keep them in the fridge for up to three days. When you’re ready to eat, grab the container and enjoy! To reheat the cauliflower, use an oven or a skillet. Preheat your oven to 350°F (175°C). Spread the cauliflower on a baking sheet and heat for about 10-15 minutes. This keeps the crispiness intact. If you use a skillet, warm it over medium heat. Stir the cauliflower for about five minutes until it's heated through. For the tortillas, warm them briefly in a dry skillet to make them soft again. You can freeze the roasted cauliflower for longer storage. Place the cooled cauliflower in a freezer-safe bag. Remove as much air as possible. Label the bag and store it in the freezer for up to three months. When you’re ready to eat, thaw it overnight in the fridge. Then, reheat it as mentioned above. Note that the tortillas do not freeze well, so it's best to enjoy them fresh. Yes, you can prepare these tacos in advance. Cook the cauliflower and store it in an airtight container. Keep the tortillas and toppings separate. When you're ready to eat, heat the cauliflower and warm the tortillas. This way, you enjoy fresh tacos without the last-minute rush. You can use many vegetables for these tacos. Bell peppers add sweetness. Zucchini gives a great crunch. Mushrooms offer a nice earthy flavor. You can even mix in some spinach for extra greens. Feel free to experiment and find your favorite combo! To add heat, try a few options. Add diced jalapeños to the cauliflower mix. A dash of cayenne pepper also works well. You can drizzle hot sauce over the tacos before serving, too. Adjust the spice to match your taste! Lemon Parmesan Cauliflower Tacos are simple and tasty. We covered key ingredients and why fresh ones matter. I shared how to prepare and roast cauliflower for great flavor. You can also make these tacos vegetarian or gluten-free. Remember, proper storage keeps leftovers fresh for later. These tacos are fun to make and eat. Try different veggies and toppings for more flavor. Enjoy your cooking and happy eating!

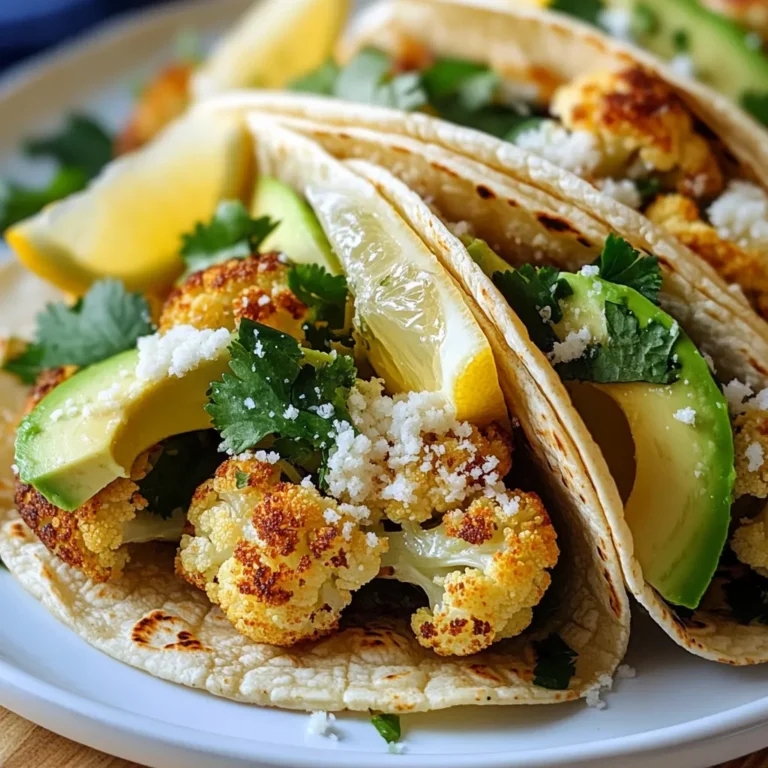
Lemon Parmesan Cauliflower Tacos Fresh and Flavorful

- 4 salmon fillets - 1/4 cup low sodium soy sauce - 1/4 cup honey - 2 cups broccoli florets - 1 bell pepper (any color) - 1 medium carrot - 2 tablespoons rice vinegar - 2 teaspoons sesame oil - Salt and pepper to taste - Optional: Sesame seeds and green onions for garnish When I make this dish, I love using fresh salmon fillets. They cook up so nicely! The soy sauce and honey blend makes a rich teriyaki glaze. This recipe keeps it simple and delicious. For the veggies, I often grab broccoli, bell peppers, and carrots. They add great color and crunch. You can use any color bell pepper you like. Each brings something unique to the plate. The sauces and seasonings are key. Rice vinegar adds a nice tang. Sesame oil gives a warm, nutty flavor. Of course, salt and pepper are a must for taste. For a fun touch, I like to sprinkle sesame seeds and chopped green onions on top when serving. It looks great and tastes even better! {{ingredient_image_1}} - Preheat the oven to 400°F (200°C). - Line a sheet pan with parchment paper. Start by preheating your oven. This step is key for even cooking. The parchment paper helps with easy cleanup and prevents sticking. - Combine soy sauce, honey, rice vinegar, sesame oil, ginger, and garlic in a saucepan. - Heat and stir until slightly thickened. In a small saucepan, mix soy sauce, honey, rice vinegar, sesame oil, grated ginger, and minced garlic. Heat this on medium. Stir often for about five minutes. You want the sauce to thicken a bit. This brings out the flavors. - Toss vegetables in olive oil, salt, and pepper. - Place salmon and veggies on prepared sheet pan. In a large bowl, toss the broccoli, bell pepper, and carrot with olive oil, salt, and pepper. This simple mix adds taste to the veggies. Next, arrange the veggies on one side of the sheet pan. Put the salmon fillets on the other side, skin-side down. - Brush glazed salmon with teriyaki sauce. - Bake for 15-20 minutes until cooked through. Generously brush the salmon with the teriyaki sauce you made. Reserve some sauce for later. Place the sheet pan in the oven. Bake for 15 to 20 minutes. The salmon should be cooked through and flaky. The veggies should be tender but still crisp. - Glaze salmon again after baking. - Serve with garnishes. Once your salmon is done, take it out of the oven. Brush on the remaining teriyaki sauce. This adds a lovely shine and flavor. Serve the salmon and veggies on plates. Garnish with sesame seeds and chopped green onions for a fresh touch. Enjoy your meal! To cook salmon just right, aim for an internal temperature of 145°F or 63°C. This ensures it’s safe to eat and still moist. Place the salmon skin-side down on the sheet pan. This helps the skin crisp up nicely while keeping the fish tender. You can mix up the veggies you use with teriyaki sauce. Try snap peas, zucchini, or even asparagus for a different taste. Seasonal veggies also work well. In spring, use fresh peas. In fall, consider Brussels sprouts for a hearty touch. Adjust the teriyaki glaze to suit your taste. If you want it sweeter, add more honey. For a saltier kick, increase the soy sauce. Want a little heat? Add chili flakes or a dash of cayenne pepper to the glaze. This adds a fun spice to the dish! Pro Tips Use Fresh Ingredients: Always opt for fresh salmon and vibrant vegetables for the best flavor and texture in your dish. Marinate for Extra Flavor: If time permits, marinate the salmon in the teriyaki sauce for 30 minutes to enhance the flavor profile. Watch the Cooking Time: Keep an eye on the salmon while baking; overcooking can lead to a dry texture. Aim for an internal temperature of 145°F (63°C). Experiment with Veggies: Feel free to add other seasonal vegetables like snap peas or zucchini for a colorful and nutritious medley. {{image_2}} You can easily swap salmon for chicken or tofu. Each protein gives a new taste. If you use chicken, cut it into even pieces. This helps it cook well. Chicken takes a bit longer, around 25-30 minutes. For tofu, use firm types and slice it thick. Bake it for about 20 minutes. Always check that your protein is fully cooked. Salmon should reach 145°F, chicken 165°F, and tofu should be hot throughout. If you need a gluten-free meal, use tamari or coconut aminos instead of soy sauce. Both give a great flavor without gluten. Check all other ingredients, too. Rice vinegar and honey are usually safe, but read labels to be sure. Use fresh veggies that are naturally gluten-free. This keeps your dish tasty and safe. Want to change up the flavor? Add some citrus! Orange or lime juice can brighten the dish. Just squeeze some over the salmon before baking. You can also try different vinegars. Apple cider vinegar or white wine vinegar can add a nice twist. Each change gives a unique taste to the teriyaki. Experiment and find your favorite! After your meal, let the salmon and veggies cool down. Place them in airtight containers. This helps keep them fresh. I suggest using glass or BPA-free plastic containers. These are safe and easy to store. Label each container with the date. This way, you know when to eat them. You can keep leftovers in the fridge for up to three days. To reheat, you can use the oven, microwave, or skillet. If using the oven, preheat it to 350°F (175°C). Place the salmon and veggies on a baking sheet. Heat for about 10 minutes. If you choose the microwave, use a low power setting. This prevents the salmon from drying out. Cover the dish with a damp paper towel for moisture. Stir the veggies halfway through to heat evenly. You can freeze leftover teriyaki salmon and veggies for later use. First, make sure the food is fully cooled. Portion them into freezer-safe bags or containers. Remove as much air as possible to prevent freezer burn. Label each bag with the date. For best results, use within three months. When ready to eat, thaw overnight in the fridge. Reheat using the guidelines above to enjoy a tasty meal again. Bake the salmon for 15 to 20 minutes. This gives you perfect, flaky salmon. The internal temperature should reach 145°F (63°C). Always check the thickest part of the fillet. This baking time works well for most ovens. Yes, you can make the teriyaki sauce ahead. Combine soy sauce, honey, rice vinegar, sesame oil, ginger, and garlic. Heat it until thickened, then cool. Store it in a jar in the fridge for up to a week. This saves time on busy nights. The best vegetables for teriyaki salmon include: - Broccoli florets - Bell peppers (any color) - Carrots Other options are snap peas, asparagus, or zucchini. These add color and crunch to your dish. Yes, frozen salmon works well. Thaw it in the fridge overnight before cooking. If you cook it from frozen, add about 5 minutes to the baking time. Make sure to check the internal temperature, aiming for 145°F (63°C). In this article, we explored how to make teriyaki salmon, from the main ingredients to detailed steps. We covered the perfect way to glaze and bake your salmon, along with tips for storing and reheating leftovers. Whether you want to switch proteins or add veggies, the options are endless. Teriyaki salmon is simple to make and delicious. Now, you can impress your family or friends with a tasty dish that is also healthy. Enjoy your cooking journey!

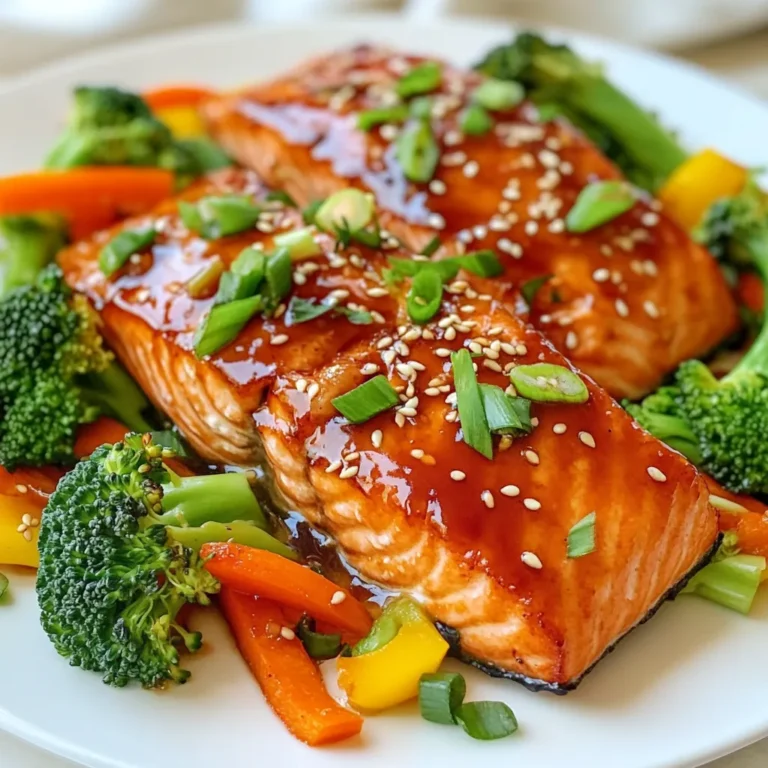
Sheet Pan Teriyaki Salmon Flavorful Dinner Recipe

- 1 ½ cups graham cracker crumbs - ½ cup unsalted butter, melted - ¼ cup sugar - 1 teaspoon cinnamon - 16 oz cream cheese, softened - ¾ cup sugar - 2 large eggs - 1 teaspoon vanilla extract - ½ teaspoon cinnamon - ¼ cup unsalted butter, melted - ½ cup sugar - 1 teaspoon cinnamon The base of our churro cheesecake bars starts with a crust. For this, you will need graham cracker crumbs. They give a nice crunch. You mix them with melted butter, sugar, and cinnamon. This mixture forms the rich and sweet base of our dessert. Next, we have the cheesecake filling. You need cream cheese for a creamy texture. Make sure it is softened for easy mixing. Add sugar, eggs, vanilla extract, and a hint of cinnamon. These ingredients create a smooth and luscious filling. Finally, we finish with a churro topping. This topping is what makes these bars special. You’ll need more melted butter, sugar, and cinnamon. Together, they make a sweet, crunchy layer that adds a delightful finish. Gather all these ingredients, and you’re ready to create a dessert that everyone will love! {{ingredient_image_1}} - Preheat your oven to 350°F (175°C). Grease an 8x8 inch baking pan with cooking spray or line it with parchment paper. This ensures the bars come out easily. - In a medium bowl, combine 1 ½ cups of graham cracker crumbs, ½ cup melted unsalted butter, ¼ cup sugar, and 1 teaspoon cinnamon. Mix until the crumbs look like wet sand. This texture helps the crust hold together. - Press the crumb mixture firmly into the bottom of the baking pan to form an even layer. Bake for 10 minutes. This baking step helps set the crust. - While the crust cools, beat 16 oz of softened cream cheese in a large bowl until smooth. Use an electric mixer for the best results. - Mix in ¾ cup sugar, 2 large eggs, 1 teaspoon vanilla extract, and ½ teaspoon cinnamon. Beat until the mixture is completely smooth. This makes a creamy filling. - Pour the cheesecake filling over the cooled graham cracker crust, spreading it evenly. This layer will be rich and delicious. - Bake the cheesecake for 25-30 minutes. The edges should be set, but the center will still jiggle slightly. This slight jiggle shows that the cheesecake is not over-baked. - Allow it to cool completely at room temperature. This step is essential before chilling. - Chill the cheesecake in the fridge for at least 2 hours. This helps it firm up and makes it easier to cut later. - In a small bowl, mix together ½ cup sugar and 1 teaspoon cinnamon for the topping. This will give your cheesecake bars that churro taste. - Brush the top of the chilled cheesecake with ¼ cup of melted butter. This adds richness and helps the topping stick. - Sprinkle the cinnamon-sugar mixture evenly over the top. This final touch makes your bars look and taste amazing. To make the best Churro Cheesecake Bars, start with the cream cheese. Always use cream cheese that is at room temperature. This helps it blend smoothly and avoids lumps in your filling. Next, to avoid cracks in the cheesecake, do not overmix your batter. Mix just until combined. Bake at the right temperature, and do not open the oven door too soon. For a perfect crust, press the graham cracker mixture firmly into the pan. This gives it stability. Bake it for the full ten minutes to set it before adding the cheesecake filling. When serving, use a decorative platter to make your bars stand out. Cut the bars into even pieces for an appealing look. Garnish with a sprinkle of cinnamon and sugar on top. This adds a nice touch. Drizzle with caramel sauce for extra sweetness and shine. It makes your bars look irresistible! Pro Tips Use Room Temperature Ingredients: Make sure your cream cheese is at room temperature for a smooth filling; this helps to prevent lumps and ensures a creamy texture. Don’t Overbake: Keep an eye on the cheesecake while it's baking; it should have a slight jiggle in the center when you take it out, which will set as it cools. Chill Before Serving: Allow the cheesecake bars to chill for at least 2 hours before cutting; this will enhance their texture and make them easier to slice. Customize Your Cinnamon Sugar: Feel free to add a pinch of nutmeg or allspice to the cinnamon sugar topping for an extra layer of flavor! {{image_2}} You can easily change up your churro cheesecake bars. Here are some fun ideas: - Add chocolate chips or caramel: Mix in a half cup of chocolate chips or drizzle caramel into the filling. This adds a sweet twist. - Swap spices: Try nutmeg or allspice instead of cinnamon. This will give your bars a new flavor profile. - Experiment with crust bases: Use crushed Oreos or vanilla wafers instead of graham crackers. This will change the taste and texture. You can make these bars fit different diets too. Here are some options: - Gluten-free options: Use gluten-free graham cracker crumbs or almond flour for the crust. This makes it safe for those with gluten allergies. - Dairy-free substitutes: Replace cream cheese with a dairy-free cream cheese. You can also use coconut milk for a creamy filling. - Low-sugar options: Use a sugar substitute like stevia or erythritol. This keeps the sweetness while lowering the sugar. These variations allow you to enjoy churro cheesecake bars in many ways. You can try one or mix and match for your perfect treat! To keep your churro cheesecake bars fresh, cover them well. You can use plastic wrap or foil. This keeps the moisture in and prevents them from drying out. Place the covered bars in the refrigerator. They stay good for up to five days. For the best storage, use an airtight container. This helps avoid any fridge odors. Choose a shallow container so the bars fit nicely. If you stack the bars, place parchment paper between layers to prevent sticking. You can freeze churro cheesecake bars for longer storage. First, cut them into squares. Then, wrap each square tightly in plastic wrap. This prevents freezer burn. Place the wrapped bars in a freezer-safe container or bag. They last for up to three months in the freezer. When you're ready to eat them, take out the bars. Place them in the fridge overnight to thaw. You can also let them sit at room temperature for about an hour. Once thawed, serve them cold or at room temperature. Enjoy their sweet, creamy goodness! You can tell the cheesecake is done when the edges look set. The center should still jiggle slightly. This means it is creamy and not overcooked. Remove it from the oven so it can cool properly. Remember, it will firm up as it cools. Yes, you can make these bars ahead of time. They taste great after chilling in the fridge. I suggest making them a day before you plan to serve them. This will give the flavors time to meld and improve. Churro Cheesecake Bars shine on their own. However, you can enhance them with toppings. Try drizzling caramel sauce on top for extra sweetness. Fresh whipped cream also pairs nicely. A scoop of vanilla ice cream adds a delightful touch. These cheesecake bars will stay fresh for about five days in the fridge. Store them in an airtight container to keep them moist and tasty. If you want to enjoy them longer, consider freezing them for up to three months. In this post, we explored how to make delicious Churro Cheesecake Bars. We covered the key ingredients: the churro crust, cheesecake filling, and churro topping. I shared step-by-step instructions for a perfect bake, and offered tips to avoid cracks and enhance presentation. There are also variations and storage tips to keep your bars fresh. Now, you can create a delightful dessert experience. Enjoy every bite of your Churro Cheesecake Bars!

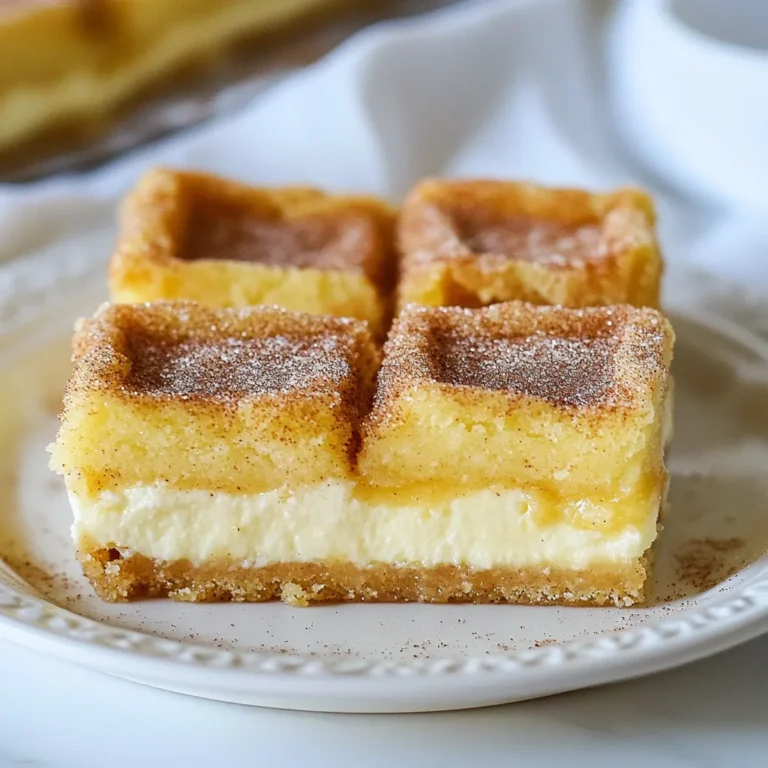
Churro Cheesecake Bars Tasty and Easy Dessert Treat

- 2 lbs chicken wings - 4 tablespoons unsalted butter, melted - 1 tablespoon minced garlic - 1 teaspoon garlic powder - 1 teaspoon onion powder - 1 teaspoon smoked paprika - ½ cup grated Parmesan cheese - 2 tablespoons fresh parsley, finely chopped - Salt and pepper to taste - Lemon wedges for serving To make Garlic Parmesan Chicken Wings, you need fresh chicken wings. The best choice is 2 pounds of wings. They will give you a good amount to share. You will also need unsalted butter. Four tablespoons of melted butter adds rich flavor. Garlic is key in this dish. Use one tablespoon of minced garlic for that strong taste. For extra garlic flavor, add one teaspoon of garlic powder. One teaspoon of onion powder brings depth to the wings. Smoked paprika adds a nice, subtle warmth. You also want half a cup of grated Parmesan cheese. This cheese makes the wings creamy and salty. Two tablespoons of fresh parsley bring color and freshness to the dish. Don’t forget salt and pepper for seasoning. Finally, serve the wings with lemon wedges. The lemon adds a bright touch to the savory wings. Gather these ingredients, and you are ready to cook. Each one plays a role in making these wings taste amazing! {{ingredient_image_1}} - Set temperature to 400°F (200°C). - Prepare the baking sheet by lining it with parchment paper or foil. This step makes cleanup easy later. - In a large bowl, combine 4 tablespoons of melted unsalted butter, 1 tablespoon of minced garlic, 1 teaspoon of garlic powder, 1 teaspoon of onion powder, 1 teaspoon of smoked paprika, and salt and pepper to taste. - Mix well to create a flavorful marinade. The butter adds richness, while the spices give it that delicious kick. - Add 2 pounds of chicken wings to the bowl with the marinade. - Toss the wings until they are evenly coated. Make sure every wing gets a nice layer of flavor. - Arrange the coated wings on the prepared baking sheet in a single layer. This helps them cook evenly. - Bake in the preheated oven for 40-45 minutes. Flip the wings halfway through to ensure they get crispy all over. - Once the wings are golden brown and cooked through, take them out of the oven. - Immediately sprinkle with ½ cup of grated Parmesan cheese and 2 tablespoons of finely chopped fresh parsley while the wings are still hot. This way, the cheese melts slightly and sticks well. - Serve hot with lemon wedges on the side for a zesty kick. To make your wings crispy, start by using a wire rack. Place the wings on the rack over a baking sheet. This helps air flow around the wings. For best results, bake them at 400°F (200°C). Flip the wings halfway for even cooking. If you want to try other methods, the air fryer works great too! It cooks the wings faster while keeping them crispy. Just adjust the time and temperature according to your air fryer’s guide. You can add spices or herbs to the wings for more flavor. Try adding Italian seasoning or a dash of cayenne for a kick. Fresh herbs like thyme or rosemary can also add a nice touch. To make it spicy, toss the wings with your favorite hot sauce. Mix the sauce with the butter before coating the wings. This adds a nice heat that pairs well with the garlic and Parmesan. These wings taste great with ranch or blue cheese. Both add a creamy touch that balances the garlic flavor. If you want something homemade, mix sour cream with garlic powder and herbs. Another fun idea is to create a zesty lemon dip. Just mix Greek yogurt with lemon juice, salt, and pepper. This adds freshness to your wings, making them even more enjoyable. Pro Tips Use Fresh Garlic: Fresh minced garlic gives a stronger flavor compared to garlic powder. Adjust the amount based on your preference for garlic intensity. For Extra Crispiness: Consider broiling the wings for the last few minutes of cooking. This will enhance their crispiness and make them even more delicious. Marinate for Flavor: If time allows, let the wings marinate in the butter and seasoning mixture for a few hours or overnight in the fridge for deeper flavor. Choosing the Right Cheese: While Parmesan is a classic, try using a blend of cheeses like Pecorino Romano or Asiago for a unique flavor twist. {{image_2}} Both methods make tasty wings, but they differ in how they cook. Oven-baked wings need about 40-45 minutes to get crispy. You flip them halfway for even cooking. Air-fried wings cook faster, in about 25-30 minutes. They also get nice and crispy with less oil. You can mix in other flavors to spice things up. Try adding a dash of hot sauce for heat. You can also use fresh herbs like thyme or rosemary. If you want a cheesy twist, try different cheeses. Aged Gouda or Pecorino Romano can add depth. Pair these wings with classic sides. Celery and carrot sticks are fresh and crunchy. You can also serve them with fries or a salad. For presentation, arrange the wings on a large platter. Use lemon wedges around the wings for color. It makes the dish look even more appetizing. How long will they last? Garlic Parmesan chicken wings will stay fresh in the fridge for about 3 to 4 days. Best storage practices To keep them tasty, place the wings in an airtight container. This prevents them from drying out. You can also wrap them tightly in plastic wrap before putting them in a container. Proper freezing methods If you want to store them for longer, freeze the wings. First, let them cool completely. Then, place them in a freezer-safe bag. Remove as much air as you can before sealing. Reheating instructions To reheat, take the wings out and thaw them in the fridge overnight. To warm them, preheat your oven to 375°F (190°C). Bake for about 15 to 20 minutes until they are hot and crispy again. Baking chicken wings takes about 40 to 45 minutes. First, preheat your oven to 400°F (200°C). Then, bake the wings for 20 to 25 minutes. After that, flip them and bake for another 20 to 25 minutes. This way, they get golden brown and crispy. Yes, you can use frozen chicken wings. But first, you need to thaw them. The best way is to place them in the fridge overnight. If you are short on time, you can run cold water over them for about 30 minutes. Once thawed, follow the same baking instructions. You may need to add a few extra minutes to the cooking time. You have many great options for sides. Here are some suggestions: - Celery sticks with ranch dressing - Carrot sticks with hummus - Crispy potato wedges - A fresh green salad - Garlic bread for a tasty twist These sides pair well and make your meal more filling and fun! You can create tasty Garlic Parmesan Chicken Wings with ease. Start by prepping the ingredients and marinade. Coat your wings and bake for crispy goodness. Add Parmesan and parsley for that final touch. Don’t forget the tips for achieving perfect wings and try different flavors. Store leftovers properly to enjoy later. With these steps, you have a fun dish that's perfect for any gathering. Enjoy your cooking adventure!

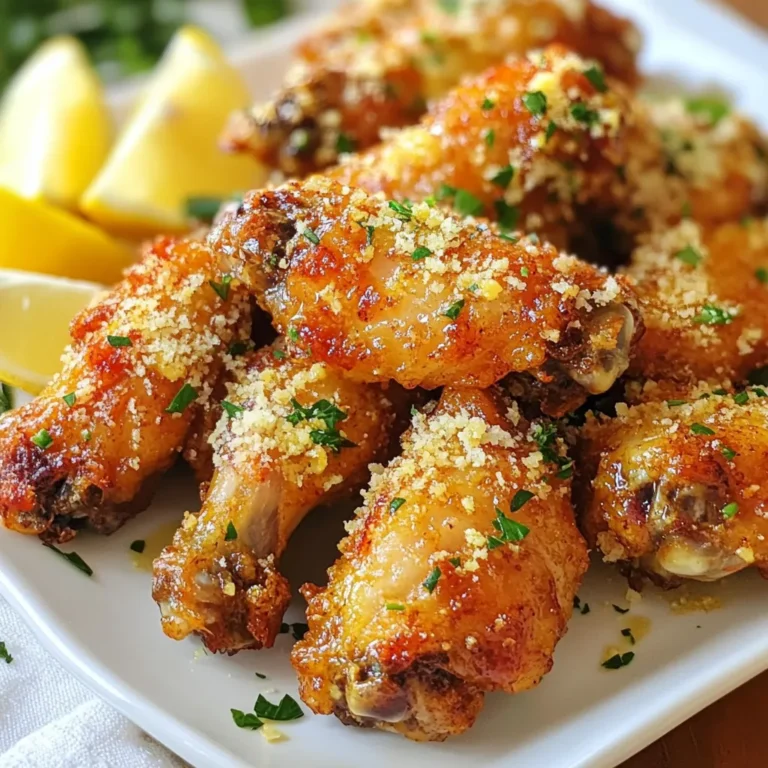
Garlic Parmesan Chicken Wings Savory and Simple Recipe

- 1 lb fresh shrimp, peeled and deveined - 2 tablespoons olive oil - Salt, to taste - Pepper, to taste To start, you need fresh shrimp. I love to use shrimp that is peeled and deveined. This saves time and makes cooking easier. You can find shrimp at most stores. For seasoning, olive oil, salt, and pepper are key. A simple mix of these gives the shrimp a great flavor. - 4 pieces of naan bread or flatbread - 1/2 cup basil pesto (store-bought or homemade) For the base, I prefer naan bread or flatbread. Both options work well. They are soft and hold toppings nicely. Next, you'll need basil pesto. You can buy it or make your own. Pesto adds a rich, herby flavor that blends well with shrimp. - 1 cup shredded mozzarella cheese - 1/2 cup cherry tomatoes, halved - 1/4 cup red onion, thinly sliced - Fresh basil leaves for garnish For toppings, shredded mozzarella cheese is a must. It melts beautifully and adds creaminess. Cherry tomatoes bring a sweet burst, while red onions add a slight crunch. Lastly, fresh basil leaves make a lovely garnish. They enhance the dish's look and taste. {{ingredient_image_1}} To start, take 1 pound of fresh shrimp. Peel and devein them if needed. In a medium bowl, add the shrimp. Pour in 1 tablespoon of olive oil, plus a sprinkle of salt and pepper. Mix well. Let the shrimp sit for about 10 minutes to soak in the flavors. Next, heat a skillet over medium heat. Add the marinated shrimp to the skillet. Cook for 2 to 3 minutes on each side until they turn pink. Once cooked, remove them from heat and set aside. Grab 4 pieces of naan bread or flatbread. Place them on a baking sheet. Start spreading a generous layer of basil pesto on each piece. Make sure to cover the whole surface. Next, take 1 cup of shredded mozzarella cheese and sprinkle it evenly over the pesto. Now, it’s time to add the cooked shrimp. Distribute them evenly on top of the cheese. Then, add 1/2 cup of halved cherry tomatoes and 1/4 cup of thinly sliced red onion. For extra flavor, drizzle a little olive oil over the assembled flatbreads. Preheat your oven to 400°F (200°C). Once preheated, place the baking sheet with flatbreads in the oven. Bake for about 10 to 12 minutes. Keep an eye on them until the cheese melts and bubbles. When done, remove the flatbreads from the oven. Let them cool for a minute before slicing. Finish by garnishing with fresh basil leaves for a pop of color and flavor. Enjoy your delicious pesto shrimp flatbread! To boost the taste of your pesto shrimp flatbread, consider adding a few extra seasonings. Garlic powder and crushed red pepper can bring depth and heat. A sprinkle of lemon zest adds a bright note that contrasts nicely with the rich pesto. You can also try fresh herbs like parsley or dill for a fresh twist. Experiment with these to find your favorite blend. For perfect shrimp, aim for a pink color. Cook them for about 2-3 minutes on each side. They should be firm but not rubbery. Overcooked shrimp can lose their delicious flavor and texture. If you have a meat thermometer, the internal temperature should reach 120°F. This ensures they are safe and tasty! Making your dish look great is key. After baking, let the flatbreads cool for a minute. This helps the cheese set a bit. Then, add fresh basil leaves on top for color. Arrange the shrimp and tomatoes in a way that shows off their vibrant colors. A drizzle of balsamic glaze can add an elegant touch and extra flavor. Pro Tips Perfectly Cooked Shrimp: To avoid rubbery shrimp, ensure you cook them just until they turn pink and opaque, which should take only 2-3 minutes per side. Homemade Pesto: For an extra flavor boost, try making your own pesto using fresh basil, garlic, pine nuts, Parmesan, and olive oil. Cheese Alternatives: If you want to mix things up, consider using goat cheese or feta for a tangy twist instead of mozzarella. Customization: Feel free to add other toppings such as spinach, bell peppers, or olives to personalize your flatbreads to your taste! {{image_2}} You can easily change the shrimp in this recipe. Chicken works great and adds a nice flavor. Simply cook the chicken until it is no longer pink. You can use tofu for a vegetarian touch. Just press and cube the tofu and cook it until golden. This adds a nice texture. You can also try using vegetables like zucchini or bell peppers. They add color and crunch to your flatbread. While naan is tasty, you can try other flatbreads too. Pita bread is soft and perfect for this dish. Tortillas work well if you want a crispy edge. You can even use gluten-free options if needed. Each type of bread gives a unique taste and feel to your meal. Feel free to swap and find your favorite! Get creative with your toppings! You can add spinach for more greens. Sliced olives add a salty twist. Try feta cheese for a tangy kick, or goat cheese for creaminess. Don't forget about herbs like oregano or thyme for extra flavor. Mixing and matching toppings makes your flatbread even more fun. It's your meal, so make it your own! To keep your pesto shrimp flatbreads fresh, place them in an airtight container. Make sure they cool completely before sealing. This helps to keep them from getting soggy. Store the container in the fridge. Leftovers can last for 2 to 3 days. If you want to enjoy them later, avoid stacking the flatbreads. This can cause them to stick together. When you're ready to eat your leftovers, preheat your oven to 350°F (175°C). Place the flatbreads on a baking sheet. Heat them for about 10 minutes. This will help restore the crispiness of the flatbreads. You can also use a skillet. Heat over medium heat for about 4-5 minutes. This method warms them evenly while keeping the texture perfect. You can freeze the assembled flatbreads if you want to prepare them ahead of time. Wrap each flatbread tightly in plastic wrap. Then place them in a freezer bag. This prevents freezer burn. They can last up to 2 months in the freezer. If you have leftover cooked shrimp, you can freeze them too. Store the shrimp in a sealed container. They can stay fresh for up to 3 months. Yes, you can use frozen shrimp. To prepare them, first thaw the shrimp in cold water. Place the shrimp in a bowl and cover it with cold water. Let them sit for about 15-20 minutes. Once thawed, drain the water and pat the shrimp dry with a paper towel. This step helps remove excess moisture, ensuring they cook well. Season them with olive oil, salt, and pepper before cooking. Making homemade basil pesto is easy. Here’s a quick recipe to try: - 2 cups fresh basil leaves - 1/2 cup olive oil - 1/4 cup pine nuts (or walnuts) - 2 cloves garlic - 1/2 cup grated Parmesan cheese - Salt, to taste In a food processor, add basil, nuts, and garlic. Pulse until finely chopped. While blending, slowly pour in olive oil until smooth. Add Parmesan and salt. Blend again until combined. Store in a jar and use it for your flatbread! Great sides for pesto shrimp flatbread include: - A simple green salad with lemon vinaigrette - Roasted vegetables like zucchini or bell peppers - A light pasta dish tossed in olive oil and garlic - Garlic bread for extra flavor These sides balance the dish and enhance your meal! This post covered how to make delicious shrimp flatbreads. We went through fresh shrimp, tasty pesto, and simple toppings like cheese and tomatoes. I shared step-by-step cooking tips and various ways to mix up the recipe, like using chicken or tofu. Remember to store leftovers properly and reheat them for the best flavor. I hope you feel inspired to try this fun, tasty dish. Enjoy making your own shrimp flatbreads and get creative with the toppings!

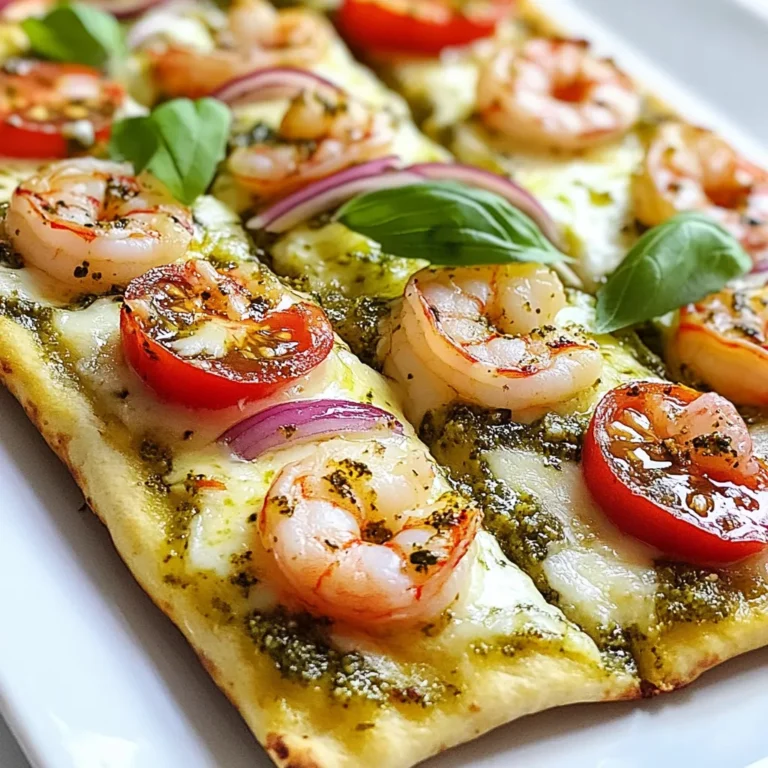
Pesto Shrimp Flatbread Flavorful and Easy Recipe

- 2 boneless, skinless chicken breasts, cut into bite-sized pieces - 1 tablespoon olive oil - 1 small onion, diced - 2 cloves garlic, minced - 1 red bell pepper, sliced - 1 yellow bell pepper, sliced - 1 cup fresh pineapple, diced (or canned, drained) - 1/2 cup coconut milk - 2 tablespoons soy sauce (or tamari for gluten-free) - 1 tablespoon fresh ginger, grated When I make Tropical Pineapple Chicken Skillet, I focus on fresh ingredients. The chicken adds protein and heartiness to the dish. I prefer boneless and skinless chicken breasts for quick cooking. These pieces become tender and juicy when cooked right. Olive oil is my go-to for sautéing. It adds a lovely flavor and helps prevent sticking. I always use a small onion, diced finely, to build a great base. Garlic and ginger follow, bringing warmth and zest to the dish. Bell peppers give the meal a pop of color and crunch. I like using both red and yellow peppers. They also add sweetness, balancing the dish. Fresh pineapple is a must; it gives a tropical taste. If fresh isn't an option, canned works in a pinch. Coconut milk adds creaminess and richness. It blends well with the soy sauce, enhancing the flavor profile. Together, these ingredients create a delightful and easy weeknight meal. - Salt and pepper - 2 green onions, sliced (for garnish) - Fresh cilantro leaves I always season with salt and pepper. This step is key for bringing out the flavors. I like to add green onions as a garnish. Their bright taste adds freshness to the dish. Fresh cilantro leaves give a nice herbal touch. They make the dish look pretty too. These simple garnishes add extra flavor and color. Enjoy your Tropical Pineapple Chicken Skillet hot and fresh! {{ingredient_image_1}} To brown the chicken, heat olive oil in a large skillet. Add the chicken pieces. Season with salt and pepper. Cook for 5-6 minutes until they turn golden brown and cook through. This browning adds flavor to your dish. Now, let’s sauté the onion, garlic, and ginger. In the same skillet, add diced onion. Cook for 2-3 minutes until soft. Then, add the minced garlic and grated ginger. Cook for 1 more minute. This step makes your kitchen smell amazing! Next, add the sliced red and yellow bell peppers. Sauté them for 4-5 minutes until they start to soften. Finally, add the diced pineapple and stir. Cook everything for an extra 2 minutes to blend the flavors. Pour in the coconut milk and soy sauce. Stir well to mix all the ingredients. This combination gives a rich, creamy taste. Bring it to a gentle simmer. This means you should see small bubbles. Let it cook for 3-4 minutes. After that, return the cooked chicken to the skillet. Stir everything together and heat for another 2 minutes. Taste and adjust seasoning with more salt or pepper if needed. Enjoy your Tropical Pineapple Chicken Skillet! To get the best chicken texture, start with bite-sized pieces. This helps them cook evenly. Use medium-high heat to quickly brown the chicken. It keeps the juices inside. Cook the chicken for 5-6 minutes. Ensure it's golden on all sides. After cooking, set the chicken aside to rest. This prevents it from drying out. For sautéing vegetables, heat your skillet before adding oil. I like to use olive oil for flavor. Add onions first, cooking for 2-3 minutes. Once they soften, add garlic and ginger. Cook for one more minute to wake up the flavors. Next, add your bell peppers. Sauté them for 4-5 minutes. You want them tender but still bright. To make your dish even better, think about extra spices. A pinch of red pepper flakes can add heat. A dash of curry powder gives it a warm flavor. You could also use fresh herbs like basil. They bring a fresh taste that shines. Always adjust the seasoning to your liking. Start with salt and pepper, but taste as you go. If it lacks flavor, add more soy sauce or coconut milk. A little sweetness from the pineapple can balance saltiness. Trust your taste buds; they guide you to the best flavor! Pro Tips Use Fresh Ingredients: Whenever possible, opt for fresh pineapple and vegetables to enhance the flavor and texture of your dish. Adjust the Sweetness: If you prefer a sweeter dish, you can add a bit of honey or brown sugar to balance the flavors of the pineapple and coconut milk. Marinate the Chicken: For even more flavor, consider marinating the chicken in soy sauce and ginger for 30 minutes before cooking. Serve with Rice: This dish pairs perfectly with jasmine rice or coconut rice to soak up the delicious sauce. {{image_2}} You can swap chicken for shrimp or tofu. Shrimp cooks fast and adds a nice bite. Cut shrimp into medium pieces. Sauté them for about 3-4 minutes until pink. Tofu is great for a meatless option. Use firm tofu, drain, and press it for better texture. Cut tofu into cubes and brown in oil. Cook it for about 5-6 minutes until golden. Both choices work well with the sweet pineapple and creamy coconut. Want to mix it up? Try adding mango or papaya. These fruits bring more sweetness and flavor. Just dice them and add with the pineapple. You can also use different coconut milk types. Light coconut milk lowers fat but keeps flavor. Or try flavored coconut milk for a twist. Each fruit and milk choice gives a unique taste to the dish. If you need gluten-free options, use tamari instead of soy sauce. Tamari has a similar taste but is gluten-free. For low-carb diets, skip the pineapple or use less. You can add more veggies like zucchini or broccoli instead. These options keep the meal tasty without extra carbs. Enjoy a delicious meal that fits your needs! To keep your Tropical Pineapple Chicken Skillet fresh, store it in the fridge. First, let it cool down. Then, place it in an airtight container. This helps keep the flavors intact. You can also use a glass container or a plastic one with a tight lid. Make sure to consume leftovers within three to four days for the best taste. When it's time to enjoy your leftovers, reheating them right is key. The best method is to use a skillet over medium heat. This helps keep the chicken juicy and the veggies crisp. Stir it often to heat evenly. If you prefer the microwave, use a microwave-safe dish. Cover it to trap steam and heat it in short bursts. Check often to avoid overcooking. This way, you keep the dish delicious and flavorful! Yes, you can use frozen chicken or vegetables. If using frozen chicken, cut it into smaller pieces. This helps it cook evenly. Start by cooking the chicken for a few extra minutes. You want to ensure it reaches 165°F. For frozen vegetables, add them after the onions and garlic. Cook until they are tender. This method keeps the dish tasty and fresh. If you lack coconut milk, don't worry. You can use milk or almond milk as substitutes. They will change the flavor, but the dish will still be good. You can also mix in some shredded coconut for a tropical taste. If you want a creamier texture, add a little cream cheese. This keeps the dish rich and flavorful. To make this dish vegetarian, swap out the chicken for tofu or chickpeas. You can cube firm tofu and cook it like the chicken. This gives a nice texture. If using chickpeas, drain and rinse them before adding to the skillet. Use vegetable broth instead of chicken broth for more flavor. You can also add more veggies for a colorful meal. In this blog post, I covered a tasty chicken dish with simple steps. You learned about the essential ingredients, cooking techniques, and flavor combinations. I also shared tips for variations, storage, and answers to common questions. Whether you're a beginner or an expert, these ideas help you create a delicious meal. Keep exploring new flavors and techniques to make your cooking fun and rewarding. Enjoy your time in the kitchen!

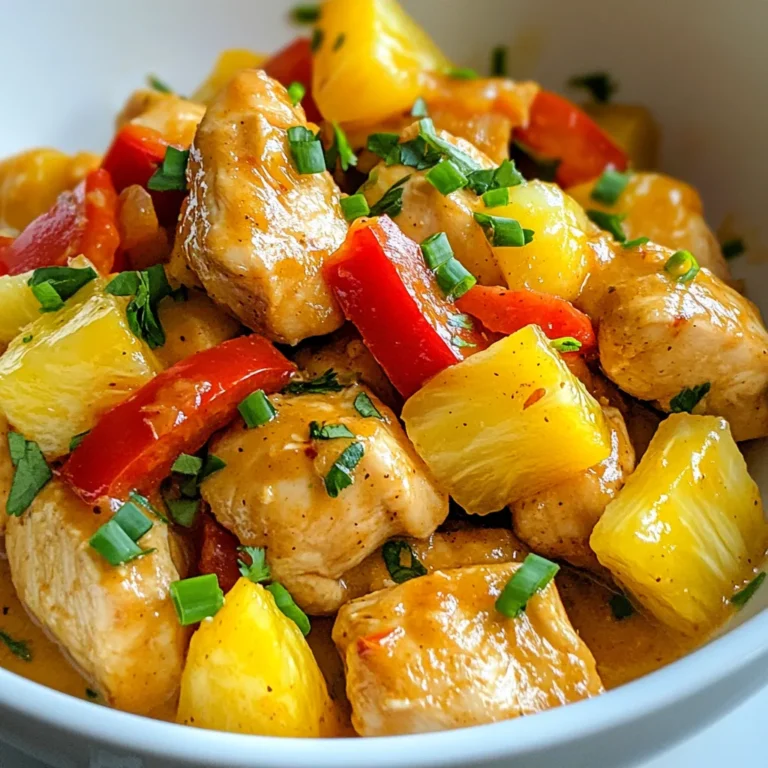
Tropical Pineapple Chicken Skillet Easy Weeknight Meal

- 200g egg noodles - 2 boneless, skinless chicken breasts, sliced thinly - 1 red bell pepper, julienned - 1 cup broccoli florets - 1 cup snow peas In this dish, egg noodles serve as the base. They soak up all the tasty sauce. Chicken breasts add protein and heartiness. Vegetables like bell pepper, broccoli, and snow peas bring color and crunch. Together, they make a satisfying meal. - 2 tablespoons sesame oil - 3 tablespoons soy sauce (low-sodium recommended) - 2 tablespoons honey - 1 tablespoon rice vinegar - 2 garlic cloves, minced - 1 tablespoon fresh ginger, grated Flavor is key! Sesame oil adds a nutty taste. Soy sauce provides saltiness and depth. Honey gives a hint of sweetness, while rice vinegar brightens everything up. Garlic and ginger give a warm, fragrant kick that makes this dish special. - 1 tablespoon sesame seeds - Fresh cilantro, chopped (for garnish) - Sliced green onions (for garnish) Garnishes make your dish look great and add flavor. Sesame seeds add crunch. Fresh cilantro brings a pop of green and freshness. Sliced green onions provide a mild bite. With these toppings, your dish will be a feast for the eyes as well as the belly! {{ingredient_image_1}} First, cook the egg noodles according to the package instructions. This usually takes around 5-7 minutes. Once done, drain them well. To keep them from sticking, drizzle a little sesame oil over the noodles and toss gently. This adds flavor and helps them stay loose. Next, heat the vegetable oil in a large skillet over medium-high heat. Add the thinly sliced chicken breasts to the hot oil. Season with a pinch of salt. Cook the chicken for about 5-7 minutes until it turns golden brown and is no longer pink inside. Once cooked, remove the chicken from the skillet and set it aside. In the same skillet, add a splash of sesame oil. Then, toss in the minced garlic and grated ginger. Sauté for 1-2 minutes until the kitchen smells amazing. Be careful not to let the garlic burn! Next, add the red bell pepper, broccoli florets, and snow peas. Stir-fry these colorful veggies for about 4-5 minutes until they are tender but still crisp. Now, it's time to bring everything together. In a small bowl, mix the soy sauce, honey, and rice vinegar. Pour this tasty sauce over the sautéed vegetables and stir well to coat. Finally, add the cooked chicken and noodles back into the skillet. Toss everything together gently. Heat for about 2-3 minutes until everything is warm. This makes a delightful meal packed with flavor! To get juicy chicken, cook it for 5 to 7 minutes. Use medium-high heat to brown it well. Always check that it's no longer pink in the center. To avoid overcooking, remove the chicken from the skillet once it reaches 165°F. Let it rest for a few minutes before slicing it. This keeps the juices in. Choose a large skillet or wok. This helps the food cook evenly. Heat the oil until it shimmers but does not smoke. Add the chicken in a single layer. This helps it brown nicely. Stir often to avoid burning. Once you add veggies, keep them moving. This way, they stay tender-crisp and colorful. Want some heat? Add red pepper flakes or sliced jalapeños to the mix. They bring a nice kick. You can also add a splash of sriracha for more spice. For deeper flavor, try adding oyster sauce or hoisin sauce. These make your dish even richer. Experiment with sesame oil too. A little drizzle at the end boosts the taste. Pro Tips Perfectly Cooked Noodles: To ensure your egg noodles are perfectly cooked, follow the package instructions closely and avoid overcooking. Rinse them under cold water after draining to stop the cooking process. Marinade for Flavor: For extra flavor, consider marinating the chicken in a mixture of soy sauce, garlic, and ginger for at least 30 minutes before cooking. This will enhance the overall taste of your dish. Veggie Variations: Feel free to mix and match your vegetables! Broccoli, snow peas, and red bell pepper are great, but you can also use carrots, snap peas, or bok choy for a colorful twist. Garnish for Freshness: Don't skip the garnishes! Fresh cilantro and sliced green onions add a burst of freshness and color to your dish, making it visually appealing and delicious. {{image_2}} You can switch the chicken with tofu or shrimp for a new taste. Tofu adds a nice texture and absorbs flavors well. If you prefer shrimp, use large ones for a hearty bite. Simply sauté them until they turn pink. You can also use other poultry like turkey or duck. Just keep the cooking time similar to chicken. Seasonal veggies can change the dish's flavor. Try bell peppers, zucchini, or snap peas. They add color and nutrients. For extra crunch, toss in some nuts like cashews or almonds. This adds a nice surprise and a healthy twist. If you want a gluten-free option, use rice noodles. They cook quickly and soak up the sauce nicely. Simply follow the package instructions. You can also try whole wheat noodles for added nutrition. They have a chewier texture and a nutty taste. To keep your sesame ginger chicken noodles fresh, put them in an airtight container. This helps prevent any strong smells from other foods in your fridge. Store the leftovers in the fridge and eat them within 3 days for the best taste and safety. You can reheat your noodles in two ways: the microwave or stovetop. For the microwave, place the noodles in a bowl and cover it with a damp paper towel. Heat in 30-second intervals, stirring in between, until warm. For stovetop, heat a skillet over medium heat. Add a splash of water or sesame oil, then stir in the noodles until heated through. This helps keep the texture soft and tasty. If you want to freeze your sesame ginger chicken noodles, let them cool first. Then, put them in a freezer-safe container. Be sure to remove as much air as possible to avoid freezer burn. You can freeze the dish for up to 2 months. When you are ready to eat, thaw it overnight in the fridge. Reheat in the microwave or on the stovetop as described above. This way, your noodles will taste almost as fresh as when you first made them! Yes, you can use other noodles. Some great substitutes include rice noodles, udon, or soba noodles. Each type has its own cooking time, so check the package. Rice noodles cook quickly, usually in 3-5 minutes. Udon noodles take about 8-10 minutes, while soba noodles need around 4-6 minutes. Adjust your cooking time based on the noodles you choose. This dish works well for meal prep. You can cook the chicken and veggies in advance. Store them in airtight containers. You can also cook the noodles ahead. Just remember to toss them with a little sesame oil. This keeps them from sticking. For storage, keep the meal in the fridge for up to 3 days. To spice it up, add red pepper flakes or sriracha. Start with a small amount and taste as you go. You can also use fresh chili peppers for a fresh kick. Just chop them finely and stir them in with the other ingredients. Adjust according to your spice level preference. This blog post covered how to make a delicious stir-fry dish. We discussed main ingredients, like egg noodles and chicken, and flavoring with sesame oil and soy sauce. You learned step-by-step cooking methods and tips for perfect results. The variations section gave ideas for different proteins and vegetables. Finally, we shared storage tips to keep your meal fresh. Cooking can be fun and simple; enjoy experimenting with your favorite flavors and ingredients!

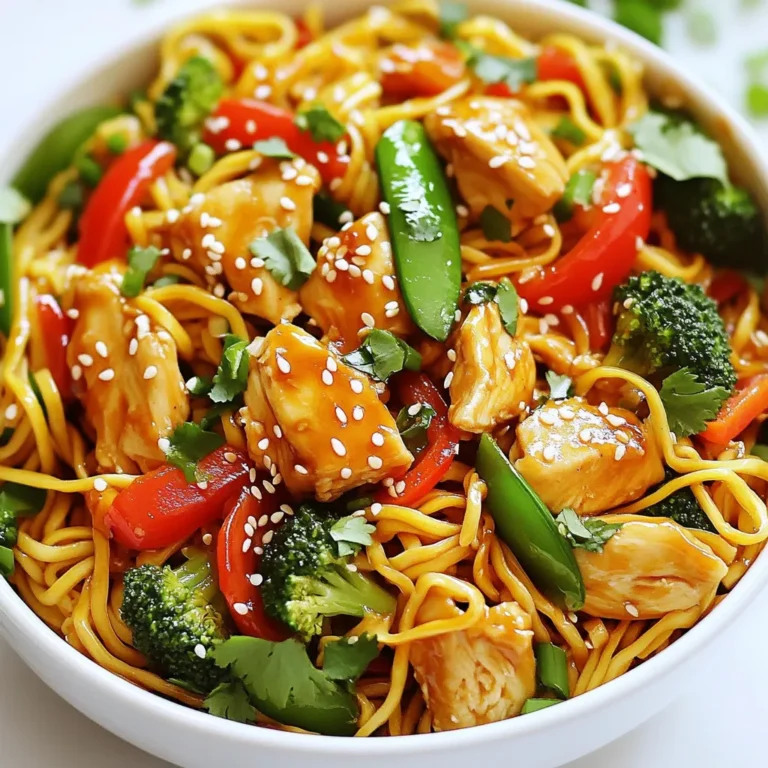
Savory Sesame Ginger Chicken Noodles Delight

- 1 cup couscous - 1 ¼ cups vegetable broth - 1 cup cherry tomatoes, halved - 1 cucumber, diced - ½ red bell pepper, diced - ½ cup red onion, finely chopped - ¼ cup fresh parsley, chopped - ¼ cup fresh mint, chopped - 1 lemon, juiced and zested - 3 tablespoons olive oil - Salt and pepper to taste - Feta cheese crumbles (optional) To make the Lemon Herb Couscous Salad, you need a few key ingredients. First, you start with couscous. Couscous is a small pasta made from wheat. It cooks quickly and has a light texture. You will also need vegetable broth to cook the couscous. The broth adds flavor and richness. Next, gather fresh vegetables. You need cherry tomatoes, cucumber, red bell pepper, and red onion. The bright colors and crunch add great texture. Then, add fresh herbs like parsley and mint. These herbs bring a fresh taste that makes the salad shine. You will also need lemon juice and zest. The lemon gives the salad a bright, zesty flavor. Olive oil is a must for dressing. It ties all the flavors together. Finally, season with salt and pepper to taste. If you want to add creaminess, consider feta cheese crumbles. They are optional but delicious. With these ingredients, you can create a fresh and flavorful salad. It’s easy to prepare and perfect for any meal! {{ingredient_image_1}} 1. Start by boiling 1 ¼ cups of vegetable broth in a medium saucepan. 2. Once the broth is bubbling, stir in 1 cup of couscous. 3. Remove the pot from heat, cover it, and let it sit for about 5 minutes. 4. After 5 minutes, fluff the couscous with a fork and set it aside to cool completely. 1. While the couscous cools, chop and dice the fresh vegetables. 2. Use 1 cup of cherry tomatoes, 1 diced cucumber, and ½ red bell pepper. 3. Finely chop ½ cup of red onion. 4. Mix all the vegetables in a large bowl for a colorful base. 1. In a small bowl, whisk together the juice and zest of 1 lemon. 2. Add 3 tablespoons of olive oil, salt, and pepper to taste. 3. Mix until the dressing is well combined. 4. Pour the dressing over the couscous salad and gently toss everything together. 1. Fold in ¼ cup of fresh parsley and ¼ cup of fresh mint. 2. If you like, sprinkle some feta cheese crumbles on top for extra flavor. 3. Serve this salad chilled or at room temperature for the best taste. To boost flavor, try adding spices like cumin or paprika. A sprinkle of these can add warmth. You can also adjust the acidity by adding more lemon juice. This makes the salad brighter and fresher. Serve this salad chilled or at room temperature. Both options keep it tasty. Pair it with grilled chicken or fish for a full meal. You can enjoy it as a light lunch or a side dish. Garnish with extra parsley or mint for a pop of color. Serve in individual bowls for a nice touch. If you use a large salad platter, it looks inviting for sharing. A sprinkle of feta on top adds charm and flavor. Pro Tips Fresh Herbs for Flavor: Use fresh parsley and mint for a vibrant taste; dried herbs won't give the same fresh flavor. Chill Before Serving: Allow the salad to chill in the fridge for at least 30 minutes to enhance the flavors and serve it cold. Customize Your Veggies: Feel free to add or substitute other vegetables like bell peppers or olives to suit your taste. Perfectly Cooked Couscous: Ensure the couscous is fluffed and cooled completely before mixing with other ingredients to avoid mushiness. {{image_2}} You can swap couscous for other grains like quinoa, farro, or bulgur. These grains add different textures and flavors. You can also use a mix of vegetables. Try adding bell peppers, carrots, or even zucchini. Feel free to get creative! Each vegetable brings its own taste and crunch. To make this salad vegan, just leave out the feta cheese. You can also use a vegan dressing. For a gluten-free option, choose gluten-free grains. Adding protein helps make this salad heartier. Chickpeas or grilled chicken work great. They add protein and make the dish more filling. Adjust your ingredients based on what's in season. In summer, use fresh corn or ripe peaches. In fall, add roasted butternut squash or apples. For festive occasions, you can sprinkle pomegranate seeds or chopped nuts. These changes will keep the dish exciting and fresh all year round! To keep your Lemon Herb Couscous Salad fresh, use airtight containers. Glass or plastic containers work well. Store the salad in the fridge for up to three days. If you notice any extra moisture, drain it before sealing the container. This helps keep the salad crisp. You may not need to reheat this salad, as it tastes best chilled or at room temperature. If you prefer warm couscous, use the microwave. Heat it in short bursts, stirring in between. This helps maintain the texture and flavor of the salad. Freezing couscous salad is not the best option. The texture may change once thawed. If you want to freeze it, omit the fresh herbs and veggies first. Store the couscous in a freezer-safe bag. When ready to eat, thaw it overnight in the fridge. Add fresh herbs and veggies before serving for the best taste. You can store Lemon Herb Couscous Salad in the fridge for up to three days. Make sure to keep it in an airtight container. The flavors will deepen as it sits, but the veggies will be best fresh. Yes, you can prepare this salad ahead of time. Make it a day before serving for great taste. Just add the herbs and feta right before serving to keep them fresh. You can use many herbs in this salad. Try basil, cilantro, or dill for a twist. Each will bring its unique flavor, making your dish even more exciting. No, couscous is not gluten-free. It is made from wheat. If you need a gluten-free option, try quinoa or rice instead. Both of these grains work well in this salad. Add protein to make the salad more filling. Grilled chicken, chickpeas, or beans work well. You can also mix in avocado for creaminess and healthy fats. This blog post outlined a simple and tasty lemon herb couscous salad. We covered the ingredients, step-by-step instructions, and helpful tips to make it shine. You learned about ingredient swaps, dietary adaptations, and smart storage tips. With this fresh dish, you can impress and enjoy healthy meals. Whether you’re cooking for a crowd or just for yourself, this salad is easy to prepare. Use fresh herbs and vibrant veggies to make it yours. Embrace your creativity and make this recipe fit your style!

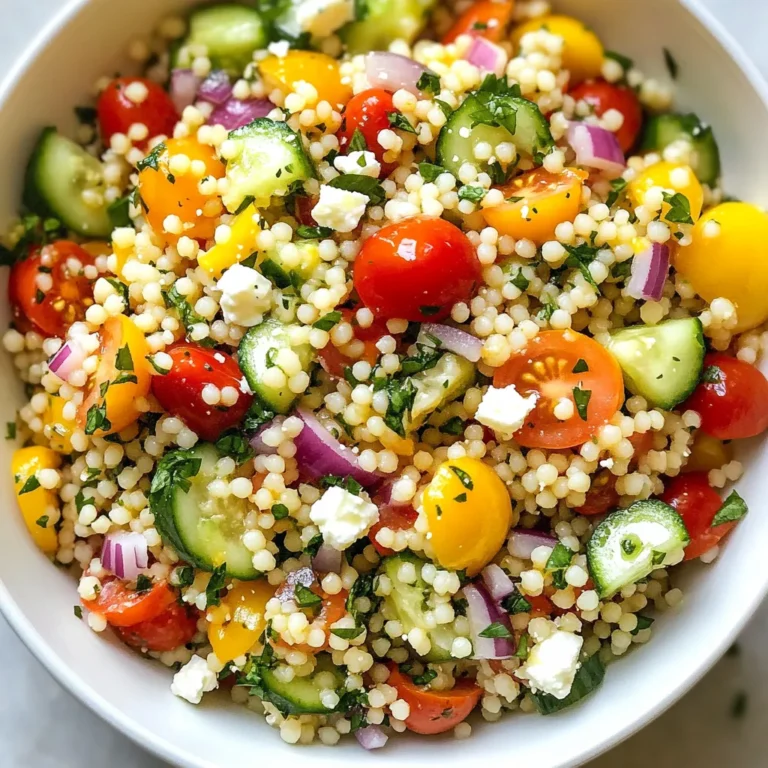
Lemon Herb Couscous Salad Fresh and Flavorful Delight

- 4 chicken thighs, bone-in and skin-on - 3 tablespoons honey - 2 tablespoons Dijon mustard - 1 tablespoon whole grain mustard - 2 cloves garlic, minced - 1 tablespoon olive oil - 1 teaspoon dried thyme - Salt and pepper to taste - Fresh parsley for garnish (optional) - Baking dish - Whisk - Measuring spoons Gathering the right ingredients is key to making great honey mustard chicken thighs. Start with four chicken thighs. I prefer using bone-in and skin-on for the best flavor and texture. You will need three tablespoons of honey for sweetness. For tanginess, add two tablespoons of Dijon mustard and one tablespoon of whole grain mustard. Next, you will need two cloves of garlic, minced, to boost the flavor. A tablespoon of olive oil helps blend the ingredients. Add a teaspoon of dried thyme for a herby note. Finally, season with salt and pepper to taste. If you like, you can garnish with fresh parsley to add a pop of color. Make sure you have a baking dish, a whisk, and measuring spoons on hand. These tools will help you mix and bake this tasty dish. {{ingredient_image_1}} Set your oven to 400°F (200°C). This heat will help the chicken cook evenly and get crispy. In a medium bowl, whisk together: - 3 tablespoons honey - 2 tablespoons Dijon mustard - 1 tablespoon whole grain mustard - 2 cloves garlic, minced - 1 tablespoon olive oil - 1 teaspoon dried thyme - Salt and pepper to taste Mix until smooth. This marinade gives the chicken a sweet and tangy flavor. First, pat the chicken thighs dry with paper towels. This step is key for crispy skin. Next, place the chicken in your baking dish. Pour the marinade over the chicken. Use a brush or your hands to rub it all over the thighs. Make sure every part is coated well. Now, place the chicken in the oven. Bake for 35-40 minutes. The chicken is ready when it reaches an internal temperature of 165°F (74°C). For extra crispiness, you can broil on high for the last 2-3 minutes. Watch it closely to avoid burning. After baking, let the chicken rest for about 5 minutes. This helps keep it juicy. If you like, garnish with fresh parsley before serving. Enjoy your tasty honey mustard chicken thighs with your favorite sides! To get crispy skin on chicken thighs, start by patting them dry with paper towels. This step is key. Moisture makes it hard for the skin to crisp up. Next, if you want extra crunch, broil the chicken for the last 2-3 minutes of cooking. Keep a close watch to avoid burning. You can boost flavor by adding herbs or spices. Consider using rosemary or paprika for a tasty twist. You might also try adding a splash of lemon juice for brightness. For sides, roasted veggies or a fresh salad pair well. You can even serve it with rice or mashed potatoes to soak up the sauce. One big mistake is overcooking the chicken. Always use a meat thermometer to check for doneness. The chicken should reach an internal temperature of 165°F (74°C). Another mistake is skipping the resting period. Let the chicken rest for 5 minutes after baking. This helps the juices settle, making your chicken juicy and tender. Pro Tips Pat the Chicken Dry: Make sure to pat the chicken thighs dry with paper towels before marinating. This helps achieve a crispy skin when baked. Mix Mustards for Depth: Combining Dijon and whole grain mustard provides a balanced flavor profile, enhancing the overall taste of the dish. Use Fresh Herbs: If possible, use fresh thyme instead of dried for a more vibrant flavor. Fresh herbs can elevate the dish significantly. Rest Before Serving: Allow the chicken to rest for a few minutes after baking. This helps the juices redistribute, ensuring a moist and flavorful bite. {{image_2}} You can change the mustard for a unique taste. Try using spicy mustard for a kick. It adds heat and flavor to the chicken. If you want a different texture, go for whole grain mustard. This brings a nice crunch to every bite. If you want to switch things up, try maple syrup or agave nectar. These sweeteners work well in place of honey. They add a different flavor while keeping the dish sweet. Each option changes the taste just a bit. You can make this dish even better by adding veggies. Chop up some carrots or bell peppers. Add them to the baking dish with the chicken. They soak up the sauce and taste great. Another tip is to marinate the chicken overnight. This lets the flavors deepen. The chicken will be more flavorful and tender. To store leftover honey mustard chicken thighs, first let them cool to room temperature. Place the chicken in an airtight container. Make sure to cover it well. Store it in the fridge for up to three days. This keeps the chicken safe and fresh. If you want to keep it longer, freezing is a great option. For reheating, the oven works best. Preheat your oven to 350°F (175°C). Place the chicken thighs on a baking sheet. Cover them with foil to keep them moist. Heat for about 15 to 20 minutes. You want the internal temperature to reach 165°F (74°C). If you want crispy skin, remove the foil for the last five minutes. To freeze honey mustard chicken thighs, wrap each piece tightly in plastic wrap. Then place them in a freezer-safe bag. Be sure to remove as much air as possible. Label the bag with the date. These can be frozen for up to three months. When you're ready to eat, thaw them in the fridge overnight before reheating. This method keeps the chicken juicy and tasty. It takes about 35-40 minutes to cook honey mustard chicken thighs. You should bake them at 400°F (200°C). The chicken is ready when it reaches an internal temperature of 165°F (74°C). You can check this with a meat thermometer. For extra crispiness, you may broil them for 2-3 minutes at the end. Yes, you can use boneless chicken thighs. They will cook faster than bone-in thighs. Check the chicken after about 25-30 minutes to ensure they are fully cooked. The internal temperature should still reach 165°F (74°C). Adjusting the cooking time helps you avoid dry chicken. Honey mustard chicken thighs pair well with many sides. Here are some great options: - Roasted vegetables like carrots or broccoli - Mashed potatoes for a creamy touch - A fresh green salad for crunch - Rice or quinoa for a hearty base - Garlic bread to soak up the sauce These sides make a complete meal that everyone will love. This guide covered a simple and tasty recipe for honey mustard chicken thighs. We explored the key ingredients, tools, and step-by-step instructions to make it easy. I shared tips for crispiness and flavor options. Remember to let the chicken rest for the best taste. Feel free to try different mustards or add veggies. Your meal can be great whether you cook for yourself or share with others. Enjoy your cooking and the delicious results!

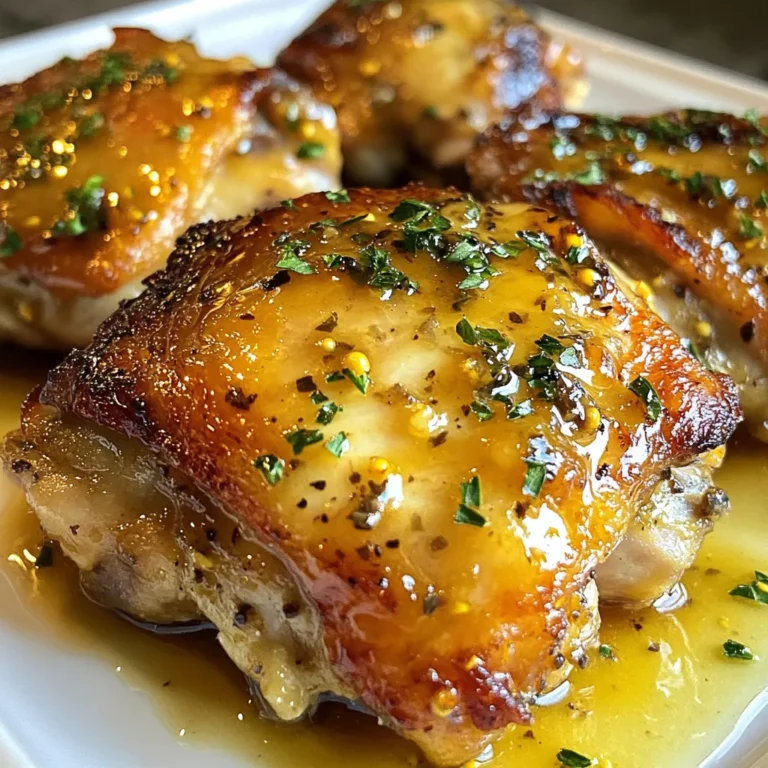
Honey Mustard Chicken Thighs Simple and Tasty Recipe

PREV 1 … 52 53 54 … 57 NEXT
flavor nest kitchen

explore

DessertsDinnerAppetizersDrinks

Our Policies

  • Cookie Policy
  • Copyright Policy
  • Disclaimer
  • GDPR Policy
  • Terms Of Use
Back to Top
  • About
  • Contact Us
  • Privacy Policy
© 2025 flavor nest kitchen