FREE DINNER EBOOK! Get your copy!
  • Cookie Policy
  • GDPR Policy
  • Disclaimer
  • Terms Of Use
  • Visit my other site: Fun Cookie Recipes
flavor nest kitchen
  • Home
  • Dinner
  • Desserts
  • Drinks
  • Appetizers
  • Contact
  • About
  • Privacy Policy
  • Home
  • Dinner
  • Desserts
  • Drinks
  • Appetizers
  • Contact
  • About
  • Privacy Policy
  • Cookie Policy
  • GDPR Policy
  • Disclaimer
  • Terms Of Use
Visit my other site: Fun Cookie Recipes

HOME / CATEGORIES /

Latest

To make a tasty creamy spinach tortellini soup, you will need: - 2 tablespoons olive oil - 1 medium onion, diced - 3 cloves garlic, minced - 4 cups vegetable broth - 1 package (9 oz) cheese tortellini - 2 cups fresh spinach, chopped - 1 cup heavy cream - 1 teaspoon Italian seasoning - Salt and pepper to taste - Fresh parsley, chopped (for garnish) These ingredients create a rich and flavorful soup. The cheese tortellini adds a nice texture, while the spinach gives it a fresh taste. If you have dietary needs, there are easy swaps you can make: - Use gluten-free tortellini for a gluten-free option. - Swap heavy cream for coconut milk for a dairy-free soup. - Try vegetable broth made from homemade stock for more flavor. These substitutions keep the soup delicious while fitting your diet. You will need a few basic tools to prepare this soup: - Large pot for cooking - Wooden spoon for stirring - Knife and cutting board for chopping - Measuring cups and spoons Having these tools ready makes cooking smooth and easy. Enjoy your cooking journey! {{ingredient_image_1}} To make creamy spinach tortellini soup, start by heating olive oil in a large pot. Use medium heat. Add your diced onion and sauté it for about five minutes. Wait until the onion is soft and clear. Then, add minced garlic and cook for one more minute. You want it to smell great! Next, pour in four cups of vegetable broth. Bring the broth to a boil. Add the cheese tortellini to the pot. Cook it as the package says, which is usually around three to four minutes. Once the tortellini is done, lower the heat. Stir in two cups of fresh spinach and one cup of heavy cream. Season the soup with one teaspoon of Italian seasoning. Add salt and pepper to taste. Mix it all well. Let it simmer for two to three more minutes. This will warm everything and blend the flavors. Taste your soup and adjust the seasoning if needed. Keep an eye on the tortellini while it cooks. Overcooking can make it mushy. Once it floats, it usually means it’s cooked. After adding spinach, just let it wilt. This takes only a minute. When you add the heavy cream, stir gently. You want it mixed well, but don’t boil it again. This keeps the cream smooth and tasty. If your soup is too thick, add a little more broth or water. Stir well to mix. If it's too thin, let it simmer longer. This helps it thicken up. If you find the soup bland, add more salt or Italian seasoning. Taste as you go to avoid overdoing it. Lastly, if the spinach looks wilted but not cooked, that's fine. It adds flavor and color. Enjoy your creamy spinach tortellini soup! To make your soup pop, use fresh herbs. Basil and thyme add fresh notes. Italian seasoning brings warmth and depth. Add salt and pepper to taste. Taste as you go. This way, you can find the perfect balance. For a rich texture, use heavy cream. It gives the soup a smooth mouthfeel. Stir in the cream gently after cooking the tortellini. This keeps it creamy without curdling. If you want a lighter option, try half-and-half or coconut milk. Serve the soup in warm bowls. This keeps it hot longer. Top with fresh parsley for color and flavor. A slice of crusty bread is great for dipping. Try pairing it with a simple salad for a complete meal. Pro Tips Use Fresh Ingredients: Fresh spinach and high-quality cheese tortellini will enhance the flavor and texture of your soup. Adjust Creaminess: For a lighter soup, you can substitute half-and-half or milk for the heavy cream, adjusting the richness to your preference. Flavor Boost: Add a squeeze of lemon juice just before serving for a fresh, zesty flavor that complements the creaminess. Make It Ahead: This soup can be made ahead of time; just add the spinach and cream just before serving to maintain freshness. {{image_2}} You can swap some ingredients to change the flavor. For a bolder taste, add sun-dried tomatoes. They bring a sweet and tangy flavor. You can also use different greens like kale or Swiss chard. Each green adds its own taste. If you want a spicy kick, mix in some red pepper flakes. This small change can transform your soup. To make this soup vegan, replace the cheese tortellini with a plant-based version. Use coconut milk instead of heavy cream. It adds creaminess and a hint of sweetness. You can also use vegetable broth for depth. Don't forget to check the labels to ensure all ingredients are vegan. This version is just as tasty and rich. If you want more protein, add cooked chicken or sausage. You can use shredded rotisserie chicken for ease. Just stir it in before serving. For sausage, cook it first before adding to the pot. It adds a hearty flavor to the soup. This makes the dish more filling and satisfying. To keep your creamy spinach tortellini soup fresh, store it in an airtight container. Allow the soup to cool down before sealing it. This prevents moisture buildup, which can lead to spoilage. Place the container in the fridge. If you plan to eat it later, you can freeze it. When you are ready to enjoy your soup again, reheat it gently. Pour it into a pot over low heat. Stir it often to prevent sticking. You might need to add a splash of broth or cream to keep it creamy. Heat until hot, but do not boil it. In the fridge, your soup lasts about 3 to 4 days. If you freeze it, it can last up to 2 to 3 months. To freeze, use a freezer-safe container. Leave some space at the top for expansion. When you want to eat it, thaw it overnight in the fridge before reheating. You can use whole milk or half-and-half for a lighter option. Coconut milk works too, giving a nice flavor. If you want a non-dairy choice, try cashew cream. Blend soaked cashews with water until smooth to get a creamy texture. Yes, you can use frozen tortellini. Just add it directly to the boiling broth. Frozen tortellini may take a minute or two longer to cook, so check the package for exact times. To add some heat, try adding red pepper flakes or a dash of hot sauce. You can also stir in some diced jalapeños for a fresh kick. Adjust the spice to match your taste. Yes, this soup can be made ahead of time. Just store it in the fridge without the cream. When you're ready to eat, heat it and stir in the cream for the best flavor and texture. Fresh parsley adds a nice touch and color. You can also sprinkle grated Parmesan cheese for extra flavor. A swirl of olive oil or a dash of chili oil can make it even better. Enjoy with a slice of crusty bread for dipping! This blog post covered everything you need to make a delicious spinach tortellini soup. We explored essential ingredients, suitable substitutions, and tools you'll need. I provided a step-by-step cooking guide along with tips to enhance flavor and texture. We also discussed variations to try, storage methods, and answered common questions. Enjoy experimenting with your own twists on the recipe. With these insights, you can create a comforting and tasty meal every time.

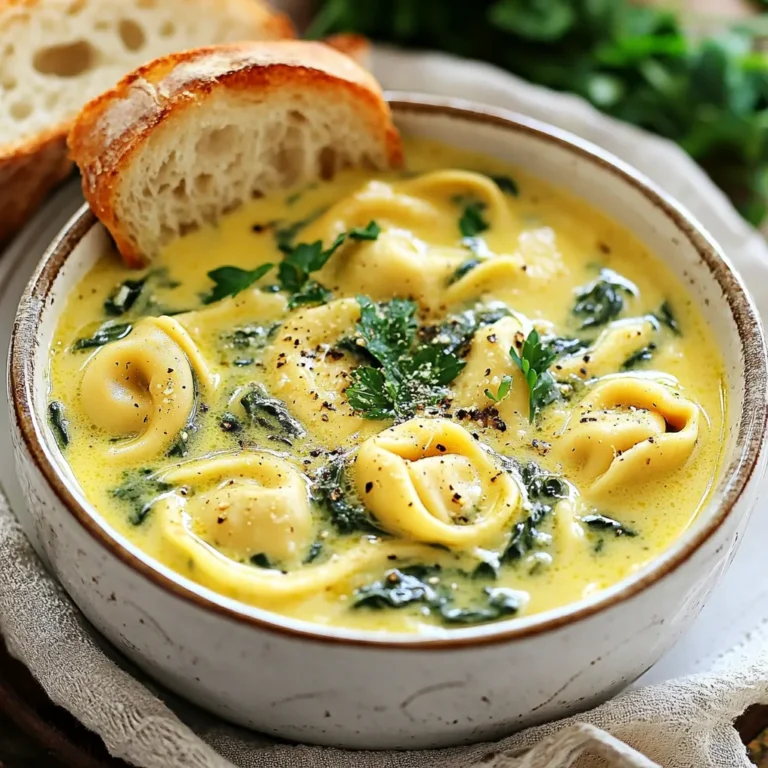
Creamy Spinach Tortellini Soup Simple and Tasty Dish

To make this chili, you need the following main ingredients: - 1 cup quinoa, rinsed and drained - 2 cans (15 oz each) black beans, drained and rinsed - 1 can (14.5 oz) diced tomatoes with green chilies - 1 bell pepper (red or green), diced - 1 medium onion, chopped - 3 cloves garlic, minced - 2 cups vegetable broth - 1 tablespoon chili powder - 1 teaspoon cumin - 1 teaspoon smoked paprika - 1 teaspoon lime juice - Salt and pepper to taste - 1 tablespoon olive oil - Fresh cilantro, chopped for garnish - Avocado slices for topping (optional) These ingredients bring a rich flavor and texture to the dish. Quinoa adds protein and fiber. Black beans give a hearty feel. Diced tomatoes enhance the chili's taste. You can customize your chili with these optional ingredients: - Corn for sweetness - Jalapeño for extra heat - Spinach for greens - Cheese for creaminess Feel free to mix in what you like. This makes each bowl unique and fun. To prepare this chili, gather these kitchen tools: - Large pot for cooking - Cutting board for chopping - Sharp knife for dicing - Measuring cups and spoons for accuracy - Stirring spoon for mixing Having the right tools makes cooking easier and more enjoyable. You’ll create a delicious meal with ease. {{ingredient_image_1}} To start, gather all your ingredients. You will need: - 1 cup quinoa, rinsed and drained - 2 cans (15 oz each) black beans, drained and rinsed - 1 can (14.5 oz) diced tomatoes with green chilies - 1 bell pepper (red or green), diced - 1 medium onion, chopped - 3 cloves garlic, minced - 2 cups vegetable broth - 1 tablespoon chili powder - 1 teaspoon cumin - 1 teaspoon smoked paprika - 1 teaspoon lime juice - Salt and pepper to taste - 1 tablespoon olive oil - Fresh cilantro, chopped for garnish - Avocado slices for topping (optional) Chop the onion and bell pepper. Mince the garlic and rinse the quinoa. This makes cooking easier. In a large pot, heat the olive oil over medium heat. Add the chopped onion and bell pepper. Cook for five minutes until they soften. Then, add the minced garlic. Cook for one more minute until it smells good. Next, stir in the rinsed quinoa and the black beans. Add the diced tomatoes with their juices and the vegetable broth. Then, mix in the chili powder, cumin, smoked paprika, lime juice, salt, and pepper. Stir everything well. Bring the chili to a boil. Once it boils, lower the heat and let it simmer. Cover the pot and cook for 20 to 25 minutes. You want the quinoa to cook fully and the chili to thicken. After cooking, taste it. Adjust the salt and spices if needed. Serve your chili hot. Top it with fresh cilantro for a pop of flavor. If you like, add avocado slices on top for extra creaminess. This dish is great on its own or with some crusty bread. Enjoy your warm and zesty meal! To boost the zest in your chili, start with lime juice. A full tablespoon adds brightness. You can also add zest from the lime for more flavor. For a kick, try adding fresh jalapeños. Sauté them with the onion and bell pepper. Consider using chipotle in adobo sauce for a smoky touch. Just a spoonful brings a nice heat. Another fun idea is to add a splash of apple cider vinegar. This adds a tangy twist that elevates the dish. To save time, rinse your quinoa ahead of time. You can also chop the onion and bell pepper the night before. Store them in the fridge to keep them fresh. Use canned black beans to skip the soaking step. This cuts down on your prep time. If you are in a hurry, you can use pre-minced garlic. It’s a great shortcut, but fresh is always best. Another tip is to cook a big batch. This way, you can enjoy leftovers later. Adjusting spice levels is easy. If you want a milder chili, skip the jalapeños. You can also reduce the chili powder by half. For more heat, add extra chili powder or cayenne pepper. Start with a small amount and taste as you go. This helps you find your perfect balance. If it gets too spicy, add more black beans or quinoa to tone it down. A dollop of sour cream or yogurt can also help cool it off. Pro Tips Rinse the Quinoa: Always rinse quinoa before cooking to remove its natural coating, called saponin, which can make it taste bitter. Customize Your Spices: Feel free to adjust the amount of chili powder and cumin to suit your taste. For more heat, add cayenne pepper or chopped jalapeños. Add More Vegetables: This chili is versatile; you can add extra vegetables like zucchini, corn, or carrots for added nutrition and flavor. Make It Ahead: This chili tastes even better the next day! Make it ahead of time and store it in the fridge for an easy meal prep option. {{image_2}} This Zesty Black Bean Quinoa Chili is already a great choice for vegetarians and vegans. It has no meat, so you can enjoy it guilt-free. The black beans and quinoa give you plenty of protein, making it filling and healthy. If you want to add more veggies, consider adding corn or zucchini. These additions boost nutrition and flavor. You don’t need to worry about gluten with this chili. All the ingredients are gluten-free. Quinoa, black beans, and vegetables are naturally safe for those with gluten issues. Make sure to check your vegetable broth. Some brands may add gluten, so choose a gluten-free option. Feel free to mix things up! You can swap black beans for pinto beans or kidney beans. Each type brings its own taste. If you want more heat, add jalapeños or cayenne pepper. For a sweeter touch, try adding diced sweet potatoes or carrots. You can even change the spices. Add oregano for a more herbal flavor or smoked paprika for extra depth. After enjoying your Zesty Black Bean Quinoa Chili, let it cool down. Pour the chili into an airtight container. Seal it well and store it in the fridge. It will stay fresh for about 3 to 4 days. If you want to keep it longer, consider freezing it. To freeze your chili, use a freezer-safe container or bag. Make sure to leave some space at the top since the chili may expand. Label the container with the date. You can freeze it for up to 3 months. When you’re ready to enjoy it again, just thaw it in the fridge overnight. To reheat your chili, you can use a pot or a microwave. If using a pot, add a splash of water to prevent sticking. Heat it over medium heat until warm. Stir often for even heating. If using a microwave, heat in short bursts, stirring in between. Enjoy your warm chili, as good as the first time! To thicken your chili, you can use a few simple methods. First, cook it longer. Letting it simmer for an extra 10-15 minutes helps. This allows the liquid to reduce. You can also mash some beans with a fork or a potato masher. This adds thickness while keeping the flavor. Another option is to stir in a bit of cornmeal or masa harina. This will give your chili a nice texture. Lastly, if you want to get fancy, blend a portion of the chili smooth. Then mix it back in for a creamy feel. Yes, you can use different beans in this chili. Feel free to swap black beans for kidney or pinto beans. Each type brings its own flavor. Using a mix of beans can add more depth. You can also try chickpeas for a fun twist. Just remember to rinse and drain them well before use. This chili pairs well with many sides. You can serve it with rice or quinoa for a filling meal. Cornbread is another great option. It adds a sweet touch to the spicy chili. You might also enjoy tortilla chips for crunch. Top your chili with sliced avocado or fresh cilantro for extra flair. Don't forget a dollop of sour cream or a sprinkle of cheese if you like. All these options make your meal even more delightful! This blog post outlined key ingredients, steps, and helpful tips for making Zesty Black Bean Quinoa Chili. You learned how to customize your dish and pick the best kitchen tools. Remember to experiment with flavors and adjust spice to match your taste. With smart storage tips, you can enjoy leftovers later. Now you're ready to impress everyone with your cooking skills and create a meal that warms hearts. Enjoy every bite of your chili adventure!

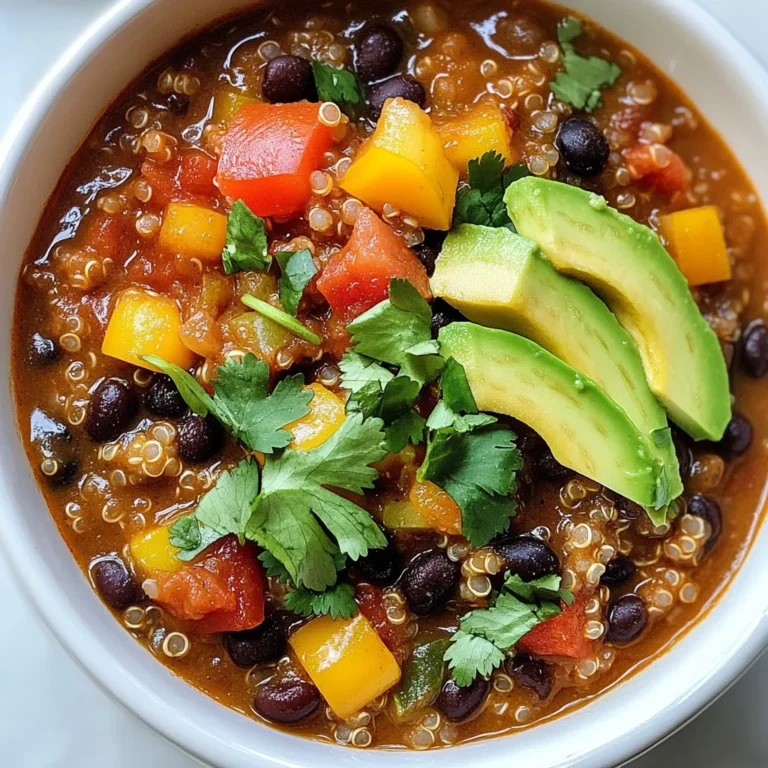
Zesty Black Bean Quinoa Chili Flavorful Comfort Meal

- 2 medium sweet potatoes, peeled and diced - 2 tablespoons olive oil - 1 tablespoon chipotle powder - 8 small corn or flour tortillas These main ingredients create a rich and smoky flavor. Sweet potatoes bring sweetness and texture. Olive oil helps with roasting. Chipotle powder adds heat and depth. Tortillas hold everything together. - Greek yogurt or sour cream - Fresh herbs I love adding Greek yogurt or sour cream on top. They add creaminess and balance the spice. Fresh herbs like cilantro give a burst of freshness. You can mix and match based on your taste. - Baking sheet - Mixing bowl - Skillet You will need a few simple tools. A baking sheet helps roast the sweet potatoes evenly. A mixing bowl is perfect for tossing the sweet potatoes with olive oil and spices. A skillet warms the tortillas quickly. Having these tools ready makes cooking easier and more fun! {{ingredient_image_1}} 1. Preheat oven and prepare sweet potatoes Start by preheating your oven to 425°F (220°C). This step ensures even cooking. While the oven heats, peel and dice your sweet potatoes into small cubes. 2. Mix spices with olive oil In a large bowl, add the diced sweet potatoes. Pour in 2 tablespoons of olive oil. Sprinkle in 1 tablespoon of chipotle powder, 1 teaspoon of smoked paprika, and 1 teaspoon of cumin. Season with salt and pepper to taste. Toss everything together until the sweet potatoes are fully coated in the spice mixture. 1. Roast sweet potatoes and warm tortillas Spread the seasoned sweet potatoes onto a baking sheet lined with parchment paper. Make sure they are in a single layer. Roast them in the oven for 25-30 minutes. Flip them halfway through for even cooking. Meanwhile, warm 8 small corn or flour tortillas in a skillet over medium heat for about 30 seconds on each side until they are soft. 2. Assemble tacos with toppings Once the sweet potatoes are tender and slightly caramelized, it’s time to assemble your tacos. On each warm tortilla, place a generous scoop of roasted sweet potatoes. Top with a spoonful of rinsed and drained black beans. Add slices of fresh avocado and a handful of thinly sliced red cabbage. For extra flavor, garnish with chopped fresh cilantro, a drizzle of Greek yogurt or sour cream, and a squeeze of lime juice. - Presentation tips For a beautiful presentation, arrange your tacos on a colorful plate. Use parchment paper or a vibrant tablecloth as a backdrop. - Pairing ideas Serve these tacos with a side of corn salad or a simple green salad. A chilled drink, like iced tea or lemonade, pairs well, too. To get perfect roasted sweet potatoes, I recommend cutting them into even cubes. This helps them cook evenly. Coat them well with olive oil and spices. This helps the sweet potatoes get crispy edges. Roast them at 425°F (220°C) for 25-30 minutes. Flip them halfway for even browning. To keep your taco assembly intact, warm the tortillas before filling them. This makes them flexible and less likely to tear. Don't overfill your tacos. A generous scoop is great, but too much can make them hard to handle. For extra flavor, try adding garlic powder or onion powder to the sweet potatoes. These spices boost the taste while keeping it simple. A dash of chili powder can add a nice kick if you like heat. Lime juice adds freshness to your tacos. Squeeze lime over the finished tacos just before serving. This brightens the flavors and balances the sweetness of the potatoes. Preparing ingredients ahead saves time. Dice sweet potatoes and store them in the fridge for up to two days. You can also mix the spices in advance. This way, you can just toss everything together when ready. To store leftovers safely, keep tacos in an airtight container. They stay fresh for about three days in the fridge. Reheat the sweet potatoes in the oven for the best texture. Enjoy your flavorful meal anytime! Pro Tips Roasting Sweet Potatoes: For maximum caramelization, ensure the sweet potatoes are spread out in a single layer on the baking sheet. This allows them to roast evenly and develop a delicious golden-brown exterior. Choosing the Right Tortillas: If you prefer a gluten-free option, opt for corn tortillas. They add a wonderful flavor and texture to the tacos. If using flour tortillas, warm them properly to prevent them from cracking. Enhancing Flavor: Before adding the black beans, give them a quick sauté in a pan with a bit of olive oil, garlic, and onions. This step adds depth to their flavor and makes them more aromatic. Fresh Garnishes: Don’t skip the fresh cilantro and lime juice! They brighten the dish and enhance the overall flavor profile of the tacos, making each bite refreshing. {{image_2}} You can switch things up by adding grilled chicken or shrimp. These proteins add a nice taste and texture. If you want a vegetarian option, consider using different beans. You can try pinto beans or chickpeas for a protein boost. If you need gluten-free options, use corn tortillas. They pair well with sweet potatoes. You can also make homemade tortillas. Just mix flour, water, and salt. Roll them out and cook them on a hot skillet. Fresh tortillas can bring a new level of flavor. Adjust the spice levels to match your taste. Add more chipotle powder for heat, or reduce it for a milder dish. You can also mix in different herbs and vegetables. Try adding fresh spinach or diced bell peppers. These changes can make the tacos even more interesting. Storing assembled tacos is simple. Place them in an airtight container. If you stack them, add parchment paper between layers. This avoids sogginess. Store the container in the fridge. For reheating, use a skillet over medium heat. Warm them for about 2-3 minutes on each side. You want them hot but not dry. Leftover roasted sweet potatoes should cool first. Then, transfer them to a container. Seal it tightly and keep it in the fridge. They stay fresh for about four days. To keep tortillas fresh, wrap them in a clean kitchen towel. Place the wrapped tortillas in a plastic bag. Store this bag in the fridge too. This helps them stay soft. Leftovers taste best within three days. After that, the flavor might fade. You can freeze sweet potatoes too. Place them in a freezer-safe container. They last up to three months in the freezer. For the tortillas, it’s best to eat them fresh. But if you freeze them, they’ll last a month. This way, you can enjoy your tacos later! Can I use other types of potatoes? Yes, you can use regular potatoes or even butternut squash. Each will bring its own taste. Just keep an eye on the cooking time. How spicy are these tacos? They have a mild to medium heat. The chipotle powder adds a nice kick, but it is not overwhelming. You can adjust the spice by using less chipotle powder. Can I make these tacos vegan? Absolutely! Skip the Greek yogurt or sour cream for a vegan option. The tacos still taste great without them. What can I substitute for chipotle powder? You can use smoked paprika for a milder flavor. Alternatively, use cayenne pepper for more heat. Adjust the amount based on your taste. Alternatives for black beans? Try pinto beans or kidney beans if you prefer. You can also use lentils for a different texture. Can I grill the sweet potatoes instead? Yes! Grilling sweet potatoes adds a nice char. Cook them over medium heat until they are tender, flipping frequently. How do I make this recipe ahead of time? You can prep the sweet potatoes and beans in advance. Store the roasted sweet potatoes in the fridge. Warm them before serving. Assemble the tacos just before eating for the best taste. You now have all you need to make delicious chipotle sweet potato tacos. We've covered the main ingredients, optional additions, and the tools you need. You learned how to prepare and cook the tacos, along with tips for flavor and meal prep. Try adding different proteins or adjusting the spice level for variety. Store leftovers safely to enjoy later. With these guidelines, you can create meals that are fun, tasty, and satisfying. Enjoy every bite of your homemade tacos!

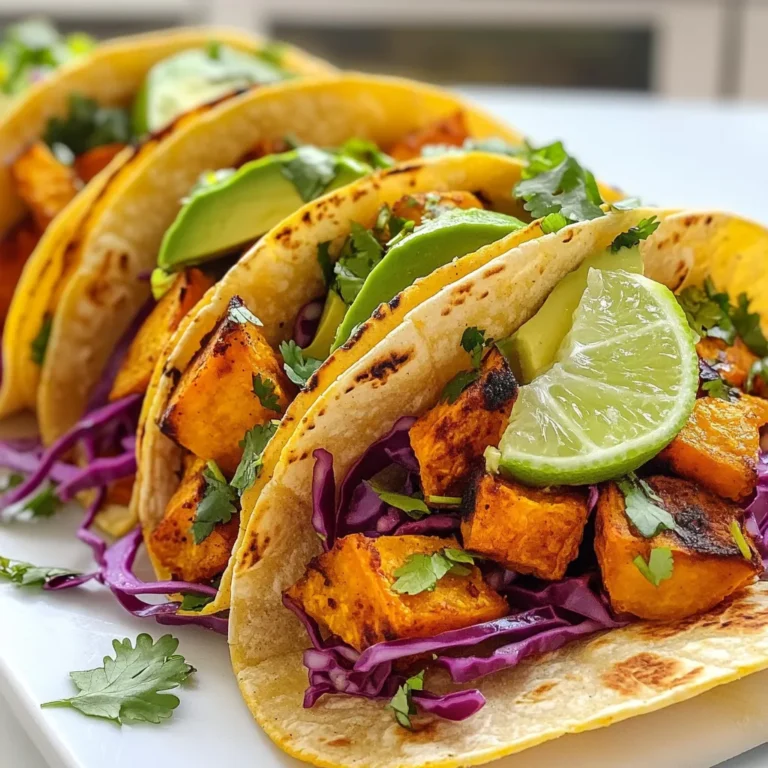
Chipotle Sweet Potato Tacos Flavorful and Easy Meal

- Gnocchi (16 oz): This is the base of our dish. Gnocchi gives a hearty texture and absorbs the creamy sauce well. You can buy it fresh or frozen. - Sun-Dried Tomatoes (1 cup, chopped): These add a burst of flavor. They are sweet and tangy, making the dish more exciting. Choose tomatoes packed in oil for added richness. - Heavy Cream (1 cup): This makes the sauce rich and smooth. It helps create a creamy texture that clings to the gnocchi. You can swap with half-and-half for a lighter option. - Fresh Spinach (1 cup): Spinach adds color and nutrients. It wilts down quickly and enhances the dish without overpowering it. - Garlic (2 cloves, minced): Garlic brings depth to the flavor. It adds warmth and a lovely aroma when sautéed. - Grated Parmesan Cheese (1/2 cup): This cheese adds a salty, nutty flavor. It helps thicken the sauce and gives it a nice finish. You can use Pecorino Romano for a bolder taste. - Olive Oil (2 tablespoons): This is used for sautéing. It adds healthy fats and enhances the flavors of garlic and tomatoes. - Salt and Pepper: These season the dish. Adjust to your taste to enhance all the other flavors. - Fresh Basil Leaves: These are optional but add freshness and a pop of color for serving. They make the dish look beautiful and taste bright. Feel free to personalize this recipe! You can add chicken for protein or use other veggies like mushrooms or bell peppers. {{ingredient_image_1}} To prepare the gnocchi, start by boiling a large pot of salted water. This adds flavor as the gnocchi cooks. Add the gnocchi and cook them according to the package instructions. They usually float to the top after about 2-3 minutes. This floating means they are done. Drain them well and set them aside. To avoid mushy gnocchi, do not overcook them. Keep an eye on them as they cook. If you take them out too late, they will turn soft. A gentle hand is key when mixing them later. For the flavor base, heat 2 tablespoons of olive oil in a large skillet over medium heat. Add 2 cloves of minced garlic and let them cook for about one minute. You want the garlic fragrant but not burnt. Next, add 1 cup of chopped sun-dried tomatoes. These should be packed in oil for extra taste. Stir in 1 cup of fresh spinach and cook until it wilts. This step takes about 2-3 minutes. Choosing high-quality sun-dried tomatoes is vital. Look for tomatoes that are plump and brightly colored. Avoid those that look dry or dark. They should have a rich, tangy flavor that enhances your dish. To make the creamy sauce, reduce the heat to low and pour in 1 cup of heavy cream. Stir well to mix it with the other ingredients. Let the sauce simmer gently. This helps the flavors blend. As the sauce simmers, gradually mix in 1/2 cup of grated Parmesan cheese. Stir until it melts and thickens the sauce. Season with salt and pepper to taste. A balanced flavor is essential for the dish, so adjust as needed. Now, it’s time to add the gnocchi. Gently fold the cooked gnocchi into the creamy sauce. Be careful not to break them apart. You want each piece to be coated in sauce. Cook everything together on low heat for an additional 1-2 minutes to warm it through. Keep the heat low to avoid overcooking the gnocchi. This way, they stay tender and hold their shape. Enjoy your creamy sun-dried tomato gnocchi with a sprinkle of fresh basil on top for a lovely finish! - Overcooking gnocchi: Gnocchi cooks very fast, usually within 2-3 minutes. When they float, they are ready. If you cook them too long, they become mushy and lose their shape. Always keep an eye on them. - Skipping the garlic sauté step: Sautéing garlic is key for flavor. If you skip this step, your dish will lack depth. Cook the garlic just until fragrant, about one minute. Be careful not to burn it. - Adding spices or herbs for extra depth: Consider adding crushed red pepper flakes for a hint of heat. Fresh herbs like thyme or oregano can boost the flavor too. A pinch of nutmeg adds a lovely warmth to the cream. - Recommendations for cheese substitutions: If you want a twist, try using goat cheese or ricotta instead of Parmesan. These cheeses can add a unique taste and creaminess to the dish. - How to serve for best visual appeal: Serve the gnocchi in shallow bowls. Sprinkle extra Parmesan on top, and add a few basil leaves. This makes the dish colorful and inviting. - Pairing drinks or sides with the dish: A crisp white wine, like Pinot Grigio, complements the creamy sauce well. For sides, a simple green salad with lemon vinaigrette balances the rich flavors of the gnocchi. Pro Tips Use Fresh Ingredients: Opt for fresh spinach and high-quality sun-dried tomatoes for a vibrant flavor profile that elevates your dish. Perfect Gnocchi Cooking: Ensure that you don’t overcook the gnocchi; they should float to the top of the boiling water, which indicates they are ready. Customize Your Cheese: Experiment with different types of cheese like Pecorino Romano or Gruyere for distinct flavor variations in your creamy sauce. Make it Vegan: Substitute the heavy cream with coconut cream and use nutritional yeast instead of Parmesan for a delicious vegan version of the dish. {{image_2}} For those avoiding gluten, look for gluten-free gnocchi. Many brands offer great taste and texture. You can also make your own using potatoes and gluten-free flour. If you're vegan, replace heavy cream with coconut cream or a cashew cream. Nutritional yeast can stand in for cheese, giving a cheesy flavor without dairy. Want to boost the dish? Add protein like chicken or shrimp. Cook them with the garlic for extra flavor. You can also swap in vegetables like zucchini or bell peppers. These add color and nutrition to your meal. Just sauté them along with the sun-dried tomatoes and spinach. For an Italian twist, use fresh basil or add a hint of lemon zest. These bright flavors enhance the dish beautifully. You can also explore other cuisines. Try adding curry powder for an Indian vibe or soy sauce for an Asian flair. These swaps give your gnocchi a fun global twist! To keep your creamy sun-dried tomato gnocchi fresh, store it in an airtight container. Let it cool first. Place it in the fridge within two hours of cooking. This helps keep the flavors and texture intact. The gnocchi can last for up to three days in the fridge. When you want to enjoy your gnocchi again, use a skillet. Heat it over medium-low heat. Add a splash of cream or water to the skillet to prevent sticking. Stir gently until it warms through. This keeps the sauce creamy and delicious. Avoid using the microwave, as it can make the gnocchi tough. If you want to save some gnocchi for later, freezing works well. First, let it cool completely. Spread it out on a baking sheet, and freeze it for about an hour. This prevents the gnocchi from sticking together. Once frozen, place the gnocchi in a freezer-safe bag. It can last for up to three months in the freezer. To eat, defrost it overnight in the fridge, then reheat it as mentioned above. Homemade gnocchi lasts about 2-3 days in the fridge. Store them in an airtight container. Look for signs of spoilage like a sour smell or slimy texture. If you see any, it's best to toss them. Yes, you can prepare ingredients ahead. Cook the gnocchi and store it separately from the sauce. This keeps the gnocchi from getting mushy. You can mix them together right before serving. To prevent sticking, dust the cooked gnocchi with a little flour before storing. When boiling, make sure not to overcrowd the pot. Stir gently during cooking. This helps keep them from clumping. You now have all the tools to make creamy sun-dried tomato gnocchi. You learned about key ingredients and their roles. The step-by-step guide helps you avoid common mistakes. I shared tips on personalizing your dish and enhancing flavors. With the right storage, you can enjoy leftovers later. Don’t be afraid to explore variations, whether dietary or international. Cooking is all about creativity. Try these techniques, make it your own, and impress everyone at the table. Enjoy your cooking journey!

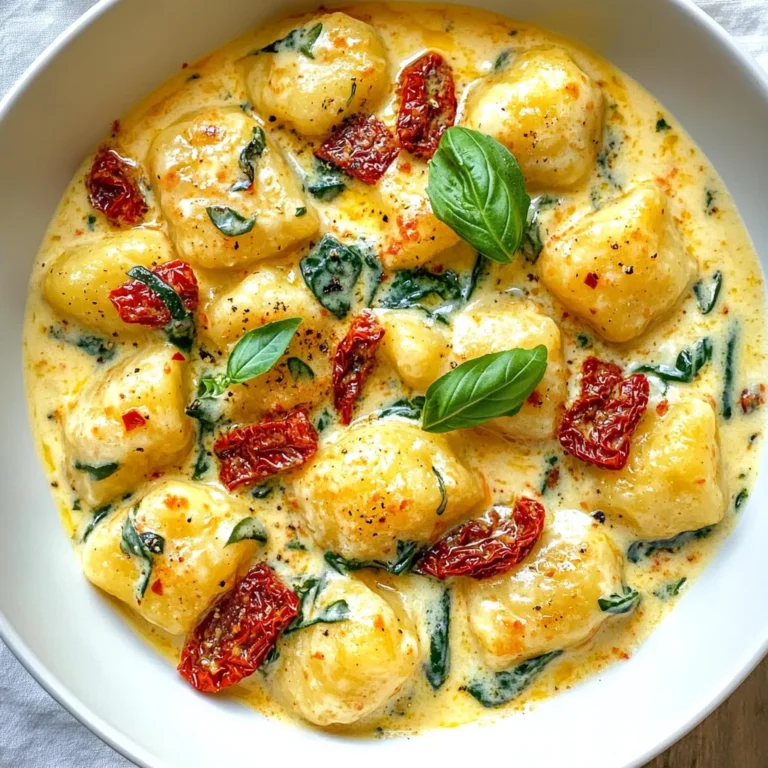
Creamy Sun-Dried Tomato Gnocchi Delightful Dinner

- 2 cups cooked shredded chicken - 1 cup cream cheese, softened - 1 cup shredded cheddar cheese - 1/4 cup honey - 2 tablespoons fresh lime juice - 1 teaspoon chili powder - 1/2 teaspoon garlic powder - 8 small flour tortillas - 1 cup enchilada sauce (mild or spicy, as preferred) - Fresh cilantro, for garnish - Lime wedges, for serving Gathering fresh ingredients is key for great flavor. I love using cooked shredded chicken. It saves time and adds rich taste. Cream cheese gives the enchiladas a creamy texture. Shredded cheddar cheese melts nicely on top. Honey adds a sweet twist. Fresh lime juice brightens every bite. Chili powder adds warmth, while garlic powder adds depth. Flour tortillas are perfect for wrapping. They hold all the tasty filling. Enchilada sauce ties everything together. You can pick it mild or spicy. To finish, I love adding fresh cilantro for a pop of color and flavor. Lime wedges are great for squeezing on top. This mix of ingredients makes for a delicious meal. {{ingredient_image_1}} - Preheating the oven: Start by setting your oven to 350°F (175°C). This step warms the oven for baking the enchiladas. - Mixing the filling: In a large bowl, add 2 cups of cooked shredded chicken. Then, mix in 1 cup of softened cream cheese and half of the shredded cheddar cheese. Pour in 1/4 cup of honey and 2 tablespoons of fresh lime juice. Add 1 teaspoon of chili powder and 1/2 teaspoon of garlic powder. Stir everything until it feels creamy and well combined. - Rolling the tortillas: Take 8 small flour tortillas and lay them flat on a clean surface. Spoon about 1/4 cup of the chicken mixture onto each tortilla. Roll them up tightly and place them seam-side down in a greased 9x13 inch baking dish. - Assembling in the baking dish: Pour 1 cup of enchilada sauce evenly over the rolled tortillas. Then, sprinkle the remaining cheddar cheese on top to create a cheesy layer. - Covering and baking: Cover the baking dish with aluminum foil. Place it in the preheated oven and bake for 20 minutes. This step helps keep the enchiladas moist. - Final baking for golden cheese: After 20 minutes, remove the foil. Bake for an additional 10 minutes. This will make the cheese bubbly and slightly golden. Once done, take them out and let them cool for a few minutes before serving. To make a creamy filling, use softened cream cheese. It blends well with chicken. Mix in honey and lime juice for a sweet and tangy flavor. Don't forget the spices! Chili powder and garlic powder add a nice kick. Taste the mixture before filling the tortillas. Adjust the spices if needed. Rolling tortillas can be tricky. Warm them up before use. This makes them soft and easy to roll. Spoon about 1/4 cup of the filling onto each tortilla. Start from one end and roll tightly. Place each rolled tortilla seam-side down in the baking dish. This keeps them together while baking. For accompaniments, serve your enchiladas with a side of rice or beans. They add great texture and flavor. You can also include a simple salad for freshness. For garnishing, sprinkle fresh cilantro on top just before serving. It adds color and flavor. Lime wedges on the side are a must. A squeeze of lime brightens the dish and enhances the flavor. These small touches make a big difference in presentation and taste. Pro Tips Use Rotisserie Chicken: For quicker preparation, consider using store-bought rotisserie chicken. It adds flavor and saves time on cooking. Adjust the Spice Level: Feel free to modify the chili powder to suit your spice preference. Add more for heat or use a milder blend for a family-friendly dish. Experiment with Cheeses: While cheddar is delicious, try mixing in other cheeses like Monterey Jack or pepper jack for a unique flavor profile. Let Them Rest: Allow the enchiladas to sit for a few minutes after baking. This helps them set and makes serving easier. {{image_2}} You can switch out the chicken for other meats. For example, turkey works well. You can also try black beans for a vegetarian option. If you want more flavor, use grilled shrimp or pulled pork. For cheese, I love using Monterey Jack. It melts great and adds a nice taste. You can also mix in pepper jack for some heat. Cream cheese can be replaced with sour cream for a tangy twist. If you want spice, add jalapeños to the filling. You can also use a spicy enchilada sauce. Another option is to sprinkle cayenne pepper in your mixture. Adding fresh herbs can boost the flavor too. Try cilantro or parsley for a fresh taste. Chopped green onions can add a nice crunch. You can also mix in some spinach for extra nutrition. To keep your Honey Lime Chicken Enchiladas fresh, let them cool first. Place them in an airtight container. You can refrigerate them for up to three days. If you want to save them longer, freeze the enchiladas. Wrap each one in plastic wrap and then in foil. This protects them from freezer burn and keeps them tasty. To reheat, take them out of the fridge or freezer. If frozen, let them thaw in the fridge overnight. Preheat your oven to 350°F (175°C). Place the enchiladas in a baking dish. Cover with foil and heat for about 20 minutes. If they are frozen, they may need an extra 10 minutes. Remove the foil for the last five minutes to get the cheese bubbly. In the fridge, your enchiladas will stay fresh for three days. They taste best when eaten fresh, but they can last. If stored in the freezer, they can last up to three months. Just remember to label them with the date. This way, you can enjoy your enchiladas later without worry. Yes, you can use rotisserie chicken. It saves time and adds flavor. Just shred it and mix with the other filling ingredients. You can choose mild or spicy enchilada sauce. It depends on your taste. I like to use a mild sauce for a balanced flavor. Yes, you can prepare the enchiladas a day in advance. Just assemble them, cover, and store in the fridge. Bake them when you're ready to serve. To make this dish gluten-free, use corn tortillas instead of flour. Most enchilada sauces are also gluten-free, but check the label. These enchiladas pair well with rice, beans, or a fresh salad. You can also add chips and salsa for extra crunch. In this blog post, we explored making delicious Honey Lime Chicken Enchiladas. We covered the key ingredients, like cooked chicken, cream cheese, and tortillas. You learned simple steps for mixing, rolling, and baking. I shared tips for creamy filling, tasty variations, and how to store leftovers. Enchiladas are easy to prepare and versatile for any meal. These ideas will help you enjoy them often. Have fun making this dish your own!

Honey Lime Chicken Enchiladas Flavorful and Easy Meal

- 1 lb ground chicken - 3 cloves garlic, minced - 1/4 cup fresh parsley, chopped - 1/4 cup fresh basil, chopped - 1/4 cup grated Parmesan cheese - 1/2 cup breadcrumbs - 1 egg, lightly beaten - 2 tablespoons olive oil - 1 teaspoon dried oregano - 1 teaspoon salt - 1/2 teaspoon black pepper The main ingredients for these garlic herb chicken meatballs start with ground chicken. It gives the meatballs a light texture and a mild flavor. Mixing in minced garlic adds a punch of taste that makes them special. Fresh parsley and basil bring brightness and freshness to each bite. Next, we have the additional ingredients. Grated Parmesan cheese adds a rich, savory note. Breadcrumbs help bind everything together and give a nice texture. The egg acts as a binder too, making sure the meatballs hold their shape. For seasoning, I use olive oil to cook the meatballs. The oil helps them brown nicely. Dried oregano brings an earthy flavor that matches well with chicken. Salt and pepper are must-haves to enhance all the flavors. Together, these ingredients create a simple yet delicious dish that you can enjoy anytime. {{ingredient_image_1}} 1. Preheat the oven and prepare the baking sheet: Set your oven to 400°F (200°C). Line a baking sheet with parchment paper. This step helps the meatballs not stick and makes cleanup easier. 2. Mix the meatball ingredients in a large bowl: In a big bowl, combine 1 pound of ground chicken, 3 minced garlic cloves, 1/4 cup of chopped parsley, and 1/4 cup of chopped basil. Add 1/4 cup of grated Parmesan cheese, 1/2 cup of breadcrumbs, and 1 beaten egg. Season with 1 teaspoon of dried oregano, 1 teaspoon of salt, and 1/2 teaspoon of black pepper. Use your hands to mix everything well until combined. 1. Roll the meat mixture into balls: Take about 2 tablespoons of the mixture and roll it into a ball. Place each meatball on your prepared baking sheet. Space the meatballs about an inch apart to allow them to cook evenly. 2. Brown meatballs in a skillet: Heat 2 tablespoons of olive oil in a large skillet over medium heat. Once the oil is hot, add the meatballs. Cook them for about 5 to 6 minutes, turning them until they are browned on all sides. This step adds flavor and a nice texture. 1. Transfer meatballs to the oven: Once browned, carefully move the meatballs back to the prepared baking sheet. 2. Check for doneness and serving temperature: Place the baking sheet in the preheated oven. Bake for 10 to 12 minutes until the meatballs are cooked through and no longer pink in the center. You can use a meat thermometer to check if they reach 165°F (74°C). Serve the meatballs warm with marinara sauce for dipping or drizzling. Enjoy your delicious garlic herb chicken meatballs! To get the best flavor, brown the meatballs first. Heat olive oil in a skillet. Add the meatballs and cook them for about 5-6 minutes. Turn them often until they are golden brown. This gives a nice crust and locks in juices. For even cooking in the oven, space the meatballs on the baking sheet. Leave about an inch between each ball. This allows hot air to flow around them. Bake at 400°F for 10-12 minutes. Check that they are no longer pink in the center. You can add more spices to boost flavor. Try a dash of red pepper flakes for heat. If you like a stronger taste, use fresh herbs. Mix in thyme or rosemary with the parsley and basil. Adjusting the texture can also make a difference. If you want meatballs to be softer, add more breadcrumbs. If you prefer them firmer, use less. Each change will give you unique meatballs. How you serve the meatballs can impress your guests. You can arrange them on a platter with warm marinara sauce. Drizzle the sauce over the meatballs for extra flavor. Garnish with fresh herbs for a pop of color. Chopped parsley or basil adds freshness. You can also sprinkle a bit of Parmesan cheese on top. This will make your dish not only tasty but also beautiful. Pro Tips Use Fresh Herbs: Fresh herbs will provide a vibrant flavor compared to dried ones. Consider using them whenever possible for the best taste. Keep Meatballs Uniform: Ensuring each meatball is the same size allows for even cooking. Use a cookie scoop for consistent portions. Don’t Overmix: When combining the ingredients, mix just until combined to keep the meatballs tender. Overmixing can lead to a tough texture. Rest Before Serving: Allow the meatballs to rest for a few minutes after baking. This helps them firm up and makes them easier to serve. {{image_2}} You can change the ground meat to fit your taste. Ground turkey works well with this recipe. You can also use lean beef or pork. If you want a plant-based option, try ground chickpeas or lentils. These swaps keep the meatballs tasty and fun. For cheese lovers, you might want to skip dairy. Use a dairy-free cheese alternative. There are many options like cashew cheese or almond cheese. These choices still give a creamy texture without the dairy. If you like some heat, add red pepper flakes. This spicy twist gives the meatballs a nice kick. Just sprinkle in a teaspoon or more, depending on your taste. Another option is to switch up the herbs. Instead of parsley and basil, you can use Italian seasoning. This blend adds a rich flavor to your meatballs. Just replace the fresh herbs with about two teaspoons of the mix. You can also try cooking these meatballs in a slow cooker. Just mix everything, form the meatballs, and place them in the cooker with some sauce. Cook on low for 6-8 hours. This method makes them super tender and juicy. If you want a quicker method, use a grill or air fryer. For the grill, preheat and cook the meatballs for about 10 minutes, turning often. In an air fryer, set it to 400°F and cook for around 10-12 minutes. Both methods give a nice crispy exterior while keeping the inside moist. To store cooked meatballs, place them in an airtight container. Make sure they cool down first. You can keep them in the fridge for about 3 to 4 days. If you want to enjoy them later, it’s best to freeze them. For freezing, let the meatballs cool completely. Then, arrange them in a single layer on a baking sheet. Freeze for 1 to 2 hours until firm. After that, transfer them to a freezer bag. They can last for up to 3 months in the freezer. When ready to eat, thaw them in the fridge overnight. Reheat in the oven or microwave until warm. You can use these meatballs in many meals. Serve them with pasta, in a sandwich, or on a salad. Leftovers work well in wraps or as a snack. You can even add them to soups for a hearty meal. Be creative and enjoy your garlic herb chicken meatballs in different ways! Can I use frozen ground chicken? Yes, you can use frozen ground chicken. Just make sure to thaw it first. You can leave it in the fridge overnight or use the microwave. Once thawed, follow the recipe as usual. What’s the best way to tell if meatballs are cooked through? The best way is to check the inside for no pink color. You can also use a meat thermometer. A safe temperature is 165°F (74°C). This ensures the meatballs are safe and juicy. What sides pair well with meatballs? Meatballs pair great with pasta, rice, or a fresh salad. Garlic bread also makes a lovely side. You can try roasted vegetables for a healthy option as well. Can I make meatballs ahead of time? Yes, you can make meatballs in advance. Just form them and store them in the fridge for up to a day. You can also freeze them for longer storage. Just thaw and cook when ready. How to adjust the recipe for a smaller batch? To make a smaller batch, just cut the ingredients in half. You can easily adjust the amounts. This way, you still get delicious meatballs without leftovers. Can I bake without browning first? Yes, you can bake them without browning. Just place the meatballs on the baking sheet and bake longer, about 15-18 minutes. They may not be as crispy but will still taste great. This blog post covered how to make delicious garlic herb chicken meatballs. We explored the main and extra ingredients, along with essential seasonings. You learned the step-by-step instructions for mixing, forming, and cooking your meatballs. We also shared tips for flavor enhancements and effective storage techniques. Don't hesitate to try variations that fit your taste. With these tips, you'll create tasty meatballs every time. Now, you have everything needed to impress at your next meal. Enjoy cooking!

Garlic Herb Chicken Meatballs Flavorful and Easy Recipe

To make a Peach Cobbler Dump Cake, you need these main items: - 2 cans (15 oz each) sliced peaches in syrup, undrained - 1 box (15.25 oz) yellow cake mix - 1/2 cup unsalted butter, melted - 1/2 teaspoon ground cinnamon - 1/4 teaspoon nutmeg These simple ingredients come together to create a warm and sweet dessert. You can enhance your dump cake with some fun extras: - 1 cup chopped pecans for a crunchy texture - Vanilla ice cream for a creamy finish - Whipped cream for added sweetness These add-ins can take your dessert to the next level! If you don't have some ingredients, you can swap them out: - Use fresh peaches instead of canned for a fresher taste. - Swap yellow cake mix with white or even chocolate for a twist. - You can replace unsalted butter with coconut oil for a dairy-free option. These substitutions allow for creativity while keeping the dish delicious. {{ingredient_image_1}} First, set your oven to 350°F (175°C). Preheating helps the cake bake evenly. This is a key step. Grab a 9x13-inch baking dish. Pour two cans of sliced peaches into the dish. Do not drain the syrup. Spread the peaches out evenly. This syrup adds sweetness and moisture. Sprinkle 1/2 teaspoon of cinnamon and 1/4 teaspoon of nutmeg over the peaches. These spices give warm flavors to your cake. Next, take a box of yellow cake mix. Spread it evenly over the peaches. Do not stir. This layer creates a soft cake. Now, melt 1/2 cup of unsalted butter. Drizzle it over the cake mix. Again, do not mix. If you want a crunch, add 1 cup of chopped pecans on top. Now, your cake is ready for the oven. Bake for 40-45 minutes. Look for a golden brown top and bubbly edges. The smell will be amazing! Let it cool a bit before you serve it. To get a great texture in your Peach Cobbler Dump Cake, pay attention to a few key steps. First, you want to use undrained peaches. This keeps the cake moist and flavorful. Second, don’t mix the cake batter after adding it to the peaches. This helps create a nice, crumbly topping. Lastly, drizzle the melted butter evenly. This ensures that every bite is rich and buttery. Serving this cake warm is a must. It pairs perfectly with vanilla ice cream. The cold ice cream melts into the warm cake, creating a creamy delight. You can also add a sprinkle of cinnamon on top. This little touch adds warmth and enhances the peach flavor. If you like nuts, sprinkle some chopped pecans on your serving. They give a nice crunch that contrasts well with the soft cake. One mistake to avoid is overmixing the cake mix. Mixing can lead to a dense texture. Also, watch the baking time closely. If you overbake, the top may burn. Keep an eye on it after 40 minutes. Finally, don’t skip the cooling step. Letting it cool slightly helps set the layers and makes serving easier. Enjoy your baking! Pro Tips Use Fresh Peaches: If you have fresh peaches available, feel free to slice and use them instead of canned peaches for a more vibrant flavor. Adjust Sweetness: Taste the peaches before adding the cake mix; if they are very sweet, you may want to reduce the sugar in your cake mix or omit the butter drizzle. Experiment with Nuts: Try different nuts like walnuts or almonds for a unique twist, or omit them entirely for a nut-free version. Serve with Toppings: Enhance the dessert by serving it with caramel sauce, chopped mint, or a sprinkle of toasted coconut along with ice cream or whipped cream. {{image_2}} You can change the fruit for more fun. Try using canned pears or cherries. Both add a sweet and tangy twist. If you want, you can mix fruits. Go for peaches and blueberries for a colorful look. Fresh fruit works too! Just make sure to slice it thin and add a bit of sugar. While yellow cake mix is classic, you can swap it out. Use a butter cake mix for a richer taste. Chocolate cake mix gives a bold twist. To make it more unique, try spice cake mix. Each option brings a new flavor to your dump cake. Feel free to experiment with whatever you have on hand. For a gluten-free version, use gluten-free cake mix. Many brands offer delicious options that work well. Check the label to ensure it meets your needs. Also, look for canned fruit that is gluten-free. Most are, but it’s good to double-check. This way, everyone can enjoy the dessert! To store your leftover peach cobbler dump cake, let it cool first. After it cools, cover the dish tightly with plastic wrap or aluminum foil. You can also transfer it to an airtight container. Keep it in the fridge. The cake stays fresh for 3 to 4 days. When you're ready to enjoy your leftovers, preheat your oven to 350°F (175°C). Place the cake in an oven-safe dish. Heat it for about 15 to 20 minutes. This warms the cake and makes the top crispy again. You can also microwave it for 30 to 45 seconds. Just be careful not to heat it too long. If you want to save the cake for later, freezing is a great option. First, let the cake cool completely. Cut it into pieces for easier serving. Wrap each piece tightly in plastic wrap. Then, place the wrapped pieces in a freezer bag or container. You can freeze it for up to 3 months. To eat, just thaw it overnight in the fridge and reheat as needed. Yes, you can make Peach Cobbler Dump Cake ahead of time. Prepare it fully and store it in the fridge for up to two days. Bake it right before you serve it for best results. This way, the flavors meld well, and it tastes fresh. Just follow the steps to bake it when you’re ready. To adjust the sweetness, you have a few options. If you want it sweeter, add a little sugar to the peaches. You can also use a sweet cake mix. For less sweetness, choose a sugar-free cake mix and rinse the peaches. This helps balance the flavors. Taste as you go to find the perfect level. Peach Cobbler Dump Cake pairs wonderfully with ice cream or whipped cream. Vanilla ice cream adds creaminess and coolness. Whipped cream gives a light, fluffy touch. You can also try serving it with a sprinkle of cinnamon or fresh fruit on top. These add fun flavors and make it look pretty too. Enjoy it warm for the best taste! This blog post covers all you need to know about making a delicious Peach Cobbler Dump Cake. We explored the main ingredients and tasty add-ins. I shared step-by-step instructions to guide you through the baking process. You learned helpful tips for the best texture and flavor. We also looked at fun variations and how to store your cake. With these insights, you'll create a satisfying dessert for any occasion. Enjoy baking and sharing this delightful treat!

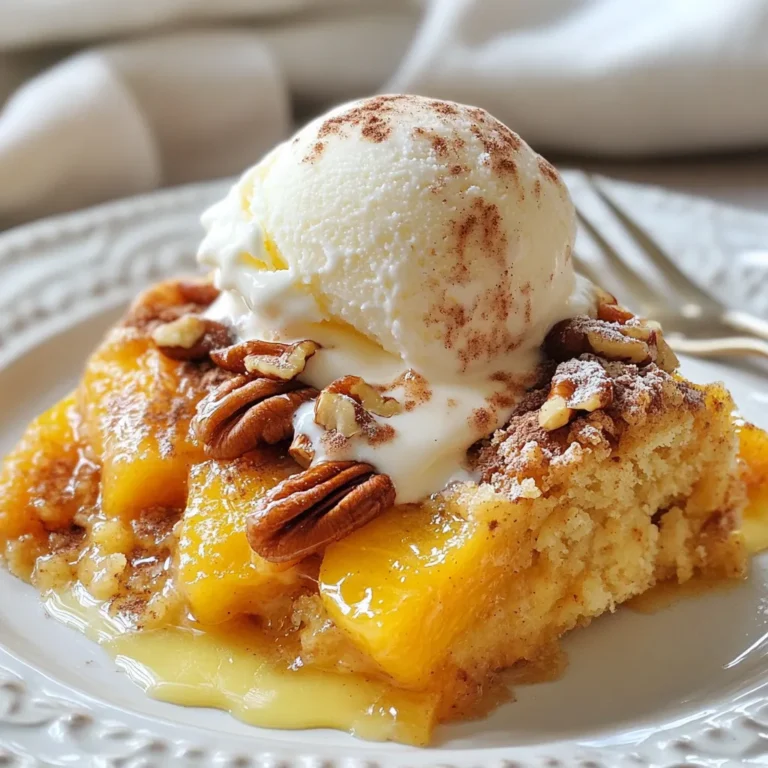
Peach Cobbler Dump Cake Easy and Delicious Dessert

PREV 1 … 56 57
flavor nest kitchen

explore

DessertsDinnerAppetizersDrinks

Our Policies

  • Cookie Policy
  • Copyright Policy
  • Disclaimer
  • GDPR Policy
  • Terms Of Use
Back to Top
  • About
  • Contact Us
  • Privacy Policy
© 2025 flavor nest kitchen