Craving a tasty treat that’s easy to make? Chocolate Covered Oreo Pops are a fun and delicious dessert to whip up! With just a few simple ingredients and steps, you can turn ordinary Oreos into delightful pops. Perfect for parties, gifts, or a personal snack, these chocolate-covered goodies will impress everyone. Let’s dive in and create some sweet magic together!
Why I Love This Recipe
- Quick and Easy: This recipe takes just 30 minutes to make, making it perfect for a last-minute treat.
- Customizable: You can personalize these pops with different types of chocolate and various decorations.
- Fun for All Ages: Kids and adults alike will enjoy making and decorating these delicious treats together.
- Perfect for Any Occasion: Whether it’s a birthday party or a simple snack, these pops are sure to impress.
Ingredients
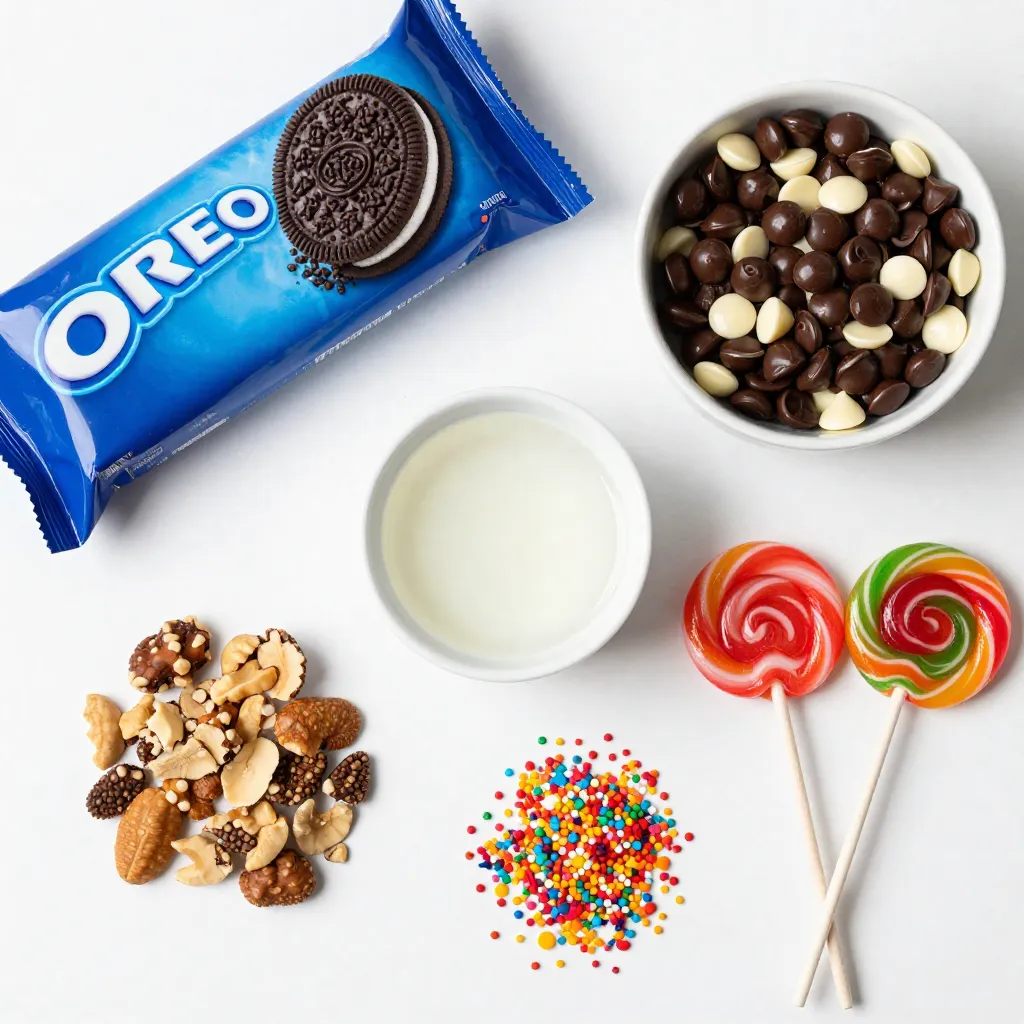
List of Ingredients
– Oreo cookies
– Chocolate chips (dark or milk)
– Coconut oil (optional)
– Decorative toppings (sprinkles or crushed nuts)
– Lollipop sticks
To make Chocolate Covered Oreo Pops, you need a few key items. First, grab a package of Oreo cookies. They serve as the sweet base for this treat. Next, choose your chocolate chips. You can use either dark or milk chocolate, depending on your taste. If you want a smooth finish, coconut oil is optional. It helps the chocolate coat better.
Next, think about how you want to decorate your pops. Sprinkles or crushed nuts add fun texture and color. Finally, don’t forget the lollipop sticks. These will help you hold and enjoy your cookie pops with ease.
With these ingredients ready, you can create a delicious dessert that’s perfect for any occasion!
Step-by-Step Instructions
Preparation of Workspace
First, grab your baking sheet. Line it with parchment paper. This makes cleaning easy later. Next, gather all your ingredients. You’ll need Oreo cookies, chocolate chips, coconut oil, and lollipop sticks. Having everything in one place helps you move fast.
Assemble the Oreo Pops
Now, take each Oreo cookie. Insert a lollipop stick into the cream filling. Go about halfway in and be gentle. You don’t want to break the cookie. This step is key to keeping your pops intact.
Melting the Chocolate
For the chocolate, use a microwave-safe bowl. Add the chocolate chips and coconut oil if you like. Microwave in 30-second bursts. Stir well between each burst. Keep going until it melts smoothly. A smooth texture makes for a nice coating.
Coating the Oreos
Dip each Oreo pop into the melted chocolate. Make sure it’s fully coated. Hold it over the bowl to let the excess chocolate drip off. This helps avoid a mess and keeps the pops neat.
Decorating the Pops
Before the chocolate sets, it’s time to add flair. You can choose sprinkles or crushed nuts. Gently press them onto the chocolate. This step makes your pops look fun and tasty.
Cooling and Setting
Now, place your coated pops on the baking sheet. Let them cool at room temperature for about 20 minutes. If you’re in a hurry, you can refrigerate them. Just make sure they harden completely before serving.
Tips & Tricks
Perfect Melting Techniques
To melt chocolate for your Oreo pops, use a microwave-safe bowl. Place chocolate chips inside and add coconut oil, if you want a smoother finish. Microwave the bowl in 30-second intervals. Stir after each interval. This helps prevent burning. Repeat until the chocolate is smooth.
If you prefer the stovetop, use a double boiler. Fill a pot with water and bring it to a simmer. Place another bowl on top, making sure it doesn’t touch the water. Add the chocolate to the bowl and stir until melted.
Decorating Ideas
Get creative with your decorations! You can match themes for parties or holidays. Use sprinkles, crushed nuts, or even colored chocolate. For a fun twist, try adding edible glitter to make your pops sparkle.
Another idea is to drizzle contrasting chocolate over the coated pops. Use a fork for a fun design or simply pour it from a squeeze bottle.
Presentation Tips
Presentation is key for these treats. Place your Oreo pops in a clear glass to show them off. Alternatively, stand them up in a block of floral foam. Cover the foam with colorful tissue paper for a festive look.
You can also create a fun dessert table. Arrange the pops on a tiered stand for a lovely display. This will catch everyone’s eye and make the treats even more fun!
Pro Tips
- Use Quality Chocolate: For the best flavor, choose high-quality chocolate chips or melting chocolate. It makes a big difference in taste!
- Experiment with Flavors: Try using flavored chocolate, such as white chocolate or mint chocolate, to give your Oreo pops a unique twist.
- Chill Before Coating: Refrigerate the Oreos for about 10 minutes before dipping them in chocolate to help the coating stick better.
- Store Properly: Keep your finished Oreo pops in an airtight container at room temperature or in the fridge for up to a week to maintain freshness.
Variations
Flavor Variations
You can change the flavor of your Chocolate Covered Oreo Pops. Try different types of cookies. Use peanut butter Oreos for a rich taste. Mint Oreos add a fresh twist. You can also mix in other cookies, like vanilla wafers or chocolate chip cookies.
For the chocolate coating, explore alternative options. Use white chocolate for a sweet touch. Dark chocolate provides a rich flavor. You can even use colored chocolate melts for fun designs!
Dietary Modifications
If you need gluten-free treats, use gluten-free Oreo alternatives. Brands like Glutino offer tasty options. You won’t lose any flavor or fun!
For vegan chocolate, look for dairy-free chocolate chips. Brands like Enjoy Life make great choices. Combine these with gluten-free cookies for a delicious vegan treat.
Seasonal Themes
Make your Oreo pops festive for any holiday! For Halloween, add orange and black sprinkles. During Christmas, use red and green decorations. You can even dip them in colored chocolate for each season.
For birthday parties, use bright sprinkles or fun themed decorations. You can make these treats match any celebration. Just let your creativity shine!
Storage Info
Best Storage Practices
Store your chocolate-covered Oreo pops at room temperature. Place them in an airtight container. This keeps them fresh and tasty. If your home is warm, consider refrigerating them. This will help the chocolate last longer. Just be sure to let them sit at room temp for a few minutes before eating. This will make them taste better.
How Long Do They Last?
Chocolate-covered pops can last about one week at room temperature. If you store them in the fridge, they will last up to two weeks. Look for signs of spoilage. If the chocolate looks dull or dry, it’s time to toss them. Also, if they smell off, do not eat them. Enjoy your treats fresh for the best flavor!
FAQs
How do I make chocolate-covered Oreo pops?
Start by setting up your workspace. Lay down parchment paper on a baking sheet. This helps when you place the finished Oreo pops. Next, take an Oreo cookie. Insert a lollipop stick into the cream filling halfway. Be gentle so the cookie doesn’t break.
In a microwave-safe bowl, mix chocolate chips and coconut oil. Heat in 30-second bursts, stirring each time. This way, the chocolate melts smoothly. Now, dip each cookie on a stick into the melted chocolate. Make sure it’s fully covered. Allow any extra chocolate to drip off.
Before the chocolate cools, add sprinkles or crushed nuts for decoration. Place the pops on the baking sheet. Let them cool for about 20 minutes at room temperature. You can also refrigerate them for faster cooling. Once set, your Chocolate Covered Oreo Pops are ready!
Can I use white chocolate instead of regular chocolate?
Yes, you can use white chocolate! White chocolate gives a sweet and creamy taste. Melt it the same way as regular chocolate. Just remember, white chocolate can be thicker. Add a bit more coconut oil to help it melt. This keeps your coating smooth and shiny.
What can I use instead of lollipop sticks?
If you don’t have lollipop sticks, try using pretzel rods. They add a nice crunch! You can also use straws or small wooden skewers. Just make sure they are sturdy enough to hold the cookie. Get creative with what you have at home!
Making chocolate-covered Oreo pops is fun and easy. You learned about the ingredients, steps, and tips to create tasty treats. Remember to prepare your workspace and choose fun decorations. Try different cookies and chocolates for some variety. Store them properly to enjoy later. With just a few simple steps, you can make special snacks for any event. Now it’s your time to get creative and enjoy making these sweet pop