Looking for a sweet treat that combines rich chocolate and tangy raspberry? You’re in the right place! Today, I’ll share my easy recipe for Chocolate Raspberry Thumbprint Cookies. These cookies are fun to make and a delight to eat. With simple steps and tasty ingredients, you’ll impress friends and family. Let’s dive in and create these mouthwatering cookies together!
Why I Love This Recipe
- Decadent Flavor: The combination of rich chocolate and tart raspberry creates a delightful contrast that is simply irresistible.
- Easy to Make: This recipe comes together quickly, making it perfect for both novice bakers and experienced cooks looking for a fun treat.
- Perfect for Any Occasion: Whether it's a holiday gathering or a casual afternoon snack, these cookies are sure to impress your guests.
- Customizable: You can easily switch out the raspberry jam for your favorite flavor, adding a personal touch to each batch.
Ingredients
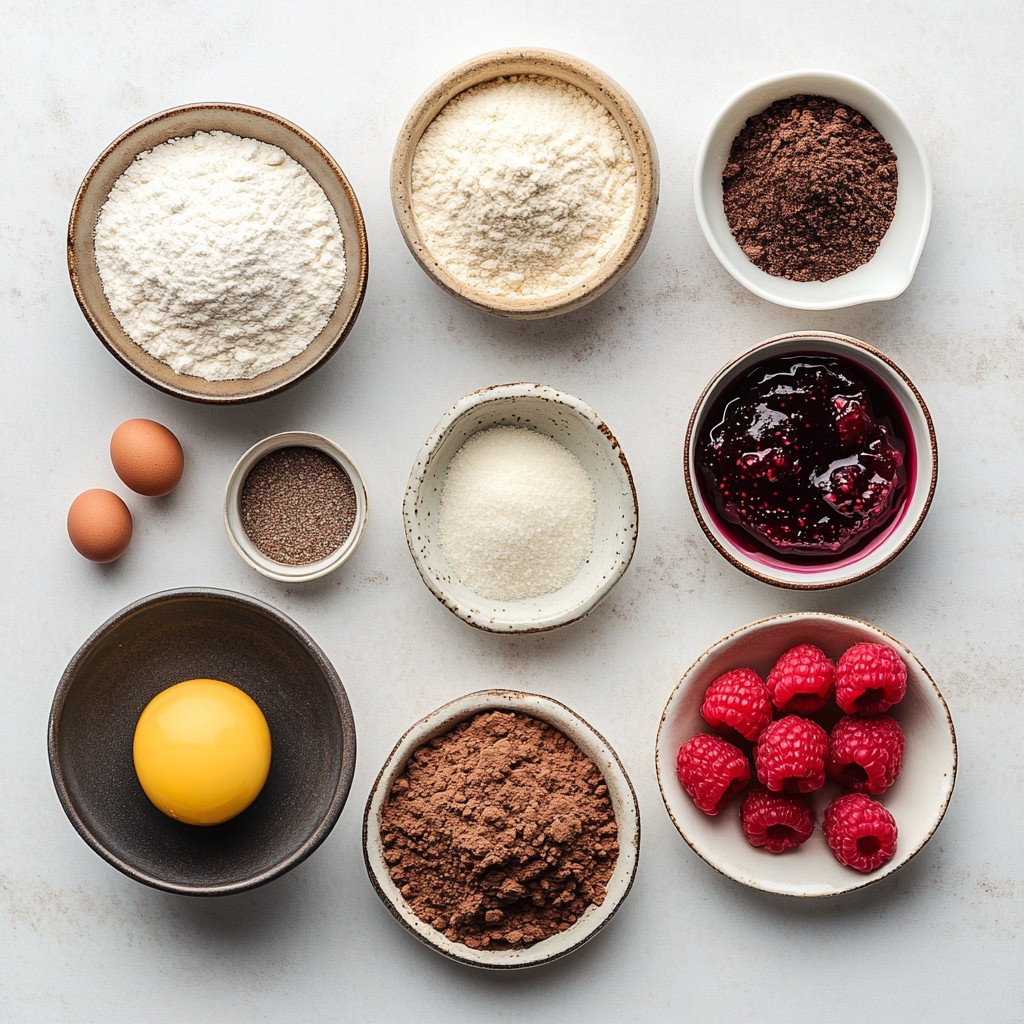
Complete List of Ingredients
To make Chocolate Raspberry Thumbprint Cookies, you will need:
- 1 cup all-purpose flour
- 1/2 cup unsweetened cocoa powder
- 1/4 teaspoon baking powder
- 1/4 teaspoon salt
- 1/2 cup unsalted butter, softened
- 1/2 cup granulated sugar
- 1/4 cup brown sugar, packed
- 1 large egg
- 1 teaspoon vanilla extract
- 1/2 cup raspberry jam
- Fresh raspberries for garnish (optional)
Recommended Brands for Quality
For the best taste, consider these brands:
- Flour: King Arthur Flour is reliable and gives great results.
- Cocoa Powder: Ghirardelli or Valrhona cocoa powder adds rich flavor.
- Butter: Challenge or Kerrygold butter improves texture and taste.
- Sugar: Domino or C&H sugars ensure sweetness and quality.
These brands often provide consistent quality and enhance your baking experience.
Possible Substitutions
You can make a few changes if you need:
- Flour: Use gluten-free all-purpose flour for a gluten-free option.
- Butter: Coconut oil can replace butter for a dairy-free choice.
- Sugar: Substitute with coconut sugar for a healthier option.
- Jam: Any fruit jam, like strawberry or apricot, works well too.
These substitutions can help you meet dietary needs without losing flavor.
Step-by-Step Instructions
Preparation Steps
Start by preheating your oven to 350°F (175°C). This temperature helps the cookies bake evenly. Line a baking sheet with parchment paper. This step prevents the cookies from sticking. In a medium bowl, whisk together 1 cup of all-purpose flour, 1/2 cup of cocoa powder, 1/4 teaspoon of baking powder, and 1/4 teaspoon of salt. Set this bowl aside. In a large mixing bowl, cream together 1/2 cup of softened unsalted butter, 1/2 cup of granulated sugar, and 1/4 cup of brown sugar. Mix until it looks light and fluffy, which takes about 3-4 minutes. Next, beat in 1 large egg and 1 teaspoon of vanilla extract until they blend well. Slowly add the dry mix to the wet mix, stirring until just combined. Be careful not to overmix.
Baking Instructions
Using your hands, form small balls of dough, about 1 inch wide. Place each ball on your prepared baking sheet, leaving space between them. With your thumb or a small spoon, make a dent in the center of each cookie. Fill these dents with about 1/2 teaspoon of raspberry jam. Bake the cookies in your preheated oven for 10-12 minutes. You want the edges to feel firm, but the centers should stay soft.
Cooling and Serving Directions
After baking, let the cookies cool on the baking sheet for 5 minutes. Then, transfer them to a wire rack to cool completely. This cooling step is vital to keep them from becoming too soft. If you want to impress guests, garnish with fresh raspberries once cooled. You can also arrange the cookies on a decorative platter and dust them lightly with powdered sugar for an elegant touch. Enjoy your chocolate raspberry thumbprint cookies!
Tips & Tricks
How to Achieve the Perfect Cookie Texture
To get that perfect cookie texture, you need to balance the butter and flour. Use softened butter, not melted. This helps your cookies stay thick and chewy. Mix the dough until just combined. Overmixing can make them tough. When you bake, keep an eye on the time. The edges should be firm, but the centers must remain soft.
Best Practices for Measuring Ingredients
Measuring your ingredients correctly is key. Use a dry measuring cup for flour and cocoa powder. Spoon the ingredient into the cup, then level it with a knife. Don’t pack it down. For the sugars, use the scoop and level method too. This way, you avoid extra sweetness or dryness in your cookies.
Common Mistakes to Avoid
One common mistake is not letting your cookies cool. If you move them too soon, they will break. Be sure to let them sit for about five minutes on the baking sheet. Another mistake is skipping the jam. Each thumbprint needs a good amount of jam for flavor. If you don't fill them enough, the cookies may taste dry.
Pro Tips
- Room Temperature Ingredients: Make sure your butter and egg are at room temperature for easier mixing and a better cookie texture.
- Prevent Sticky Dough: If your dough is too sticky to handle, chill it in the refrigerator for about 30 minutes before forming into balls.
- Indention Technique: Use the back of a small spoon if you find it difficult to create a perfect thumbprint with your thumb.
- Storage Tips: Store your cookies in an airtight container at room temperature for up to a week to keep them soft and fresh.
Variations
Alternative Jams and Fillings
You can switch up the jam in these cookies. I love using strawberry or cherry jam. Both give a sweet and fruity flavor. You can also try lemon curd for a zesty twist. The tartness pairs well with rich chocolate. Just remember, 1/2 teaspoon fits well in each thumbprint.
Gluten-Free Options
Want to make these gluten-free? Swap the all-purpose flour with a gluten-free blend. Look for one that includes xanthan gum. This helps keep the cookies soft and chewy. You can also use almond flour for a nutty taste. Adjust the cocoa powder to keep the flavor balanced.
Different Flavor Combinations
Get creative with flavors! Add a pinch of orange zest to the dough for a citrus kick. You can mix in some espresso powder for a coffee flavor. Or, try adding peppermint extract for a holiday treat. Each flavor gives the cookies a unique twist. It’s all about what you enjoy!
Storage Info
How to Store Cookies Properly
To keep your Chocolate Raspberry Thumbprint Cookies fresh, store them in an airtight container. This method keeps moisture out and flavor in. Place parchment paper between layers to avoid sticking. If stored this way, your cookies can last up to a week at room temperature.
Freezing Instructions for Longer Shelf Life
Freezing is a great option for longer storage. First, let the cookies cool completely. Then, arrange them on a baking sheet in a single layer. Freeze them for about two hours until solid. Once frozen, transfer the cookies to a freezer-safe bag or container. They can last up to three months in the freezer. Just remember to label them with the date!
Best Ways to Reheat or Refresh
To refresh your cookies, take them out of the container. Preheat your oven to 350°F (175°C). Place the cookies on a baking sheet and heat for about 5 minutes. This helps regain their soft texture. If you prefer a warm treat, serve them with a scoop of vanilla ice cream. Enjoy the delightful mix of chocolate and raspberry flavors!
FAQs
Can I use other types of fruit jam?
Yes, you can use other types of fruit jam. Choose any jam that you enjoy. Some good options include strawberry, apricot, or blueberry. Each jam will give a unique taste to your cookies. Just keep the amount the same, about 1/2 teaspoon per cookie. Feel free to mix and match!
How do I know when cookies are done baking?
To check if your cookies are done, look at the edges. The edges should feel firm but the centers may still look soft. A good rule is to bake them for about 10 to 12 minutes. If they start to crack, they are likely ready. You can also gently touch the edge; it should feel set.
What can I do if my dough is too sticky?
If your dough feels too sticky, add a little more flour. Start with one tablespoon at a time. Mix it in until the dough is easier to handle. You can also chill the dough for 30 minutes. Chilling makes it firmer and easier to shape into balls.
This article covered all you need to know for perfect cookies. We explored ingredients, brand suggestions, and substitutions. You learned step-by-step instructions, baking tips, and common mistakes to avoid. We also shared fun variations, storage methods, and answered common questions.
Baking cookies can be fun and easy. With practice, you’ll create tasty treats every time. Enjoy sharing your cookies with friends and family!