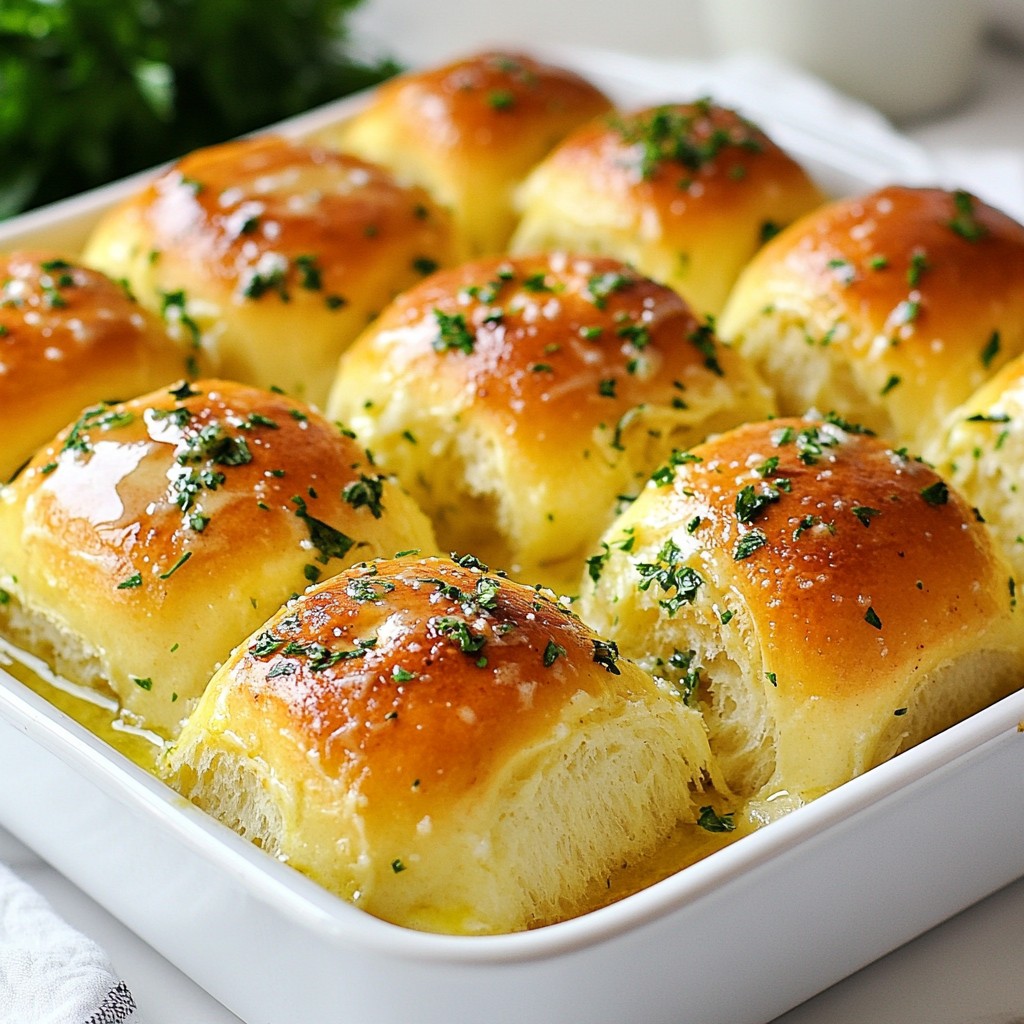
Do you crave warm, buttery rolls fresh from the oven? My Garlic Herb Pull-Apart Rolls are simple to make and bursting with flavor. This easy recipe uses pantry staples and just a few steps to create soft, fluffy rolls that everyone will love. Whether you’re a seasoned baker or a novice in the kitchen, you’ll enjoy this fun and tasty project. Let’s dive in and make magic happen with dough!
Why I Love This Recipe
- Soft and Fluffy: These rolls are incredibly soft and fluffy, making them the perfect accompaniment to any meal.
- Garlic Goodness: The rich garlic and herb flavors infuse every bite, elevating the taste to a whole new level.
- Fun to Share: Pull-apart rolls are perfect for sharing at gatherings, creating a warm and inviting atmosphere.
- Customizable: You can easily customize the herbs and spices to suit your taste, making this recipe versatile.
Ingredients
List of Ingredients
- 3 ½ cups all-purpose flour
- 1 packet (2 ¼ teaspoons) active dry yeast
- 1 tablespoon sugar
- 1 teaspoon salt
- 1 cup warm milk (110°F)
- ¼ cup unsalted butter, melted
- 2 cloves garlic, minced
- 2 tablespoons fresh parsley, chopped
- 1 teaspoon dried oregano
- 1 teaspoon dried thyme
- ½ teaspoon black pepper
- Extra melted butter for brushing
Special Notes on Ingredient Quality
Using fresh herbs makes a big difference. Fresh parsley adds a bright flavor. For garlic, use fresh cloves for the best taste. When choosing flour, go for all-purpose with a high protein content. This helps create a better dough structure. Ensure your yeast is fresh for a good rise. Always check the expiration date on the package.
Substitutions for Common Ingredients
If you don't have fresh parsley, try basil or chives instead. You can swap the milk for almond milk or soy milk if you're dairy-free. If you can't find all-purpose flour, use bread flour for a chewier roll. For a vegan option, replace the butter with coconut oil or vegan butter. You can also use garlic powder if you're out of fresh garlic. These swaps keep the rolls tasty and enjoyable.

Step-by-Step Instructions
Preparing the Yeast Mixture
Start by making the yeast mix. In a small bowl, combine the warm milk, sugar, and yeast. Stir gently. Let the mixture sit for about 5 to 10 minutes. You want it to get frothy. This shows the yeast is active.
Mixing and Kneading the Dough
In a large bowl, mix the flour and salt. Make a well in the center. Pour in the melted butter and the yeast mixture. Stir until a dough forms. Transfer the dough to a floured surface. Knead it for about 5 to 7 minutes. The dough should be smooth and elastic when done.
Rising and Dividing the Dough
Place the dough in a greased bowl. Cover it with a damp cloth. Let it rise in a warm spot for about 1 hour. It should double in size. After it rises, punch down the dough. Divide it into 12 equal pieces. Roll each piece into a ball.
Assembling the Garlic Herb Mixture
In a small bowl, mix the minced garlic, parsley, oregano, thyme, and black pepper. Set aside half of this mixture. Dip each dough ball in melted butter. Roll them in the garlic herb mix. Arrange the balls in a greased bundt pan or round dish, stacking them.
Baking Directions and Timing
Once all the dough balls are in the pan, sprinkle the remaining garlic herb mix on top. Let the rolls rest for 20 minutes. Preheat your oven to 350°F (175°C). Bake the rolls for 20 to 25 minutes. They should be golden brown. Brush with extra melted butter right after baking. Let them cool for a few minutes before serving. Enjoy pulling them apart!
Tips & Tricks
Troubleshooting Common Issues
If your dough doesn't rise, check the yeast. Make sure it's fresh. Warm milk activates the yeast. If it cools too much, the yeast will not work. Another issue is dough that is too sticky. Add a bit more flour while kneading. If the dough is too dry, add a drop of warm water.
Ensuring Perfectly Fluffy Rolls
To get fluffy rolls, knead the dough well. This builds gluten, which gives structure. Letting the dough rise in a warm place helps too. A good tip is to cover the bowl with a damp cloth. This keeps moisture in and helps the dough grow.
Best Practices for Kneading and Rising
Knead the dough for about 5-7 minutes. Use a lightly floured surface to prevent sticking. When rising, make sure the bowl is greased. This keeps the dough from sticking to the sides. After rising, remember to punch down the dough to remove air. Then, divide it into equal pieces for even baking.
Pro Tips
- Tip Title: Use Fresh Herbs: Fresh herbs like parsley, oregano, and thyme enhance the flavor of your rolls significantly. If possible, opt for fresh rather than dried for a vibrant taste.
- Tip Title: Proper Dough Rising: Ensure your dough rises in a warm, draft-free area. A great tip is to preheat your oven to the lowest setting for a minute, then turn it off and place the dough inside to rise.
- Tip Title: Prevent Sticking: To prevent the rolls from sticking to the pan, make sure to grease your bundt pan or baking dish generously. You can also use parchment paper for easier removal.
- Tip Title: Brush with Butter: For extra flavor and a beautiful golden crust, brush the rolls with melted butter immediately after taking them out of the oven. This adds richness and keeps them moist.
Variations
Adding Cheese for Extra Flavor
You can make these rolls even better by adding cheese. Cheese brings a creamy taste that pairs well with garlic. Try mozzarella for a gooey center or sharp cheddar for a zing. Simply mix shredded cheese into the garlic herb mixture before coating your dough balls. You can also sprinkle cheese on top before baking for a nice crust.
Herb Variations Based on Season
Herbs can change the flavor of your rolls based on the season. In spring, try fresh basil or chives for a bright taste. In summer, add some fresh dill or thyme. Fall calls for sage or rosemary, while winter can use dried herbs. Mix and match herbs to find your favorite combo. This way, your rolls will always be fresh and exciting.
Sweet Pull-Apart Roll Options
If you prefer a sweeter option, you can easily switch things up. Replace the garlic and herbs with cinnamon and sugar. Use the same dough and add a bit of nutmeg for warmth. Roll the dough balls in melted butter, then coat them in a cinnamon-sugar mix. Bake as usual for a delightful dessert. These sweet rolls are perfect for brunch or special occasions.
Storage Info
How to Store Leftover Rolls
To keep your rolls fresh, let them cool completely. Place the rolls in an airtight container. You can also wrap them in plastic wrap. This helps prevent them from drying out. Store them at room temperature for up to three days. If you want to keep them longer, consider freezing.
Reheating Instructions
To reheat the rolls, preheat your oven to 350°F (175°C). Place the rolls on a baking sheet. Cover them with foil to keep moisture. Heat for about 10-15 minutes until warm. If you want a crispier top, remove the foil for the last 5 minutes.
Freezing and Thawing Tips
To freeze, wrap the cooled rolls tightly in plastic wrap. Then place them in a freezer bag. This keeps them fresh for up to three months. When you’re ready to eat them, take them out and let them thaw in the fridge overnight. Reheat them in the oven for the best taste.
FAQs
Can I use instant yeast instead of active dry yeast?
Yes, you can use instant yeast in place of active dry yeast. Instant yeast works faster and does not need proofing. Just mix it directly with your flour. Use the same amount as active dry yeast. This makes the process quicker and easier.
What is the best way to serve Garlic Herb Pull-Apart Rolls?
Serve these rolls warm straight from the oven. They look great in the baking dish. You can also arrange them on a wooden board. Add a small bowl of olive oil and balsamic vinegar for dipping. This adds a nice touch and flavor.
How do I know when the rolls are fully baked?
Look for a golden brown color on top. The rolls should feel firm when you press them gently. You can also check the internal temperature. It should be around 190°F (88°C). A toothpick inserted in the center should come out clean. This means they are ready to enjoy!
In this article, we covered the key ingredients, step-by-step instructions, and helpful tips for perfect Garlic Herb Pull-Apart Rolls. You learned about ingredient quality, yeast preparation, and how to troubleshoot common issues. We also explored exciting variations and proper storage methods to keep your rolls fresh.
Remember, practice makes perfect. Enjoy creating these rolls, and feel proud of your baking skills! Perfect rolls can be yours with a bit of care and love.