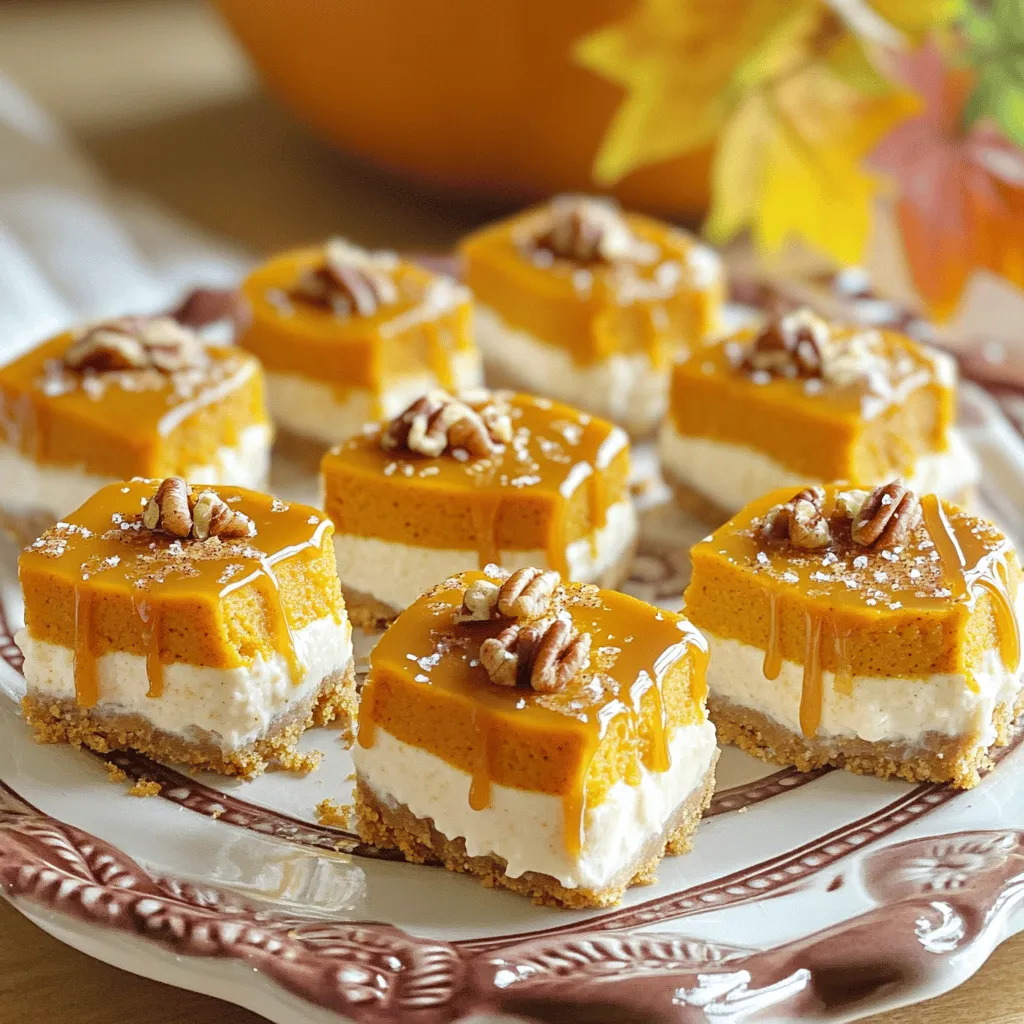
Indulge in a dessert that screams fall: Salted Caramel Pumpkin Cheesecake Bites! These no-bake treats are easy to make and pack a ton of flavor—perfect for any gathering. With a smooth pumpkin filling and a touch of sweet, salty caramel, each bite delivers a taste of autumn bliss. Let’s dive into the ingredients and steps to whip up this delightful treat together!
Ingredients
Detailed List of Ingredients
To make Salted Caramel Pumpkin Cheesecake Bites, gather these ingredients:
– 1 cup graham cracker crumbs
– 4 tablespoons unsalted butter, melted
– 1 cup cream cheese, softened
– 1/2 cup pure pumpkin puree
– 1/2 cup powdered sugar
– 1 teaspoon vanilla extract
– 1 teaspoon pumpkin pie spice
– 1/4 cup salted caramel sauce, plus extra for drizzling
– Pinch of salt
– 1/4 cup chopped pecans (optional, for garnish)
These ingredients work together to create rich flavors and a creamy texture.
Alternative Ingredient Suggestions
If you need alternatives, here are some options:
– Use almond flour instead of graham cracker crumbs for a gluten-free crust.
– Replace cream cheese with Greek yogurt for a lighter option.
– Use maple syrup or honey instead of powdered sugar for natural sweetness.
– Substitute pecans with walnuts or leave them out entirely if you prefer.
These swaps can change the taste and texture while keeping the recipe easy.
Ingredient Notes
Here are some helpful notes about the ingredients:
– Graham Crackers: Look for brands with simple ingredients. This helps ensure a tasty crust.
– Cream Cheese: Use full-fat cream cheese for the best creamy texture. Brands like Philadelphia work well.
– Pumpkin Puree: Choose pure pumpkin puree, not pumpkin pie filling, for the right flavor.
– Caramel Sauce: Store-bought caramel sauce is fine, but homemade adds a special touch.
– Pecans: If you want to use chopped pecans, toast them lightly for added crunch and flavor.
These notes will help you select the best ingredients for your cheesecake bites. Enjoy the process!
Step-by-Step Instructions
Preparation of the Graham Cracker Crust
To start, gather your ingredients for the crust. You need graham cracker crumbs and melted butter. In a mixing bowl, combine one cup of graham cracker crumbs with four tablespoons of melted unsalted butter. Mix these until the crumbs look like wet sand.
Next, line a mini muffin pan or silicone mold with cupcake liners. Take about one tablespoon of the crust mixture and press it into the bottom of each liner. Make sure it is packed tightly. This forms the base for your cheesecake bites.
Making the Pumpkin Cheesecake Filling
Now, let’s move on to the filling. In a clean bowl, beat one cup of softened cream cheese with an electric mixer. Mix until it is creamy and smooth. Then, add in half a cup of pure pumpkin puree, half a cup of powdered sugar, one teaspoon of vanilla extract, one teaspoon of pumpkin pie spice, and a pinch of salt.
Beat this mixture until all the ingredients are fully combined and fluffy. This step is key to getting the right texture. The filling should be light and airy, perfect for your bites.
Assembling and Setting the Cheesecake Bites
Next, spoon the pumpkin cheesecake mixture over the prepared graham cracker crusts. Fill each cup just to the top. Once all the cups are filled, it’s time to set them. Place the muffin pan in the refrigerator for at least two hours. This helps the cheesecake to firm up.
After the bites are set, carefully remove them from the pan. Drizzle each bite with salted caramel sauce. If you like, sprinkle some chopped pecans on top for extra crunch. These steps make your cheesecake bites look and taste amazing. Enjoy your delicious creation!
Tips & Tricks
How to Achieve the Perfect Texture
To get the best texture in your cheesecake bites, use softened cream cheese. This makes mixing easy and helps avoid lumps. Beat it well until smooth and creamy. When you add pumpkin puree, mix gently to keep air in the batter. This keeps your bites light and fluffy. Chill them for at least two hours. This time helps them set nicely. If you want a firmer bite, let them chill longer.
Serving Suggestions
When serving your cheesecake bites, presentation matters. Use a pretty platter to display them. Drizzle extra salted caramel sauce over the top for a sweet touch. You can also sprinkle some pumpkin pie spice on each bite for added flavor. For a nice crunch, add chopped pecans on top. Serve them with a small bowl of caramel sauce on the side. This lets guests add more if they like.
Common Mistakes to Avoid
One common mistake is not chilling the bites long enough. If they are not set, they will fall apart when you serve them. Another mistake is using cold cream cheese. This can lead to lumps in your mixture. Make sure to mix well after adding the pumpkin. Also, press the crust firmly into the muffin pan. This helps the crust hold together when you remove the bites. Avoid overfilling the cups; leave a little space for the cheesecake to expand.
Variations
Seasonal Flavor Twists
You can add fun spices to these bites. Try a pinch of nutmeg for warmth. Cinnamon adds a nice touch too. You might also want to use ginger for a spicy kick. These flavors mix well with pumpkin. Each tweak brings a new taste to enjoy.
Substitute Options for Allergies
If you have gluten allergies, use gluten-free graham crackers. You can also swap cream cheese for a dairy-free version. Look for cashew or almond cream cheese. For nut allergies, skip the pecans. You can use sunflower seeds instead for crunch. These swaps help everyone enjoy the treat.
Eyecatching Garnishes and Toppings
Garnishes make your bites pop. Drizzle more salted caramel on top for sweetness. You can also sprinkle cocoa powder for a rich look. Edible flowers add a fancy touch. For a festive feel, use candy corn around the bites. These fun additions will impress your guests.
Storage Info
Best Practices for Storing Cheesecake Bites
To keep your salted caramel pumpkin cheesecake bites fresh, store them in the fridge. Place them in an airtight container. This method helps prevent drying and keeps flavors intact. You can stack them gently with parchment paper in between the layers. They stay good for about 4 to 5 days.
Freezing Instructions for Longer Storage
If you want to keep these bites longer, freezing is a great option. First, let them set in the fridge for at least 2 hours. Then, remove them from the pan. Wrap each bite tightly in plastic wrap. After that, place them in a freezer-safe bag or container. They can last up to 2 months in the freezer. When you want to enjoy them, thaw in the fridge overnight.
How to Reheat or Revive Leftovers
These cheesecake bites are best served cold, but you can bring them back to life. If they seem a bit soft after thawing, place them in the fridge for a couple of hours. This helps them firm up again. You can drizzle more salted caramel sauce on top before serving for extra flavor. Enjoy them cold, and they will taste just as delightful!
FAQs
Can I use a different crust type?
Yes, you can. Try using crushed cookies, like Oreos or Nilla wafers. They add a fun twist. You can even use nuts for a gluten-free option. Just make sure to mix them with melted butter like in the original recipe.
How long do these cheesecakes last in the fridge?
These cheesecake bites can last up to five days in the fridge. Store them in an airtight container to keep them fresh. The longer they sit, the more the flavors blend together. However, they taste best when eaten fresh.
Can I make these bites ahead of time?
Absolutely! You can make these cheesecake bites a day in advance. Just store them in the fridge until you are ready to serve. This makes them a great option for parties or gatherings. You can focus on other tasks while knowing these bites are ready to go.
You now have a clear plan for making delicious pumpkin cheesecake bites. We covered key ingredients and offered helpful alternatives. You learned how to prepare a graham cracker crust and make the perfect filling. Remember the tips for texture and avoid common mistakes. You can get creative with flavors and garnishes too. Lastly, follow best practices for storage and reheating. Enjoy these treats with friends or family, and feel proud of your baking skills. Happy cooking!