Indulging in a rich, creamy vanilla bean crème brûlée is one of life's simple pleasures. This elegant dessert combines the crispness of caramelized sugar with a silky custard. In this post, I'll guide you through every step, from choosing key ingredients to achieving the perfect texture. Whether you’re a beginner or a seasoned chef, you’ll find tips to make your crème brûlée a delightful hit at any gathering. Let’s dive in!
Why I Love This Recipe
- Decadent Flavor: This crème brûlée is rich and creamy with a perfect balance of vanilla, making every bite a delightful indulgence.
- Impressive Presentation: The caramelized sugar crust adds a stunning finish, making it a show-stopping dessert for any occasion.
- Simple Ingredients: With just a few basic ingredients, you can create a gourmet dessert that tastes like it came from a fancy restaurant.
- Customizable: Feel free to experiment with different flavors or toppings, such as chocolate, coffee, or citrus zest, to make it your own.
Ingredients
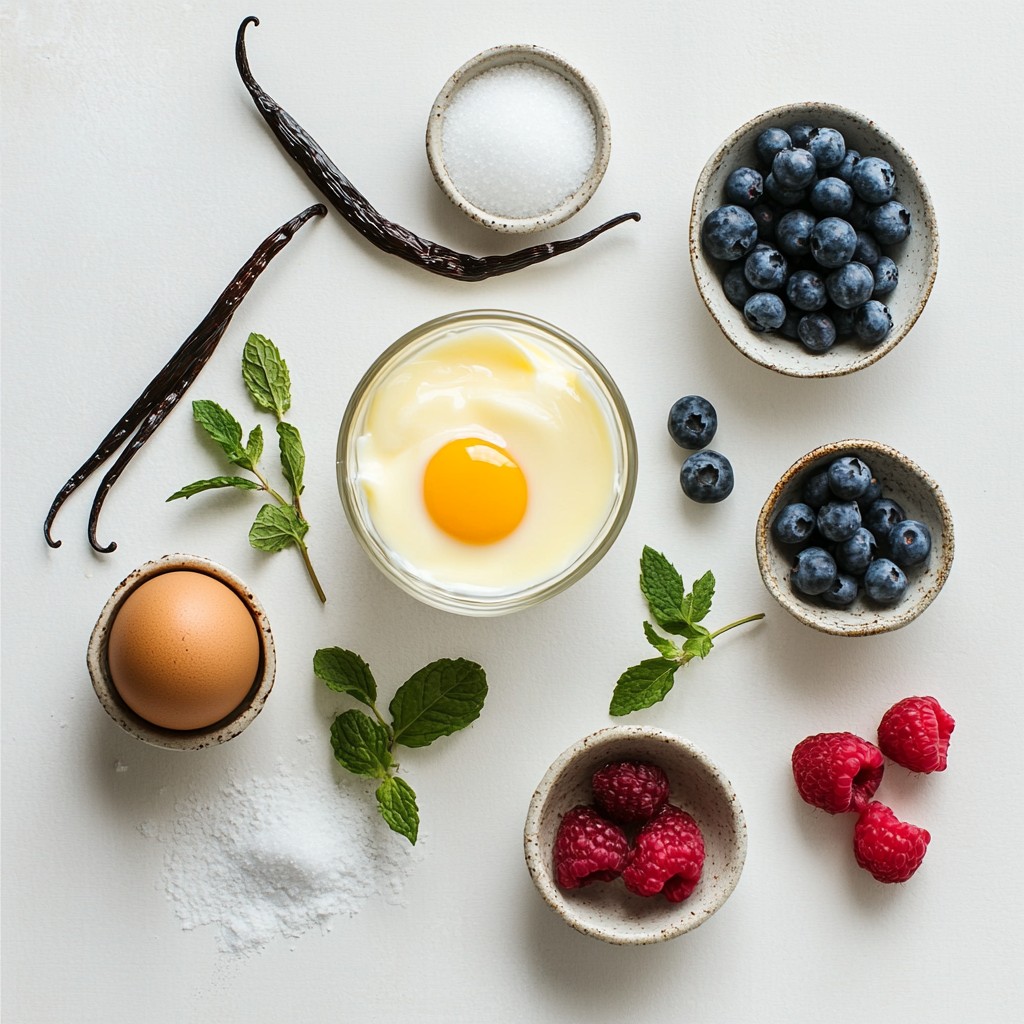
Key Ingredients for Vanilla Bean Crème Brûlée
For a perfect vanilla bean crème brûlée, you need a few key ingredients:
- 2 cups heavy cream
- 1 vanilla bean, split and scraped (or 1 tablespoon vanilla extract)
- 5 large egg yolks
- 1/2 cup granulated sugar (plus extra for caramelizing)
- Pinch of salt
Each ingredient plays a crucial role. The heavy cream creates a rich base. The vanilla bean adds a deep, aromatic flavor. The egg yolks bring creaminess and help set the custard. Sugar sweetens and forms a crunchy top. The salt enhances all these flavors.
Optional Garnishes and Extras
Garnishes can elevate your dessert. Here are some great options:
- Fresh berries (like strawberries or raspberries)
- Mint leaves
These add color and freshness. The berries contrast nicely with the sweet custard. Mint gives a refreshing touch.
Substitutions and Alternatives
You can make this dessert even if you lack some ingredients. Here are some substitutions:
- Use 1 tablespoon vanilla extract instead of a vanilla bean.
- Swap heavy cream for half-and-half if you want a lighter version.
- Use coconut cream for a dairy-free option.
These swaps can change the flavor and texture but still yield a tasty dessert.
Step-by-Step Instructions
Preparing the Oven and Ingredients
Start by preheating your oven to 325°F (160°C). This step is key for even cooking. Gather your ingredients:
- 2 cups heavy cream
- 1 vanilla bean, split and scraped (or 1 tablespoon vanilla extract)
- 5 large egg yolks
- 1/2 cup granulated sugar (plus extra for caramelizing)
- Pinch of salt
- Fresh berries and mint for garnish (optional)
Make sure everything is ready before you begin.
Infusing the Cream and Preparing the Egg Mixture
In a medium saucepan, combine the heavy cream and the split vanilla bean. Heat it over medium until it simmers. Stir gently and keep an eye on it. Once it simmers, remove it from the heat and let it steep for 15 minutes.
While the cream cools, whisk together the egg yolks, sugar, and salt in a bowl. Mix until it thickens slightly. This creates a rich base for your custard.
Next, slowly pour the warm cream into the egg mixture while whisking. This process is called tempering and it helps prevent curdling. If you use vanilla extract, add it now.
Baking and Chilling for Perfect Texture
Pour the mixture through a fine-mesh sieve into another bowl. This removes lumps and the vanilla pod.
Now, prepare your ramekins. Place them in a baking dish and fill each with the custard mixture. Leave some space at the top.
Next, create a water bath. Carefully pour hot water into the baking dish. The water should reach halfway up the sides of the ramekins.
Bake in your preheated oven for about 25-30 minutes. The edges should set, but the center must jiggle slightly.
After baking, let the ramekins cool in the water bath for 10 minutes. Then, transfer them to a wire rack to cool fully. Chill in the fridge for at least 4 hours or overnight for the best results.
When ready to serve, sprinkle sugar on top of each custard. Use a kitchen torch to caramelize the sugar until it bubbles and turns amber. Allow it to cool and harden before serving. Garnish with fresh berries and mint if you like.
Tips & Tricks
Common Mistakes to Avoid
When making vanilla bean crème brûlée, some mistakes can spoil your dessert. Here are a few to watch for:
- Not tempering the eggs: Pour the hot cream slowly into the egg mixture while whisking. This keeps the eggs from cooking too fast.
- Overbaking: Bake just until the edges set. The center should still jiggle a bit. This gives a creamy texture.
- Skipping the straining step: Strain your mixture to remove lumps. This ensures a smooth custard.
Best Tools for Caramelizing Sugar
Caramelizing sugar is a key step for this dessert. You need the right tools:
- Kitchen torch: This is the best tool for caramelizing. It gives you control over the heat.
- Granulated sugar: Use fine sugar for a better melt. Sprinkle an even layer on top.
- Ramekins: Choose shallow ramekins for even cooking and easy serving.
Ensuring a Creamy Custard Texture
A creamy custard makes your crème brûlée shine. Here’s how to achieve it:
- Use heavy cream: This adds richness. It also helps create a smooth texture.
- Cool in a water bath: This ensures even cooking. It also prevents curdling.
- Chill before serving: Refrigerate for at least four hours. This sets the custard and enhances flavor.
Follow these tips to impress your friends and family with your dessert skills!
Pro Tips
- Use Fresh Ingredients: Always opt for fresh heavy cream and real vanilla beans for the best flavor. Fresh ingredients make a noticeable difference in the taste of your crème brûlée.
- Control the Oven Temperature: Make sure your oven is well-calibrated. Baking at the right temperature ensures even cooking and prevents the custard from curdling.
- Chill Thoroughly: Allow the custards to chill completely in the refrigerator for at least 4 hours or overnight. This helps the flavors to meld and the texture to set perfectly.
- Uniform Sugar Layer: When caramelizing the sugar, make sure to spread it evenly across the surface of the custard for a consistent crack and golden color. This enhances both presentation and taste.
Variations
Flavored Crème Brûlée Ideas
You can play with flavors to make your crème brûlée special. Here are some ideas:
- Coffee: Add 2 tablespoons of finely ground coffee to the cream. This gives a rich coffee flavor.
- Chocolate: Melt 4 ounces of dark chocolate and mix it with the cream. This creates a decadent chocolate treat.
- Citrus: Add the zest of a lemon or orange to the cream for a bright, fresh taste.
- Matcha: Mix in 1-2 teaspoons of matcha powder for a unique green tea flavor.
These options let you explore different tastes and keep things exciting!
Healthy or Vegan Alternatives
If you want a healthier or vegan version, you can make some easy swaps:
- Nut Milk: Use almond or coconut milk instead of heavy cream. This will lighten the dish.
- Silken Tofu: Blend silken tofu with sweetener for a creamy base. This works well for a vegan treat.
- Maple Syrup: Replace granulated sugar with maple syrup or agave nectar for a healthier sweetener.
- Aquafaba: Use aquafaba (the liquid from chickpeas) in place of egg yolks for a vegan custard.
These alternatives allow everyone to enjoy this classic dessert!
Serving Suggestions for Different Occasions
When serving crème brûlée, think about the setting:
- Dinner Parties: Serve in elegant ramekins with fresh berries and mint. This adds a touch of class.
- Casual Gatherings: Use fun dishes or glasses for a playful look. You can also mix flavors for variety.
- Holidays: Top with seasonal spices like cinnamon or nutmeg. This gives a festive twist.
- Picnics: Pack in small jars for easy transport. They are a hit on warm days.
These serving ideas will help you impress your guests and make any occasion special!
Storage Info
How to Store Crème Brûlée Properly
To keep your vanilla bean crème brûlée fresh, store it in the fridge. Place each ramekin in an airtight container. This will help keep the custard creamy and smooth. Avoid covering the tops with plastic wrap. It can stick to the caramelized sugar.
Freezing Instructions for Leftovers
You can freeze crème brûlée, but it’s not ideal. The texture may change. If you must freeze, leave off the sugar topping. Wrap each ramekin tightly in plastic wrap and then foil. Store them in the freezer for up to one month. When ready to eat, thaw in the fridge overnight.
Shelf Life and Reheating Tips
Crème brûlée lasts about 3 to 4 days in the fridge. Always check for any off smells or changes in texture. To reheat, do not microwave. Instead, place the ramekin in a warm water bath for a few minutes. This helps maintain the creamy texture. Add fresh sugar and caramelize just before serving.
FAQs
What is the best type of vanilla to use?
The best type of vanilla for crème brûlée is the vanilla bean. It gives a rich flavor and beautiful specks. You can also use vanilla extract if needed. Use one tablespoon of extract for each bean. This swap is handy when beans are hard to find.
Can I make Crème Brûlée ahead of time?
Yes, you can make crème brûlée ahead of time. Prepare it up to two days in advance. Just store it in the fridge after it cools. This makes it easy to serve when you have guests. Just caramelize the sugar right before serving.
How do I fix broken custard?
If your custard looks curdled, it may have cooked too fast. To fix this, follow these steps:
- Strain the mixture again to remove lumps.
- If it is too thick, whisk in a bit of cream or milk.
- Reheat gently over low heat while stirring.
This should help you achieve a smooth custard again.
In this article, we covered how to make Vanilla Bean Crème Brûlée. We went through ingredients, steps for preparation, and tips for success. I shared ways to add flavor and substitute ingredients. We discussed storage methods and answered common questions. You now have the tools to create a perfect dessert. Remember, practice improves your skill. Enjoy making your own delicious Crème Brûlée!